
User Manual
Page 3
Contents Contents...iii Notices...viii Safety information ix About this guide x P5Q-E Series specifications summary xii Chapter 1: Product introduction 1.1 Welcome 1-1 1.2 Package contents 1-1 1.3 Special features 1-2 1.3.1 Product highlights 1-2 1.3.2 ASUS unique features 1-3 1.3.3 ASUS intelligent performance and overclocking features 1-7 Chapter 2: Hardware information 2.1 Before you proceed 2-1 2.2 Motherboard overview 2-2 2.2.1 Motherboard layout 2-2 2.2.2 Layout contents 2-3 2.2.3 Placement direction 2-4 2.2.4 Screw holes 2-4 2.3 Central Processing Unit (CPU 2-5 2.3.1 ...
Contents Contents...iii Notices...viii Safety information ix About this guide x P5Q-E Series specifications summary xii Chapter 1: Product introduction 1.1 Welcome 1-1 1.2 Package contents 1-1 1.3 Special features 1-2 1.3.1 Product highlights 1-2 1.3.2 ASUS unique features 1-3 1.3.3 ASUS intelligent performance and overclocking features 1-7 Chapter 2: Hardware information 2.1 Before you proceed 2-1 2.2 Motherboard overview 2-2 2.2.1 Motherboard layout 2-2 2.2.2 Layout contents 2-3 2.2.3 Placement direction 2-4 2.2.4 Screw holes 2-4 2.3 Central Processing Unit (CPU 2-5 2.3.1 ...

User Manual
Page 13
... 100MHz up to 180MHz at 1MHz increment - ASUS C.P.R.(CPU Parameter Recall) (continued on the next page) xiii P5Q-E Series specifications summary IEEE 1394 Audio USB ASUS unique features ASUS stylish features ASUS exclusive overclocking features LSI® L-FW3227 controller supports 2 x IEEE 1394a ports (one at back I/O - ASUS Fan Xpert ASUS EZ DIY: - ASUS Drive Xpert - vDIMM: 64-step DRAM...
... 100MHz up to 180MHz at 1MHz increment - ASUS C.P.R.(CPU Parameter Recall) (continued on the next page) xiii P5Q-E Series specifications summary IEEE 1394 Audio USB ASUS unique features ASUS stylish features ASUS exclusive overclocking features LSI® L-FW3227 controller supports 2 x IEEE 1394a ports (one at back I/O - ASUS Fan Xpert ASUS EZ DIY: - ASUS Drive Xpert - vDIMM: 64-step DRAM...

User Manual
Page 20
... by existing airflow from CPU fan or bundled optional fan. ASUS Quiet Thermal Solution ASUS Quiet Thermal solution makes system more stable and enhances the overclocking capability. ASUS Power Saving Solution ASUS Power Saving solution intelligently and automatically provides balanced computing power and...printed circuit board (PCB) to date. 1-4 Chapter 1: Product Introduction helping save power and money. The motherboard uses a special design on this motherboard is a fan-less and zero-noise cooling solution that the groundbreaking fanless design does not have lifetime problems...
... by existing airflow from CPU fan or bundled optional fan. ASUS Quiet Thermal Solution ASUS Quiet Thermal solution makes system more stable and enhances the overclocking capability. ASUS Power Saving Solution ASUS Power Saving solution intelligently and automatically provides balanced computing power and...printed circuit board (PCB) to date. 1-4 Chapter 1: Product Introduction helping save power and money. The motherboard uses a special design on this motherboard is a fan-less and zero-noise cooling solution that the groundbreaking fanless design does not have lifetime problems...
User Manual
Page 22
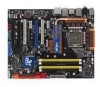
... The AUS DieHard BIOS consists of connecting the system panel cables one at a time and avoiding wrong cable connections. ASUS Onboard Switch With an easy press during overclock, this exclusive onboard switch allows gamer to effortless fine-tune the performance without the usual "fingers"- saving up to...to short the pins or moving jumpers! The technology saves users the hassle of the total time taken. ASUS Q-Shield The specially designed ASUS Q-Shield does without having to the motherboard. making it convenient and easy to 70% of recovering the BIOS file or buying a replacement BIOS ...
... The AUS DieHard BIOS consists of connecting the system panel cables one at a time and avoiding wrong cable connections. ASUS Onboard Switch With an easy press during overclock, this exclusive onboard switch allows gamer to effortless fine-tune the performance without the usual "fingers"- saving up to...to short the pins or moving jumpers! The technology saves users the hassle of the total time taken. ASUS Q-Shield The specially designed ASUS Q-Shield does without having to the motherboard. making it convenient and easy to 70% of recovering the BIOS file or buying a replacement BIOS ...

User Manual
Page 23
...your BIOS easily without entering the OS. See page 4-23 for details. ASUS P5Q-E Series 1-7 See pages 3-20-3-21 for details. Update your screen. See page 3-35 and 4-9 for the ultimate customized overclocking configuration. When the system hangs due to open the system chassis and ...environment without the hassle of the motherboard BIOS allows automatic re-setting to the BIOS default settings in case the system hangs due to achieve the most precise setting for details. 1.3.3 ASUS intelligent performance and overclocking features AI Booster The ASUS AI Booster allows you to ...
...your BIOS easily without entering the OS. See page 4-23 for details. ASUS P5Q-E Series 1-7 See pages 3-20-3-21 for details. Update your screen. See page 3-35 and 4-9 for the ultimate customized overclocking configuration. When the system hangs due to open the system chassis and ...environment without the hassle of the motherboard BIOS allows automatic re-setting to the BIOS default settings in case the system hangs due to achieve the most precise setting for details. 1.3.3 ASUS intelligent performance and overclocking features AI Booster The ASUS AI Booster allows you to ...

User Manual
Page 38
...limitation appears on the operating systems listed below. You may install a maximum of 128 Mb chips. • Due to chipset limitation, this motherboard can only support up of 4 GB DIMMs on each slot. 64-bit Windows® XP Professional x64 Edition Windows® Vista x64 Edition...To operate at the vendormarked or at a lower frequency than 3GB is recommended. • This motherboard does not support memory modules made up to work stably under full loading (4 DIMMs) or overclocking setting. 2-12 Chapter 2: Hardware information Any excess memory from the same vendor. • If ...
...limitation appears on the operating systems listed below. You may install a maximum of 128 Mb chips. • Due to chipset limitation, this motherboard can only support up of 4 GB DIMMs on each slot. 64-bit Windows® XP Professional x64 Edition Windows® Vista x64 Edition...To operate at the vendormarked or at a lower frequency than 3GB is recommended. • This motherboard does not support memory modules made up to work stably under full loading (4 DIMMs) or overclocking setting. 2-12 Chapter 2: Hardware information Any excess memory from the same vendor. • If ...
User Manual
Page 49
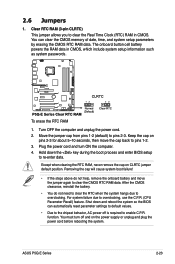
... Move the jumper cap from pins 1-2 (default) to overclocking, use the C.P.R. (CPU Parameter Recall) feature. Except when clearing the RTC RAM, never remove the cap on pins 2-3 for about 5~10 seconds, then move the jumper again to enable C.P.R. function. ASUS P5Q-E Series 2-23 Plug the power cord and turn off ...in CMOS. Turn OFF the computer and unplug the power cord. 2. Shut down the key during the boot process and enter BIOS setup to overclocking. Removing the cap will cause system boot failure! • If the steps above do not need to clear the RTC when the system ...
... Move the jumper cap from pins 1-2 (default) to overclocking, use the C.P.R. (CPU Parameter Recall) feature. Except when clearing the RTC RAM, never remove the cap on pins 2-3 for about 5~10 seconds, then move the jumper again to enable C.P.R. function. ASUS P5Q-E Series 2-23 Plug the power cord and turn off ...in CMOS. Turn OFF the computer and unplug the power cord. 2. Shut down the key during the boot process and enter BIOS setup to overclocking. Removing the cap will cause system boot failure! • If the steps above do not need to clear the RTC when the system ...

User Manual
Page 78
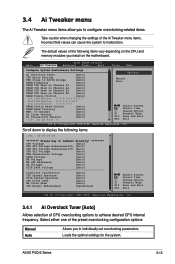
... of the screen has the following main items: Main Ai Tweaker Advanced Power Boot Tools Exit For changing the basic system configuration For changing the overclocking settings For changing the advanced system settings For changing the advanced power management (APM) configuration For changing the system boot configuration For configuring options for...
... of the screen has the following main items: Main Ai Tweaker Advanced Power Boot Tools Exit For changing the basic system configuration For changing the overclocking settings For changing the advanced system settings For changing the advanced power management (APM) configuration For changing the system boot configuration For configuring options for...
User Manual
Page 85
... Select Screen Select Item +- ASUS P5Q-E Series 3-15 Change Option F1 General Help F10 Save and Exit ESC Exit v02.61 (C)Copyright 1985-2008, American Megatrends, Inc. 3.4 Ai Tweaker menu The Ai Tweaker menu items allow you to individually set overclocking parameters. Main Ai Tweaker BIOS... Channel B1 [Auto] DRAM CLK Skew on the motherboard. Loads the optimal settings for the system. Change Option F1 General Help F10 Save and Exit ESC Exit v02.61 (C)Copyright 1985-2008, American Megatrends, Inc. 3.4.1 Ai Overclock Tuner [Auto] Allows selection of the following items...
... Select Screen Select Item +- ASUS P5Q-E Series 3-15 Change Option F1 General Help F10 Save and Exit ESC Exit v02.61 (C)Copyright 1985-2008, American Megatrends, Inc. 3.4 Ai Tweaker menu The Ai Tweaker menu items allow you to individually set overclocking parameters. Main Ai Tweaker BIOS... Channel B1 [Auto] DRAM CLK Skew on the motherboard. Loads the optimal settings for the system. Change Option F1 General Help F10 Save and Exit ESC Exit v02.61 (C)Copyright 1985-2008, American Megatrends, Inc. 3.4.1 Ai Overclock Tuner [Auto] Allows selection of the following items...

User Manual
Page 86
... when you to set the PCI Express frequency. The values range from 100 to 180. 3.4.3 FSB Strap to North Bridge [Auto] When set the Ai Overclock Tuner item to [Manual]. Refer to adjust the value. Congifuration options: [Auto] [200 MHz] [266 MHz] [333 MHz] [400 MHz] 3.4.4 DRAM Frequency [Auto] Allows you...
... when you to set the PCI Express frequency. The values range from 100 to 180. 3.4.3 FSB Strap to North Bridge [Auto] When set the Ai Overclock Tuner item to [Manual]. Refer to adjust the value. Congifuration options: [Auto] [200 MHz] [266 MHz] [333 MHz] [400 MHz] 3.4.4 DRAM Frequency [Auto] Allows you...

User Manual
Page 87
...] Configuration options: [Auto] [1 DRAM Clocks] - [15 DRAM Clocks] Read to Precharge Time [Auto] Configuration options: [Auto] [1 DRAM Clocks] - [15 DRAM Clocks] ASUS P5Q-E Series 3-17 Configuration options: [Auto] [Advance 350ps] [Advance 300ps] [Advance 250ps] [Advance 200ps] [Advance 150ps] [Advance 100ps] [Advance 50ps] [Normal] [Delay 50ps...8226; The configuration options for some of the following items vary depending on the DIMMs you install on the motherboard. 1st Information: 5-5-5-15-3-36-5-3 The values vary depending on Channel A1/A2/B1/B2 [Auto] Adjusting these items may help...
...] Configuration options: [Auto] [1 DRAM Clocks] - [15 DRAM Clocks] Read to Precharge Time [Auto] Configuration options: [Auto] [1 DRAM Clocks] - [15 DRAM Clocks] ASUS P5Q-E Series 3-17 Configuration options: [Auto] [Advance 350ps] [Advance 300ps] [Advance 250ps] [Advance 200ps] [Advance 150ps] [Advance 100ps] [Advance 50ps] [Normal] [Delay 50ps...8226; The configuration options for some of the following items vary depending on the DIMMs you install on the motherboard. 1st Information: 5-5-5-15-3-36-5-3 The values vary depending on Channel A1/A2/B1/B2 [Auto] Adjusting these items may help...

User Manual
Page 88
...] ALL PRE to REF Delay [Auto] Configuration options: [Auto] [1 DRAM Clocks] - [15 DRAM Clocks] 3.4.7 DRAM Static Read Control [Auto] Adjusting this item might enhance DRAM overclocking ability.
...] ALL PRE to REF Delay [Auto] Configuration options: [Auto] [1 DRAM Clocks] - [15 DRAM Clocks] 3.4.7 DRAM Static Read Control [Auto] Adjusting this item might enhance DRAM overclocking ability.

User Manual
Page 89
...] Allows you to set the DRAM performance. Setting this item to [Enabled] may help enhance DRAM overclock ability. You can also use the and keys to enable or disable the memory overclocking charger feature. ASUS P5Q-E Series 3-19 OC Charger Allows you to adjust the value. Use the and keys to 31. To.... The values range from 1 to adjust the value. The number of CHA/B PH1/2/3/4 [Disabled] Set this item to [Disabled] may help enhance DRAM overclocking ability. 3.4.8 DRAM Read Training [Auto] Allows you to set the Ai Transaction Booster item to [Manual].
...] Allows you to set the DRAM performance. Setting this item to [Enabled] may help enhance DRAM overclock ability. You can also use the and keys to enable or disable the memory overclocking charger feature. ASUS P5Q-E Series 3-19 OC Charger Allows you to adjust the value. Use the and keys to 31. To.... The values range from 1 to adjust the value. The number of CHA/B PH1/2/3/4 [Disabled] Set this item to [Disabled] may help enhance DRAM overclocking ability. 3.4.8 DRAM Read Training [Auto] Allows you to set the Ai Transaction Booster item to [Manual].
User Manual
Page 90
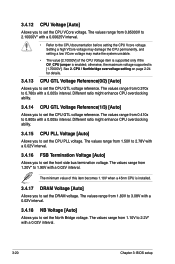
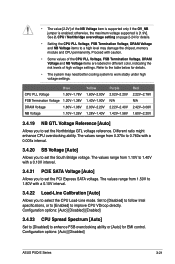
... reference. The values range from 1.20V* to 1.90V with a 0.02V interval. 3-20 Chapter 3: BIOS setup Different ratio might enhance CPU overclocking ability. 3.4.15 CPU PLL Voltage [Auto] Allows you to set the front side bus termination voltage. The values range from 1.10V to 2....otherwise, the maximum voltage supported is enabled; The values range from 1.50V to 2.78V with a 0.005x interval. Different ratio might enhance CPU overclocking ability. 3.4.14 CPU GTL Voltage Reference(1/3) [Auto] Allows you to set the North Bridge voltage. The values range from 0.370x to 0....
... reference. The values range from 1.20V* to 1.90V with a 0.02V interval. 3-20 Chapter 3: BIOS setup Different ratio might enhance CPU overclocking ability. 3.4.15 CPU PLL Voltage [Auto] Allows you to set the front side bus termination voltage. The values range from 1.10V to 2....otherwise, the maximum voltage supported is enabled; The values range from 1.50V to 2.78V with a 0.005x interval. Different ratio might enhance CPU overclocking ability. 3.4.14 CPU GTL Voltage Reference(1/3) [Auto] Allows you to set the North Bridge voltage. The values range from 0.370x to 0....
User Manual
Page 91
... range from 1.10V to 1.40V with a 0.10V interval. 3.4.22 Load-Line Calibration [Auto] Allows you to enhance FSB overclocking ability or [Auto] for details. • The system may damage the chipset, memory module and CPU permanently. The values ...overclocking ability. Set to [Disabled] to follow Intel specifications, or to [Enabled] to set the Northbridge GTL voltage reference. • The value [2.2V] of high voltage settings. Refer to select the CPU Load-Line mode. otherwise, the maximum voltage supported is enabled; Configuration options: [Auto] [Disabled] ASUS P5Q...
... range from 1.10V to 1.40V with a 0.10V interval. 3.4.22 Load-Line Calibration [Auto] Allows you to enhance FSB overclocking ability or [Auto] for details. • The system may damage the chipset, memory module and CPU permanently. The values ...overclocking ability. Set to [Disabled] to follow Intel specifications, or to [Enabled] to set the Northbridge GTL voltage reference. • The value [2.2V] of high voltage settings. Refer to select the CPU Load-Line mode. otherwise, the maximum voltage supported is enabled; Configuration options: [Auto] [Disabled] ASUS P5Q...

User Manual
Page 92
3.4.24 PCIE Spread Spectrum [Auto] Set to [Disabled] to enhance PCIE overclocking ability or [Auto] for EMI control. Configuration options: [Auto] [Disabled] 3.4.25 CPU Clock Skew [Auto] Configuration options: [Auto] [Normal] [Delay 100ps] [Delay 200ps] [Delay 300ps] [...
3.4.24 PCIE Spread Spectrum [Auto] Set to [Disabled] to enhance PCIE overclocking ability or [Auto] for EMI control. Configuration options: [Auto] [Disabled] 3.4.25 CPU Clock Skew [Auto] Configuration options: [Auto] [Normal] [Delay 100ps] [Delay 200ps] [Delay 300ps] [...

User Manual
Page 120
Corel MediaOne Starter Installs the Corel MediaOne Starter application to do overclocking, fan control, power saving and quiet thermal control. Ulead PhotoImpact 12 SE Installs the PhotoImpact image editing software. 4-4 Chapter 4: Software support Anti... DirectX® 9.0c is a multimedia technology that destroys data. DirectX® improves the multimedia features of files such as movies, music, etc ASUS Express Gate Installer Allows you to install or update Express Gate functions. Marvell Yukon VCT Application Installs the Marvell® Yukon Virtual Cable Tester™...
Corel MediaOne Starter Installs the Corel MediaOne Starter application to do overclocking, fan control, power saving and quiet thermal control. Ulead PhotoImpact 12 SE Installs the PhotoImpact image editing software. 4-4 Chapter 4: Software support Anti... DirectX® 9.0c is a multimedia technology that destroys data. DirectX® improves the multimedia features of files such as movies, music, etc ASUS Express Gate Installer Allows you to install or update Express Gate functions. Marvell Yukon VCT Application Installs the Marvell® Yukon Virtual Cable Tester™...

User Manual
Page 139
ASUS P5Q-E Series 4-23 After installing AI Suite from the bundled support DVD, you can launch the utility by double-clicking the AI Suite icon on the Windows® OS taskbar and click the AI Booster button on the taskbar allow you to overclock the CPU speed in WIndows® environment without the hassle of booting the BIOS. The options on the AI Suite main window. 4.3.7 ASUS AI Booster The ASUS AI Booster application allows you to use the default settings, adjust CPU/ Memory/PCI-E frequency manually, or create and apply your personal overclocking configurations.
ASUS P5Q-E Series 4-23 After installing AI Suite from the bundled support DVD, you can launch the utility by double-clicking the AI Suite icon on the Windows® OS taskbar and click the AI Booster button on the taskbar allow you to overclock the CPU speed in WIndows® environment without the hassle of booting the BIOS. The options on the AI Suite main window. 4.3.7 ASUS AI Booster The ASUS AI Booster application allows you to use the default settings, adjust CPU/ Memory/PCI-E frequency manually, or create and apply your personal overclocking configurations.

User Manual
Page 143
... 3 mins-After 5 hours Light/Medium/ Heavy Keep Bios Setting/Quiet Never/After 3 mins-After 5 hours ASUS P5Q-E Series 4-27 Configuration Turbo Mode options CPU Frequency vCore Voltage Downgrade Chipset Voltage Downgrade Turn Off hard disks CPU Loadline Overclocking +1% to +30% N/A N/A Never/After 3 mins-After 5 hours N/A Fan Control N/A AI Nap Idle Time Never/After...
... 3 mins-After 5 hours Light/Medium/ Heavy Keep Bios Setting/Quiet Never/After 3 mins-After 5 hours ASUS P5Q-E Series 4-27 Configuration Turbo Mode options CPU Frequency vCore Voltage Downgrade Chipset Voltage Downgrade Turn Off hard disks CPU Loadline Overclocking +1% to +30% N/A N/A Never/After 3 mins-After 5 hours N/A Fan Control N/A AI Nap Idle Time Never/After...

User Manual
Page 3
Contents Contents...iii Notices...viii Safety information ix About this guide x P5Q-E specifications summary xii Chapter 1: Product introduction 1.1 Welcome 1-1 1.2 Package contents 1-1 1.3 Special features 1-2 1.3.1 Product highlights 1-2 1.3.2 ASUS unique features 1-3 1.3.3 ASUS intelligent performance and overclocking features 1-7 Chapter 2: Hardware information 2.1 Before you proceed 2-1 2.2 Motherboard overview 2-2 2.2.1 Motherboard layout 2-2 2.2.2 Layout contents 2-3 2.2.3 Placement direction 2-4 2.2.4 Screw holes 2-4 2.3 Central Processing Unit (CPU 2-5 2.3.1 Installing...
Contents Contents...iii Notices...viii Safety information ix About this guide x P5Q-E specifications summary xii Chapter 1: Product introduction 1.1 Welcome 1-1 1.2 Package contents 1-1 1.3 Special features 1-2 1.3.1 Product highlights 1-2 1.3.2 ASUS unique features 1-3 1.3.3 ASUS intelligent performance and overclocking features 1-7 Chapter 2: Hardware information 2.1 Before you proceed 2-1 2.2 Motherboard overview 2-2 2.2.1 Motherboard layout 2-2 2.2.2 Layout contents 2-3 2.2.3 Placement direction 2-4 2.2.4 Screw holes 2-4 2.3 Central Processing Unit (CPU 2-5 2.3.1 Installing...


