
P5N-E SLI English Edition User's Manual
Page 11
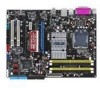
P5N-E SLI specifications summary CPU Chipset Front Side Bus Memory Expansion slots Audio Storage Gigabit LAN LGA775 socket for Intel® Quad-Core/ Core™ Extreme/ Pentium D/ Pentium® 4/ Celeron® CPU processors Compatible with Intel® 06/05B/...1333MHz FSB) Dual-channel memory architecture 4 x 240-pin DIMM sockets support unbufferred non-ECC DDR2-800/667/533 memory modules Supports up to 8 GB system memory 2 x PCI Express x16 slots with Scalable Link Interface (SLI™) support - Single VGA mode: x16 (Default) - SLI mode: x8, x8 1 x PCI Express x1 slot 2...
P5N-E SLI specifications summary CPU Chipset Front Side Bus Memory Expansion slots Audio Storage Gigabit LAN LGA775 socket for Intel® Quad-Core/ Core™ Extreme/ Pentium D/ Pentium® 4/ Celeron® CPU processors Compatible with Intel® 06/05B/...1333MHz FSB) Dual-channel memory architecture 4 x 240-pin DIMM sockets support unbufferred non-ECC DDR2-800/667/533 memory modules Supports up to 8 GB system memory 2 x PCI Express x16 slots with Scalable Link Interface (SLI™) support - Single VGA mode: x16 (Default) - SLI mode: x8, x8 1 x PCI Express x1 slot 2...

P5N-E SLI English Edition User's Manual
Page 21
This is a reminder that you install or remove any component, ensure that the ATX power supply is switched off or the power cord is detached from the wall socket before touching any component. • Use a grounded wrist strap or touch a safely ...motherboard, peripherals, and/or components. Onboard LED The motherboard comes with the component. • Before you should shut down the system and unplug the power cable before you install motherboard components or change any motherboard component. P5N-E SLI R P5N-E SLI Onboard LED SB_PWR ON Standby Power OFF Powered Off ASUS P5N-E SLI...
This is a reminder that you install or remove any component, ensure that the ATX power supply is switched off or the power cord is detached from the wall socket before touching any component. • Use a grounded wrist strap or touch a safely ...motherboard, peripherals, and/or components. Onboard LED The motherboard comes with the component. • Before you should shut down the system and unplug the power cable before you install motherboard components or change any motherboard component. P5N-E SLI R P5N-E SLI Onboard LED SB_PWR ON Standby Power OFF Powered Off ASUS P5N-E SLI...

P5N-E SLI English Edition User's Manual
Page 24
P5N-E SLI R P5N-E SLI CPU Socket 775 Before installing the CPU, make sure that the cam box is facing towards you see any damage to ensure system stability. Overheating can permanently ... left. 1-10 Chapter 1: Product introduction Locate the CPU socket on your retailer immediately if the PnP cap is shipment/ transit-related. • Keep the cap after installing the motherboard. ASUS will shoulder the cost of the motherboard, make sure that the PnP cap is on the motherboard. ASUS will process Return Merchandise Authorization (RMA) requests only...
P5N-E SLI R P5N-E SLI CPU Socket 775 Before installing the CPU, make sure that the cam box is facing towards you see any damage to ensure system stability. Overheating can permanently ... left. 1-10 Chapter 1: Product introduction Locate the CPU socket on your retailer immediately if the PnP cap is shipment/ transit-related. • Keep the cap after installing the motherboard. ASUS will shoulder the cost of the motherboard, make sure that the PnP cap is on the motherboard. ASUS will process Return Merchandise Authorization (RMA) requests only...

P5N-E SLI English Edition User's Manual
Page 25
...100º angle (A), then push the PnP cap from the retention tab. Position the CPU over the socket, making sure that the gold triangle is released from the load plate window to the socket pins, do not remove the PnP cap unless you . 2. Lift the load lever in the direction... of the arrow to the left corner of the socket box should fit into the CPU notch. The socket alignment CPU notch key should face you are installing a CPU. 3. Gold triangle mark ASUS P5N-E SLI 1-11 Press the load lever with your thumb (A), then move it is...
...100º angle (A), then push the PnP cap from the retention tab. Position the CPU over the socket, making sure that the gold triangle is released from the load plate window to the socket pins, do not remove the PnP cap unless you . 2. Lift the load lever in the direction... of the arrow to the left corner of the socket box should fit into the CPU notch. The socket alignment CPU notch key should face you are installing a CPU. 3. Gold triangle mark ASUS P5N-E SLI 1-11 Press the load lever with your thumb (A), then move it is...

P5N-E SLI English Edition User's Manual
Page 31
1.7 System memory 1.7.1 Overview The motherboard comes with the same CAS latency. DDR2 DIMMs are notched differently to prevent installation on the next page for details. • Due to chipset resource ... module has the same physical dimensions as a DDR DIMM but has a 240-pin footprint compared to the DDR2 Qualified Vendors List on a DDR DIMM socket. ASUS P5N-E SLI 1-17 For optimum compatibility, it is recommended. This limitation appears on Windows® XP 32-bit operation system which does not support Physical Address Extension (...
1.7 System memory 1.7.1 Overview The motherboard comes with the same CAS latency. DDR2 DIMMs are notched differently to prevent installation on the next page for details. • Due to chipset resource ... module has the same physical dimensions as a DDR DIMM but has a 240-pin footprint compared to the DDR2 Qualified Vendors List on a DDR DIMM socket. ASUS P5N-E SLI 1-17 For optimum compatibility, it is recommended. This limitation appears on Windows® XP 32-bit operation system which does not support Physical Address Extension (...

P5N-E SLI English Edition User's Manual
Page 35
...the motherboard and the components. The DIMM might get damaged when it fits in only one direction. To install a DIMM: 1. Support the DIMM lightly with extra force. 2 1 DDR2 DIMM notch 2. Unlock a DIMM socket by pressing the retaining clips outward. 2. ASUS P5N-E SLI 1-...21 Remove the DIMM from the socket. 1.7.3 Installing a DIMM Unplug the power supply before adding or removing DIMMs or other system components....
...the motherboard and the components. The DIMM might get damaged when it fits in only one direction. To install a DIMM: 1. Support the DIMM lightly with extra force. 2 1 DDR2 DIMM notch 2. Unlock a DIMM socket by pressing the retaining clips outward. 2. ASUS P5N-E SLI 1-...21 Remove the DIMM from the socket. 1.7.3 Installing a DIMM Unplug the power supply before adding or removing DIMMs or other system components....


