
User Manual
Page 3
... vii About this guide vii P5KPL/EPU specifications summary ix Chapter 1: Product introduction 1.1 Welcome 1-1 1.2 Package contents 1-1 1.3 Special features 1-1 1.3.1 Product highlights 1-1 1.3.2 Innovative ASUS features 1-2 1.4 Before you proceed 1-4 1.5 Motherboard overview 1-5 1.5.1 Placement direction 1-5 1.5.2 Screw holes 1-5 1.5.3 Motherboard layout 1-6 1.5.4 Layout contents 1-6 1.6 Central Processing Unit (CPU 1-7 1.6.1 Installing the CPU 1-7 1.6.2 Installing the CPU heatsink and fan 1-10 1.6.3 Uninstalling the CPU heatsink and fan 1-11...
... vii About this guide vii P5KPL/EPU specifications summary ix Chapter 1: Product introduction 1.1 Welcome 1-1 1.2 Package contents 1-1 1.3 Special features 1-1 1.3.1 Product highlights 1-1 1.3.2 Innovative ASUS features 1-2 1.4 Before you proceed 1-4 1.5 Motherboard overview 1-5 1.5.1 Placement direction 1-5 1.5.2 Screw holes 1-5 1.5.3 Motherboard layout 1-6 1.5.4 Layout contents 1-6 1.6 Central Processing Unit (CPU 1-7 1.6.1 Installing the CPU 1-7 1.6.2 Installing the CPU heatsink and fan 1-10 1.6.3 Uninstalling the CPU heatsink and fan 1-11...

User Manual
Page 4
... 2-1 2.1.2 ASUS EZ Flash 2 utility 2-2 2.1.3 ASUS CrashFree BIOS 3 utility 2-3 2.2 BIOS setup program 2-4 2.2.1 BIOS menu screen 2-5 2.2.2 Menu bar 2-5 2.2.3 Navigation keys 2-6 2.2.4 Menu items 2-6 2.2.5 Submenu items 2-6 2.2.6 Configuration fields 2-6 2.2.7 Pop-up window 2-6 2.2.8 Scroll bar 2-6 2.2.9 General help 2-6 2.3 Main menu 2-7 2.3.1 System Time 2-7 2.3.2 System Date 2-7 2.3.3 Primary IDE Master/SATA 1-4 2-7 2.3.4 IDE Configuration 2-8 2.3.5 System Information 2-9 2.4 Advanced menu 2-9 2.4.1 JumperFree Configuration 2-9 2.4.2 USB Configuration 2-11 2.4.3 CPU...
... 2-1 2.1.2 ASUS EZ Flash 2 utility 2-2 2.1.3 ASUS CrashFree BIOS 3 utility 2-3 2.2 BIOS setup program 2-4 2.2.1 BIOS menu screen 2-5 2.2.2 Menu bar 2-5 2.2.3 Navigation keys 2-6 2.2.4 Menu items 2-6 2.2.5 Submenu items 2-6 2.2.6 Configuration fields 2-6 2.2.7 Pop-up window 2-6 2.2.8 Scroll bar 2-6 2.2.9 General help 2-6 2.3 Main menu 2-7 2.3.1 System Time 2-7 2.3.2 System Date 2-7 2.3.3 Primary IDE Master/SATA 1-4 2-7 2.3.4 IDE Configuration 2-8 2.3.5 System Information 2-9 2.4 Advanced menu 2-9 2.4.1 JumperFree Configuration 2-9 2.4.2 USB Configuration 2-11 2.4.3 CPU...
User Manual
Page 9
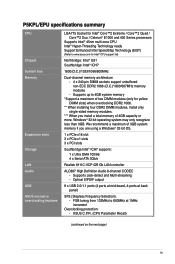
...P5KPL/EPU specifications summary CPU Chipset System bus Memory Expansion slots Storage LAN Audio USB ASUS exclusive overclocking features LGA775 Socket for Intel® Core™2 Extreme / Core™2 Quad / Core™2 Duo / Celeron® E1000 and 400 Series processors Supports Intel® 45nm multi-core CPU...CODEC - Optical S/PDIF output 8 x USB 2.0/1.1 ports (4 ports at mid-board, 4-ports at 1MHz increment Overclocking protection: - ASUS C.P.R. (CPU Parameter Recall) (continued on the next page) ix FSB tuning from 133MHz to 4GB system memory *Support a maximum of 4GB ...
...P5KPL/EPU specifications summary CPU Chipset System bus Memory Expansion slots Storage LAN Audio USB ASUS exclusive overclocking features LGA775 Socket for Intel® Core™2 Extreme / Core™2 Quad / Core™2 Duo / Celeron® E1000 and 400 Series processors Supports Intel® 45nm multi-core CPU...CODEC - Optical S/PDIF output 8 x USB 2.0/1.1 ports (4 ports at mid-board, 4-ports at 1MHz increment Overclocking protection: - ASUS C.P.R. (CPU Parameter Recall) (continued on the next page) ix FSB tuning from 133MHz to 4GB system memory *Support a maximum of 4GB ...

User Manual
Page 10
P5KPL/EPU specifications summary Rear panel ports Internal connectors ASUS Special features BIOS features Manageability Accessories Support OS Support DVD Form factor 1 x PS/2 mouse port 1 x PS/2 keyboard port 1 x Optical S/...connector 2 x USB 2.0 connectors support additional 4 USB 2.0 ports 1 x CPU / 1 x Chassis / 1 x Power fan connectors 1 x CD audio-in connector 1 x IDE connector 1 x 24-pin EPS Power connector 1 x 4-pin ATX 12V Power connector ASUS CrashFree BIOS 3 ASUS EZ Flash2 ASUS Express Gate ASUS EPU ASUS Q-Fan ASUS MyLogo 2 8 Mb Flash ROM, AMI BIOS, Special H/W write protection, PnP...
P5KPL/EPU specifications summary Rear panel ports Internal connectors ASUS Special features BIOS features Manageability Accessories Support OS Support DVD Form factor 1 x PS/2 mouse port 1 x PS/2 keyboard port 1 x Optical S/...connector 2 x USB 2.0 connectors support additional 4 USB 2.0 ports 1 x CPU / 1 x Chassis / 1 x Power fan connectors 1 x CD audio-in connector 1 x IDE connector 1 x 24-pin EPS Power connector 1 x 4-pin ATX 12V Power connector ASUS CrashFree BIOS 3 ASUS EZ Flash2 ASUS Express Gate ASUS EPU ASUS Q-Fan ASUS MyLogo 2 8 Mb Flash ROM, AMI BIOS, Special H/W write protection, PnP...

User Manual
Page 11
...and expanded power management capabilities for new levels of ASUS quality motherboards! Intel® 45nm Processor Ready This motherboard supports the latest Intel 45nm CPU which are excellent for buying an ASUS® P5KPL/EPU motherboard! This motherboard also supports Intel® ...CPUs in the long line of energy efficiency. Before you for multitasking, multimedia, and enthusiastic gamers with 1600 (O.C.) / 1333/ 1066/ 800 MHz FSB. ASUS P5KPL/EPU 1-1 ...
...and expanded power management capabilities for new levels of ASUS quality motherboards! Intel® 45nm Processor Ready This motherboard supports the latest Intel 45nm CPU which are excellent for buying an ASUS® P5KPL/EPU motherboard! This motherboard also supports Intel® ...CPUs in the long line of energy efficiency. Before you for multitasking, multimedia, and enthusiastic gamers with 1600 (O.C.) / 1333/ 1066/ 800 MHz FSB. ASUS P5KPL/EPU 1-1 ...

User Manual
Page 13
...) The BIOS C.P.R. feature automatically restores the CPU default settings when the system hangs due to safeguard consumers' health while minimizing the impact on the system configuration. • ASUS Express Gate supports file uploading from SATA HDDs, ODDs and USB drives and downloading to 100 meters at ...the system, and any faulty cable connections are reported back up to USB drives only. ASUS P5KPL/EPU 1-3 Simply shut down and reboot the system, and the BIOS automatically restores the CPU parameters to update the BIOS without using the bundled support DVD or USB disk that contains...
...) The BIOS C.P.R. feature automatically restores the CPU default settings when the system hangs due to safeguard consumers' health while minimizing the impact on the system configuration. • ASUS Express Gate supports file uploading from SATA HDDs, ODDs and USB drives and downloading to 100 meters at ...the system, and any faulty cable connections are reported back up to USB drives only. ASUS P5KPL/EPU 1-3 Simply shut down and reboot the system, and the BIOS automatically restores the CPU parameters to update the BIOS without using the bundled support DVD or USB disk that contains...

User Manual
Page 16
... (3-pin PS2 USBPW1-4) 2. USB device wake-up (3-pin USBPW5-8) Page 1-20 1-27 1-25 1-28 1-29 1-29 1-30 1-21 1-6 Chapter 1: Product introduction CPU, chassis, and power fan connectors (4-pin CPU_FAN, 3-pin CHA_FAN, 3-pin PWR_FAN) 4. LGA775 CPU socket 5. Chassis intrusion connector (4-1 pin CHASSIS) 1-7 12. 1.5.3 Motherboard layout 20.8cm(8.2in) 1.5.4 Layout contents Connectors/Jumpers/Slots 1.
... (3-pin PS2 USBPW1-4) 2. USB device wake-up (3-pin USBPW5-8) Page 1-20 1-27 1-25 1-28 1-29 1-29 1-30 1-21 1-6 Chapter 1: Product introduction CPU, chassis, and power fan connectors (4-pin CPU_FAN, 3-pin CHA_FAN, 3-pin PWR_FAN) 4. LGA775 CPU socket 5. Chassis intrusion connector (4-1 pin CHASSIS) 1-7 12. 1.5.3 Motherboard layout 20.8cm(8.2in) 1.5.4 Layout contents Connectors/Jumpers/Slots 1.

User Manual
Page 17
... the cost of the PnP cap. ASUS P5KPL/EPU 1-7 Locate the CPU socket on your left. 1.6 Central Processing Unit (CPU) The motherboard comes with a surface mount LGA775 socket designed for the Intel® Core™2 Extreme / Core™2 Quad / Core™2 Duo / Pentium&#...the load lever is on the LGA775 socket. • The product warranty does not cover damage to the PnP cap/socket contacts/motherboard components. ASUS will process Return Merchandise Authorization (RMA) requests only if the motherboard comes with the Intel® Enhanced Intel SpeedStep® Technology (EIST) ...
... the cost of the PnP cap. ASUS P5KPL/EPU 1-7 Locate the CPU socket on your left. 1.6 Central Processing Unit (CPU) The motherboard comes with a surface mount LGA775 socket designed for the Intel® Core™2 Extreme / Core™2 Quad / Core™2 Duo / Pentium&#...the load lever is on the LGA775 socket. • The product warranty does not cover damage to the PnP cap/socket contacts/motherboard components. ASUS will process Return Merchandise Authorization (RMA) requests only if the motherboard comes with the Intel® Enhanced Intel SpeedStep® Technology (EIST) ...

User Manual
Page 18
.... 4. Lift the load plate with your thumb and forefinger to a 100º angle (4A), then push the PnP cap from the retention tab. Position the CPU over the socket, ensuring that the gold triangle is released from the load plate window to the left corner of the arrow to the socket... pins, do not remove the PnP cap unless you are installing a CPU. 3. Press the load lever with your thumb (A), then move it is on the bottom‑left (B) until it to remove (4B). Retention tab A B Load lever...
.... 4. Lift the load plate with your thumb and forefinger to a 100º angle (4A), then push the PnP cap from the retention tab. Position the CPU over the socket, ensuring that the gold triangle is released from the load plate window to the left corner of the arrow to the socket... pins, do not remove the PnP cap unless you are installing a CPU. 3. Press the load lever with your thumb (A), then move it is on the bottom‑left (B) until it to remove (4B). Retention tab A B Load lever...
User Manual
Page 19
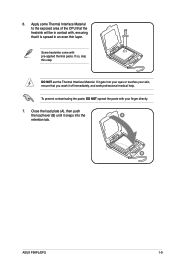
...NOT eat the Thermal Interface Material. If it gets into the A retention tab. Apply some Thermal Interface Material to the exposed area of the CPU that the heatsink will be in contact with, ensuring that you wash it snaps into your eyes or touches your finger directly. 7. Some heatsinks...it is spread in an even thin layer. To prevent contaminating the paste, DO NOT spread the paste with pre-applied thermal paste. B ASUS P5KPL/EPU 1-9 If so, skip this step. Close the load plate (A), then push the load lever (B) until it off immediately, and seek professional medical help....
...NOT eat the Thermal Interface Material. If it gets into the A retention tab. Apply some Thermal Interface Material to the exposed area of the CPU that the heatsink will be in contact with, ensuring that you wash it snaps into your eyes or touches your finger directly. 7. Some heatsinks...it is spread in an even thin layer. To prevent contaminating the paste, DO NOT spread the paste with pre-applied thermal paste. B ASUS P5KPL/EPU 1-9 If so, skip this step. Close the load plate (A), then push the load lever (B) until it off immediately, and seek professional medical help....

User Manual
Page 20
...connector. 2. Push down two fasteners at a time in a diagonal sequence to ensure optimum thermal condition and performance. • When you buy a CPU separately, ensure that you use only Intel®‑certified multi‑directional heatsink and fan. • Your Intel® LGA775 heatsink and fan ...assembly comes in a push-pin design and requires no tool to install. • If you purchased a separate CPU heatsink and fan assembly, ensure that you have properly applied Thermal Interface Material to the chassis before you install the...
...connector. 2. Push down two fasteners at a time in a diagonal sequence to ensure optimum thermal condition and performance. • When you buy a CPU separately, ensure that you use only Intel®‑certified multi‑directional heatsink and fan. • Your Intel® LGA775 heatsink and fan ...assembly comes in a push-pin design and requires no tool to install. • If you purchased a separate CPU heatsink and fan assembly, ensure that you have properly applied Thermal Interface Material to the chassis before you install the...
User Manual
Page 21
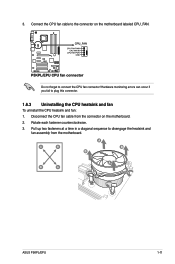
Do not forget to disengage the heatsink and fan assembly from the connector on the motherboard labeled CPU_FAN. Pull up two fasteners at a time in a diagonal sequence to connect the CPU fan connector! Connect the CPU fan cable to plug this connector. 1.6.3 Uninstalling the CPU heatsink and fan To uninstall the CPU heatsink and fan: 1. A B A B B A B A ASUS P5KPL/EPU 1-11 Rotate each fastener counterclockwise. 3. Disconnect the CPU fan cable from the motherboard. Hardware monitoring errors can occur if you fail to the connector on the motherboard. 2. 3.
Do not forget to disengage the heatsink and fan assembly from the connector on the motherboard labeled CPU_FAN. Pull up two fasteners at a time in a diagonal sequence to connect the CPU fan connector! Connect the CPU fan cable to plug this connector. 1.6.3 Uninstalling the CPU heatsink and fan To uninstall the CPU heatsink and fan: 1. A B A B B A B A ASUS P5KPL/EPU 1-11 Rotate each fastener counterclockwise. 3. Disconnect the CPU fan cable from the motherboard. Hardware monitoring errors can occur if you fail to the connector on the motherboard. 2. 3.

User Manual
Page 28
Clear RTC RAM (3-pin CLRTC) This jumper allows you use the CPU Parameter Recall (C.P.R.) feature. You can clear the CMOS memory of date, time, and system setup parameters by erasing the CMOS RTC RAM data. You must ...
Clear RTC RAM (3-pin CLRTC) This jumper allows you use the CPU Parameter Recall (C.P.R.) feature. You can clear the CMOS memory of date, time, and system setup parameters by erasing the CMOS RTC RAM data. You must ...
User Manual
Page 29
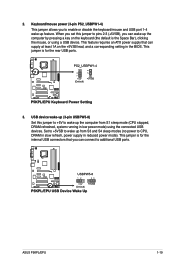
This jumper is the Space Bar), clicking the mouse, or using the connected USB devices. ASUS P5KPL/EPU 1-19 2. When you set this jumper to pins 2-3 (+5VSB), you can wake up (3-pin USBPW5-8) Set this jumper to +5V to CPU, DRAM in slow refresh, power supply in reduced power mode). USB device wake-up the... the internal USB connectors that can connect to enable or disable the keyboard/mouse and USB port 1-4 wake-up the computer from S1 sleep mode (CPU stopped, DRAM refreshed, system running in the BIOS. Set to +5VSB to wake up from S3 and S4 sleep modes (no power to wake up...
This jumper is the Space Bar), clicking the mouse, or using the connected USB devices. ASUS P5KPL/EPU 1-19 2. When you set this jumper to pins 2-3 (+5VSB), you can wake up (3-pin USBPW5-8) Set this jumper to +5V to CPU, DRAM in slow refresh, power supply in reduced power mode). USB device wake-up the... the internal USB connectors that can connect to enable or disable the keyboard/mouse and USB port 1-4 wake-up the computer from S1 sleep mode (CPU stopped, DRAM refreshed, system running in the BIOS. Set to +5VSB to wake up from S3 and S4 sleep modes (no power to wake up...
User Manual
Page 31
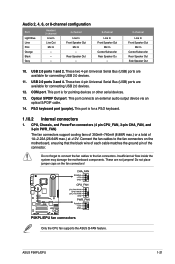
... - - - 4-channel Line In Front Speaker Out Mic In - USB 2.0 ports 3 and 4. CPU, Chassis, and PowerFan connectors (4 pin CPU_FAN, 3-pin CHA_FAN, and 3-pin PWR_FAN) The fan connectors support cooling fans of 350mA~740mA (8.88W max.) or a total of the connector. ASUS P5KPL/EPU 1-21 COM port. PS/2 keyboard port (purple). Do not forget to connect... on the motherboard, ensuring that the black wire of each cable matches the ground pin of 1A~2.22A (26.64W max.) at +12V. Only the CPU fan supports the ASUS Q-FAN feature.
... - - - 4-channel Line In Front Speaker Out Mic In - USB 2.0 ports 3 and 4. CPU, Chassis, and PowerFan connectors (4 pin CPU_FAN, 3-pin CHA_FAN, and 3-pin PWR_FAN) The fan connectors support cooling fans of 350mA~740mA (8.88W max.) or a total of the connector. ASUS P5KPL/EPU 1-21 COM port. PS/2 keyboard port (purple). Do not forget to connect... on the motherboard, ensuring that the black wire of each cable matches the ground pin of 1A~2.22A (26.64W max.) at +12V. Only the CPU fan supports the ASUS Q-FAN feature.

User Manual
Page 49
... frequency/voltage. loads the optimal settings for the CPU and other system devices. Main Advanced Power BIOS SETUP UTILITY Boot Tools Exit JumperFree Configuration USB Configuration CPU Configuration Chipset Onboard Devices Configuration PCIPnP Adjust System frequency...preset overclocking configuration options: Manual - Select either one of CPU overclocking options to achieve desired CPU internal frequency. 2.3.5 System Information This menu gives you to individually set overclocking parameters. ASUS P5KPL/EPU 2-9 The BIOS automatically detects the items in this menu....
... frequency/voltage. loads the optimal settings for the CPU and other system devices. Main Advanced Power BIOS SETUP UTILITY Boot Tools Exit JumperFree Configuration USB Configuration CPU Configuration Chipset Onboard Devices Configuration PCIPnP Adjust System frequency...preset overclocking configuration options: Manual - Select either one of CPU overclocking options to achieve desired CPU internal frequency. 2.3.5 System Information This menu gives you to individually set overclocking parameters. ASUS P5KPL/EPU 2-9 The BIOS automatically detects the items in this menu....

User Manual
Page 50
The value of this happens, revert to the default setting. 2-10 Chapter 2: BIOS information You can also type the desired CPU frequency using the numeric keypad. Configuration options: [Auto] [667 MHz] [800 MHz] [1067MHz] The following table shows the DRAM Frequency options that...you to set the DDR2 operating frequency. Use the and keys to the table below for the correct Front Side Bus and CPU External Frequency settings. Refer to adjust the CPU frequency. Overclock Options [Overclock 5%] Allows you to select the overclock options. If this item is 1600, 1333, 1066, ...
The value of this happens, revert to the default setting. 2-10 Chapter 2: BIOS information You can also type the desired CPU frequency using the numeric keypad. Configuration options: [Auto] [667 MHz] [800 MHz] [1067MHz] The following table shows the DRAM Frequency options that...you to set the DDR2 operating frequency. Use the and keys to the table below for the correct Front Side Bus and CPU External Frequency settings. Refer to adjust the CPU frequency. Overclock Options [Overclock 5%] Allows you to select the overclock options. If this item is 1600, 1333, 1066, ...

User Manual
Page 51
...). Configuration options: [Disabled] [Enabled] [8 USB Ports] USB 2.0 Controller [Enabled] Allows you to change the USB-related features. Configuration options: [FullSpeed] [HiSpeed] ASUS P5KPL/EPU 2-11 Configuration options: [Auto] [1.30V] [1.35V] [1.40] [1.45] CPU Vcore Over Voltage [Auto] Allows you to disable or enable the USB functions. Setting to [Auto] allows the system to display...
...). Configuration options: [Disabled] [Enabled] [8 USB Ports] USB 2.0 Controller [Enabled] Allows you to change the USB-related features. Configuration options: [FullSpeed] [HiSpeed] ASUS P5KPL/EPU 2-11 Configuration options: [Auto] [1.30V] [1.35V] [1.40] [1.45] CPU Vcore Over Voltage [Auto] Allows you to disable or enable the USB functions. Setting to [Auto] allows the system to display...

User Manual
Page 52
... or disable C1E Support. If an invalid ratio is plugged. Configuration options: [Auto] [Floppy] [Forced FDD] [Hard Disk] [CDROM] 2.4.3 CPU Configuration The items in ratio numbers directly. C1E Support [Enabled] Allows you to set the USB mass stroage reset delay. Setting this menu show the... CPU-related information that supports the Enhanced Intel® SpeedStep® Technology (EIST). 2-12 Chapter 2: BIOS information The following item appears only...
... or disable C1E Support. If an invalid ratio is plugged. Configuration options: [Auto] [Floppy] [Forced FDD] [Hard Disk] [CDROM] 2.4.3 CPU Configuration The items in ratio numbers directly. C1E Support [Enabled] Allows you to set the USB mass stroage reset delay. Setting this menu show the... CPU-related information that supports the Enhanced Intel® SpeedStep® Technology (EIST). 2-12 Chapter 2: BIOS information The following item appears only...

User Manual
Page 56
... Select Ignored if you to enable or disable RI to generate a wake event. Configuration options: [Disabled] [Enabled] 2.5.5 Hardware Monitor CPU Temperature [xxxºC/xxxºF] or [Ignored] MB Temperature [xxxºC/xxxºF] or [Ignored] The onboard hardware monitor automatically ...detects and displays the motherboard and CPU temperatures. Resume On Ring [Disabled] Allows you do not wish to display the detected speed. 2-16 Chapter 2: BIOS information Configuration ...
... Select Ignored if you to enable or disable RI to generate a wake event. Configuration options: [Disabled] [Enabled] 2.5.5 Hardware Monitor CPU Temperature [xxxºC/xxxºF] or [Ignored] MB Temperature [xxxºC/xxxºF] or [Ignored] The onboard hardware monitor automatically ...detects and displays the motherboard and CPU temperatures. Resume On Ring [Disabled] Allows you do not wish to display the detected speed. 2-16 Chapter 2: BIOS information Configuration ...


