User Manual
Page 4
Contents 1.11 Software support 1-27 1.11.1 Installing an operating system 1-27 1.11.2 Support DVD information 1-27 Chapter 2: BIOS information 2.1 Managing and updating your BIOS 2-1 2.1.1 ASUS Update utility 2-1 2.1.2 ASUS EZ Flash 2 2-2 2.1.3 ASUS CrashFree BIOS 2-3 2.2 BIOS setup program 2-4 2.2.1 BIOS menu screen 2-5 2.2.2 Menu bar 2-5 2.2.3 Navigation keys 2-6 2.2.4 Menu items 2-6 2.2.5 Submenu items 2-6 2.2.6 Configuration fields 2-6 2.2.7 Pop-up window 2-6 2.2.8 Scroll bar 2-6 2.2.9 General help 2-6 2.3 Main menu 2-7 2.3.1 System...
Contents 1.11 Software support 1-27 1.11.1 Installing an operating system 1-27 1.11.2 Support DVD information 1-27 Chapter 2: BIOS information 2.1 Managing and updating your BIOS 2-1 2.1.1 ASUS Update utility 2-1 2.1.2 ASUS EZ Flash 2 2-2 2.1.3 ASUS CrashFree BIOS 2-3 2.2 BIOS setup program 2-4 2.2.1 BIOS menu screen 2-5 2.2.2 Menu bar 2-5 2.2.3 Navigation keys 2-6 2.2.4 Menu items 2-6 2.2.5 Submenu items 2-6 2.2.6 Configuration fields 2-6 2.2.7 Pop-up window 2-6 2.2.8 Scroll bar 2-6 2.2.9 General help 2-6 2.3 Main menu 2-7 2.3.1 System...

User Manual
Page 7
... outlet you detect any area where it may become wet. • Place the product on it supports. • Chapter 2: BIOS information This chapter tells how to change system settings through the BIOS Setup menus. Detailed descriptions of the motherboard and the new technology it , carefully read all the manuals that came with... company. • If the power supply is organized This guide contains the following parts: • Chapter 1: Product introduction This chapter describes the features of the BIOS parameters are connected. vii
... outlet you detect any area where it may become wet. • Place the product on it supports. • Chapter 2: BIOS information This chapter tells how to change system settings through the BIOS Setup menus. Detailed descriptions of the motherboard and the new technology it , carefully read all the manuals that came with... company. • If the power supply is organized This guide contains the following parts: • Chapter 1: Product introduction This chapter describes the features of the BIOS parameters are connected. vii

User Manual
Page 10
P5G41TD-M PRO specifications summary ASUS unique features Back panel I/O ports Internal connectors BIOS Accessories Support DVD Form factor ASUS CrashFree BIOS 3 ASUS AI NET 2 ASUS Q-Fan ASUS EZ Flash 2 ASUS MyLogo 2 ASUS Anti-Surge Protection ASUS Turbo Key ASUS Express Gate ASUS EPU-4 ASUS Stack Cool 3 1 x PS/2 keyboard port 1 x PS/2 mouse port 1 x S/PDIF Out port (Optical) 1 x HDMI port 1 x VGA port 1 x DVI port 1 x LAN (RJ-45) port...
P5G41TD-M PRO specifications summary ASUS unique features Back panel I/O ports Internal connectors BIOS Accessories Support DVD Form factor ASUS CrashFree BIOS 3 ASUS AI NET 2 ASUS Q-Fan ASUS EZ Flash 2 ASUS MyLogo 2 ASUS Anti-Surge Protection ASUS Turbo Key ASUS Express Gate ASUS EPU-4 ASUS Stack Cool 3 1 x PS/2 keyboard port 1 x PS/2 mouse port 1 x S/PDIF Out port (Optical) 1 x HDMI port 1 x VGA port 1 x DVI port 1 x LAN (RJ-45) port...

User Manual
Page 13
... USB drives. Simply shut down and reboot the system, and the BIOS automatically restores the CPU parameters to overclocking failure. ASUS P5G41TD-M PRO 1-3 ASUS EZ Flash 2 ASUS EZ Flash 2 is an auto-recovery tool that contains the latest BIOS file. eliminates the need to USB drives only. ASUS MyLogo2™ This feature allows you to safeguard consumers' health...
... USB drives. Simply shut down and reboot the system, and the BIOS automatically restores the CPU parameters to overclocking failure. ASUS P5G41TD-M PRO 1-3 ASUS EZ Flash 2 ASUS EZ Flash 2 is an auto-recovery tool that contains the latest BIOS file. eliminates the need to USB drives only. ASUS MyLogo2™ This feature allows you to safeguard consumers' health...
User Manual
Page 27
...not need to use . 4. Remove the system unit cover (if your motherboard is completely seated on the system and change the necessary BIOS settings, if any. See Chapter 2 for the card. 2. Before installing the expansion card, read the documentation that you intend to install...x1 slot This motherboard supports PCI Express x1 network cards, SCSI cards, and other cards that comply with the PCI Express specifications. ASUS P5G41TD-M PRO 1-17 The following sub‑sections describe the slots and the expansion cards that complies with the PCI Express specifications. 1.8.5 PCI ...
...not need to use . 4. Remove the system unit cover (if your motherboard is completely seated on the system and change the necessary BIOS settings, if any. See Chapter 2 for the card. 2. Before installing the expansion card, read the documentation that you intend to install...x1 slot This motherboard supports PCI Express x1 network cards, SCSI cards, and other cards that comply with the PCI Express specifications. ASUS P5G41TD-M PRO 1-17 The following sub‑sections describe the slots and the expansion cards that complies with the PCI Express specifications. 1.8.5 PCI ...
User Manual
Page 28
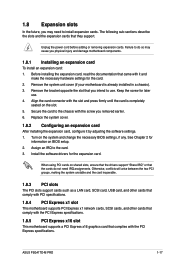
Hold down and reboot the system, then the BIOS automatically resets parameter settings to pins 1-2. 3. 1.9 Jumpers 1. You can clear the CMOS memory of date, time, and system setup parameters by erasing the CMOS RTC ... not need to clear the RTC when the system hangs due to re-enter data. Shut down the key during the boot process and enter BIOS setup to overclocking. To erase the RTC RAM: 1. Move the jumper cap from pins 1-2 (default) to overclocking, use the CPU Parameter Recall (C.P.R.) feature. Keep the...
Hold down and reboot the system, then the BIOS automatically resets parameter settings to pins 1-2. 3. 1.9 Jumpers 1. You can clear the CMOS memory of date, time, and system setup parameters by erasing the CMOS RTC ... not need to clear the RTC when the system hangs due to re-enter data. Shut down the key during the boot process and enter BIOS setup to overclocking. To erase the RTC RAM: 1. Move the jumper cap from pins 1-2 (default) to overclocking, use the CPU Parameter Recall (C.P.R.) feature. Keep the...

User Manual
Page 33
...audio I /O module that you want to connect a high-definition front panel audio module to this connector, set the Front Panel Type item in the BIOS setup to [AC97]. Front panel audio connector (10-1 pin AAFP) This connector is for a chassis-mounted front panel audio I /O module cable ...Serial ATA 3Gb/s is set the item to [HD Audio]. See section 2.4.3 Chipset for Serial ATA 3Gb/s hard disk and optical disk drives. ASUS P5G41TD-M PRO 1-23 If you connect a high-definition front panel audio module to this connector. • We recommend that supports either HD Audio or legacy...
...audio I /O module that you want to connect a high-definition front panel audio module to this connector, set the Front Panel Type item in the BIOS setup to [AC97]. Front panel audio connector (10-1 pin AAFP) This connector is for a chassis-mounted front panel audio I /O module cable ...Serial ATA 3Gb/s is set the item to [HD Audio]. See section 2.4.3 Chipset for Serial ATA 3Gb/s hard disk and optical disk drives. ASUS P5G41TD-M PRO 1-23 If you connect a high-definition front panel audio module to this connector. • We recommend that supports either HD Audio or legacy...

User Manual
Page 35
... you turn on the system power, and blinks when the system is in sleep or soft-off the system power. ASUS P5G41TD-M PRO 1-25 Pressing the power button turns the system on the BIOS settings. 8. The system power LED lights up or flashes when data is read from or written to this connector. Connect...
... you turn on the system power, and blinks when the system is in sleep or soft-off the system power. ASUS P5G41TD-M PRO 1-25 Pressing the power button turns the system on the BIOS settings. 8. The system power LED lights up or flashes when data is read from or written to this connector. Connect...

User Manual
Page 39
... click Auto Select then click Next. ASUS P5G41TD-M PRO 2-1 Select the ASUS FTP site nearest you update the BIOS using the ASUS Update utility. 2.1.1 ASUS Update utility The ASUS Update is a utility that comes with the motherboard package. Installing ASUS Update To install ASUS Update: 1. The Drivers menu appears. 2. b. Copy the original motherboard BIOS using this utility. Quit all Windows®...
... click Auto Select then click Next. ASUS P5G41TD-M PRO 2-1 Select the ASUS FTP site nearest you update the BIOS using the ASUS Update utility. 2.1.1 ASUS Update utility The ASUS Update is a utility that comes with the motherboard package. Installing ASUS Update To install ASUS Update: 1. The Drivers menu appears. 2. b. Copy the original motherboard BIOS using this utility. Quit all Windows®...

User Manual
Page 40
b. Always update the utility to enable it. ASUSTek EZ Flash 2 BIOS ROM Utility V3.36 FLASH TYPE: MXIC 25L8005 Current ROM BOARD: P5G41TD-M-PRO VER: 0202 (H:00 B:01) DATE: 10/15/2009 Update ROM BOARD: Unknown VER: Unknown DATE: Unknown PATH: A:\ A: Note [Enter] Select or... only. • DO NOT shut down or reset the system while updating the BIOS to complete the updating process. 2.1.2 ASUS EZ Flash 2 The ASUS EZ Flash 2 feature allows you start using this utility, download the latest BIOS file from a file, then click Next. Updating from the Open window, then ...
b. Always update the utility to enable it. ASUSTek EZ Flash 2 BIOS ROM Utility V3.36 FLASH TYPE: MXIC 25L8005 Current ROM BOARD: P5G41TD-M-PRO VER: 0202 (H:00 B:01) DATE: 10/15/2009 Update ROM BOARD: Unknown VER: Unknown DATE: Unknown PATH: A:\ A: Note [Enter] Select or... only. • DO NOT shut down or reset the system while updating the BIOS to complete the updating process. 2.1.2 ASUS EZ Flash 2 The ASUS EZ Flash 2 feature allows you start using this utility, download the latest BIOS file from a file, then click Next. Updating from the Open window, then ...

User Manual
Page 41
... shut down or reset the system while updating the BIOS! Recovering the BIOS To recover the BIOS: 1. The utility automatically checks the devices for details. 2.1.3 ASUS CrashFree BIOS The ASUS CrashFree BIOS is an auto recovery tool that contains the updated BIOS file. • Before using this utility. Turn on again. Refer to ensure system compatibility and stability. ASUS P5G41TD-M PRO 2-3
... shut down or reset the system while updating the BIOS! Recovering the BIOS To recover the BIOS: 1. The utility automatically checks the devices for details. 2.1.3 ASUS CrashFree BIOS The ASUS CrashFree BIOS is an auto recovery tool that contains the updated BIOS file. • Before using this utility. Turn on again. Refer to ensure system compatibility and stability. ASUS P5G41TD-M PRO 2-3
User Manual
Page 42
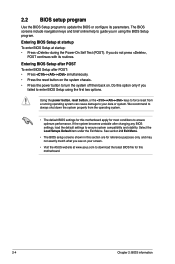
... ++ simultaneously. • Press the reset button on . Entering BIOS Setup at startup To enter BIOS Setup at www.asus.com to update the BIOS or configure its routines. Entering BIOS Setup after POST To enter BIOS Setup after changing any BIOS settings, load the default settings to turn the system off then ... button to ensure system compatibility and stability. Do this section are for most conditions to your screen. • Visit the ASUS website at startup: • Press during the Power-On Self Test (POST). The BIOS screens include navigation keys and brief online help to enter...
... ++ simultaneously. • Press the reset button on . Entering BIOS Setup at startup To enter BIOS Setup at www.asus.com to update the BIOS or configure its routines. Entering BIOS Setup after POST To enter BIOS Setup after changing any BIOS settings, load the default settings to turn the system off then ... button to ensure system compatibility and stability. Do this section are for most conditions to your screen. • Visit the ASUS website at startup: • Press during the Power-On Self Test (POST). The BIOS screens include navigation keys and brief online help to enter...

User Manual
Page 43
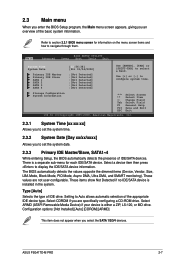
...right or left arrow key on top of the screen has the following main items: Main For changing the basic system configuration. ASUS P5G41TD-M PRO 2-5 Submenu items Navigation keys 2.2.2 Menu bar The menu bar on the keyboard until the desired item is highlighted. Tools For ...select a field. Boot For changing the system boot configuration. Advanced For changing the advanced system settings. 2.2.1 BIOS menu screen Menu items Menu bar Main Advanced Power Configuration fields BIOS SETUP UTILITY Boot Tools Exit General help System Time [00:31:48] System Date [Fri 01/04/...
...right or left arrow key on top of the screen has the following main items: Main For changing the basic system configuration. ASUS P5G41TD-M PRO 2-5 Submenu items Navigation keys 2.2.2 Menu bar The menu bar on the keyboard until the desired item is highlighted. Tools For ...select a field. Boot For changing the system boot configuration. Advanced For changing the advanced system settings. 2.2.1 BIOS menu screen Menu items Menu bar Main Advanced Power Configuration fields BIOS SETUP UTILITY Boot Tools Exit General help System Time [00:31:48] System Date [Fri 01/04/...

User Manual
Page 44
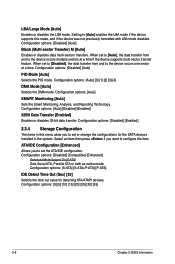
Use the navigation keys to select items in brackets, and is enclosed in the menu and change the settings. Main Advanced BIOS SETUP UTILITY Power Boot Tools Exit Suspend Mode ACPI 2.0 Support ACPI APIC support APM Configuration Hardware Monitor [Auto] [Disabled] [...Configuration fields These fields show the values for the menu items. If an item is a brief description of the selected item. 2-6 Chapter 2: BIOS information You cannot select an item that item. configurable, you can change the value of a field, select it then press to another. 2.2.4...
Use the navigation keys to select items in brackets, and is enclosed in the menu and change the settings. Main Advanced BIOS SETUP UTILITY Power Boot Tools Exit Suspend Mode ACPI 2.0 Support ACPI APIC support APM Configuration Hardware Monitor [Auto] [Disabled] [...Configuration fields These fields show the values for the menu items. If an item is a brief description of the selected item. 2-6 Chapter 2: BIOS information You cannot select an item that item. configurable, you can change the value of a field, select it then press to another. 2.2.4...
User Manual
Page 45
... Mode, PIO Mode, Async DMA, Ultra DMA, and SMART monitoring). Use [+] or [-] to section 2.2.1 BIOS menu screen for each IDE/SATA device. These values are specifically configuring a CD-ROM drive. ASUS P5G41TD-M PRO 2-7 2.3 Main menu When you enter the BIOS Setup program, the Main menu screen appears, giving you are not user-configurable. Storage Configuration...
... Mode, PIO Mode, Async DMA, Ultra DMA, and SMART monitoring). Use [+] or [-] to section 2.2.1 BIOS menu screen for each IDE/SATA device. These values are specifically configuring a CD-ROM drive. ASUS P5G41TD-M PRO 2-7 2.3 Main menu When you enter the BIOS Setup program, the Main menu screen appears, giving you are not user-configurable. Storage Configuration...
User Manual
Page 46
... installed in this mode, and if the device was not previously formatted with LBA mode disabled. Configuration options: [0] [5] [10] [15] [20] [25] [30] [35] 2-8 Chapter 2: BIOS information Configuration options: [Disabled] [Auto] PIO Mode [Auto] Selects the PIO mode. Configuration options: [Disabled] [Enabled] 2.3.4 Storage Configuration The items in the system. Configuration options...
... installed in this mode, and if the device was not previously formatted with LBA mode disabled. Configuration options: [0] [5] [10] [15] [20] [25] [30] [35] 2-8 Chapter 2: BIOS information Configuration options: [Disabled] [Auto] PIO Mode [Auto] Selects the PIO mode. Configuration options: [Disabled] [Enabled] 2.3.4 Storage Configuration The items in the system. Configuration options...

User Manual
Page 47
... options to achieve desired CPU internal frequency. allows you to change the settings for the CPU and other system devices. ASUS P5G41TD-M PRO 2-9 2.3.5 System Information This menu gives you an overview of the Advanced menu items. Incorrect field values can cause the... system memory. 2.4 Advanced menu The Advanced menu items allow you to adjust the system frequency/voltage. Main Advanced Power BIOS SETUP UTILITY Boot Tools Exit JumperFree Configuration CPU Configuration Chipset Onboard Devices Configuration USB Configuration PCIPnP Adjust System frequency/voltage. 2.4.1...
... options to achieve desired CPU internal frequency. allows you to change the settings for the CPU and other system devices. ASUS P5G41TD-M PRO 2-9 2.3.5 System Information This menu gives you an overview of the Advanced menu items. Incorrect field values can cause the... system memory. 2.4 Advanced menu The Advanced menu items allow you to adjust the system frequency/voltage. Main Advanced Power BIOS SETUP UTILITY Boot Tools Exit JumperFree Configuration CPU Configuration Chipset Onboard Devices Configuration USB Configuration PCIPnP Adjust System frequency/voltage. 2.4.1...
User Manual
Page 48
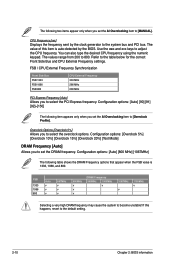
...following item appears only when you set the AI Overclocking item to adjust the CPU frequency. CPU Frequency [xxx] Displays the frequency sent by the BIOS. Refer to set the DRAM frequency. Configuration options: [Overclock 5%] [Overclock 10%] [Overclock 15%] [Overclock 20%] [Test Mode] DRAM Frequency... Frequency settings. If this item is 1333, 1066, and 800. The values range from 200 to the default setting. 2-10 Chapter 2: BIOS information Configuration options: [Auto] [90] [91] [92]~[150] The following table shows the DRAM Frequency options that appear when the FSB...
...following item appears only when you set the AI Overclocking item to adjust the CPU frequency. CPU Frequency [xxx] Displays the frequency sent by the BIOS. Refer to set the DRAM frequency. Configuration options: [Overclock 5%] [Overclock 10%] [Overclock 15%] [Overclock 20%] [Test Mode] DRAM Frequency... Frequency settings. If this item is 1333, 1066, and 800. The values range from 200 to the default setting. 2-10 Chapter 2: BIOS information Configuration options: [Auto] [90] [91] [92]~[150] The following table shows the DRAM Frequency options that appear when the FSB...

User Manual
Page 49
... that the BIOS automatically detects. The values range from 1.12500V to boot even without support for CPUs with a 0.00625V increment. The values range from 1.20000V to set values may differ. • Key in this item to [Enabled] allows legacy operating systems to 1.51875V with a 0.00625V increment. Configuration options: [Disabled] [Enabled] ASUS P5G41TD-M PRO 2-11...
... that the BIOS automatically detects. The values range from 1.12500V to boot even without support for CPUs with a 0.00625V increment. The values range from 1.20000V to set values may differ. • Key in this item to [Enabled] allows legacy operating systems to 1.51875V with a 0.00625V increment. Configuration options: [Disabled] [Enabled] ASUS P5G41TD-M PRO 2-11...

User Manual
Page 50
... Intel® Virtualization Technology allows a platform to use the EIST. Configuration options: [Disabled] [Enabled, 32MB] [Enabled, 48MB] [Enabled, 64MB] [Enabled, 128MB] [Enabled, 256MB] 2-12 Chapter 2: BIOS information Set this item to [Disabled] forces the XD feature flag to always return to select the graphics controller as multiple virtual systems. Configuration options...
... Intel® Virtualization Technology allows a platform to use the EIST. Configuration options: [Disabled] [Enabled, 32MB] [Enabled, 48MB] [Enabled, 64MB] [Enabled, 128MB] [Enabled, 256MB] 2-12 Chapter 2: BIOS information Set this item to [Disabled] forces the XD feature flag to always return to select the graphics controller as multiple virtual systems. Configuration options...


