User Manual
Page 3
Contents Notices...vi Safety information vii About this guide viii P5G41T-M LX specifications summary ix Chapter 1: Product introduction 1.1 Welcome 1-1 1.2 Package contents 1-1 1.3 Special features 1-1 1.3.1 Product highlights 1-1 1.3.2 Innovative ASUS features 1-2 1.4 Before you proceed 1-4 1.5 Motherboard overview 1-5 1.5.1 Placement ... slots 1-17 1.8.1 Installing an expansion card 1-17 1.8.2 Configuring an expansion card 1-17 1.8.3 PCI slots 1-17 1.8.4 PCI Express x1 slot 1-17 1.8.5 PCI Express x16 slot 1-17 1.9 Jumpers 1-18 1.10 Connectors 1-20 1.10.1 Rear panel connectors...
Contents Notices...vi Safety information vii About this guide viii P5G41T-M LX specifications summary ix Chapter 1: Product introduction 1.1 Welcome 1-1 1.2 Package contents 1-1 1.3 Special features 1-1 1.3.1 Product highlights 1-1 1.3.2 Innovative ASUS features 1-2 1.4 Before you proceed 1-4 1.5 Motherboard overview 1-5 1.5.1 Placement ... slots 1-17 1.8.1 Installing an expansion card 1-17 1.8.2 Configuring an expansion card 1-17 1.8.3 PCI slots 1-17 1.8.4 PCI Express x1 slot 1-17 1.8.5 PCI Express x16 slot 1-17 1.9 Jumpers 1-18 1.10 Connectors 1-20 1.10.1 Rear panel connectors...

User Manual
Page 4
...an operating system 1-27 1.11.2 Support DVD information 1-27 Chapter 2: BIOS information 2.1 Managing and updating your BIOS 2-1 2.1.1 ASUS Update utility 2-1 2.1.2 ASUS EZ Flash 2 2-2 2.1.3 ASUS CrashFree BIOS 2-3 2.2 BIOS setup program 2-4 2.2.1 BIOS menu screen 2-5 2.2.2 Menu bar 2-5 2.2.3 Navigation keys 2-6 2.2.4 Menu ... CPU Configuration 2-11 2.4.3 Chipset 2-12 2.4.4 Onboard Devices Configuration 2-13 2.4.5 USB Configuration 2-14 2.4.6 PCI PnP 2-15 2.5 Power menu 2-15 2.5.1 Suspend Mode [Auto 2-15 2.5.2 ACPI 2.0 Support [Enabled 2-15 2.5.3 ACPI APIC Support [Enabled 2-15...
...an operating system 1-27 1.11.2 Support DVD information 1-27 Chapter 2: BIOS information 2.1 Managing and updating your BIOS 2-1 2.1.1 ASUS Update utility 2-1 2.1.2 ASUS EZ Flash 2 2-2 2.1.3 ASUS CrashFree BIOS 2-3 2.2 BIOS setup program 2-4 2.2.1 BIOS menu screen 2-5 2.2.2 Menu bar 2-5 2.2.3 Navigation keys 2-6 2.2.4 Menu ... CPU Configuration 2-11 2.4.3 Chipset 2-12 2.4.4 Onboard Devices Configuration 2-13 2.4.5 USB Configuration 2-14 2.4.6 PCI PnP 2-15 2.5 Power menu 2-15 2.5.1 Suspend Mode [Auto 2-15 2.5.2 ACPI 2.0 Support [Enabled 2-15 2.5.3 ACPI APIC Support [Enabled 2-15...
User Manual
Page 9
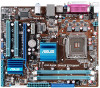
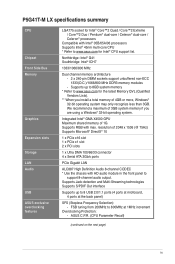
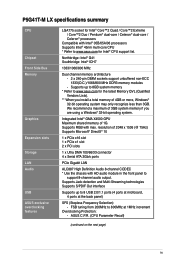
P5G41T-M LX specifications summary CPU Chipset Front Side Bus Memory Graphics Expansion slots Storage LAN Audio USB ASUS exclusive overclocking features LGA775 socket for Intel® Core™2 Quad / Core™2 Extreme / Core™2 Duo / Pentium® dual-core / Celeron® dual... memory if you install a total memory of 2048 x 1536 (@ 75Hz) Supports Microsoft® DirectX® 10 1 x PCIe x16 slot 1 x PCIe x1 slot 2 x PCI slots 1 x Ultra DMA 100/66/33 connector 4 x Serial ATA 3Gb/s ports PCIe Gigabit LAN ALC887 High Definition Audio 8-channel CODEC * Use the chassis with max...
P5G41T-M LX specifications summary CPU Chipset Front Side Bus Memory Graphics Expansion slots Storage LAN Audio USB ASUS exclusive overclocking features LGA775 socket for Intel® Core™2 Quad / Core™2 Extreme / Core™2 Duo / Pentium® dual-core / Celeron® dual... memory if you install a total memory of 2048 x 1536 (@ 75Hz) Supports Microsoft® DirectX® 10 1 x PCIe x16 slot 1 x PCIe x1 slot 2 x PCI slots 1 x Ultra DMA 100/66/33 connector 4 x Serial ATA 3Gb/s ports PCIe Gigabit LAN ALC887 High Definition Audio 8-channel CODEC * Use the chassis with max...
User Manual
Page 27
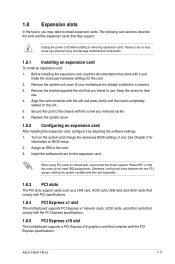
...support "Share IRQ" or that came with the slot and press firmly until the card is already installed in a chassis). 3. When using PCI cards on BIOS setup. 2. Unplug the power cord before adding or removing expansion cards. Keep the screw for the card. 2. Assign ... IRQ to do not need to the chassis with the PCI Express specifications. Replace the system cover. 1.8.2 Configuring an expansion card After installing the expansion card, configure it and make the necessary hardware settings for later use . ASUS P5G41T-M LX 1-17 1.8 Expansion slots In the future, you physical injury...
...support "Share IRQ" or that came with the slot and press firmly until the card is already installed in a chassis). 3. When using PCI cards on BIOS setup. 2. Unplug the power cord before adding or removing expansion cards. Keep the screw for the card. 2. Assign ... IRQ to do not need to the chassis with the PCI Express specifications. Replace the system cover. 1.8.2 Configuring an expansion card After installing the expansion card, configure it and make the necessary hardware settings for later use . ASUS P5G41T-M LX 1-17 1.8 Expansion slots In the future, you physical injury...
User Manual
Page 48
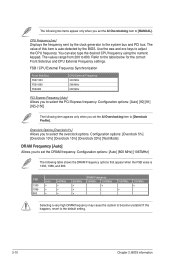
...667MHz v v v 800MHz v v v DRAM Frequency 960MHz 1000MHz v 1067MHz v 1100MHz v Selecting a very high DRAM frequency may cause the system to select the PCI Express frequency. Configuration options: [Auto] [800 MHz] [1067MHz] The following item appears only when you to adjust the CPU frequency. If this item is 1333... Front Side Bus FSB 1333 FSB 1066 FSB 800 CPU External Frequency 333 MHz 266 MHz 200 MHz PCI Express Frequency [Auto] Allows you to the system bus and PCI bus. CPU Frequency [xxx] Displays the frequency sent by the BIOS. Configuration options: [Auto] [90...
...667MHz v v v 800MHz v v v DRAM Frequency 960MHz 1000MHz v 1067MHz v 1100MHz v Selecting a very high DRAM frequency may cause the system to select the PCI Express frequency. Configuration options: [Auto] [800 MHz] [1067MHz] The following item appears only when you to adjust the CPU frequency. If this item is 1333... Front Side Bus FSB 1333 FSB 1066 FSB 800 CPU External Frequency 333 MHz 266 MHz 200 MHz PCI Express Frequency [Auto] Allows you to the system bus and PCI bus. CPU Frequency [xxx] Displays the frequency sent by the BIOS. Configuration options: [Auto] [90...

User Manual
Page 50
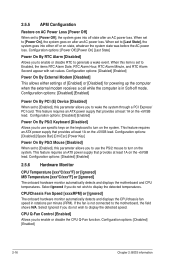
... [Enabled] Allows you to enable or disable the No-Execution Page Protection Technology. Configuration options: [Enabled] [Disabled] Initiate Graphic Adapter [PEG/PCI] Allows you to select the graphics controller as the primary boot device. Configuration options: [Disabled] [Enabled, 32MB] [Enabled, 48MB] [Enabled...CPU overheating protection function. When set to [Enabled], you to display the sub-menu. Configuration options: [IGD] [PCI/IGD] [PCI/PEG] [PEG/IGD] [PEG/PCI] IGD Graphics Mode Select [Enabled, 32MB] Allows you can adjust the system power settings in the operating system ...
... [Enabled] Allows you to enable or disable the No-Execution Page Protection Technology. Configuration options: [Enabled] [Disabled] Initiate Graphic Adapter [PEG/PCI] Allows you to select the graphics controller as the primary boot device. Configuration options: [Disabled] [Enabled, 32MB] [Enabled, 48MB] [Enabled...CPU overheating protection function. When set to [Enabled], you to display the sub-menu. Configuration options: [IGD] [PCI/IGD] [PCI/PEG] [PEG/IGD] [PEG/PCI] IGD Graphics Mode Select [Enabled, 32MB] Allows you can adjust the system power settings in the operating system ...
User Manual
Page 53
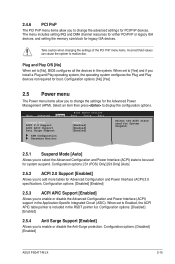
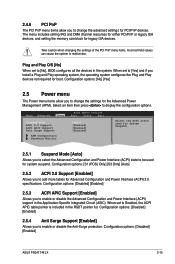
... options: [Disabled] [Enabled] 2.5.4 Anti Surge Support [Enabled] Allows you to display the configuration options. Configuration options: [Disabled] [Enabled] ASUS P5G41T-M LX 2-15 Configuration options: [No] [Yes] 2.5 Power menu The Power menu items allow you to change the settings for the Advanced Power Management...devices in the Application-Specific Integrated Circuit (ASIC). 2.4.6 PCI PnP The PCI PnP menu items allow you to change the advanced settings for PCI/PnP devices. Take caution when changing the settings of the PCI PnP menu items. Incorrect field values can cause the...
... options: [Disabled] [Enabled] 2.5.4 Anti Surge Support [Enabled] Allows you to display the configuration options. Configuration options: [Disabled] [Enabled] ASUS P5G41T-M LX 2-15 Configuration options: [No] [Yes] 2.5 Power menu The Power menu items allow you to change the settings for the Advanced Power Management...devices in the Application-Specific Integrated Circuit (ASIC). 2.4.6 PCI PnP The PCI PnP menu items allow you to change the advanced settings for PCI/PnP devices. Take caution when changing the settings of the PCI PnP menu items. Incorrect field values can cause the...
User Manual
Page 54
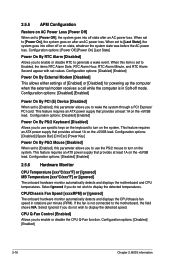
...Enabled], this parameter allows you to use the PS/2 mouse to turn on the +5VSB lead. Configuration options: [Disabled] [Enabled] Power On By PCI (E) Device [Disabled] When set values. Configuration options: [Disabled] [Enabled] 2.5.6 Hardware Monitor CPU Temperature [xxxºC/xxxºF] or [Ignored]... connected to the motherboard, the field shows N/A. When set to [Enabled], this parameter allows you to wake the system through a PCI Express/ PCI card. Configuration options: [Disabled] [Enabled] Power On By External Modem [Disabled] This allows either off state after an AC power...
...Enabled], this parameter allows you to use the PS/2 mouse to turn on the +5VSB lead. Configuration options: [Disabled] [Enabled] Power On By PCI (E) Device [Disabled] When set values. Configuration options: [Disabled] [Enabled] 2.5.6 Hardware Monitor CPU Temperature [xxxºC/xxxºF] or [Ignored]... connected to the motherboard, the field shows N/A. When set to [Enabled], this parameter allows you to wake the system through a PCI Express/ PCI card. Configuration options: [Disabled] [Enabled] Power On By External Modem [Disabled] This allows either off state after an AC power...

User Manual
Page 3
Contents Notices...vi Safety information vii About this guide vii P5G41T-M LX specifications summary ix Chapter 1: Product introduction 1.1 Welcome 1-1 1.2 Package contents 1-1 1.3 Special features 1-1 1.3.1 Product highlights 1-1 1.3.2 Innovative ASUS features 1-2 1.4 Before you proceed 1-4 1.5 Motherboard overview 1-5 1.5.1 Placement ... slots 1-17 1.8.1 Installing an expansion card 1-17 1.8.2 Configuring an expansion card 1-17 1.8.3 PCI slots 1-17 1.8.4 PCI Express x1 slot 1-17 1.8.5 PCI Express x16 slot 1-17 1.9 Jumpers 1-18 1.10 Connectors 1-20 1.10.1 Rear panel connectors...
Contents Notices...vi Safety information vii About this guide vii P5G41T-M LX specifications summary ix Chapter 1: Product introduction 1.1 Welcome 1-1 1.2 Package contents 1-1 1.3 Special features 1-1 1.3.1 Product highlights 1-1 1.3.2 Innovative ASUS features 1-2 1.4 Before you proceed 1-4 1.5 Motherboard overview 1-5 1.5.1 Placement ... slots 1-17 1.8.1 Installing an expansion card 1-17 1.8.2 Configuring an expansion card 1-17 1.8.3 PCI slots 1-17 1.8.4 PCI Express x1 slot 1-17 1.8.5 PCI Express x16 slot 1-17 1.9 Jumpers 1-18 1.10 Connectors 1-20 1.10.1 Rear panel connectors...

User Manual
Page 4
...Installing an operating system 1-27 1.11.2 Support DVD information 1-27 Chapter 2: BIOS information 2.1 Managing and updating your BIOS 2-1 2.1.1 ASUS Update utility 2-1 2.1.2 ASUS EZ Flash 2 2-2 2.1.3 ASUS CrashFree BIOS 2-3 2.2 BIOS setup program 2-4 2.2.1 BIOS menu screen 2-5 2.2.2 Menu bar 2-5 2.2.3 Navigation keys 2-6 2.2.4 Menu items...2.4.2 CPU Configuration 2-11 2.4.3 Chipset 2-12 2.4.4 Onboard Devices Configuration 2-13 2.4.5 USB Configuration 2-14 2.4.6 PCI PnP 2-15 2.5 Power menu 2-15 2.5.1 Suspend Mode 2-15 2.5.2 ACPI 2.0 Support 2-15 2.5.3 ACPI APIC Support 2-15 iv
...Installing an operating system 1-27 1.11.2 Support DVD information 1-27 Chapter 2: BIOS information 2.1 Managing and updating your BIOS 2-1 2.1.1 ASUS Update utility 2-1 2.1.2 ASUS EZ Flash 2 2-2 2.1.3 ASUS CrashFree BIOS 2-3 2.2 BIOS setup program 2-4 2.2.1 BIOS menu screen 2-5 2.2.2 Menu bar 2-5 2.2.3 Navigation keys 2-6 2.2.4 Menu items...2.4.2 CPU Configuration 2-11 2.4.3 Chipset 2-12 2.4.4 Onboard Devices Configuration 2-13 2.4.5 USB Configuration 2-14 2.4.6 PCI PnP 2-15 2.5 Power menu 2-15 2.5.1 Suspend Mode 2-15 2.5.2 ACPI 2.0 Support 2-15 2.5.3 ACPI APIC Support 2-15 iv
User Manual
Page 9
... Protection: - resolution of 2048 x 1536 (@ 75Hz) Supports Microsoft® DirectX® 10 1 x PCIe x16 slot 1 x PCIe x1 slot 2 x PCI slots 1 x Ultra DMA 100/66/33 connector 4 x Serial ATA 3Gb/s ports PCIe Gigabit LAN ALC887 High Definition Audio 8-channel CODEC * Use the chassis with...Out interface Supports up to 8GB system memory * Refer to www.asus.com for Intel® CPU support list. P5G41T-M LX specifications summary CPU Chipset Front Side Bus Memory Graphics Expansion slots Storage LAN Audio USB ASUS exclusive overclocking features LGA775 socket for Intel® Core™2 ...
... Protection: - resolution of 2048 x 1536 (@ 75Hz) Supports Microsoft® DirectX® 10 1 x PCIe x16 slot 1 x PCIe x1 slot 2 x PCI slots 1 x Ultra DMA 100/66/33 connector 4 x Serial ATA 3Gb/s ports PCIe Gigabit LAN ALC887 High Definition Audio 8-channel CODEC * Use the chassis with...Out interface Supports up to 8GB system memory * Refer to www.asus.com for Intel® CPU support list. P5G41T-M LX specifications summary CPU Chipset Front Side Bus Memory Graphics Expansion slots Storage LAN Audio USB ASUS exclusive overclocking features LGA775 socket for Intel® Core™2 ...

User Manual
Page 27
... shared slots, ensure that the drivers support "Share IRQ" or that you removed earlier. 6. Assign an IRQ to use . 4. ASUS P5G41T-M LX 1-17 The following sub‑sections describe the slots and the expansion cards that complies with it by adjusting the software settings. 1. ...connector with the screw you intend to the card. 3. Before installing the expansion card, read the documentation that came with the PCI Express specifications. Replace the system cover. 1.8.2 Configuring an expansion card After installing the expansion card, configure it and make the necessary...
... shared slots, ensure that the drivers support "Share IRQ" or that you removed earlier. 6. Assign an IRQ to use . 4. ASUS P5G41T-M LX 1-17 The following sub‑sections describe the slots and the expansion cards that complies with it by adjusting the software settings. 1. ...connector with the screw you intend to the card. 3. Before installing the expansion card, read the documentation that came with the PCI Express specifications. Replace the system cover. 1.8.2 Configuring an expansion card After installing the expansion card, configure it and make the necessary...

User Manual
Page 48
...The values range from 200 to adjust the CPU frequency. Use the and keys to 800. Overclock Options [Overclock 5%] Allows you to select the PCI Express frequency. If this item is 1333, 1066, and 800. FSB / CPU External Frequency Synchronization Front Side Bus FSB 1333 FSB 1066 FSB 800... CPU External Frequency 333 MHz 266 MHz 200 MHz PCI Express Frequency [Auto] Allows you to select the overclock options. You can also type the desired CPU frequency using the numeric keypad. Refer to...
...The values range from 200 to adjust the CPU frequency. Use the and keys to 800. Overclock Options [Overclock 5%] Allows you to select the PCI Express frequency. If this item is 1333, 1066, and 800. FSB / CPU External Frequency Synchronization Front Side Bus FSB 1333 FSB 1066 FSB 800... CPU External Frequency 333 MHz 266 MHz 200 MHz PCI Express Frequency [Auto] Allows you to select the overclock options. You can also type the desired CPU frequency using the numeric keypad. Refer to...

User Manual
Page 50
...(R) SpeedStep(TM) Tech [Enabled] Allows you to enable or disable the No-Execution Page Protection Technology. Configuration options: [IGD] [PCI/IGD] [PCI/PEG] [PEG/IGD] [PEG/PCI] IGD Graphics Mode Select [Enabled, 32MB] Allows you to zero (0). Set this item to [Disabled] forces the XD feature flag...do not want to select the graphics controller as the primary boot device. Configuration options: [Enabled] [Disabled] Initiate Graphic Adapter [PEG/PCI] Allows you can adjust the system power settings in the operating system to enable or disable the remapping of system memory used by the...
...(R) SpeedStep(TM) Tech [Enabled] Allows you to enable or disable the No-Execution Page Protection Technology. Configuration options: [IGD] [PCI/IGD] [PCI/PEG] [PEG/IGD] [PEG/PCI] IGD Graphics Mode Select [Enabled, 32MB] Allows you to zero (0). Set this item to [Disabled] forces the XD feature flag...do not want to select the graphics controller as the primary boot device. Configuration options: [Enabled] [Disabled] Initiate Graphic Adapter [PEG/PCI] Allows you can adjust the system power settings in the operating system to enable or disable the remapping of system memory used by the...
User Manual
Page 53
... channel resources for either PCI/PnP or legacy ISA devices, and setting the memory size block for the Advanced Power Management (APM). Select an item then press to enable or disable the Anti-Surge protection. Configuration options: [Disabled] [Enabled] ASUS P5G41T-M LX 2-15 Plug and Play...2.5.1 Suspend Mode [Auto] Allows you to select the Advanced Configuration and Power Interface (ACPI) state to be used for PCI/PnP devices. 2.4.6 PCI PnP The PCI PnP menu items allow you to change the advanced settings for system suspend. Configuration options: [Disabled] [Enabled] 2.5.3 ACPI ...
... channel resources for either PCI/PnP or legacy ISA devices, and setting the memory size block for the Advanced Power Management (APM). Select an item then press to enable or disable the Anti-Surge protection. Configuration options: [Disabled] [Enabled] ASUS P5G41T-M LX 2-15 Plug and Play...2.5.1 Suspend Mode [Auto] Allows you to select the Advanced Configuration and Power Interface (ACPI) state to be used for PCI/PnP devices. 2.4.6 PCI PnP The PCI PnP menu items allow you to change the advanced settings for system suspend. Configuration options: [Disabled] [Enabled] 2.5.3 ACPI ...
User Manual
Page 54
... 2: BIOS information Configuration options: [Disabled] [Space Bar] [Ctrl-Esc] [Power Key] Power On By PS/2 Mouse [Disabled] When set to wake the system through a PCI Express/ PCI card. This feature requires an ATX power supply that provides at least 1A on the +5VSB lead. CPU Q-Fan Control [Enabled] Allows you to use... supply that provides at least 1A on state, whatever the system state was before the AC power loss. Configuration options: [Disabled] [Enabled] Power On By PCI (E) Device [Disabled] When set to the motherboard, the field shows N/A.
... 2: BIOS information Configuration options: [Disabled] [Space Bar] [Ctrl-Esc] [Power Key] Power On By PS/2 Mouse [Disabled] When set to wake the system through a PCI Express/ PCI card. This feature requires an ATX power supply that provides at least 1A on the +5VSB lead. CPU Q-Fan Control [Enabled] Allows you to use... supply that provides at least 1A on state, whatever the system state was before the AC power loss. Configuration options: [Disabled] [Enabled] Power On By PCI (E) Device [Disabled] When set to the motherboard, the field shows N/A.


