User Manual
Page 7
Contact a qualified service technician or your dealer immediately. • To avoid short circuits, keep paper clips, screws, and staples away from connectors, slots, sockets and circuitry. • Avoid dust, humidity, and temperature extremes. Safety information Electrical safety • To prevent electric shock hazard, disconnect the power cable from the ...
Contact a qualified service technician or your dealer immediately. • To avoid short circuits, keep paper clips, screws, and staples away from connectors, slots, sockets and circuitry. • Avoid dust, humidity, and temperature extremes. Safety information Electrical safety • To prevent electric shock hazard, disconnect the power cable from the ...
User Manual
Page 9
...resolution of 4GB or more, Windows® 32-bit operating system may only recognize less than 3GB. P5G41C-M specifications summary CPU Chipset Front Side Bus Memory Graphics Expansion slots Storage LAN Audio USB LGA775 socket for Intel® Core™2 Quad / Core™2 Extreme / Core™2 Duo / Pentium...When you are using a Windows® 32-bit operating system. Integrated Intel® GMA X4500 GPU Supports HDMI with max. Supports up to www.asus.com for Intel® CPU support list. We recommend a maximum of 3GB system memory if you install a total memory of 2048 x 1536 (@...
...resolution of 4GB or more, Windows® 32-bit operating system may only recognize less than 3GB. P5G41C-M specifications summary CPU Chipset Front Side Bus Memory Graphics Expansion slots Storage LAN Audio USB LGA775 socket for Intel® Core™2 Quad / Core™2 Extreme / Core™2 Duo / Pentium...When you are using a Windows® 32-bit operating system. Integrated Intel® GMA X4500 GPU Supports HDMI with max. Supports up to www.asus.com for Intel® CPU support list. We recommend a maximum of 3GB system memory if you install a total memory of 2048 x 1536 (@...
User Manual
Page 14
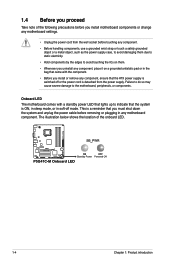
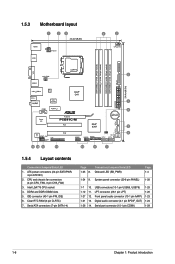
... shows the location of the following precautions before you install motherboard components or change any motherboard settings. • Unplug the power cord from the wall socket before removing or plugging in the bag that came with a standby power LED that lights up to avoid damaging them . • Whenever you install or...
... shows the location of the following precautions before you install motherboard components or change any motherboard settings. • Unplug the power cord from the wall socket before removing or plugging in the bag that came with a standby power LED that lights up to avoid damaging them . • Whenever you install or...
User Manual
Page 16
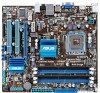
..., USB78) 1-29 1-12 11. Digital audio connector (4-1 pin SPDIF_OUT) 1-24 1-26 14. Front panel audio connector (10-1 pin AAFP) 1-23 1-21 13. Intel LGA775 CPU socket 4.
..., USB78) 1-29 1-12 11. Digital audio connector (4-1 pin SPDIF_OUT) 1-24 1-26 14. Front panel audio connector (10-1 pin AAFP) 1-23 1-21 13. Intel LGA775 CPU socket 4.
User Manual
Page 17
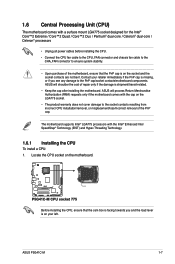
...) and Hyper-Threading Technology. 1.6.1 Installing the CPU To install a CPU: 1. ASUS P5G41C-M 1-7 ASUS will process Return Merchandise Authorization (RMA) requests only if the motherboard comes with the cap on the socket and the socket contacts are not bent. Locate the CPU socket on your left. ASUS will shoulder the cost of the PnP cap. Contact your retailer...
...) and Hyper-Threading Technology. 1.6.1 Installing the CPU To install a CPU: 1. ASUS P5G41C-M 1-7 ASUS will process Return Merchandise Authorization (RMA) requests only if the motherboard comes with the cap on the socket and the socket contacts are not bent. Locate the CPU socket on your left. ASUS will shoulder the cost of the PnP cap. Contact your retailer...

User Manual
Page 18
... angle (4A), then push the PnP cap from the retention tab. Position the CPU over the socket, ensuring that the gold triangle is released from the load plate window to the left corner of the arrow to the... socket pins, do not remove the PnP cap unless you are installing a CPU. 3. 2. Retention tab A B Load lever PnP... To prevent damage to a 135º angle. 4. Lift the load lever in the direction of the socket then fit the socket alignment key into the CPU notch.
... angle (4A), then push the PnP cap from the retention tab. Position the CPU over the socket, ensuring that the gold triangle is released from the load plate window to the left corner of the arrow to the... socket pins, do not remove the PnP cap unless you are installing a CPU. 3. 2. Retention tab A B Load lever PnP... To prevent damage to a 135º angle. 4. Lift the load lever in the direction of the socket then fit the socket alignment key into the CPU notch.

User Manual
Page 22
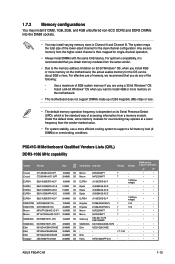
Rotate each fastener clockwise to ensure correct orientation when reinstalling. 1.7 System memory 1.7.1 Overview The motherboard comes with two Double Data Rate 2 (DDR2) and two Double Data Rate 3 (DDR3) Dual Inline Memory Modules (DIMM) sockets. Carefully remove the heatsink and fan assembly from the motherboard. 5. The figure illustrates the location of the DIMM sockets: Channel Channel A Channel B Sockets DDR3_A1 and DDR2_A1 DDR3_B1 and DDR2_B1 1-12 Chapter 1: Product introduction 4.
Rotate each fastener clockwise to ensure correct orientation when reinstalling. 1.7 System memory 1.7.1 Overview The motherboard comes with two Double Data Rate 2 (DDR2) and two Double Data Rate 3 (DDR3) Dual Inline Memory Modules (DIMM) sockets. Carefully remove the heatsink and fan assembly from the motherboard. 5. The figure illustrates the location of the DIMM sockets: Channel Channel A Channel B Sockets DDR3_A1 and DDR2_A1 DDR3_B1 and DDR2_B1 1-12 Chapter 1: Product introduction 4.
User Manual
Page 23
... 4GB or more memory on 32-bit Windows® OS, when you are using a 32-bit Windows® OS. - Timing Voltage DIMM socket support (Optional) A* B* Crucial CT12864BA1067.8FF 1024MB SS Micron 9GF22D9KPT 7 - • • Crucial CT25664BA1067.16FF 2048MB DS Micron 9HF22D9KPT 7 ...-BE 2048MB DS Elixir - - - • • Kingtiger 2GB DIMM PC3-8500 2048MB DS Hynix H5TQ1G83AFP G7C - - • • ASUS P5G41C-M 1-13 Install a 64-bit Windows® OS when you want to the memory address limitation on the motherboard, the actual usable memory for single-...
... 4GB or more memory on 32-bit Windows® OS, when you are using a 32-bit Windows® OS. - Timing Voltage DIMM socket support (Optional) A* B* Crucial CT12864BA1067.8FF 1024MB SS Micron 9GF22D9KPT 7 - • • Crucial CT25664BA1067.16FF 2048MB DS Micron 9HF22D9KPT 7 ...-BE 2048MB DS Elixir - - - • • Kingtiger 2GB DIMM PC3-8500 2048MB DS Hynix H5TQ1G83AFP G7C - - • • ASUS P5G41C-M 1-13 Install a 64-bit Windows® OS when you want to the memory address limitation on the motherboard, the actual usable memory for single-...
User Manual
Page 25
... 8-8-8-24 1.5V • • • • • • • • • • • • ASUS P5G41C-M 1-15 ELPIDA J1108BASE-DJ-E - Samsung K4B1G0846D-HCH9 - ASINT DDRII1208-DJ 0844 - Samsung K4B1G0846D-HCH9 - ELPIDA J1108BASE-DJ-E - - - 7-7-7-20... - - 7-7-7-20 Voltage 1.8V 1.65V(low voltage) 1.65V 1.85V 1.75V 1.65V 1.65V 1.60V - - - - - - - - DIMM socket support (Optional) A* B* • • • • • • • • • • • • • •...
... 8-8-8-24 1.5V • • • • • • • • • • • • ASUS P5G41C-M 1-15 ELPIDA J1108BASE-DJ-E - Samsung K4B1G0846D-HCH9 - ASINT DDRII1208-DJ 0844 - Samsung K4B1G0846D-HCH9 - ELPIDA J1108BASE-DJ-E - - - 7-7-7-20... - - 7-7-7-20 Voltage 1.8V 1.65V(low voltage) 1.65V 1.85V 1.75V 1.65V 1.65V 1.60V - - - - - - - - DIMM socket support (Optional) A* B* • • • • • • • • • • • • • •...

User Manual
Page 27
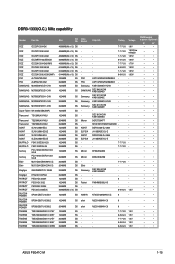
DIMM socket support (Optional) A* B* • • GEIL - 5 1.8V • • GEIL - 4 - • • GEIL - 5 - • • GEIL GL2L128M88BA25AB 5 - • •... E1108ACBG-8E-E 5 - • • V-Data VD29608A8A-25EG20813 - - • • Samsung K4T51083QE - - • • Hynix H5PS1G83EFRS6C 852AK - - • • ASUS P5G41C-M 1-17 GEIL - DDR2-800 MHz capability Vendor Part No. Timing 5 Voltage - Size SS/ DS GEIL GE24GB800C5QC 1024MB DS GEIL GX22GB6400DC 1024MB DS GEIL GX22GB6400UDC 1024MB...
DIMM socket support (Optional) A* B* • • GEIL - 5 1.8V • • GEIL - 4 - • • GEIL - 5 - • • GEIL GL2L128M88BA25AB 5 - • •... E1108ACBG-8E-E 5 - • • V-Data VD29608A8A-25EG20813 - - • • Samsung K4T51083QE - - • • Hynix H5PS1G83EFRS6C 852AK - - • • ASUS P5G41C-M 1-17 GEIL - DDR2-800 MHz capability Vendor Part No. Timing 5 Voltage - Size SS/ DS GEIL GE24GB800C5QC 1024MB DS GEIL GX22GB6400DC 1024MB DS GEIL GX22GB6400UDC 1024MB...

User Manual
Page 28
... TX1066QLU-2GK Transcend TX1066QLU-4GK 2048MB(kit of 2) SS 4096MB(kit of dual-channel memory configuration. Heat-Sink Package - GL2L128M88BA18BW GL2L128M88BA25AB GL2L128M88BA25AB - Visit the ASUS website at www.asus.com for the latest QVL. 1-18 Chapter 1: Product introduction Heat-Sink Package - - - - - 2.2V - - 5-5-5-15 2.2V - - 5-5-5-15 21.V - - 6-7-7-20 2.2V - - - 2.2V PSC A3R1GE3FGF907MAT0FTAIWANG8E 5-5-5-12...
... TX1066QLU-2GK Transcend TX1066QLU-4GK 2048MB(kit of 2) SS 4096MB(kit of dual-channel memory configuration. Heat-Sink Package - GL2L128M88BA18BW GL2L128M88BA25AB GL2L128M88BA25AB - Visit the ASUS website at www.asus.com for the latest QVL. 1-18 Chapter 1: Product introduction Heat-Sink Package - - - - - 2.2V - - 5-5-5-15 2.2V - - 5-5-5-15 21.V - - 6-7-7-20 2.2V - - - 2.2V PSC A3R1GE3FGF907MAT0FTAIWANG8E 5-5-5-12...
User Manual
Page 29
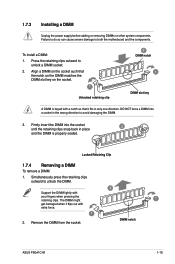
...the notch on the DIMM matches the DIMM slot key on the socket. 1 Unlocked retaining clip 2 DIMM notch 1 DIMM slot key A DIMM is properly seated. Locked Retaining Clip 1.7.4 Removing a DIMM To remove a DIMM: 1. DIMM notch ASUS P5G41C-M 1-19 The DIMM might 1 get damaged when it fits ... a DIMM Unplug the power supply before adding or removing DIMMs or other system components. Simultaneously press the retaining clips outward to unlock a DIMM socket. 2. To install a DIMM: 1. Press the retaining clips outward to unlock the DIMM. 2 Support the DIMM lightly with extra force. 1 2....
...the notch on the DIMM matches the DIMM slot key on the socket. 1 Unlocked retaining clip 2 DIMM notch 1 DIMM slot key A DIMM is properly seated. Locked Retaining Clip 1.7.4 Removing a DIMM To remove a DIMM: 1. DIMM notch ASUS P5G41C-M 1-19 The DIMM might 1 get damaged when it fits ... a DIMM Unplug the power supply before adding or removing DIMMs or other system components. Simultaneously press the retaining clips outward to unlock a DIMM socket. 2. To install a DIMM: 1. Press the retaining clips outward to unlock the DIMM. 2 Support the DIMM lightly with extra force. 1 2....


