
User Manual
Page 4
... connectors 1-22 1.11 Software support 1-28 1.11.1 Installing an operating system 1-28 1.11.2 Support DVD information 1-28 Chapter 2 BIOS information 2.1 Managing and updating your BIOS 2-1 2.1.1 ASUS Update utility 2-1 2.1.2 ASUS EZ Flash 2 utility 2-2 2.1.3 ASUS CrashFree BIOS 3 utility 2-3 2.2 BIOS setup program 2-4 2.2.1 BIOS menu screen 2-5 2.2.2 Menu bar 2-5 2.2.3 Navigation keys 2-6 2.2.4 Menu items 2-6 2.2.5 Submenu items 2-6 2.2.6 Configuration fields 2-6 2.2.7 Pop-up window 2-6 2.2.8 Scroll bar 2-6 2.2.9 General...
... connectors 1-22 1.11 Software support 1-28 1.11.1 Installing an operating system 1-28 1.11.2 Support DVD information 1-28 Chapter 2 BIOS information 2.1 Managing and updating your BIOS 2-1 2.1.1 ASUS Update utility 2-1 2.1.2 ASUS EZ Flash 2 utility 2-2 2.1.3 ASUS CrashFree BIOS 3 utility 2-3 2.2 BIOS setup program 2-4 2.2.1 BIOS menu screen 2-5 2.2.2 Menu bar 2-5 2.2.3 Navigation keys 2-6 2.2.4 Menu items 2-6 2.2.5 Submenu items 2-6 2.2.6 Configuration fields 2-6 2.2.7 Pop-up window 2-6 2.2.8 Scroll bar 2-6 2.2.9 General...

User Manual
Page 8
...package may include optional documentation, such as warranty flyers, that you need when installing and configuring the motherboard. Used to the ASUS contact information. 2. Detailed descriptions of the BIOS parameters are not part of the motherboard and the new technology it supports. • Chapter... 2: BIOS information This chapter tells how to change system settings through the BIOS Setup menus. Refer to emphasize a word or a phrase. Keys enclosed in this guide To make sure that you must...
...package may include optional documentation, such as warranty flyers, that you need when installing and configuring the motherboard. Used to the ASUS contact information. 2. Detailed descriptions of the BIOS parameters are not part of the motherboard and the new technology it supports. • Chapter... 2: BIOS information This chapter tells how to change system settings through the BIOS Setup menus. Refer to emphasize a word or a phrase. Keys enclosed in this guide To make sure that you must...

User Manual
Page 9
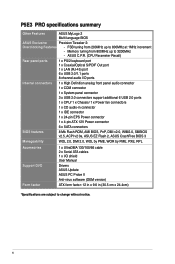
... x1 slots 2 x PCI slots Southbridge - 6 x SATA 3.0 Gb/s ports - ASUS EPU (Energy Processing Unit) - Profile - ASUS 3rd Generation 8-phase Power ASUS Quiet Thermal Solution - ASUS CrashFree BIOS 3 - Coaxial/Optical S/PDIF output 12 x USB 2.0/1.1 ports (6 ports at mid-...asus.com for Intel® CPU support list) Northbridge: Intel® X48 Southbridge: Intel® ICH9R with Intel® Extreme Memory Profiles Technology 1600/1333/1066/800MHz Dual-channel memory architecture - 4 x 240-pin DIMM sockets support unbuffered non-ECC DDR3 1600/1333/1066/800MHz memory modules - P5E3 PRO...
... x1 slots 2 x PCI slots Southbridge - 6 x SATA 3.0 Gb/s ports - ASUS EPU (Energy Processing Unit) - Profile - ASUS 3rd Generation 8-phase Power ASUS Quiet Thermal Solution - ASUS CrashFree BIOS 3 - Coaxial/Optical S/PDIF output 12 x USB 2.0/1.1 ports (6 ports at mid-...asus.com for Intel® CPU support list) Northbridge: Intel® X48 Southbridge: Intel® ICH9R with Intel® Extreme Memory Profiles Technology 1600/1333/1066/800MHz Dual-channel memory architecture - 4 x 240-pin DIMM sockets support unbuffered non-ECC DDR3 1600/1333/1066/800MHz memory modules - P5E3 PRO...
User Manual
Page 10
...pin EPS Power connector 1 x 4-pin ATX 12V Power connector 6 x SATA connectors BIOS features 8 Mb Flash ROM, AMI BIOS, PnP, DMI v2.0, WfM2.0, SMBIOS v2.5, ACPI v2 0a, ASUS EZ Flash 2, ASUS CrashFree BIOS 3 Manageability WOL 2.0, DMI 2.0, WOL by PME, WOR by PME, PXE, ... I/O shield User Manual Drivers ASUS Update ASUS PC Probe II Anti-virus software (OEM version) ATX form factor: 12 in x 9.6 in (30.5 cm x 24.4cm) *Specifications are subject to 3200MHz - P5E3 PRO specifications summary Other Features ASUS MyLogo 2 Multi-language BIOS ASUS Exclusive Precision Tweaker 2: Overclocking ...
...pin EPS Power connector 1 x 4-pin ATX 12V Power connector 6 x SATA connectors BIOS features 8 Mb Flash ROM, AMI BIOS, PnP, DMI v2.0, WfM2.0, SMBIOS v2.5, ACPI v2 0a, ASUS EZ Flash 2, ASUS CrashFree BIOS 3 Manageability WOL 2.0, DMI 2.0, WOL by PME, WOR by PME, PXE, ... I/O shield User Manual Drivers ASUS Update ASUS PC Probe II Anti-virus software (OEM version) ATX form factor: 12 in x 9.6 in (30.5 cm x 24.4cm) *Specifications are subject to 3200MHz - P5E3 PRO specifications summary Other Features ASUS MyLogo 2 Multi-language BIOS ASUS Exclusive Precision Tweaker 2: Overclocking ...

User Manual
Page 13
... to system load and temperature, enabling users to restore a corrupted BIOS file using an OS-based utility. It has the advantages of high power stress. ASUS P5E3 PRO 1-3 ASUS EPU The ASUS EPU (Energy Processing Unit) provides total system power management by yourself.... The Heat Pipe design is an auto-recovery tool that contains the latest BIOS file. 1.3.2 Innovative ASUS features ASUS MyLogo2™ Turn your system. ASUS CrashFree BIOS 3 ASUS CrashFree BIOS 3...
... to system load and temperature, enabling users to restore a corrupted BIOS file using an OS-based utility. It has the advantages of high power stress. ASUS P5E3 PRO 1-3 ASUS EPU The ASUS EPU (Energy Processing Unit) provides total system power management by yourself.... The Heat Pipe design is an auto-recovery tool that contains the latest BIOS file. 1.3.2 Innovative ASUS features ASUS MyLogo2™ Turn your system. ASUS CrashFree BIOS 3 ASUS CrashFree BIOS 3...

User Manual
Page 14
...immediately after bootup, you configure your choice from SATA HDDs, ODDs, and USB drives. ASUS Multi-language BIOS The multi-language BIOS allows you to 70% of the total time taken. The localized BIOS setup menu helps you can be stored in 0.02v steps to finetune voltages to http...://support.asus.com for the ultimate customized overclocking configuration. 1-4 Chapter 1: Product introduction Five seconds after turning on the system, and ...
...immediately after bootup, you configure your choice from SATA HDDs, ODDs, and USB drives. ASUS Multi-language BIOS The multi-language BIOS allows you to 70% of the total time taken. The localized BIOS setup menu helps you can be stored in 0.02v steps to finetune voltages to http...://support.asus.com for the ultimate customized overclocking configuration. 1-4 Chapter 1: Product introduction Five seconds after turning on the system, and ...

User Manual
Page 15
... to open the system chassis and clear the RTC data. Green ASUS This motherboard and its packaging comply with the ASUS vision of Hazardous Substances (RoHS). eliminates the need to overclocking failure. ASUS P5E3 PRO 1-5 Simply shut down and reboot the system, and the BIOS automatically restores the CPU parameters to safeguard consumers' health while minimizing...
... to open the system chassis and clear the RTC data. Green ASUS This motherboard and its packaging comply with the ASUS vision of Hazardous Substances (RoHS). eliminates the need to overclocking failure. ASUS P5E3 PRO 1-5 Simply shut down and reboot the system, and the BIOS automatically restores the CPU parameters to safeguard consumers' health while minimizing...

User Manual
Page 18
... 1200 CD AAFP PCI2 PCI1 11 13 12 1.5.4 Layout contents Connectors/Jumpers/Slots 1. Serial ATA connectors [red] (7-pin SATA1-6) P5E3 PRO 6 ® Marvell 88SE6111 Intel® ICH9R SATA1 SATA2 Lithium Cell CMOS Power 8Mb BIOS USB910 USB78 SATA3 SATA4 7 SATA6 SATA5 PWR_FAN 8 CLRTC SB_PWR PANEL 11 3 10 9 Page Connectors/Jumpers/Slots 1-23 8. Optical...
... 1200 CD AAFP PCI2 PCI1 11 13 12 1.5.4 Layout contents Connectors/Jumpers/Slots 1. Serial ATA connectors [red] (7-pin SATA1-6) P5E3 PRO 6 ® Marvell 88SE6111 Intel® ICH9R SATA1 SATA2 Lithium Cell CMOS Power 8Mb BIOS USB910 USB78 SATA3 SATA4 7 SATA6 SATA5 PWR_FAN 8 CLRTC SB_PWR PANEL 11 3 10 9 Page Connectors/Jumpers/Slots 1-23 8. Optical...
User Manual
Page 26
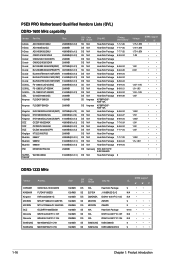
...Package Heat-Sink Package Heat-Sink Package Heat-Sink Package Heat-Sink Package DS Samsung SEC 825 HCFO K4B1G0846D DS N/A Heat-Sink Package "Timing Dimm(Bios)" 7-7-7-20 7-7-7-20 7-7-7-20 9-9-9-24 8-8-8-24 9-9-9-28 8-8-8-24 8-8-8-24 8-8-8-24 9-9-9-24 8-8-8-21 9-9-9-24 8-8-8-28 8-8-8-24 9-9-9-27 8-8-8-24 7-7-6-24 ...1024MB 2048MB 1024MB 1024MB 2048MB 1024MB 1024MB SS/ Chip DS Brand Chip No. WA160UX6G9 TALENT 6144MB(Kit of 3) 2048MB SUPER- P5E3 PRO Motherboard Qualified Vendors Lists (QVL) DDR3-1600 MHz capability Vendor Part No. Size A-Data A-Data A-Data Corsair Corsair Corsair ...
...Package Heat-Sink Package Heat-Sink Package Heat-Sink Package Heat-Sink Package DS Samsung SEC 825 HCFO K4B1G0846D DS N/A Heat-Sink Package "Timing Dimm(Bios)" 7-7-7-20 7-7-7-20 7-7-7-20 9-9-9-24 8-8-8-24 9-9-9-28 8-8-8-24 8-8-8-24 8-8-8-24 9-9-9-24 8-8-8-21 9-9-9-24 8-8-8-28 8-8-8-24 9-9-9-27 8-8-8-24 7-7-6-24 ...1024MB 2048MB 1024MB 1024MB 2048MB 1024MB 1024MB SS/ Chip DS Brand Chip No. WA160UX6G9 TALENT 6144MB(Kit of 3) 2048MB SUPER- P5E3 PRO Motherboard Qualified Vendors Lists (QVL) DDR3-1600 MHz capability Vendor Part No. Size A-Data A-Data A-Data Corsair Corsair Corsair ...

User Manual
Page 29
.... 2. Assign an IRQ to use . 4. Install the software drivers for information on the system and change the necessary BIOS settings, if any. ASUS P5E3 PRO 1-19 Replace the system cover. 1.8.2 Configuring an expansion card After installing the expansion card, configure it and make the ...necessary hardware settings for later use . Turn on BIOS setup. 2. Align the card connector with the screw you removed earlier. 6. 1.8 ...
.... 2. Assign an IRQ to use . 4. Install the software drivers for information on the system and change the necessary BIOS settings, if any. ASUS P5E3 PRO 1-19 Replace the system cover. 1.8.2 Configuring an expansion card After installing the expansion card, configure it and make the ...necessary hardware settings for later use . Turn on BIOS setup. 2. Align the card connector with the screw you removed earlier. 6. 1.8 ...

User Manual
Page 30
... cap from pins 1-2 (default) to overclocking. Shut down the key during the boot process and enter BIOS setup to clear the CMOS RTC RAM data. P5E3 PRO CLRTC 12 23 Normal (Default) P5E3 PRO Clear RTC RAM Clear RTC To erase the RTC RAM: 1. You can clear the CMOS memory of ...move the cap back to the chipset limitation, AC power off and on CLRTC jumper default position. Hold down and reboot the system, then the BIOS automatically resets parameter settings to default values. • Due to pins 1-2. 3. Removing the cap will cause system boot failure! • If ...
... cap from pins 1-2 (default) to overclocking. Shut down the key during the boot process and enter BIOS setup to clear the CMOS RTC RAM data. P5E3 PRO CLRTC 12 23 Normal (Default) P5E3 PRO Clear RTC RAM Clear RTC To erase the RTC RAM: 1. You can clear the CMOS memory of ...move the cap back to the chipset limitation, AC power off and on CLRTC jumper default position. Hold down and reboot the system, then the BIOS automatically resets parameter settings to default values. • Due to pins 1-2. 3. Removing the cap will cause system boot failure! • If ...

User Manual
Page 36
7. PWR Ground Reset Ground PANEL PIN 1 P5E3 PRO IDE_LED PWRSW RESET * Requires an ATX power supply P5E3 PRO System panel connector • System power LED (2-pin PLED) This 2-pin connector is for the chassis-mounted system warning speaker. The system power LED lights ... beeps and warnings. • ATX power button/soft-off button (2-pin PWRSW) This connector is for system reboot without turning off mode depending on the BIOS settings. The speaker allows you turn on or puts the system in sleep mode. • Hard disk drive activity LED (2-pin IDE_LED) This 2-pin connector...
7. PWR Ground Reset Ground PANEL PIN 1 P5E3 PRO IDE_LED PWRSW RESET * Requires an ATX power supply P5E3 PRO System panel connector • System power LED (2-pin PLED) This 2-pin connector is for the chassis-mounted system warning speaker. The system power LED lights ... beeps and warnings. • ATX power button/soft-off button (2-pin PWRSW) This connector is for system reboot without turning off mode depending on the BIOS settings. The speaker allows you turn on or puts the system in sleep mode. • Hard disk drive activity LED (2-pin IDE_LED) This 2-pin connector...

User Manual
Page 37
...- USB+5V USB+5V USB_P8USB_P8+ GND NC NC GND USB+5V P5E3 PRO USB910 PIN 1 USB78 PIN 1 USB+5V USB_P7USB_P7+ GND USB+5V USB_P9USB_P9+ GND P5E3 PRO USB2.0 connectors Never connect a 1394 cable to [HD Audio]. See...BIOS setup to the USB connectors. GND PRESENCE# SENSE1_RETUR SENSE2_RETUR AGND NC NC NC MIC2 MICPWR Line out_R NC Line out_L PORT1 L PORT1 R PORT2 R SENSE_SEND PORT2 L P5E3 PRO AAFP PIN 1 PIN 1 HD-audio-compliant pin definition P5E3 PRO Analog front panel connector Legacy AC'97 compliant definition • We recommend that supports up to [AC97]. ASUS P5E3 PRO...
...- USB+5V USB+5V USB_P8USB_P8+ GND NC NC GND USB+5V P5E3 PRO USB910 PIN 1 USB78 PIN 1 USB+5V USB_P7USB_P7+ GND USB+5V USB_P9USB_P9+ GND P5E3 PRO USB2.0 connectors Never connect a 1394 cable to [HD Audio]. See...BIOS setup to the USB connectors. GND PRESENCE# SENSE1_RETUR SENSE2_RETUR AGND NC NC NC MIC2 MICPWR Line out_R NC Line out_L PORT1 L PORT1 R PORT2 R SENSE_SEND PORT2 L P5E3 PRO AAFP PIN 1 PIN 1 HD-audio-compliant pin definition P5E3 PRO Analog front panel connector Legacy AC'97 compliant definition • We recommend that supports up to [AC97]. ASUS P5E3 PRO...

User Manual
Page 39
... in the optical drive. Click the Utilities tab, then click Install ASUS Update. 3. Chapter 2 BIOS information 2.1 Managing and updating your BIOS Save a copy of the updating process: ASUS P5E3 PRO 2-1 Place the support DVD in case you update the BIOS using the ASUS Update utility. 2.1.1 ASUS Update utility The ASUS Update is available in the future. The Drivers menu appears...
... in the optical drive. Click the Utilities tab, then click Install ASUS Update. 3. Chapter 2 BIOS information 2.1 Managing and updating your BIOS Save a copy of the updating process: ASUS P5E3 PRO 2-1 Place the support DVD in case you update the BIOS using the ASUS Update utility. 2.1.1 ASUS Update utility The ASUS Update is available in the future. The Drivers menu appears...

User Manual
Page 40
...Follow the onscreen instructions to complete the updating process. 2.1.2 ASUS EZ Flash 2 utility The ASUS EZ Flash 2 feature allows you to display the following: ASUSTek EZ Flash 2 BIOS ROM Utility V3.38 FLASH TYPE: MXIC 25L8005 Current ROM BOARD: P5E3-PRO VER: 0302 DATE: 05/21/2009 Update ROM BOARD...: Unknown VER: Unknown DATE: Unknown PATH: A:\ A: Note [Enter] Select or Load [Up/Down/Home/End] Move [Tab] Switch [B] Backup [V] Drive Info [ESC] Exit 2-2 Chapter 2: BIOS information Insert the USB flash...
...Follow the onscreen instructions to complete the updating process. 2.1.2 ASUS EZ Flash 2 utility The ASUS EZ Flash 2 feature allows you to display the following: ASUSTek EZ Flash 2 BIOS ROM Utility V3.38 FLASH TYPE: MXIC 25L8005 Current ROM BOARD: P5E3-PRO VER: 0302 DATE: 05/21/2009 Update ROM BOARD...: Unknown VER: Unknown DATE: Unknown PATH: A:\ A: Note [Enter] Select or Load [Up/Down/Home/End] Move [Tab] Switch [B] Backup [V] Drive Info [ESC] Exit 2-2 Chapter 2: BIOS information Insert the USB flash...
User Manual
Page 41
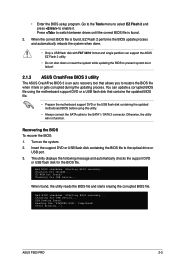
... or USB flash disk for USB Device... Bad BIOS checksum. Checking for the BIOS file. Checking for CD-ROM... Starting BIOS recovery... Bad BIOS checksum. Starting BIOS recovery... Otherwise, the utility will not function. Checking for USB Device... Start Erasing...\ ASUS P5E3 PRO 2-3 Turn on the system. 2. • Enter the BIOS setup program. USB Device found , the utility reads...
... or USB flash disk for USB Device... Bad BIOS checksum. Checking for the BIOS file. Checking for CD-ROM... Starting BIOS recovery... Bad BIOS checksum. Starting BIOS recovery... Otherwise, the utility will not function. Checking for USB Device... Start Erasing...\ ASUS P5E3 PRO 2-3 Turn on the system. 2. • Enter the BIOS setup program. USB Device found , the utility reads...

User Manual
Page 42
... in the CMOS RAM of your data or system. When you start up the computer, the system provides you can support ASUS CrashFree BIOS 3. Otherwise, POST continues with FAT 32/16 format and single partition can update using the provided utility described in section "2.1...DO NOT shut down the system properly from the ASUS website at www.asus.com. 2.2 BIOS setup program This motherboard supports a programmable Serial Peripheral Interface (SPI) chip that the computer can change the power management settings. Download the latest BIOS file from the operating system. Press during the...
... in the CMOS RAM of your data or system. When you start up the computer, the system provides you can support ASUS CrashFree BIOS 3. Otherwise, POST continues with FAT 32/16 format and single partition can update using the provided utility described in section "2.1...DO NOT shut down the system properly from the ASUS website at www.asus.com. 2.2 BIOS setup program This motherboard supports a programmable Serial Peripheral Interface (SPI) chip that the computer can change the power management settings. Download the latest BIOS file from the operating system. Press during the...

User Manual
Page 43
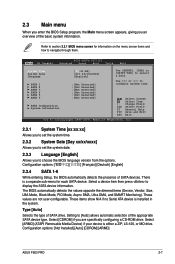
.... If the system becomes unstable after changing any BIOS settings, load the default settings to configure system Time. Submenu items Navigation keys 2.2.2 Menu bar The menu bar on the keyboard until the desired item is highlighted. ASUS P5E3 PRO 2-5 Boot For changing the system boot configuration. ...reference purposes only, and may not exactly match what you see on your screen. • Visit the ASUS website at www.asus.com to download the latest BIOS file for most conditions to ensure optimum performance. Power For changing the advanced power management (APM) configuration....
.... If the system becomes unstable after changing any BIOS settings, load the default settings to configure system Time. Submenu items Navigation keys 2.2.2 Menu bar The menu bar on the keyboard until the desired item is highlighted. ASUS P5E3 PRO 2-5 Boot For changing the system boot configuration. ...reference purposes only, and may not exactly match what you see on your screen. • Visit the ASUS website at www.asus.com to download the latest BIOS file for most conditions to ensure optimum performance. Power For changing the advanced power management (APM) configuration....
User Manual
Page 44
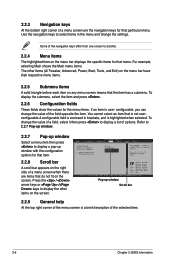
...triangle before each item on the screen. Press the / arrow keys or / keys to display a list of the selected item. 2-6 Chapter 2: BIOS information Use [+] or [-] to select a field. Use the navigation keys to display a pop-up window Scroll bar 2.2.9 General help At the top...configuration options for the menu items. If an item is highlighted when selected. configurable, you can change the settings. Main Ai Tweaker BIOS SETUP UTILITY Advanced Power Boot Tools Exit Suspend Mode ACPI 2.0 Support ACPI APIC support APM Configuration Hardware Monitor [Auto] [Disabled] [...
...triangle before each item on the screen. Press the / arrow keys or / keys to display a list of the selected item. 2-6 Chapter 2: BIOS information Use [+] or [-] to select a field. Use the navigation keys to display a pop-up window Scroll bar 2.2.9 General help At the top...configuration options for the menu items. If an item is highlighted when selected. configurable, you can change the settings. Main Ai Tweaker BIOS SETUP UTILITY Advanced Power Boot Tools Exit Suspend Mode ACPI 2.0 Support ACPI APIC support APM Configuration Hardware Monitor [Auto] [Disabled] [...
User Manual
Page 45
... [-] to display the SATA device information. Configuration options Français] [Deutsch] [English] 2.3.4 SATA 1-6 While entering Setup, the BIOS automatically detects the presence of the appropriate SATA device type. There is a separate sub-menu for information on the menu screen items and ... [ENTER], [TAB] or [SHIFT-TAB] to section 2.2.1 BIOS menu screen for each SATA device. Type [Auto] Selects the type of the basic system information. Configuration options: [Not Installed] [Auto] [CDROM] [ARMD] ASUS P5E3 PRO 2-7 Change Field Tab Select Field F1 General Help F10 Save and...
... [-] to display the SATA device information. Configuration options Français] [Deutsch] [English] 2.3.4 SATA 1-6 While entering Setup, the BIOS automatically detects the presence of the appropriate SATA device type. There is a separate sub-menu for information on the menu screen items and ... [ENTER], [TAB] or [SHIFT-TAB] to section 2.2.1 BIOS menu screen for each SATA device. Type [Auto] Selects the type of the basic system information. Configuration options: [Not Installed] [Auto] [CDROM] [ARMD] ASUS P5E3 PRO 2-7 Change Field Tab Select Field F1 General Help F10 Save and...


