
P4U800-X user's manual for English Version
Page 3
... guide vii Conventions used in this guide vii Where to find more information vii P4U800-X specification summary viii Chapter 1: Product introduction 1.1 Welcome 1-2 1.2 Package contents 1-2 1.3 Special features 1-2 1.4 Before you proceed 1-4 1.5 Motherboard overview 1-5 1.5.1 Motherboard layout 1-5 1.5.2 Placement direction 1-6 1.5.3 Screw holes 1-6 1.6 Central Processing Unit (CPU 1-7 1.6.1 Overview 1-7 1.6.2 Installing the CPU 1-8 1.7 System memory 1-9 1.7.1 DIMM sockets location 1-9 1.7.2 Memory configurations...
... guide vii Conventions used in this guide vii Where to find more information vii P4U800-X specification summary viii Chapter 1: Product introduction 1.1 Welcome 1-2 1.2 Package contents 1-2 1.3 Special features 1-2 1.4 Before you proceed 1-4 1.5 Motherboard overview 1-5 1.5.1 Motherboard layout 1-5 1.5.2 Placement direction 1-6 1.5.3 Screw holes 1-6 1.6 Central Processing Unit (CPU 1-7 1.6.1 Overview 1-7 1.6.2 Installing the CPU 1-8 1.7 System memory 1-9 1.7.1 DIMM sockets location 1-9 1.7.2 Memory configurations...

P4U800-X user's manual for English Version
Page 4
...updating your BIOS 2-2 2.1.1 Creating a bootable floppy disk 2-2 2.1.2 Updating the BIOS with EZ Flash feature 2-3 2.1.3 Recovering the BIOS with CrashFree BIOS .......... 2-4 2.1.4 ASUS Update 2-5 2.2 BIOS Setup program 2-7 2.2.1 BIOS menu screen 2-8 2.2.2 Menu bar 2-8 2.2.3 Legend bar 2-9 2.2.4 General help 2-9 2.2.5 Sub-menu 2-9 2.2.6 Pop...23 2.5.2 Hardware Monitor 2-25 2.6 Boot menu 2-26 2.7 Exit menu 2-28 Chapter 3: Software support 3.1 Install an operating system 3-2 3.2 Support CD information 3-2 3.2.1 Running the support CD 3-2 3.2.2 Drivers menu 3-3 3.2.3 Utilities menu...
...updating your BIOS 2-2 2.1.1 Creating a bootable floppy disk 2-2 2.1.2 Updating the BIOS with EZ Flash feature 2-3 2.1.3 Recovering the BIOS with CrashFree BIOS .......... 2-4 2.1.4 ASUS Update 2-5 2.2 BIOS Setup program 2-7 2.2.1 BIOS menu screen 2-8 2.2.2 Menu bar 2-8 2.2.3 Legend bar 2-9 2.2.4 General help 2-9 2.2.5 Sub-menu 2-9 2.2.6 Pop...23 2.5.2 Hardware Monitor 2-25 2.6 Boot menu 2-26 2.7 Exit menu 2-28 Chapter 3: Software support 3.1 Install an operating system 3-2 3.2 Support CD information 3-2 3.2.1 Running the support CD 3-2 3.2.2 Drivers menu 3-3 3.2.3 Utilities menu...

P4U800-X user's manual for English Version
Page 5
... and • This device must accept any interference received including interference that interference will not occur in a residential installation. These limits are designed to comply with manufacturer's instructions, may cause undesired operation. Operation is no guarantee that... FCC Rules. This equipment has been tested and found to provide reasonable protection against harmful interference in a particular installation. Notices Federal Communications Commission Statement This device complies with Part 15 of Communications Statement This digital apparatus does not ...
... and • This device must accept any interference received including interference that interference will not occur in a residential installation. These limits are designed to comply with manufacturer's instructions, may cause undesired operation. Operation is no guarantee that... FCC Rules. This equipment has been tested and found to provide reasonable protection against harmful interference in a particular installation. Notices Federal Communications Commission Statement This device complies with Part 15 of Communications Statement This digital apparatus does not ...

P4U800-X user's manual for English Version
Page 6
... power cables from the existing system before you encounter technical problems with the product, contact a qualified service technician or your retailer. Operation safety • Before installing the motherboard and adding devices on a stable surface. • If you add a device. • Before connecting or removing signal cables from the motherboard, ensure that...
... power cables from the existing system before you encounter technical problems with the product, contact a qualified service technician or your retailer. Operation safety • Before installing the motherboard and adding devices on a stable surface. • If you add a device. • Before connecting or removing signal cables from the motherboard, ensure that...

P4U800-X user's manual for English Version
Page 12
The Pentium 4 processor with the list below. 1.2 Package contents Check your P4U800-X package for the following items. ASUS P4U800-X motherboard ASUS motherboard support CD 1 x UltraDMA 100/66 cable 1 x Floppy disk cable I/O shield Bag of extra jumper caps User Guide If any... allows up to 6.4GB/s data transfer rates. Thank you start installing the motherboard, and hardware devices on it another standout in the long line of up to 3.2+ GHz core frequencies for buying the ASUS® P4U800-X motherboard! The ASUS P4U800-X motherboard, based on 0.13 micron processor includes a 800/533/...
The Pentium 4 processor with the list below. 1.2 Package contents Check your P4U800-X package for the following items. ASUS P4U800-X motherboard ASUS motherboard support CD 1 x UltraDMA 100/66 cable 1 x Floppy disk cable I/O shield Bag of extra jumper caps User Guide If any... allows up to 6.4GB/s data transfer rates. Thank you start installing the motherboard, and hardware devices on it another standout in the long line of up to 3.2+ GHz core frequencies for buying the ASUS® P4U800-X motherboard! The ASUS P4U800-X motherboard, based on 0.13 micron processor includes a 800/533/...
P4U800-X user's manual for English Version
Page 14
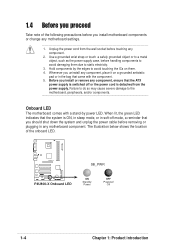
... and unplug the power cable before removing or plugging in any motherboard settings. 1. Before you install or remove any component, ensure that the ATX power supply is detached from the wall socket before touching any component. 2. P4U800-X ® P4U800-X Onboard LED SB_PWR ON Standby Power OFF Powered Off 1-4 Chapter 1: Product introduction Onboard LED...
... and unplug the power cable before removing or plugging in any motherboard settings. 1. Before you install or remove any component, ensure that the ATX power supply is detached from the wall socket before touching any component. 2. P4U800-X ® P4U800-X Onboard LED SB_PWR ON Standby Power OFF Powered Off 1-4 Chapter 1: Product introduction Onboard LED...

P4U800-X user's manual for English Version
Page 16
Place this side towards the rear of the chassis as indicated in the image below. 1.5.3 Screw holes Place seven (7) screws into the chassis in the correct orientation. 1.5.2 Placement direction When installing the motherboard, make sure that you place it into the holes indicated by circles to secure the motherboard to the rear part of the chassis 1-6 Chapter 1: Product introduction Doing so may damage the motherboard. Do not overtighten the screws! The edge with external ports goes to the chassis.
Place this side towards the rear of the chassis as indicated in the image below. 1.5.3 Screw holes Place seven (7) screws into the chassis in the correct orientation. 1.5.2 Placement direction When installing the motherboard, make sure that you place it into the holes indicated by circles to secure the motherboard to the rear part of the chassis 1-6 Chapter 1: Product introduction Doing so may damage the motherboard. Do not overtighten the screws! The edge with external ports goes to the chassis.

P4U800-X user's manual for English Version
Page 17
... the BIOS setup (See Chapter 2: BIOS Information). ASUS P4U800-X motherboard 1-7 1.6 Central Processing Unit (CPU) 1.6.1 Overview The Intel® Pentium® 4 processors has a gold triangular mark on this motherboard: 1. To verify the Hyper-Threading feature, go to enable the Hyper-Threading Technology item in the BIOS before installing a supported operating system. 3. For more information...
... the BIOS setup (See Chapter 2: BIOS Information). ASUS P4U800-X motherboard 1-7 1.6 Central Processing Unit (CPU) 1.6.1 Overview The Intel® Pentium® 4 processors has a gold triangular mark on this motherboard: 1. To verify the Hyper-Threading feature, go to enable the Hyper-Threading Technology item in the BIOS before installing a supported operating system. 3. For more information...

P4U800-X user's manual for English Version
Page 18
... in place. Unlock the socket by pressing the lever sideways, then lift it up to secure the CPU. Install a CPU heatsink and fan following the instructions that it fits in completely. 90 - 100 3. 1.6.2 Installing the CPU Follow these steps to prevent bending the pins and damaging the CPU! 5. DO NOT force the... one correct orientation. Locate the 478-pin ZIF socket on the motherboard. Gold Mark 1-8 Chapter 1: Product introduction Carefully insert the CPU into the socket to install a CPU. 1.
... in place. Unlock the socket by pressing the lever sideways, then lift it up to secure the CPU. Install a CPU heatsink and fan following the instructions that it fits in completely. 90 - 100 3. 1.6.2 Installing the CPU Follow these steps to prevent bending the pins and damaging the CPU! 5. DO NOT force the... one correct orientation. Locate the 478-pin ZIF socket on the motherboard. Gold Mark 1-8 Chapter 1: Product introduction Carefully insert the CPU into the socket to install a CPU. 1.

P4U800-X user's manual for English Version
Page 19
..., 128MB, 256MB, 512MB, and 1GB DDR DIMMs into the DIMM sockets using the memory configurations in this section. ASUS P4U800-X motherboard 1-9 Important notes 1. When installing long AGP cards, it is recommended to unplug the power supply before adding or removing DIMMs or other system components. Double-sided DDR DIMMs with ...
..., 128MB, 256MB, 512MB, and 1GB DDR DIMMs into the DIMM sockets using the memory configurations in this section. ASUS P4U800-X motherboard 1-9 Important notes 1. When installing long AGP cards, it is recommended to unplug the power supply before adding or removing DIMMs or other system components. Double-sided DDR DIMMs with ...

P4U800-X user's manual for English Version
Page 20
supports one direction. The operating memory frequency will work only at 266MHz when you install DDR400 DIMM modules to install a DIMM. 1. Visit the ASUS website (www.asus.com) for the latest QVL. 1.7.3 Installing a DIMM Follow these steps to all slots is properly seated. Double Sided CL - B - Unlock a DIMM socket by...with a notch so that the notch on the DIMM matches the break on all slots. • Obtain DDR 400 DIMMs only from ASUS qualified vendors. Single Sided DS - supports on pair of three DDR400 DIMM modules on the socket. 3. Firmly insert the DIMM into ...
supports one direction. The operating memory frequency will work only at 266MHz when you install DDR400 DIMM modules to install a DIMM. 1. Visit the ASUS website (www.asus.com) for the latest QVL. 1.7.3 Installing a DIMM Follow these steps to all slots is properly seated. Double Sided CL - B - Unlock a DIMM socket by...with a notch so that the notch on the DIMM matches the break on all slots. • Obtain DDR 400 DIMMs only from ASUS qualified vendors. Single Sided DS - supports on pair of three DDR400 DIMM modules on the socket. 3. Firmly insert the DIMM into ...

P4U800-X user's manual for English Version
Page 21
... Onboard Audio A B C D E F GH - Assign an IRQ to the tables next page. 4. Install the drivers and/or software applications for the expansion card according to the card documentation. 1.8.1 Standard interrupt assignments ..., conflicts will arise between the two PCI groups, making the system unstable and the card inoperable. shared - - - -- - - shared - - -- - - - - - ASUS P4U800-X motherboard 1-11 Install an expansion card following the instructions that the cards do not need IRQ assignments. Turn on shared slots, ensure that the drivers support "Share...
... Onboard Audio A B C D E F GH - Assign an IRQ to the tables next page. 4. Install the drivers and/or software applications for the expansion card according to the card documentation. 1.8.1 Standard interrupt assignments ..., conflicts will arise between the two PCI groups, making the system unstable and the card inoperable. shared - - - -- - - shared - - -- - - - - - ASUS P4U800-X motherboard 1-11 Install an expansion card following the instructions that the cards do not need IRQ assignments. Turn on shared slots, ensure that the drivers support "Share...

P4U800-X user's manual for English Version
Page 22
..., make sure that you ask for optimum performance and overclocking stability. 1-12 Chapter 1: Product introduction Install only +1.5V AGP cards. Note the notches on the motherboard. P4U800-X Keyed for 1.5v ® P4U800-X Accelerated Graphics Port (AGP) If installing the ATI 9500 or 9700 Pro Series VGA cards, use only the card version PN xxx...
..., make sure that you ask for optimum performance and overclocking stability. 1-12 Chapter 1: Product introduction Install only +1.5V AGP cards. Note the notches on the motherboard. P4U800-X Keyed for 1.5v ® P4U800-X Accelerated Graphics Port (AGP) If installing the ATI 9500 or 9700 Pro Series VGA cards, use only the card version PN xxx...

P4U800-X user's manual for English Version
Page 28
... USB peripherals such as high resolution cameras, scanners, and printers. 5. CPU_FAN1 Rotation +12V GND P4U800-X ® CHA_FAN1 GND +12V Rotation P4U800-X Fan connectors 6. You may damage the motherboard components. These are inadequate, a USB header is purchased separately. • Install the USB 2.0 driver before using the USB 2.0 feature. 1-18 Chapter 1: Product introduction Connect the...
... USB peripherals such as high resolution cameras, scanners, and printers. 5. CPU_FAN1 Rotation +12V GND P4U800-X ® CHA_FAN1 GND +12V Rotation P4U800-X Fan connectors 6. You may damage the motherboard components. These are inadequate, a USB header is purchased separately. • Install the USB 2.0 driver before using the USB 2.0 feature. 1-18 Chapter 1: Product introduction Connect the...

P4U800-X user's manual for English Version
Page 37
... tab, then click Install ASUS Update VX.XX.XX. The ASUS Update initial screen appears. 2. This utility is copied into your desired update method, then click Next. 3. Launch the utility from the Internet, select the ASUS FTP site nearest you selected updating/ downloading from the Windows desktop by clicking Start > Programs > ASUS > ASUSUpdate > ASUSUpdate. ASUS P4U800-X motherboard 2-5
... tab, then click Install ASUS Update VX.XX.XX. The ASUS Update initial screen appears. 2. This utility is copied into your desired update method, then click Next. 3. Launch the utility from the Internet, select the ASUS FTP site nearest you selected updating/ downloading from the Windows desktop by clicking Start > Programs > ASUS > ASUSUpdate > ASUSUpdate. ASUS P4U800-X motherboard 2-5

P4U800-X user's manual for English Version
Page 39
... Setup program when you are not prompted to ensure system stability. This section explains how to change the power management settings. ASUS P4U800-X motherboard 2-7 When you start up the computer, the system provides you may want to configure your selections from the available options... in the CMOS RAM of your BIOS." This requires you to reconfigure your system using the BIOS Setup program so that you are installing a motherboard, reconfiguring your system, or prompted to enter the Setup utility. 2.2 BIOS Setup program This motherboard supports a programmable firmware...
... Setup program when you are not prompted to ensure system stability. This section explains how to change the power management settings. ASUS P4U800-X motherboard 2-7 When you start up the computer, the system provides you may want to configure your selections from the available options... in the CMOS RAM of your BIOS." This requires you to reconfigure your system using the BIOS Setup program so that you are installing a motherboard, reconfiguring your system, or prompted to enter the Setup utility. 2.2 BIOS Setup program This motherboard supports a programmable firmware...

P4U800-X user's manual for English Version
Page 40
... Security Option Installed Memory HDD S.M.A.R.T. Capability Halt On Wed, Jun 01 2004 15 : 30 : 30 [1.44M, 3.5 in this chapter are for reference purposes only, and may not exactly match what you see on the keyboard until the desired item is highlighted. • The BIOS setup screens shown in .] [ST321122A] [ASUS CDS520/A] [None...
... Security Option Installed Memory HDD S.M.A.R.T. Capability Halt On Wed, Jun 01 2004 15 : 30 : 30 [1.44M, 3.5 in this chapter are for reference purposes only, and may not exactly match what you see on the keyboard until the desired item is highlighted. • The BIOS setup screens shown in .] [ST321122A] [ASUS CDS520/A] [None...

P4U800-X user's manual for English Version
Page 42
...system information. Use the or keys to the date that you specify (usually the current date). Legacy Diskette A [1.44M, 3.5 in .] [ST321122A] [ASUS CDS520/A] [None] [None] [Enabled] Clear Clear [Setup] 256MB [Disabled] [All Errors] Select Menu Item Specific Help Change the day, month, ...Legacy Diskette A: IDE Primary Master IDE Primary Slave IDE Secondary Master IDE Secondary Slave Case Open Warning Supervisor Password User Password Security Option Installed Memory HDD S.M.A.R.T. The format is hour, minute, second. Use the or keys to move between the hour, minute, and second ...
...system information. Use the or keys to the date that you specify (usually the current date). Legacy Diskette A [1.44M, 3.5 in .] [ST321122A] [ASUS CDS520/A] [None] [None] [Enabled] Clear Clear [Setup] 256MB [Disabled] [All Errors] Select Menu Item Specific Help Change the day, month, ...Legacy Diskette A: IDE Primary Master IDE Primary Slave IDE Secondary Master IDE Secondary Slave Case Open Warning Supervisor Password User Password Security Option Installed Memory HDD S.M.A.R.T. The format is hour, minute, second. Use the or keys to move between the hour, minute, and second ...

P4U800-X user's manual for English Version
Page 43
... cables and remove the button cell battery. The User password is required to eight alphanumeric characters. Configuration options: [Setup] [System] Installed Memory [XXXMB] The installed memory value is not user-configurable. Symbols and other characters are ignored. A note about 2 seconds, then power up to enter..., highlight this field, and press . If you to require the password before entering the BIOS setup or the system. ASUS P4U800-X motherboard 2-11 Select [System] to section "2.6 Jumpers" on page 2-18 for instructions on erasing the CMOS RTC RAM.
... cables and remove the button cell battery. The User password is required to eight alphanumeric characters. Configuration options: [Setup] [System] Installed Memory [XXXMB] The installed memory value is not user-configurable. Symbols and other characters are ignored. A note about 2 seconds, then power up to enter..., highlight this field, and press . If you to require the password before entering the BIOS setup or the system. ASUS P4U800-X motherboard 2-11 Select [System] to section "2.6 Jumpers" on page 2-18 for instructions on erasing the CMOS RTC RAM.

P4U800-X user's manual for English Version
Page 44
... system to halt on errors according to the system functions specified in the correct values for this may detect incorrect parameters. If automatic detection is installed or if you set the IDE Channel 0/1 Master/Slave to [Manual] to enable the Smart Monitoring, Analysis, and Reporting Technology (SMART) feature of an IDE...
... system to halt on errors according to the system functions specified in the correct values for this may detect incorrect parameters. If automatic detection is installed or if you set the IDE Channel 0/1 Master/Slave to [Manual] to enable the Smart Monitoring, Analysis, and Reporting Technology (SMART) feature of an IDE...


