
Motherboard DIY Troubleshooting Guide
Page 36
Starting BIOS recovery... Checking for floppy... Reading file "p4u800-x.bin". Bad BIOS checksum. Checking for floppy... Bad BIOS checksum. Start flashing... 2-4 Starting BIOS recovery... Completed. Floppy found!
Starting BIOS recovery... Checking for floppy... Reading file "p4u800-x.bin". Bad BIOS checksum. Checking for floppy... Bad BIOS checksum. Start flashing... 2-4 Starting BIOS recovery... Completed. Floppy found!

Motherboard DIY Troubleshooting Guide
Page 60
F1 : Help ↑↓ : Select Item -/+ : Change Value F5 : Setup Defaults ESC : Exit →← : Select Menu Enter : Select Sub-menu F10 : Save and Exit 2-28 Save & Exit Exit Without Saving Load SETUP Defaults Discard Changes Save Changes Select Menu Item Specific Help This option saves data to CMOS and exits the BIOS Setup.
F1 : Help ↑↓ : Select Item -/+ : Change Value F5 : Setup Defaults ESC : Exit →← : Select Menu Enter : Select Sub-menu F10 : Save and Exit 2-28 Save & Exit Exit Without Saving Load SETUP Defaults Discard Changes Save Changes Select Menu Item Specific Help This option saves data to CMOS and exits the BIOS Setup.

P4U800-X user's manual for English Version
Page 4
Safeguards Contents Chapter 2: BIOS Information 2.1 Managing and updating your BIOS 2-2 2.1.1 Creating a bootable floppy disk 2-2 2.1.2 Updating the BIOS with EZ Flash feature 2-3 2.1.3 Recovering the BIOS with CrashFree BIOS .......... 2-4 2.1.4 ASUS Update 2-5 2.2 BIOS Setup program 2-7 2.2.1 BIOS menu screen 2-8 2.2.2 Menu bar 2-8 2.2.3 Legend bar 2-9 2.2.4 General help 2-9 2.2.5 Sub-menu 2-9 2.2.6 Pop-up window... system 3-2 3.2 Support CD information 3-2 3.2.1 Running the support CD 3-2 3.2.2 Drivers menu 3-3 3.2.3 Utilities menu 3-3 3.2.4 ASUS Contact Information 3-4 iv
Safeguards Contents Chapter 2: BIOS Information 2.1 Managing and updating your BIOS 2-2 2.1.1 Creating a bootable floppy disk 2-2 2.1.2 Updating the BIOS with EZ Flash feature 2-3 2.1.3 Recovering the BIOS with CrashFree BIOS .......... 2-4 2.1.4 ASUS Update 2-5 2.2 BIOS Setup program 2-7 2.2.1 BIOS menu screen 2-8 2.2.2 Menu bar 2-8 2.2.3 Legend bar 2-9 2.2.4 General help 2-9 2.2.5 Sub-menu 2-9 2.2.6 Pop-up window... system 3-2 3.2 Support CD information 3-2 3.2.1 Running the support CD 3-2 3.2.2 Drivers menu 3-3 3.2.3 Utilities menu 3-3 3.2.4 ASUS Contact Information 3-4 iv

P4U800-X user's manual for English Version
Page 8
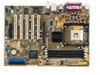
P4U800-X specification summary CPU Chipset Front Side Bus (FSB) Memory Expansion slots Storage Audio LAN Special features Overclocking Rear panel I/O Socket 478 for Intel® Pentium&#... CODEC support S/PDIF out interface ULI M1563 integrated 10/100 Mbps MAC with VIA VT6103 PHY ASUS EZ Flash ASUS C.P.R. (CPU Parameter Recall) ASUS CrashFree BIOS ASUS JumperFree SFS (Stepless Frequency Selection) at 1Mhz increment Adjustable FSB/DDR ratio ASUS C.P.R. (CPU Parameter Recall) 1 x Parallel port 1 x Serial port 1 x PS/2 keyboard port 1 x PS/2 mouse port 4 x USB 2.0 ports 1 x RJ...
P4U800-X specification summary CPU Chipset Front Side Bus (FSB) Memory Expansion slots Storage Audio LAN Special features Overclocking Rear panel I/O Socket 478 for Intel® Pentium&#... CODEC support S/PDIF out interface ULI M1563 integrated 10/100 Mbps MAC with VIA VT6103 PHY ASUS EZ Flash ASUS C.P.R. (CPU Parameter Recall) ASUS CrashFree BIOS ASUS JumperFree SFS (Stepless Frequency Selection) at 1Mhz increment Adjustable FSB/DDR ratio ASUS C.P.R. (CPU Parameter Recall) 1 x Parallel port 1 x Serial port 1 x PS/2 keyboard port 1 x PS/2 mouse port 4 x USB 2.0 ports 1 x RJ...

P4U800-X user's manual for English Version
Page 9
ix P4U800-X specification summary Internal I/O BIOS features Industry standard Manageability Power Requirement Form Factor Support CD contents 1 x USB 2.0 connector for 2 additional USB ports CPU/Chassis fan connectors 20-pin/4-pin ATX ... power connectors CD/AUX/MODEM connectors Game/MIDI port connector 20-pin panel connector Front panel audio connector 2Mb Flash ROM, AMI BIOS, ACPI, PnP, DMI2.0, WfM 2.0, SM BIOS 2.3, DMI 2.0, ASUS CrashFree BIOS, ASUS EZ Flash PCI 2.2, USB 2.0/1.1 DMI 2.0, WOL/WOR by PME, SMBus ATX power supply (with 4-pin 12V plug) ATX form factor: 12...
ix P4U800-X specification summary Internal I/O BIOS features Industry standard Manageability Power Requirement Form Factor Support CD contents 1 x USB 2.0 connector for 2 additional USB ports CPU/Chassis fan connectors 20-pin/4-pin ATX ... power connectors CD/AUX/MODEM connectors Game/MIDI port connector 20-pin panel connector Front panel audio connector 2Mb Flash ROM, AMI BIOS, ACPI, PnP, DMI2.0, WfM 2.0, SM BIOS 2.3, DMI 2.0, ASUS CrashFree BIOS, ASUS EZ Flash PCI 2.2, USB 2.0/1.1 DMI 2.0, WOL/WOR by PME, SMBus ATX power supply (with 4-pin 12V plug) ATX form factor: 12...
P4U800-X user's manual for English Version
Page 13
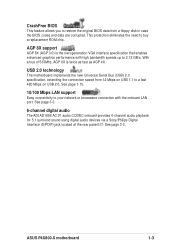
...2.0 technology The motherboard implements the new Universal Serial Bus (USB) 2.0 specification, extending the connection speed from a floppy disk in case the BIOS codes and data are corrupted. This protection eliminates the need to buy a replacement ROM chip. See page 3-3. 6-channel digital audio The ADI ...you to restore the original BIOS data from 12 Mbps on USB 1.1 to a fast 480 Mbps on USB 2.0. With a bus of 533Mhz, AGP 8X is the next generation VGA interface specification that enables enhanced graphics performance with the onboard LAN port. ASUS P4U800-X motherboard 1-3 AGP 8X ...
...2.0 technology The motherboard implements the new Universal Serial Bus (USB) 2.0 specification, extending the connection speed from a floppy disk in case the BIOS codes and data are corrupted. This protection eliminates the need to buy a replacement ROM chip. See page 3-3. 6-channel digital audio The ADI ...you to restore the original BIOS data from 12 Mbps on USB 1.1 to a fast 480 Mbps on USB 2.0. With a bus of 533Mhz, AGP 8X is the next generation VGA interface specification that enables enhanced graphics performance with the onboard LAN port. ASUS P4U800-X motherboard 1-3 AGP 8X ...

P4U800-X user's manual for English Version
Page 17
P4U800-X Gold Arrow ® P4U800-X Socket 478 Incorrect installation of the CPU socket. Power up the system and enter the BIOS setup (See Chapter 2: BIOS Information). Under the Advanced Menu, make sure that should display two existing processors. 4. Notes on ...™ and later versions only. 5. Install the CPU. 2. Buy an Intel® Pentium® 4 CPU that supports Hyper-Threading Technology. 3. ASUS P4U800-X motherboard 1-7 1.6 Central Processing Unit (CPU) 1.6.1 Overview The Intel® Pentium® 4 processors has a gold triangular mark on Intel® Hyper...
P4U800-X Gold Arrow ® P4U800-X Socket 478 Incorrect installation of the CPU socket. Power up the system and enter the BIOS setup (See Chapter 2: BIOS Information). Under the Advanced Menu, make sure that should display two existing processors. 4. Notes on ...™ and later versions only. 5. Install the CPU. 2. Buy an Intel® Pentium® 4 CPU that supports Hyper-Threading Technology. 3. ASUS P4U800-X motherboard 1-7 1.6 Central Processing Unit (CPU) 1.6.1 Overview The Intel® Pentium® 4 processors has a gold triangular mark on Intel® Hyper...

P4U800-X user's manual for English Version
Page 21
...- -- - - shared - - -- - - - - shared - - shared - - When using PCI cards on the system and change the necessary BIOS settings, if any. Assign an IRQ to the card documentation. 1.8.1 Standard interrupt assignments IRQ Priority Standard Function 0 1 System Timer 1 2 Keyboard Controller 2 ...for ISA or PCI devices. 1.8.2 IRQ assignments for BIOS information. 3. used - - - - - -- - - shared - - - -- - - - Refer to the tables next page. 4. shared - - -- - - - - - ASUS P4U800-X motherboard 1-11 1.8 Expansion slots To install and...
...- -- - - shared - - -- - - - - shared - - shared - - When using PCI cards on the system and change the necessary BIOS settings, if any. Assign an IRQ to the card documentation. 1.8.1 Standard interrupt assignments IRQ Priority Standard Function 0 1 System Timer 1 2 Keyboard Controller 2 ...for ISA or PCI devices. 1.8.2 IRQ assignments for BIOS information. 3. used - - - - - -- - - shared - - - -- - - - Refer to the tables next page. 4. shared - - -- - - - - - ASUS P4U800-X motherboard 1-11 1.8 Expansion slots To install and...

P4U800-X user's manual for English Version
Page 23
...; P4U800-X Clear RTC RAM CLRTC 2 1 Normal (Default) 3 2 Clear CMOS You do not need to clear the RTC when the system hangs due to pins 2-3. Turn OFF the computer and unplug the power cord. 2. Hold down and reboot the system so BIOS can clear the CMOS memory of date, time, .... Removing the cap will cause system boot failure! 1.9 Jumpers 1. Keep the cap on CLRTC1 jumper default position. ASUS P4U800-X motherboard 1-13 Shut down the key during the boot process and enter BIOS setup to clear the Real Time Clock (RTC) RAM in CMOS, that include system setup information such as system...
...; P4U800-X Clear RTC RAM CLRTC 2 1 Normal (Default) 3 2 Clear CMOS You do not need to clear the RTC when the system hangs due to pins 2-3. Turn OFF the computer and unplug the power cord. 2. Hold down and reboot the system so BIOS can clear the CMOS memory of date, time, .... Removing the cap will cause system boot failure! 1.9 Jumpers 1. Keep the cap on CLRTC1 jumper default position. ASUS P4U800-X motherboard 1-13 Shut down the key during the boot process and enter BIOS setup to clear the Real Time Clock (RTC) RAM in CMOS, that include system setup information such as system...

P4U800-X user's manual for English Version
Page 31
Take note of any device connected to the primary or secondary IDE connector cause this LED to the hard disk activity LED. ASUS P4U800-X motherboard 1-21 The read or write activities of the specific connector colors as described. The System Panel connector is color-coded for rebooting the... switch that controls the system power. Pressing the power switch turns the system between ON and SLEEP, or ON and SOFT OFF, depending on the BIOS or OS settings. • Reset Switch Lead (Blue 2-pin RESET) This 2-pin connector connects to the case-mounted reset switch for easy and foolproof...
Take note of any device connected to the primary or secondary IDE connector cause this LED to the hard disk activity LED. ASUS P4U800-X motherboard 1-21 The read or write activities of the specific connector colors as described. The System Panel connector is color-coded for rebooting the... switch that controls the system power. Pressing the power switch turns the system between ON and SLEEP, or ON and SOFT OFF, depending on the BIOS or OS settings. • Reset Switch Lead (Blue 2-pin RESET) This 2-pin connector connects to the case-mounted reset switch for easy and foolproof...

P4U800-X user's manual for English Version
Page 33
Chapter 2 This chapter tells how to change system settings through the BIOS Setup menus. BIOS information ASUS P4U800-X motherboard 2-1 Detailed descriptions of the BIOS parameters are also provided.
Chapter 2 This chapter tells how to change system settings through the BIOS Setup menus. BIOS information ASUS P4U800-X motherboard 2-1 Detailed descriptions of the BIOS parameters are also provided.

P4U800-X user's manual for English Version
Page 34
... My Computer. Windows® XP environment a. b. c. d. Insert a floppy disk to manage and update the motherboard Basic Input/Output System (BIOS) setup. 1. ASUS Update (Updates the BIOS in the support CD. c. d. Click Start. 2-2 Chapter 2: BIOS information b. Insert a 1.44 MB floppy disk when prompted. From your Windows desktop, click on Add/Remove Programs icon from the...
... My Computer. Windows® XP environment a. b. c. d. Insert a floppy disk to manage and update the motherboard Basic Input/Output System (BIOS) setup. 1. ASUS Update (Updates the BIOS in the support CD. c. d. Click Start. 2-2 Chapter 2: BIOS information b. Insert a 1.44 MB floppy disk when prompted. From your Windows desktop, click on Add/Remove Programs icon from the...

P4U800-X user's manual for English Version
Page 35
...disk to avoid loading a wrong BIOS file. 1. Insert the disk that contains the new BIOS file into the floppy drive. 3. After the new BIOS file is copied, the computer returns to the bootable floppy disk you created earlier. 2. ASUS P4U800-X motherboard 2-3 Press during the ...flash process. 7. Copy the original (or the latest) motherboard BIOS to display the following screen. 5. After verification, AWDFLASH flashes the new BIOS file. Download the latest BIOS file from the floppy disk. 6....
...disk to avoid loading a wrong BIOS file. 1. Insert the disk that contains the new BIOS file into the floppy drive. 3. After the new BIOS file is copied, the computer returns to the bootable floppy disk you created earlier. 2. ASUS P4U800-X motherboard 2-3 Press during the ...flash process. 7. Copy the original (or the latest) motherboard BIOS to display the following screen. 5. After verification, AWDFLASH flashes the new BIOS file. Download the latest BIOS file from the floppy disk. 6....

P4U800-X user's manual for English Version
Page 36
... may cause system boot failure! 2. Start flashing... 2.1.3 Recovering the BIOS with the BIOS update process. 2. Boot the system. 2. Bad BIOS checksum. Checking for floppy... 3. See section "2.1.1 Creating a bootable floppy disk." Reading file "p4u800-x.bin". Starting BIOS recovery... Visit the ASUS website (www.asus.com) to restore the BIOS. Bad BIOS checksum. Prepare a floppy disk that contains the original, or...
... may cause system boot failure! 2. Start flashing... 2.1.3 Recovering the BIOS with the BIOS update process. 2. Boot the system. 2. Bad BIOS checksum. Checking for floppy... 3. See section "2.1.1 Creating a bootable floppy disk." Reading file "p4u800-x.bin". Starting BIOS recovery... Visit the ASUS website (www.asus.com) to restore the BIOS. Bad BIOS checksum. Prepare a floppy disk that contains the original, or...

P4U800-X user's manual for English Version
Page 37
...BIOS in the support CD that allows you to the optical drive. 2.1.4 ASUS Update The ASUS Update is a utility that comes with the motherboard package. See page 5-3 for details for the Utilities menu screen. 3. The ASUS Update utility is available in Windows® environment. If you to avoid network traffic, or choose Auto Select. ASUS P4U800...-X motherboard 2-5 Launch the utility from the Internet, select the ASUS FTP site nearest you selected updating/ downloading from the Windows desktop by clicking Start > Programs > ASUS > ASUSUpdate...
...BIOS in the support CD that allows you to the optical drive. 2.1.4 ASUS Update The ASUS Update is a utility that comes with the motherboard package. See page 5-3 for details for the Utilities menu screen. 3. The ASUS Update utility is available in Windows® environment. If you to avoid network traffic, or choose Auto Select. ASUS P4U800...-X motherboard 2-5 Launch the utility from the Internet, select the ASUS FTP site nearest you selected updating/ downloading from the Windows desktop by clicking Start > Programs > ASUS > ASUSUpdate...

P4U800-X user's manual for English Version
Page 38
Select the file, click Save, then follow the screen instructions to complete the update process. Follow the instructions on the succeeding screens to complete the update process. 2-6 Chapter 2: BIOS information 2. From the FTP site, select the BIOS version that you to download. Click Next. 5. If you selected the option to update the BIOS from a file, a window pops up prompting you wish to locate the file.
Select the file, click Save, then follow the screen instructions to complete the update process. Follow the instructions on the succeeding screens to complete the update process. 2-6 Chapter 2: BIOS information 2. From the FTP site, select the BIOS version that you to download. Click Next. 5. If you selected the option to update the BIOS from a file, a window pops up prompting you wish to locate the file.

P4U800-X user's manual for English Version
Page 39
...restart the system by pressing + + , or by turning the system off and then back on. See section "2.7 Exit menu." ASUS P4U800-X motherboard 2-7 Use the BIOS Setup program when you are not prompted to use as easy to use the Setup program, you may want to reconfigure your system... FWH chip on the system chassis. The Setup program is a menudriven program, which means you can update using the navigation keys. 2.2 BIOS Setup program This motherboard supports a programmable firmware hub (FHW) chip that the computer can recognize these changes and record them in the CMOS...
...restart the system by pressing + + , or by turning the system off and then back on. See section "2.7 Exit menu." ASUS P4U800-X motherboard 2-7 Use the BIOS Setup program when you are not prompted to use as easy to use the Setup program, you may want to reconfigure your system... FWH chip on the system chassis. The Setup program is a menudriven program, which means you can update using the navigation keys. 2.2 BIOS Setup program This motherboard supports a programmable firmware hub (FHW) chip that the computer can recognize these changes and record them in the CMOS...

P4U800-X user's manual for English Version
Page 40
... for reference purposes only, and may not exactly match what you see on the keyboard until the desired item is highlighted. • The BIOS setup screens shown in .] [ST321122A] [ASUS CDS520/A] [None] [None] [Enabled] Clear Clear [Setup] 256MB [Disabled] [All Errors] Select Menu Item Specific Help Change the day, month, year and... and loading default settings To select an item on the menu bar, press the right or left arrow key on your screen. • Visit the ASUS website (www.asus.com) to download the latest BIOS information. 2-8 Chapter 2: BIOS information
... for reference purposes only, and may not exactly match what you see on the keyboard until the desired item is highlighted. • The BIOS setup screens shown in .] [ST321122A] [ASUS CDS520/A] [None] [None] [Enabled] Clear Clear [Setup] 256MB [Disabled] [All Errors] Select Menu Item Specific Help Change the day, month, year and... and loading default settings To select an item on the menu bar, press the right or left arrow key on your screen. • Visit the ASUS website (www.asus.com) to download the latest BIOS information. 2-8 Chapter 2: BIOS information

P4U800-X user's manual for English Version
Page 42
... Sets the system to the date that you specify (usually the current date). Configuration options: [Enabled] [Disabled] 2-10 Chapter 2: BIOS information Use the key to activate the chassis intrusion feature of the motherboard. The format is hour, minute, second. Configuration options: [...None] [360K, 5.25 in.] [1.2M , 5.25 in.] [720K , 3.5 in.] [1.44M, 3.5 in.] [2.88M, 3.5 in .] [ST321122A] [ASUS CDS520/A] [None] [None] [Enabled] Clear Clear [Setup] 256MB [Disabled] [All Errors] Select Menu Item Specific Help Change the day, month, year and century. ...
... Sets the system to the date that you specify (usually the current date). Configuration options: [Enabled] [Disabled] 2-10 Chapter 2: BIOS information Use the key to activate the chassis intrusion feature of the motherboard. The format is hour, minute, second. Configuration options: [...None] [360K, 5.25 in.] [1.2M , 5.25 in.] [720K , 3.5 in.] [1.44M, 3.5 in.] [2.88M, 3.5 in .] [ST321122A] [ASUS CDS520/A] [None] [None] [Enabled] Clear Clear [Setup] 256MB [Disabled] [All Errors] Select Menu Item Specific Help Change the day, month, year and century. ...

P4U800-X user's manual for English Version
Page 43
...press . To set passwords. Type in a password then press . Forgot the password? This field is changed to eight alphanumeric characters. ASUS P4U800-X motherboard 2-11 You can clear it by the onboard button cell battery. The password field setting is not user-configurable. The RAM... data containing the password information is auto-detected. Refer to enter the password before entering the BIOS setup or the system. Supervisor Password [Clear] / User Password [Clear] These fields allow you can type up the system. Configuration...
...press . To set passwords. Type in a password then press . Forgot the password? This field is changed to eight alphanumeric characters. ASUS P4U800-X motherboard 2-11 You can clear it by the onboard button cell battery. The password field setting is not user-configurable. The RAM... data containing the password information is auto-detected. Refer to enter the password before entering the BIOS setup or the system. Supervisor Password [Clear] / User Password [Clear] These fields allow you can type up the system. Configuration...


