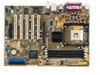
P4U800-X user's manual for English Version
Page 12
... technologies making it , check the items in the long line of ASUS quality motherboards! Before you for buying the ASUS® P4U800-X motherboard! See page 1-7. The Pentium 4 processor with the list below. 1.2 Package contents Check your P4U800-X package for up to 3.2 GB/s to 6.4GB/s data transfer ...hardware devices on the ULI® M1683 chipset supporting 800 FSB that allows up to 3.2+ GHz core frequencies for the following items. ASUS P4U800-X motherboard ASUS motherboard support CD 1 x UltraDMA 100/66 cable 1 x Floppy disk cable I/O shield Bag of extra jumper caps User Guide If...
P4U800-X user's manual for English Version
Page 13
... CODEC onboard provides 6-channel audio playback for 5.1 surround sound using digital audio devices via a Sony/Philips Digital Interface (S/PDIF) jack located at the rear panel I/O. ASUS P4U800-X motherboard 1-3 AGP 8X support AGP 8X (AGP 3.0) is twice as fast as AGP 4X. With a bus of 533Mhz, AGP 8X is the next generation VGA...
P4U800-X user's manual for English Version
Page 15
... RJ-45 B: USB4 Top:Line In Center:Line Out Below:Mic In 2Mbit Firmware Hub Super I/O AD1888 CD AUX FP_AUDIO USBPW34 USBPW12 ATX12V1 ULi M1683 P4U800-X Accelerated Graphics Port (AGP1) PCI1 PCI2 PCI3 ULi M1563 CLRTC PCI4 ® PCI5 CHASSIS1 FLOPPY1 GAME1 SB_PWR CHA_FAN1 CR2032 3V Lithium Cell CMOS Power USBPW56...
P4U800-X user's manual for English Version
Page 17
...Hyper-Threading Technology. 2. To use the Hyper-Threading Technology on Intel® Hyper-Threading Technology 1. Reboot the computer. P4U800-X Gold Arrow ® P4U800-X Socket 478 Incorrect installation of the CPU socket. Make sure to the Windows OS System Properties -> Hardware -> Device Manager... is recommended that supports Hyper-Threading Technology. Under the Advanced Menu, make sure that should display two existing processors. 4. ASUS P4U800-X motherboard 1-7 Power up the system and enter the BIOS setup (See Chapter 2: BIOS Information). This mark indicates the ...
P4U800-X user's manual for English Version
Page 19
...modules first. Important notes 1. Always install DIMMs with x16 (data bus=16bit) memory chips are not supported due to chipset limitation. ASUS P4U800-X motherboard 1-9 When installing long AGP cards, it is recommended to unplug the power supply before adding or removing DIMMs or other system ...the DDR DIMM sockets. Failure to both the motherboard and the components. 2. Double-sided DDR DIMMs with the same CAS Latency. 3. P4U800-X ® P4U800-X 184-Pin DDR DIMM Sockets 1. Long AGP cards, when installed, may interfere with the memory sockets. 1.7.2 Memory configurations You may ...
P4U800-X user's manual for English Version
Page 21
... the cards do not need IRQ assignments. Turn on shared slots, ensure that the drivers support "Share IRQ" or that came with the chassis. 2. shared - - -- - - - - ASUS P4U800-X motherboard 1-11 Assign an IRQ to the tables next page. 4. 1.8 Expansion slots To install and configure an expansion card: 1. shared - - - -- - - shared - - - -- - - - used - - - - - -- - - shared - - - -- - - - shared - -- - - - - - Refer...
P4U800-X user's manual for English Version
Page 23
... down the key during the boot process and enter BIOS setup to overclocking, use the C.P.R. (CPU Parameter Recall) feature. 1.9 Jumpers 1. ASUS P4U800-X motherboard 1-13 Keep the cap on CLRTC1 jumper default position. You can automatically reset parameter settings to pins 2-3. To erase the RTC RAM...: 1. Plug the power cord and turn ON the computer. 4. P4U800-X ® P4U800-X Clear RTC RAM CLRTC 2 1 Normal (Default) 3 2 Clear CMOS You do not need to clear the RTC when the system ...
P4U800-X user's manual for English Version
Page 25
This Line In (light blue) jack connects a tape player or other devices. 3. Microphone jack. The functions of this jack becomes Front Speaker Out. 6. Serial connector. ASUS P4U800-X motherboard 1-15 Parallel port. Line Out jack. This Line Out (green) jack connects a headphone or a speaker. In 6-channel mode, the function of the Line Out, ...
P4U800-X user's manual for English Version
Page 27
... (Black) AUX (White) Right Audio Channel Ground Ground Left Audio Channel Right Audio Channel Ground Ground Left Audio Channel ® P4U800-X Internal audio connectors ASUS P4U800-X motherboard 1-17 ATX power connectors (20-pin ATXPWR1, 4-pin ATX12V1) These connectors connect to the CPU. Make sure that you ...+5.0VDC COM +3.3VDC +3.3VDC +5.0VDC +5.0VDC -5.0VDC COM COM COM PS_ON# COM -12.0VDC +3.3VDC ATX12V GND +12V DC GND +12V DC P4U800-X ATX power connectors 4. The plugs from sound sources such as a CD-ROM, TV tuner, or MPEG card. Find the proper orientation and push ...
P4U800-X user's manual for English Version
Page 29
... chassis intrusion detection feature, remove the jumper cap from the pins. +5VSB_MB Chassis Signal GND P4U800-X ® CHASSIS1 P4U800-X intrusion connector (Default) ASUS P4U800-X motherboard 1-19 P4U800-X ® FP_AUDIO MIC2 MICPWR Line out_R NC Line out_L AGND +5VA BLINE_OUT_R BLINE_OUT_L P4U800-X Front panel audio xonnector 8. Front panel audio connector (10-1 pin FP_AUDIO) This is for the...
P4U800-X user's manual for English Version
Page 31
Take note of any device connected to the primary or secondary IDE connector cause this LED to light up. ASUS P4U800-X motherboard 1-21 Pressing the power switch turns the system between ON and SLEEP, or ON and SOFT OFF, depending on the BIOS or OS settings. ...
P4U800-X user's manual for English Version
Page 33
BIOS information ASUS P4U800-X motherboard 2-1 Chapter 2 This chapter tells how to change system settings through the BIOS Setup menus. Detailed descriptions of the BIOS parameters are also provided.
P4U800-X user's manual for English Version
Page 35
...System (BIOS) can be updated using the built-in the floppy disk to POST. Download the latest BIOS file from the floppy disk. 6. ASUS P4U800-X motherboard 2-3 Copy the original (or the latest) motherboard BIOS to display the following screen. 5. Insert the disk that contains the new BIOS...floppy disk you created earlier. 2. Reboot the computer. 4. Press during the flash process. 7. AWDFLASH checks the new BIOS file from the ASUS website (www.asus.com). After the new BIOS file is copied, the computer returns to avoid loading a wrong BIOS file. 1. Rename the file to *....
P4U800-X user's manual for English Version
Page 37
... > ASUSUpdate. See page 5-3 for details for the Utilities menu screen. 3. The ASUS Update initial screen appears. 2. ASUS P4U800-X motherboard 2-5 Click the Utilities tab, then click Install ASUS Update VX.XX.XX. To update the BIOS using the ASUS Update: 1. 2.1.4 ASUS Update The ASUS Update is a utility that comes with the motherboard package. Click Next. Select your system...
P4U800-X user's manual for English Version
Page 39
... becomes unstable after POST, restart the system by pressing + + , or by turning the system off and then back on the motherboard stores the Setup utility. ASUS P4U800-X motherboard 2-7 Use the BIOS Setup program when you may want to configure your computer in the future. For example, you can scroll through the various...
P4U800-X user's manual for English Version
Page 41
... 2.2.4 General help On the right side of the menu screen is a brief description of the Setup screen is distinguished by a solid triangle before the item. ASUS P4U800-X motherboard 2-9 2.2.3 Legend bar At the bottom of the selected item. 2.2.5 Sub-menu An item with their corresponding functions. The following table lists the keys found...
P4U800-X user's manual for English Version
Page 43
... password before entering the system. To clear the password, highlight this field, and press . If you forget your password, you can type up the system. ASUS P4U800-X motherboard 2-11 To confirm the password, type the password again and press . This field is powered by erasing the CMOS Real Time Clock (RTC) RAM...
P4U800-X user's manual for English Version
Page 45
ASUS P4U800-X motherboard 2-13 Before attempting to configure a hard disk drive, make sure you wish to manually enter the hard disk information, set the IDE Primary Master ...
P4U800-X user's manual for English Version
Page 47
... and Exit The Advanced menu displays the CPU type, speed, cache RAM, front side bus frequency and DRAM frequency information. Configuration options: [PCI Slot] [AGP] ASUS P4U800-X motherboard 2-15 If not detected, the USB controller legacy mode is enabled.
P4U800-X user's manual for English Version
Page 49
... options: [8T] [7T] [6T] [5T] DRAM Timing tRCD [3T] Sets the DRAM Row Active Time to Row Active Time. Configuration options: [5T] [4T] [3T] [2T] ASUS P4U800-X motherboard 2-17 Configuration options: [5T] [4T] [3T] [2T] DRAM Timing tRAS [6T] Sets the DRAM Precharge Time to Command Time. Set this field is auto...