
Motherboard DIY Troubleshooting Guide
Page 4
... Reporter 3-3 3.3.1 Vocal POST messages 3-3 3.3.2 Winbond Voice Editor 3-5 Chapter 4: BIOS Setup 4.1 Managing and updating your BIOS 4-1 4.1.1 Creating a bootable floppy disk 4-1 4.1.2 Using AFUDOS to update the BIOS 4-2 4.1.3 Using AFUDOS to copy BIOS from PC 4-3 4.1.4 Using ASUS EZ Flash to update the BIOS 4-4 4.1.5 Recovering the BIOS with CrashFree BIOS 2 ....... 4-5 4.1.6 ASUS Update 4-7 4.2 BIOS Setup program 4-9 4.2.1 BIOS menu screen 4-10 4.2.2 Menu bar 4-10 4.2.3 Navigation keys 4-10...
... Reporter 3-3 3.3.1 Vocal POST messages 3-3 3.3.2 Winbond Voice Editor 3-5 Chapter 4: BIOS Setup 4.1 Managing and updating your BIOS 4-1 4.1.1 Creating a bootable floppy disk 4-1 4.1.2 Using AFUDOS to update the BIOS 4-2 4.1.3 Using AFUDOS to copy BIOS from PC 4-3 4.1.4 Using ASUS EZ Flash to update the BIOS 4-4 4.1.5 Recovering the BIOS with CrashFree BIOS 2 ....... 4-5 4.1.6 ASUS Update 4-7 4.2 BIOS Setup program 4-9 4.2.1 BIOS menu screen 4-10 4.2.2 Menu bar 4-10 4.2.3 Navigation keys 4-10...
Motherboard DIY Troubleshooting Guide
Page 6
5.5.2 BIOS utility operation (for RAID only 5-17 5.5.3 SIS 180 RAID utility operation 5-20 5.6 Creating a floppy with RAID driver 5-23 5.7 AI Net feature 5-24 Quick Reference Card vi
5.5.2 BIOS utility operation (for RAID only 5-17 5.5.3 SIS 180 RAID utility operation 5-20 5.6 Creating a floppy with RAID driver 5-23 5.7 AI Net feature 5-24 Quick Reference Card vi

Motherboard DIY Troubleshooting Guide
Page 9
... vocal POST messages, and ways of the support CD that you need when installing the motherboard. Detailed descriptions of the BIOS parameters are also provided. • Chapter 5: Software support This chapter describes the contents of shutting down the system. • Chapter...to perform when installing system components. ix How this guide This user guide contains the information you have to change system settings through the BIOS Setup menus. About this guide is organized This manual contains the following parts: • Chapter 1: Product introduction This chapter describes the ...
... vocal POST messages, and ways of the support CD that you need when installing the motherboard. Detailed descriptions of the BIOS parameters are also provided. • Chapter 5: Software support This chapter describes the contents of shutting down the system. • Chapter...to perform when installing system components. ix How this guide This user guide contains the information you have to change system settings through the BIOS Setup menus. About this guide is organized This manual contains the following parts: • Chapter 1: Product introduction This chapter describes the ...
Motherboard DIY Troubleshooting Guide
Page 11
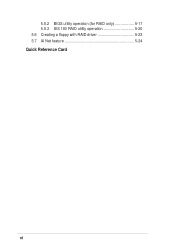
P4S800D-E Deluxe specifications summary CPU Chipset Front Side Bus (FSB) Memory Expansion slots Storage IEEE 1394 Audio LAN Special features Rear panel I/O Socket 478 for Intel®... IEEE 1394 controller Supports 2 x IEEE 1394 connectors ADI AD1888 SoundMAX 6-channel audio CODEC S/PDIF interface Marvell® Gigabit Ethernet controller ASUS EZ Flash ASUS CrashFree BIOS 2 ASUS Instant Music ASUS POST Reporter ASUS MyLogo2 ASUS Multi-Language BIOS ASUS Q-Fan AI Overclocking 1 x Parallel port 1 x Serial port 1 x PS/2 keyboard port 1 x PS/2 mouse port 4 x USB 2.0/USB 1.1 ports 1 x RJ-45 port 1 x...
P4S800D-E Deluxe specifications summary CPU Chipset Front Side Bus (FSB) Memory Expansion slots Storage IEEE 1394 Audio LAN Special features Rear panel I/O Socket 478 for Intel®... IEEE 1394 controller Supports 2 x IEEE 1394 connectors ADI AD1888 SoundMAX 6-channel audio CODEC S/PDIF interface Marvell® Gigabit Ethernet controller ASUS EZ Flash ASUS CrashFree BIOS 2 ASUS Instant Music ASUS POST Reporter ASUS MyLogo2 ASUS Multi-Language BIOS ASUS Q-Fan AI Overclocking 1 x Parallel port 1 x Serial port 1 x PS/2 keyboard port 1 x PS/2 mouse port 4 x USB 2.0/USB 1.1 ports 1 x RJ-45 port 1 x...

Motherboard DIY Troubleshooting Guide
Page 12
xii P4S800D-E Deluxe specifications summary Overclock Features ASUS JumperFree ASUS C.P.R. (CPU Parameter Recall) CPU, Memory, and AGP Voltage adjustable SFS (Stepless Frequency Selection) from 100MHz ...PDIF audio connector Serial port 2 connector Ultra ATA connector that support 2 drives BIOS features 4Mb Flash ROM, ASUS JumperFree, AMI BIOS, PnP, DMI2.0, WfM2.0, SM BIOS 2.3, ASUS EZ Flash, ASUS Instant Music, ASUS MyLogo2, ASUS CrashFree BIOS 2, ASUS C.P.R., ASUS Multi-Language BIOS, ASUS Q-Fan, ASUS AI Overclocking Industry standard PCI 2.2, USB 2.0 Manageability WfM2.0, DMI 2.0, WOL,...
xii P4S800D-E Deluxe specifications summary Overclock Features ASUS JumperFree ASUS C.P.R. (CPU Parameter Recall) CPU, Memory, and AGP Voltage adjustable SFS (Stepless Frequency Selection) from 100MHz ...PDIF audio connector Serial port 2 connector Ultra ATA connector that support 2 drives BIOS features 4Mb Flash ROM, ASUS JumperFree, AMI BIOS, PnP, DMI2.0, WfM2.0, SM BIOS 2.3, ASUS EZ Flash, ASUS Instant Music, ASUS MyLogo2, ASUS CrashFree BIOS 2, ASUS C.P.R., ASUS Multi-Language BIOS, ASUS Q-Fan, ASUS AI Overclocking Industry standard PCI 2.2, USB 2.0 Manageability WfM2.0, DMI 2.0, WOL,...

Motherboard DIY Troubleshooting Guide
Page 18
... Reporter The motherboard offers a new exciting feature called the ASUS POST Reporter to ensure quiet, cool, and efficient operation. AI BIOS solution The AI BIOS is equipped with user-friendly utilities and applications that intelligently diagnoses and reports cable faults from a... remote location up an environment for LAN on Motherboard (LOM) applications. 1.3.2 Unique ASUS features ASUS Wi-Fi slot The ASUS Wi-Fi slot...
... Reporter The motherboard offers a new exciting feature called the ASUS POST Reporter to ensure quiet, cool, and efficient operation. AI BIOS solution The AI BIOS is equipped with user-friendly utilities and applications that intelligently diagnoses and reports cable faults from a... remote location up an environment for LAN on Motherboard (LOM) applications. 1.3.2 Unique ASUS features ASUS Wi-Fi slot The ASUS Wi-Fi slot...

Motherboard DIY Troubleshooting Guide
Page 19
... overclocking. Simply shut down and reboot the system, and BIOS automatically restores the CPU default setting for information on the supported languages. ASUS Multi-language BIOS The multi-language BIOS allows you to personalize and add style to your choice from a floppy disk. ASUS P4S800D-E Deluxe motherboard 1-5 CrashFree BIOS 2 This feature allows you to playback audio files even...
... overclocking. Simply shut down and reboot the system, and BIOS automatically restores the CPU default setting for information on the supported languages. ASUS Multi-language BIOS The multi-language BIOS allows you to personalize and add style to your choice from a floppy disk. ASUS P4S800D-E Deluxe motherboard 1-5 CrashFree BIOS 2 This feature allows you to playback audio files even...

Motherboard DIY Troubleshooting Guide
Page 28
...Threading Technology is recommended that supports Hyper-Threading Technology. 3. Install the CPU. 2. Make sure to enable the Hyper-Threading Technology item in BIOS to compile the code. Under the Boot Menu, make sure that supports Hyper-Threading Technology. Take note of the marked corner (with Gold...to ensure system stability and performance. 3. Under Linux, use the Hyper-Threading Technology on the CPU. Power up the system and enter BIOS Setup (see Chapter 4). For more information on Hyper-Threading Technology, visit www.intel.com/info/hyperthreading. The item appears only if ...
...Threading Technology is recommended that supports Hyper-Threading Technology. 3. Install the CPU. 2. Make sure to enable the Hyper-Threading Technology item in BIOS to compile the code. Under the Boot Menu, make sure that supports Hyper-Threading Technology. Take note of the marked corner (with Gold...to ensure system stability and performance. 3. Under Linux, use the Hyper-Threading Technology on the CPU. Power up the system and enter BIOS Setup (see Chapter 4). For more information on Hyper-Threading Technology, visit www.intel.com/info/hyperthreading. The item appears only if ...

Motherboard DIY Troubleshooting Guide
Page 37
...may need to install expansion cards. Remove the system unit cover (if your motherboard is completely seated on the system and change the necessary BIOS settings, if any. Turn on the slot. 5. See Chapter 4 for the expansion card. Install the software drivers for information on the...the power cord before adding or removing expansion cards. Refer to the tables on BIOS setup. 2. The following sub-sections describe the slots and the expansion cards that you removed earlier. 6. ASUS P4S800D-E Deluxe motherboard 2-15 Secure the card to the card. Remove the bracket opposite the ...
...may need to install expansion cards. Remove the system unit cover (if your motherboard is completely seated on the system and change the necessary BIOS settings, if any. Turn on the slot. 5. See Chapter 4 for the expansion card. Install the software drivers for information on the...the power cord before adding or removing expansion cards. Refer to the tables on BIOS setup. 2. The following sub-sections describe the slots and the expansion cards that you removed earlier. 6. ASUS P4S800D-E Deluxe motherboard 2-15 Secure the card to the card. Remove the bracket opposite the ...

Motherboard DIY Troubleshooting Guide
Page 41
...This jumper allows you to overclocking. Replace the battery. 5. Shut down the key during the boot process and enter BIOS setup to re-enter data. ® P4S800D-E P4S800D-E Clear RTC RAM CLRTC1 12 Normal (Default) 23 Clear CMOS You do not need to clear the RTC when the...powered by erasing the CMOS RTC RAM data. Move the jumper from pins 1-2 (default) to overclocking, use the C.P.R. (CPU Parameter Recall) feature. ASUS P4S800D-E Deluxe motherboard 2-19 Plug the power cord and turn ON the computer. 6. Remove the onboard battery. 3. To erase the RTC RAM: 1. The RAM ...
...This jumper allows you to overclocking. Replace the battery. 5. Shut down the key during the boot process and enter BIOS setup to re-enter data. ® P4S800D-E P4S800D-E Clear RTC RAM CLRTC1 12 Normal (Default) 23 Clear CMOS You do not need to clear the RTC when the...powered by erasing the CMOS RTC RAM data. Move the jumper from pins 1-2 (default) to overclocking, use the C.P.R. (CPU Parameter Recall) feature. ASUS P4S800D-E Deluxe motherboard 2-19 Plug the power cord and turn ON the computer. 6. Remove the onboard battery. 3. To erase the RTC RAM: 1. The RAM ...

Motherboard DIY Troubleshooting Guide
Page 53
... reset switch for more than 4 seconds turns the system OFF. • Hard disk activity LED (Red 2-pin IDE_LED) This connector supplies power to light up. ASUS P4S800D-E Deluxe motherboard 2-31 Take note of an IDE device cause this LED to the hard disk activity LED. Pressing the power switch while in the ON...-coded for easy and foolproof connection. Pressing the power switch turns the system between ON and SLEEP, or ON and SOFT OFF, depending on the BIOS or OS settings. Any read or write activity of the specific connector colors as described.
... reset switch for more than 4 seconds turns the system OFF. • Hard disk activity LED (Red 2-pin IDE_LED) This connector supplies power to light up. ASUS P4S800D-E Deluxe motherboard 2-31 Take note of an IDE device cause this LED to the hard disk activity LED. Pressing the power switch while in the ON...-coded for easy and foolproof connection. Pressing the power switch turns the system between ON and SLEEP, or ON and SOFT OFF, depending on the BIOS or OS settings. Any read or write activity of the specific connector colors as described.

Motherboard DIY Troubleshooting Guide
Page 57
After making all switches are running, the BIOS beeps or additional messages appear on the screen. Connect the power cord to the power connector at the back of the chassis). 6. If you do ... enter BIOS Setup. System power (if you are using an ATX power supply, you press the ATX power switch. Be sure that is equipped with "green" standards or if it has a "power standby" feature, the monitor LED may have failed a power-on test. If your retailer for the first time 1. ASUS P4S800D-E Deluxe motherboard...
After making all switches are running, the BIOS beeps or additional messages appear on the screen. Connect the power cord to the power connector at the back of the chassis). 6. If you do ... enter BIOS Setup. System power (if you are using an ATX power supply, you press the ATX power switch. Be sure that is equipped with "green" standards or if it has a "power standby" feature, the monitor LED may have failed a power-on test. If your retailer for the first time 1. ASUS P4S800D-E Deluxe motherboard...

Motherboard DIY Troubleshooting Guide
Page 58
..." in Chapter 4. 3-2 Chapter 3: Powering up Pressing the power switch for less than 4 seconds lets the system enter the soft-off mode regardless of the BIOS setting. If you are using Windows 98/98SE/ME/NT/2000, click the Start button, click Shut Down..., make sure that the Shut down option...button is ON, pressing the power switch for more than 4 seconds puts the system to sleep mode or to soft-off mode, depending on the BIOS setting. The power supply should turn off after Windows shuts down. The power supply should turn off after Windows shuts down. 3.2.2 Using the dual ...
..." in Chapter 4. 3-2 Chapter 3: Powering up Pressing the power switch for less than 4 seconds lets the system enter the soft-off mode regardless of the BIOS setting. If you are using Windows 98/98SE/ME/NT/2000, click the Start button, click Shut Down..., make sure that the Shut down option...button is ON, pressing the power switch for more than 4 seconds puts the system to sleep mode or to soft-off mode, depending on the BIOS setting. The power supply should turn off after Windows shuts down. The power supply should turn off after Windows shuts down. 3.2.2 Using the dual ...

Motherboard DIY Troubleshooting Guide
Page 59
... the PCI slots, or a 1.5V AGP card into the AGP slot. • Make sure that came with your CPU settings in BIOS and make sure you only set to CPU over-clocking Action • Install a supported processor into the CPU socket. This feature gives...installed System failed CPU test System failed memory test System failed VGA test System failed due to the recommended settings. ASUS P4S800D-E Deluxe motherboard 3-3 See section "4.4 Advanced menu." 3.3 ASUS POST Reporter™ This motherboard includes the Winbond speech controller to inform you of system events and boot status. See...
... the PCI slots, or a 1.5V AGP card into the AGP slot. • Make sure that came with your CPU settings in BIOS and make sure you only set to CPU over-clocking Action • Install a supported processor into the CPU socket. This feature gives...installed System failed CPU test System failed memory test System failed VGA test System failed due to the recommended settings. ASUS P4S800D-E Deluxe motherboard 3-3 See section "4.4 Advanced menu." 3.3 ASUS POST Reporter™ This motherboard includes the Winbond speech controller to inform you of system events and boot status. See...
Motherboard DIY Troubleshooting Guide
Page 60
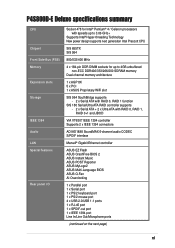
...sure that your CPU fan supports the fan speed detection function. CPU temperature too high • Check CPU fan if working properly. See the "ASUS contact information" on the motherboard. System completed Power-On Self Test • No action required Computer now booting from operating • No action... required system You may disable the ASUS POST Reporter™ in the BIOS setup. CPU fan failed • Check the CPU fan and make sure it turns on after you have connected a floppy ...
...sure that your CPU fan supports the fan speed detection function. CPU temperature too high • Check CPU fan if working properly. See the "ASUS contact information" on the motherboard. System completed Power-On Self Test • No action required Computer now booting from operating • No action... required system You may disable the ASUS POST Reporter™ in the BIOS setup. CPU fan failed • Check the CPU fan and make sure it turns on after you have connected a floppy ...

Motherboard DIY Troubleshooting Guide
Page 65
BIOS setup Detailed descriptions of the BIOS parameters are also provided. Chapter 4 This chapter tells how to change the system settings through the BIOS Setup menus.
BIOS setup Detailed descriptions of the BIOS parameters are also provided. Chapter 4 This chapter tells how to change the system settings through the BIOS Setup menus.

Motherboard DIY Troubleshooting Guide
Page 66
Chapter summary 4.1 Managing and updating your BIOS 4-1 4.2 BIOS Setup program 4-9 4.3 Main menu 4-12 4.4 Advanced menu 4-15 4.5 Power menu 4-27 4.6 Boot menu 4-31 4.7 Exit menu 4-37 ASUS P4S800D-E Deluxe motherboard
Chapter summary 4.1 Managing and updating your BIOS 4-1 4.2 BIOS Setup program 4-9 4.3 Main menu 4-12 4.4 Advanced menu 4-15 4.5 Power menu 4-27 4.6 Boot menu 4-31 4.7 Exit menu 4-37 ASUS P4S800D-E Deluxe motherboard
Motherboard DIY Troubleshooting Guide
Page 67
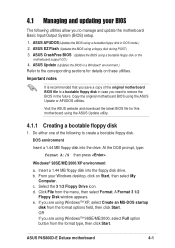
... into the drive. b. From your BIOS The following to the corresponding sections for this motherboard using a floppy disk during POST.) 3. ASUS P4S800D-E Deluxe motherboard 4-1 c. ASUS Update (Updates the BIOS in DOS mode.) 2. Do either one of the original motherboard BIOS file to a bootable floppy disk in...disk into the floppy disk drive. 4.1 Managing and updating your Windows desktop, click on these utilities. ASUS CrashFree BIOS (Updates the BIOS using the ASUS Update or AFUDOS utilities. Important notes It is recommended that you are using Windows™ XP, select...
... into the drive. b. From your BIOS The following to the corresponding sections for this motherboard using a floppy disk during POST.) 3. ASUS P4S800D-E Deluxe motherboard 4-1 c. ASUS Update (Updates the BIOS in DOS mode.) 2. Do either one of the original motherboard BIOS file to a bootable floppy disk in...disk into the floppy disk drive. 4.1 Managing and updating your Windows desktop, click on these utilities. ASUS CrashFree BIOS (Updates the BIOS using the ASUS Update or AFUDOS utilities. Important notes It is recommended that you are using Windows™ XP, select...
Motherboard DIY Troubleshooting Guide
Page 68
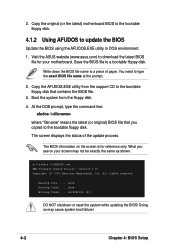
... floppy disk. All rights reserved. Doing so may not be exactly the same as shown. Visit the ASUS website (www.asus.com) to download the latest BIOS file for reference only. Write down the BIOS file name to the bootable floppy disk. The screen displays the status of paper. done Erasing flash ....... 2. Save the BIOS file to the bootable floppy disk that you see on the screen is ...
... floppy disk. All rights reserved. Doing so may not be exactly the same as shown. Visit the ASUS website (www.asus.com) to download the latest BIOS file for reference only. Write down the BIOS file name to the bootable floppy disk. The screen displays the status of paper. done Erasing flash ....... 2. Save the BIOS file to the bootable floppy disk that you see on the screen is ...

Motherboard DIY Troubleshooting Guide
Page 69
...At the DOS prompt, type the command line: afudos /o where "filename" can be used as shown. The BIOS information on your screen may not be any user provided filename of not more than eight (8) alpha-numeric characters ... ..... Version 1.10 Copyright (C) 2002 American Megatrends, Inc. When the BIOS update process is for the extension name. done A:\> 5. Main filename Extension name A:\>afudos /oMYBIOS03.rom AMI Firmware Update Utility - Reading flash ..... 0x0008CC00 (9%) ASUS P4S800D-E Deluxe motherboard 4-3 A:\>afudos /iP4S800D.rom AMI Firmware Update Utility - done Writing...
...At the DOS prompt, type the command line: afudos /o where "filename" can be used as shown. The BIOS information on your screen may not be any user provided filename of not more than eight (8) alpha-numeric characters ... ..... Version 1.10 Copyright (C) 2002 American Megatrends, Inc. When the BIOS update process is for the extension name. done A:\> 5. Main filename Extension name A:\>afudos /oMYBIOS03.rom AMI Firmware Update Utility - Reading flash ..... 0x0008CC00 (9%) ASUS P4S800D-E Deluxe motherboard 4-3 A:\>afudos /iP4S800D.rom AMI Firmware Update Utility - done Writing...


