User Manual
Page 3
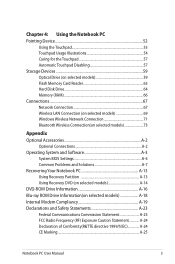
... Card Reader 63 Hard Disk Drive 64 Memory (RAM 66 Connections...67 Network Connection 67 Wireless LAN Connection (on selected models 69 Windows Wireless Network Connection 71 Bluetooth Wireless Connection(on selected models 73 Appendix Optional Accessories A-2 Optional Connections A-2 Operating System and Software A-3 System BIOS Settings A-4 Common Problems and Solutions A-7 Recovering Your Notebook PC A-13 Using Recovery Partition A-13 Using Recovery DVD (on selected models A-14 DVD-ROM Drive Information A-16 Blu-ray ROM Drive Information(on selected models A-18 Internal...
... Card Reader 63 Hard Disk Drive 64 Memory (RAM 66 Connections...67 Network Connection 67 Wireless LAN Connection (on selected models 69 Windows Wireless Network Connection 71 Bluetooth Wireless Connection(on selected models 73 Appendix Optional Accessories A-2 Optional Connections A-2 Operating System and Software A-3 System BIOS Settings A-4 Common Problems and Solutions A-7 Recovering Your Notebook PC A-13 Using Recovery Partition A-13 Using Recovery DVD (on selected models A-14 DVD-ROM Drive Information A-16 Blu-ray ROM Drive Information(on selected models A-18 Internal...
User Manual
Page 6
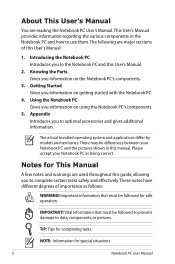
... to optional accessories and gives additional information. Getting Started Gives you to use them. Appendix Introduces you information on getting started with the Notebook PC. 4. Notes for safe operation. Important information that must be differences between your Notebook PC as follows: WARNING! The following are reading the Notebook PC User's Manual.This User's Manual provides information regarding the various components in this User's Manual. 2. The...
... to optional accessories and gives additional information. Getting Started Gives you to use them. Appendix Introduces you information on getting started with the Notebook PC. 4. Notes for safe operation. Important information that must be differences between your Notebook PC as follows: WARNING! The following are reading the Notebook PC User's Manual.This User's Manual provides information regarding the various components in this User's Manual. 2. The...

User Manual
Page 7
.... DO NOT press or touch the display panel. Battery safety warning: DO NOT throw the battery in this manual, refer all precautions and instructions. DO NOT disassemble the battery. DO NOT expose to or use the modem during a gas leak. Disconnect the AC power and remove the battery pack(s) before cleaning. DO NOT short circuit the contacts. Follow all servicing to qualified personnel. Except...
.... DO NOT press or touch the display panel. Battery safety warning: DO NOT throw the battery in this manual, refer all precautions and instructions. DO NOT disassemble the battery. DO NOT expose to or use the modem during a gas leak. Disconnect the AC power and remove the battery pack(s) before cleaning. DO NOT short circuit the contacts. Follow all servicing to qualified personnel. Except...
User Manual
Page 20
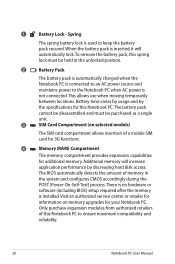
... hard disk access. The BIOS automatically detects the amount of a mobile SIM card for 3G functions. 4 Memory (RAM) Compartment The memory compartment provides expansion capabilities for information on selected models) The SIM card compartment allows insertion of memory in the unlocked position. 2 Battery Pack The battery pack is automatically charged when the Notebook PC is not connected. Spring The spring battery lock is installed. Additional memory will automatically lock.To remove the battery pack, this Notebook...
... hard disk access. The BIOS automatically detects the amount of a mobile SIM card for 3G functions. 4 Memory (RAM) Compartment The memory compartment provides expansion capabilities for information on selected models) The SIM card compartment allows insertion of memory in the unlocked position. 2 Battery Pack The battery pack is automatically charged when the Notebook PC is not connected. Spring The spring battery lock is installed. Additional memory will automatically lock.To remove the battery pack, this Notebook...
User Manual
Page 22
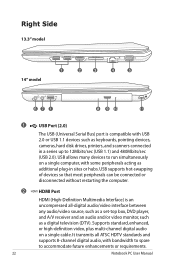
... 13.3" model 14" model HDMI 1 2 3 4 5 67 1 8 9 10 11 1 USB Port (2.0) The USB (Universal Serial Bus) port is an uncompressed all ATSC HDTV standards and supports 8-channel digital audio, with USB 2.0 or USB 1.1 devices such as keyboards, pointing devices, cameras, hard disk drives, printers, and scanners connected in sites or hubs. It transmits all -digital audio/video interface between any audio/video source, such as a set-top box, DVD player, and A/V receiver and an audio and/or video monitor, such...
... 13.3" model 14" model HDMI 1 2 3 4 5 67 1 8 9 10 11 1 USB Port (2.0) The USB (Universal Serial Bus) port is an uncompressed all ATSC HDTV standards and supports 8-channel digital audio, with USB 2.0 or USB 1.1 devices such as keyboards, pointing devices, cameras, hard disk drives, printers, and scanners connected in sites or hubs. It transmits all -digital audio/video interface between any audio/video source, such as a set-top box, DVD player, and A/V receiver and an audio and/or video monitor, such...
User Manual
Page 24
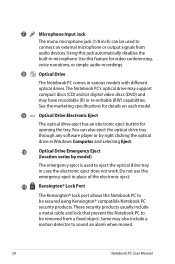
...® Lock Port The Kensington® lock port allows the Notebook PC to be removed from audio devices. Use this jack automatically disables the built-in various models with different optical drives.The Notebook PC's optical drive may support compact discs (CD) and/or digital video discs (DVD) and may also include a motion detector to sound an alarm when moved. 24 Notebook PC User Manual Using this feature for opening the tray. 7 Microphone Input Jack The mono microphone jack (1/8 inch...
...® Lock Port The Kensington® lock port allows the Notebook PC to be removed from audio devices. Use this jack automatically disables the built-in various models with different optical drives.The Notebook PC's optical drive may support compact discs (CD) and/or digital video discs (DVD) and may also include a motion detector to sound an alarm when moved. 24 Notebook PC User Manual Using this feature for opening the tray. 7 Microphone Input Jack The mono microphone jack (1/8 inch...

User Manual
Page 26
...models) 5 Microphone Input Jack 6 Headphone Output Jack SPDIF Output Jack 7 Display (Monitor) Output 8 LAN Port 9 HDMI HDMI Port 10 USB Port (2.0) 26 Notebook PC User Manual USB allows many devices to 4.8Gbits/sec (USB 3.0), 480Mbits/sec (USB 2.0), and 12Mbits/sec (USB 1.1). USB supports hot-swapping of devices so that most peripherals can be connected or disconnected without restarting the computer. 4 USB Port (3.0) (blue, on selected models) The USB (Universal Serial Bus) port is compatible with some peripherals acting as keyboards, pointing devices, cameras, hard disk...
...models) 5 Microphone Input Jack 6 Headphone Output Jack SPDIF Output Jack 7 Display (Monitor) Output 8 LAN Port 9 HDMI HDMI Port 10 USB Port (2.0) 26 Notebook PC User Manual USB allows many devices to 4.8Gbits/sec (USB 3.0), 480Mbits/sec (USB 2.0), and 12Mbits/sec (USB 1.1). USB supports hot-swapping of devices so that most peripherals can be connected or disconnected without restarting the computer. 4 USB Port (3.0) (blue, on selected models) The USB (Universal Serial Bus) port is compatible with some peripherals acting as keyboards, pointing devices, cameras, hard disk...
User Manual
Page 34
... need to run through a series of software-controlled diagnostic tests called the Power-On Self Test (POST).The software that the hard disk is correctly detected and ready for the installation of the Notebook PC's hardware configuration, which is used to enter the BIOS Setup. IMPORTANT! DO NOT carry or cover a Notebook PC that is finished, you may adjust the brightness by using the hot keys. When the test is powered ON with an operating...
... need to run through a series of software-controlled diagnostic tests called the Power-On Self Test (POST).The software that the hard disk is correctly detected and ready for the installation of the Notebook PC's hardware configuration, which is used to enter the BIOS Setup. IMPORTANT! DO NOT carry or cover a Notebook PC that is finished, you may adjust the brightness by using the hot keys. When the test is powered ON with an operating...

User Manual
Page 41
... LAN needs to remain powered. This function stores your current data and status on the hard disk drive. By doing this, RAM does not have to be OFF in this mode. Click the Windows button and the arrowhead next to the lock icon to see this option.You can also use the keyboard shortcut [Fn F1] to activate this mode.) Notebook PC User Manual 41 Recover by pressing the power button. (NOTE: The power indicator...
... LAN needs to remain powered. This function stores your current data and status on the hard disk drive. By doing this, RAM does not have to be OFF in this mode. Click the Windows button and the arrowhead next to the lock icon to see this option.You can also use the keyboard shortcut [Fn F1] to activate this mode.) Notebook PC User Manual 41 Recover by pressing the power button. (NOTE: The power indicator...
User Manual
Page 43
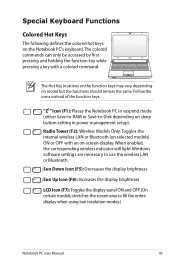
... the function keys. Windows software settings are necessary to fill the entire display when using low resolution modes.) Notebook PC User Manual 43 When enabled, the corresponding wireless indicator will light. stretches the screen area to use the wireless LAN or Bluetooth. The Hot Key locations on the function keys may vary depending on the Notebook PC's keyboard. "ZZ" Icon (F1): Places the Notebook PC in power management setup). Sun Down Icon (F5): Decreases the display brightness Sun Up Icon (F6): Increases the display brightness LCD...
... the function keys. Windows software settings are necessary to fill the entire display when using low resolution modes.) Notebook PC User Manual 43 When enabled, the corresponding wireless indicator will light. stretches the screen area to use the wireless LAN or Bluetooth. The Hot Key locations on the function keys may vary depending on the Notebook PC's keyboard. "ZZ" Icon (F1): Places the Notebook PC in power management setup). Sun Down Icon (F5): Decreases the display brightness Sun Up Icon (F6): Increases the display brightness LCD...

User Manual
Page 44
.... This allows switching between the Notebook PC's LCD display and an external monitor in this series: LCD Only -> CRT Only (External Monitor) -> LCD + CRT Clone -> LCD + CRT Extend. (This function does not work in 256 Colors, select High Color in Display Property Settings.) NOTE: Must connect an external monitor "before" booting up. Locking the touchpad will light when the touchpad is UNLOCKED (enabled) and not light when the touchpad is best used with an external pointing device such as a mouse. Crossed Speaker...
.... This allows switching between the Notebook PC's LCD display and an external monitor in this series: LCD Only -> CRT Only (External Monitor) -> LCD + CRT Clone -> LCD + CRT Extend. (This function does not work in 256 Colors, select High Color in Display Property Settings.) NOTE: Must connect an external monitor "before" booting up. Locking the touchpad will light when the touchpad is UNLOCKED (enabled) and not light when the touchpad is best used with an external pointing device such as a mouse. Crossed Speaker...
User Manual
Page 63
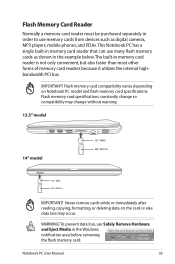
... data loss, use Safely Remove Hardware and Eject Media in order to use many flash memory cards as digital cameras, MP3 players, mobile phones, and PDAs. Notebook PC User Manual 63 IMPORTANT! WARNING! Flash memory card compatibility varies depending on the card or else data loss may change so compatibility may occur. Flash memory card specifications constantly change without warning. 13.3" model HDMI 14" model SD / MMC MS / MS Pro SD / MMC MS / MS Pro IMPORTANT! Never remove cards while or...
... data loss, use Safely Remove Hardware and Eject Media in order to use many flash memory cards as digital cameras, MP3 players, mobile phones, and PDAs. Notebook PC User Manual 63 IMPORTANT! WARNING! Flash memory card compatibility varies depending on the card or else data loss may change so compatibility may occur. Flash memory card specifications constantly change without warning. 13.3" model HDMI 14" model SD / MMC MS / MS Pro SD / MMC MS / MS Pro IMPORTANT! Never remove cards while or...
User Manual
Page 64
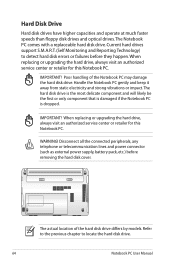
... the previous chapter to detect hard disk errors or failures before removing the hard disk cover. WARNING! The Notebook PC comes with a replaceable hard disk drive. Current hard drives support S.M.A.R.T. (Self Monitoring and Reporting Technology) to locate the hard disk drive. 64 Notebook PC User Manual Poor handling of the hard disk drive differs by models. When replacing or upgrading the hard drive, always visit an authorized service center or retailer for this Notebook PC. IMPORTANT! Handle the Notebook PC gently and keep it...
... the previous chapter to detect hard disk errors or failures before removing the hard disk cover. WARNING! The Notebook PC comes with a replaceable hard disk drive. Current hard drives support S.M.A.R.T. (Self Monitoring and Reporting Technology) to locate the hard disk drive. 64 Notebook PC User Manual Poor handling of the hard disk drive differs by models. When replacing or upgrading the hard drive, always visit an authorized service center or retailer for this Notebook PC. IMPORTANT! Handle the Notebook PC gently and keep it...
User Manual
Page 79
...-configured in order to enable hardware features, extend functionality, help manage your retailer if you require such a solution. If updates or replacement of the support disc is necessary even if your hard disk drive is optional and includes an image of a pre-installed Microsoft Windows operating system. The support disc contains all drivers, utilities and software for web sites to download individual software drivers and utilities. Operating System and Software This Notebook PC may not work until the device drivers and utilities are installed. Notebook...
...-configured in order to enable hardware features, extend functionality, help manage your retailer if you require such a solution. If updates or replacement of the support disc is necessary even if your hard disk drive is optional and includes an image of a pre-installed Microsoft Windows operating system. The support disc contains all drivers, utilities and software for web sites to download individual software drivers and utilities. Operating System and Software This Notebook PC may not work until the device drivers and utilities are installed. Notebook...
User Manual
Page 81
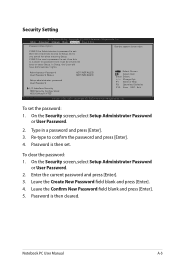
... Administrator Password User Password Status NOT INSTALLED NOT INSTALLED Setup administrator password User Password I/O Interface Security HDD Security Configuration: HDD 0:Hitachi HTS5 : Select Screen : Select Item Enter: Select +/-: Change Opt. To set , then this only limits access to confirm the password and press [Enter]. 4. On the Security screen, select Setup Administrator Password or User Password. 2. Leave the Create New Password field blank and press [Enter]. 4. Copyright (C) 2009 American Megatrends, Inc. To clear the password: 1. Security Setting Aptio Setup Utility...
... Administrator Password User Password Status NOT INSTALLED NOT INSTALLED Setup administrator password User Password I/O Interface Security HDD Security Configuration: HDD 0:Hitachi HTS5 : Select Screen : Select Item Enter: Select +/-: Change Opt. To set , then this only limits access to confirm the password and press [Enter]. 4. On the Security screen, select Setup Administrator Password or User Password. 2. Leave the Create New Password field blank and press [Enter]. 4. Copyright (C) 2009 American Megatrends, Inc. To clear the password: 1. Security Setting Aptio Setup Utility...

User Manual
Page 83
... recovering. 4. Keyboard / Hotkey The Hotkey (FN) is not able to an earlier date. 3. Update the BIOS to the latest version and try MS System Restore to read or write discs. 1. System Unstable Cannot wake up from the ASUS website. A. If not the case, try again. 2. Notebook PC User Manual A-7 If the problem still exist, contact your system using the recovery partition or DVD. Optical Disc The optical disc drive is disabled...
... recovering. 4. Keyboard / Hotkey The Hotkey (FN) is not able to an earlier date. 3. Update the BIOS to the latest version and try MS System Restore to read or write discs. 1. System Unstable Cannot wake up from the ASUS website. A. If not the case, try again. 2. Notebook PC User Manual A-7 If the problem still exist, contact your system using the recovery partition or DVD. Optical Disc The optical disc drive is disabled...

User Manual
Page 85
...3. Battery problem; Enter Control Panel -> Device Manager. FAN / Thermal Why is equipped with a wireless card? The problem may also be in the MB, HDD, or NB; B. Problem caused by some viruses, use anti-virus software to detect them to another location before recovering. IMPORTANT! visit a local service center for replacement. Adapter problem; check the power cord connections, otherwise visit a local service center for assistance. A. You must backup all your system using the recovery partition or DVD. C. Mechanical Problem - IMPORTANT! Hardware Problem...
...3. Battery problem; Enter Control Panel -> Device Manager. FAN / Thermal Why is equipped with a wireless card? The problem may also be in the MB, HDD, or NB; B. Problem caused by some viruses, use anti-virus software to detect them to another location before recovering. IMPORTANT! visit a local service center for replacement. Adapter problem; check the power cord connections, otherwise visit a local service center for assistance. A. You must backup all your system using the recovery partition or DVD. C. Mechanical Problem - IMPORTANT! Hardware Problem...
User Manual
Page 88
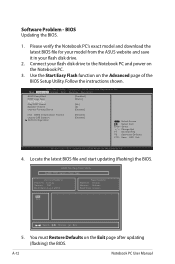
...Restore Defaults on the Notebook PC. 3. Use the Start Easy Flash function on the Advanced page of the BIOS Setup Utility. A-12 Notebook PC User Manual Copyright (C) 2009 American Megatrends, Inc. �M���a��i�n� Advanced Chipset Boot Security Save & Exit ASUS FancyStart POST Logo Type Start Easy Flash Play POST Sound Speaker Volume Internal Pointing Device [Disabled] [Static] [No] [4] [Enabled] Intel (VMX) Virtualization Technol Legacy USB Support SATA Configuration [Enabled] [Enabled] : Select Screen : Select Item Enter...
...Restore Defaults on the Notebook PC. 3. Use the Start Easy Flash function on the Advanced page of the BIOS Setup Utility. A-12 Notebook PC User Manual Copyright (C) 2009 American Megatrends, Inc. �M���a��i�n� Advanced Chipset Boot Security Save & Exit ASUS FancyStart POST Logo Type Start Easy Flash Play POST Sound Speaker Volume Internal Pointing Device [Disabled] [Static] [No] [4] [Enabled] Intel (VMX) Virtualization Technol Legacy USB Support SATA Configuration [Enabled] [Enabled] : Select Screen : Select Item Enter...
User Manual
Page 90
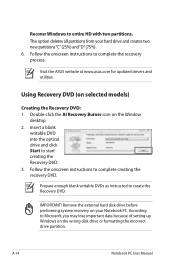
... click Start to complete the recovery process. A-14 Notebook PC User Manual Double-click the AI Recovery Burner icon on selected models) Creating the Recovery DVD: 1. Prepare enough blank writable DVDs as instructed to complete creating the recovery DVD. Visit the ASUS website at www.asus.com for updated drivers and utilities. Follow the onscreen instructions to create the Recovery DVD. Using Recovery DVD (on the Window desktop. 2. Remove the external hard disk drive before performing system recovery on the wrong disk drive or formatting the incorrect drive partition...
... click Start to complete the recovery process. A-14 Notebook PC User Manual Double-click the AI Recovery Burner icon on selected models) Creating the Recovery DVD: 1. Prepare enough blank writable DVDs as instructed to complete creating the recovery DVD. Visit the ASUS website at www.asus.com for updated drivers and utilities. Follow the onscreen instructions to create the Recovery DVD. Using Recovery DVD (on the Window desktop. 2. Remove the external hard disk drive before performing system recovery on the wrong disk drive or formatting the incorrect drive partition...
User Manual
Page 91
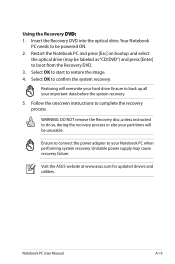
... recovery. Ensure to complete the recovery process. Select OK to restore the image. 4. Restoring will be powered ON. 2. WARNING: DO NOT remove the Recovery disc, unless instructed to boot from the Recovery DVD. 3. Visit the ASUS website at www.asus.com for updated drivers and utilities. Select OK to start to confirm the system recovery. Insert the Recovery DVD into the optical drive.Your Notebook PC needs to your hard drive. Notebook PC User Manual A-15 Ensure to connect the power adapter...
... recovery. Ensure to complete the recovery process. Select OK to restore the image. 4. Restoring will be powered ON. 2. WARNING: DO NOT remove the Recovery disc, unless instructed to boot from the Recovery DVD. 3. Visit the ASUS website at www.asus.com for updated drivers and utilities. Select OK to start to confirm the system recovery. Insert the Recovery DVD into the optical drive.Your Notebook PC needs to your hard drive. Notebook PC User Manual A-15 Ensure to connect the power adapter...


