
P3V4X User Manual
Page 4
...ASUS P3V4X User's Manual HARDWARE SETUP 14 3.1 P3V4X Motherboard Layout 14 3.2 Layout Contents 15 3.3 Hardware Setup Procedure 16 3.4 Motherboard Settings 16 3.5 System Memory (DIMM 20 3.6 Central Processing Unit (CPU 23 3.6.1 Quick CPU Installation Procedure 23 3.6.2 Attaching the Heatsink 24 3.6.3 Installing the Universal Retention Mechanism 24 3.6.4 Installing the Processor 26 3.6.5 Removing the Processor...7 1.2 Item Checklist 7 2. FEATURES 8 2.1 The ASUS P3V4X 8 2.1.1 Specifications 8 2.1.2 Special Features 10 2.1.3 Performance Features 10 2.1.4 Intelligence 11...
...ASUS P3V4X User's Manual HARDWARE SETUP 14 3.1 P3V4X Motherboard Layout 14 3.2 Layout Contents 15 3.3 Hardware Setup Procedure 16 3.4 Motherboard Settings 16 3.5 System Memory (DIMM 20 3.6 Central Processing Unit (CPU 23 3.6.1 Quick CPU Installation Procedure 23 3.6.2 Attaching the Heatsink 24 3.6.3 Installing the Universal Retention Mechanism 24 3.6.4 Installing the Processor 26 3.6.5 Removing the Processor...7 1.2 Item Checklist 7 2. FEATURES 8 2.1 The ASUS P3V4X 8 2.1.1 Specifications 8 2.1.2 Special Features 10 2.1.3 Performance Features 10 2.1.4 Intelligence 11...
P3V4X User Manual
Page 7
...-L101 Wake-On-LAN 10/100 Ethernet Card (optional) CPU thermal sensor cable (optional) ASUS P3V4X User's Manual 7 BIOS SETUP 5. If you discover damaged or missing items, contact your retailer. (1) ASUS Motherboard (1) Universal Retention Mechanism for SECC2/SECC/SEPP processors (1) Ribbon cable for master and slave UltraDMA/66 or UltraDMA/33 IDE drives (1) Ribbon...
...-L101 Wake-On-LAN 10/100 Ethernet Card (optional) CPU thermal sensor cable (optional) ASUS P3V4X User's Manual 7 BIOS SETUP 5. If you discover damaged or missing items, contact your retailer. (1) ASUS Motherboard (1) Universal Retention Mechanism for SECC2/SECC/SEPP processors (1) Ribbon cable for master and slave UltraDMA/66 or UltraDMA/33 IDE drives (1) Ribbon...

P3V4X User Manual
Page 8
FEATURES 2.1 The ASUS P3V4X The ASUS P3V4X motherboard is carefully designed for the demanding PC user who wants advanced features processed by the fastest processors. 2.1.1 Specifications • Latest Intel Processor Support Intel Pentium® III 100MHz FSB, Katmai core SECC2 Intel Pentium® III B ...drives. • Wake-On-LAN Connector: Supports Wake-On-LAN activity through BIOS setup when JumperFree™ mode is enabled. Appendix). 8 ASUS P3V4X User's Manual 2. and UltraDMA/66 / UltraDMA/33. • PC133 Memory / VCM /HSDRAM Support: Equipped with 512, 256, 128, ...
FEATURES 2.1 The ASUS P3V4X The ASUS P3V4X motherboard is carefully designed for the demanding PC user who wants advanced features processed by the fastest processors. 2.1.1 Specifications • Latest Intel Processor Support Intel Pentium® III 100MHz FSB, Katmai core SECC2 Intel Pentium® III B ...drives. • Wake-On-LAN Connector: Supports Wake-On-LAN activity through BIOS setup when JumperFree™ mode is enabled. Appendix). 8 ASUS P3V4X User's Manual 2. and UltraDMA/66 / UltraDMA/33. • PC133 Memory / VCM /HSDRAM Support: Equipped with 512, 256, 128, ...
P3V4X User Manual
Page 9
ASUS P3V4X User's Manual 9 FEATURES • Wake-On-Ring Connector: Supports Wake-On-Ring activity through the onboard hardware ASUS ASIC and the bundled ASUS PC Probe. • SMBus: Features the System Management Bus interface, which is used to physically transport commands ... LAN cards (PCI supports up to the memory and processor. • Universal Retention Mechanism: Supports a Pentium®III / II processor packaged in a Single Edge Contact Cartridge (SECC2/SECC) or a Celeron™ processor packaged in a Single Edge Processor Package (SEPP). • Smart BIOS: 2MB firmware ...
ASUS P3V4X User's Manual 9 FEATURES • Wake-On-Ring Connector: Supports Wake-On-Ring activity through the onboard hardware ASUS ASIC and the bundled ASUS PC Probe. • SMBus: Features the System Management Bus interface, which is used to physically transport commands ... LAN cards (PCI supports up to the memory and processor. • Universal Retention Mechanism: Supports a Pentium®III / II processor packaged in a Single Edge Contact Cartridge (SECC2/SECC) or a Celeron™ processor packaged in a Single Edge Processor Package (SEPP). • Smart BIOS: 2MB firmware ...
P3V4X User Manual
Page 10
...bit device drivers and installation procedures for Windows95/98/NT . • Symbios SCSI BIOS: Supports optional ASUS SCSI controller cards through the onboard SYMBIOS firmware. 2.1.3 Performance Features • Concurrent PCI: Concurrent PCI allows... multiple PCI transfers from PCI master busses to the memory and processor. • High-Speed Data Transfer Interface: IDE transfers using UltraDMA/33 Bus Master IDE can be enabled...) for higher system performance at minimal cost premium. 10 ASUS P3V4X User's Manual FEATURES Performance 2.
...bit device drivers and installation procedures for Windows95/98/NT . • Symbios SCSI BIOS: Supports optional ASUS SCSI controller cards through the onboard SYMBIOS firmware. 2.1.3 Performance Features • Concurrent PCI: Concurrent PCI allows... multiple PCI transfers from PCI master busses to the memory and processor. • High-Speed Data Transfer Interface: IDE transfers using UltraDMA/33 Bus Master IDE can be enabled...) for higher system performance at minimal cost premium. 10 ASUS P3V4X User's Manual FEATURES Performance 2.
P3V4X User Manual
Page 11
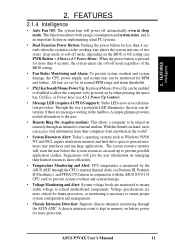
... information to the user. • Remote Ring On (requires modem): This allows a computer to present enormous user interfaces and run large applications. ASUS P3V4X User's Manual 11 All fans are set for its normal RPM range and alarm thresholds. • PS/2 Keyboard/Mouse Power Up: Keyboard/Mouse ...are used up to prevent system overheat and system damage. • Voltage Monitoring and Alert: System voltage levels are more critical for future processors, so monitoring is pressed for less than 4 seconds, the system enters the soft-off mode regardless of two states: sleep mode or soft...
... information to the user. • Remote Ring On (requires modem): This allows a computer to present enormous user interfaces and run large applications. ASUS P3V4X User's Manual 11 All fans are set for its normal RPM range and alarm thresholds. • PS/2 Keyboard/Mouse Power Up: Keyboard/Mouse ...are used up to prevent system overheat and system damage. • Voltage Monitoring and Alert: System voltage levels are more critical for future processors, so monitoring is pressed for less than 4 seconds, the system enters the soft-off mode regardless of two states: sleep mode or soft...
P3V4X User Manual
Page 12
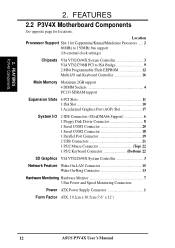
FEATURES 2.2 P3V4X Motherboard Components See opposite page for Coppermine/Katmai/Mendecino Processors ...... 2 66MHz to 150MHz bus support (16 external clock settings) Chipsets VIA VT82C694X System Controller 3 VIA VT82C596B PCI to ISA Bridge 9 2 Mbit Programmable Flash EEPROM 12 ... 13 Hardware Monitoring Hardware Monitor 7 3 Fan Power and Speed Monitoring Connectors Power ATX Power Supply Connector 1 Form Factor ATX, 19.2cm x 30.5cm (7.6" x 12") 12 ASUS P3V4X User's Manual 2. Location Processor Support Slot 1 for locations. FEATURES...
FEATURES 2.2 P3V4X Motherboard Components See opposite page for Coppermine/Katmai/Mendecino Processors ...... 2 66MHz to 150MHz bus support (16 external clock settings) Chipsets VIA VT82C694X System Controller 3 VIA VT82C596B PCI to ISA Bridge 9 2 Mbit Programmable Flash EEPROM 12 ... 13 Hardware Monitoring Hardware Monitor 7 3 Fan Power and Speed Monitoring Connectors Power ATX Power Supply Connector 1 Form Factor ATX, 19.2cm x 30.5cm (7.6" x 12") 12 ASUS P3V4X User's Manual 2. Location Processor Support Slot 1 for locations. FEATURES...

P3V4X User Manual
Page 17
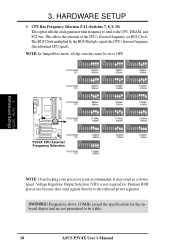
H/W SETUP Motherboard Settings 3. See the processor table on the following page. ON ON 1 2 3 4 5 6 7 8 9 10 1 2 3 4 5 6 7 8 9 10 P3V4X AGP Bus Freq. x2/3 R ON ON 1 2 3 4 5 6 7 8 9 10 Auto Mode 1 2 3 4 5 6 7 8 9 10 AGP Bus Freq. =DRAM Freq. JumperFree™ Mode (JEN) This ... frquency. The default sets the AGP frequency to be set Switch 5 to OFF. x1 =DRAM Freq. 3. The JumperFree™ mode allows processor settings to enable or disable the JumperFree™ mode. HARDWARE SETUP 1. x1/2 P3V4X AGP Bus Frequency Setting ASUS P3V4X User's Manual 17
H/W SETUP Motherboard Settings 3. See the processor table on the following page. ON ON 1 2 3 4 5 6 7 8 9 10 1 2 3 4 5 6 7 8 9 10 P3V4X AGP Bus Freq. x2/3 R ON ON 1 2 3 4 5 6 7 8 9 10 Auto Mode 1 2 3 4 5 6 7 8 9 10 AGP Bus Freq. =DRAM Freq. JumperFree™ Mode (JEN) This ... frquency. The default sets the AGP frequency to be set Switch 5 to OFF. x1 =DRAM Freq. 3. The JumperFree™ mode allows processor settings to enable or disable the JumperFree™ mode. HARDWARE SETUP 1. x1/2 P3V4X AGP Bus Frequency Setting ASUS P3V4X User's Manual 17
P3V4X User Manual
Page 18
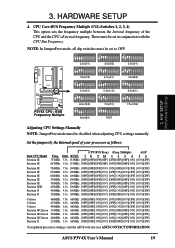
...140MHz 35MHz 1 2 3 4 5 6 7 8 9 10 150MHz 37MHz 1 2 3 4 5 6 7 8 9 10 124MHz 31MHz P3V4X CPU External Frequency Selection ON 1 2 3 4 5 6 7 8 9 10 CPU/DRAM PCI 133MHz 33MHz NOTE: Overclocking your processor is not required for the onboard chipset and are not guaranteed to the onboard power regulator. WARNING! It...switches must be stable. 18 ASUS P3V4X User's Manual Voltage Regulator Output Selection (VID) is not recommended. H/W SETUP Motherboard Settings 3. Frequencies above 133MHz exceed the specifications for Pentium III/II processors because they send signals directly ...
...140MHz 35MHz 1 2 3 4 5 6 7 8 9 10 150MHz 37MHz 1 2 3 4 5 6 7 8 9 10 124MHz 31MHz P3V4X CPU External Frequency Selection ON 1 2 3 4 5 6 7 8 9 10 CPU/DRAM PCI 133MHz 33MHz NOTE: Overclocking your processor is not required for the onboard chipset and are not guaranteed to the onboard power regulator. WARNING! It...switches must be stable. 18 ASUS P3V4X User's Manual Voltage Regulator Output Selection (VID) is not recommended. H/W SETUP Motherboard Settings 3. Frequencies above 133MHz exceed the specifications for Pentium III/II processors because they send signals directly ...
P3V4X User Manual
Page 19
...][OFF][ON] [ON][OFF] Pentium II 233MHz 3.5x 66MHz [OFF][OFF][ON][ON] [OFF][OFF][ON][ON] [ON][OFF] For updated processor settings, visit the ASUS web site (see ASUS CONTACT INFORMATION) ASUS P3V4X User's Manual 19 3. Multiple) AGP Freq. ON ON ON 1 2 3 4 5 6 7 8 9 10 2.0x(2/1) ON 1 2 3 4 5 6 7 8 9 10 2.5x(5/2) ON 1 2 3 4 5 6 7 8 9 10 3.0x(3/1) ON 1 2 3 4 5 6 7 8 9 10 1 2 3 4 5 6 7 8 9 10 1 2 3 4 5 6 7 8 9 10...
...][OFF][ON] [ON][OFF] Pentium II 233MHz 3.5x 66MHz [OFF][OFF][ON][ON] [OFF][OFF][ON][ON] [ON][OFF] For updated processor settings, visit the ASUS web site (see ASUS CONTACT INFORMATION) ASUS P3V4X User's Manual 19 3. Multiple) AGP Freq. ON ON ON 1 2 3 4 5 6 7 8 9 10 2.0x(2/1) ON 1 2 3 4 5 6 7 8 9 10 2.5x(5/2) ON 1 2 3 4 5 6 7 8 9 10 3.0x(3/1) ON 1 2 3 4 5 6 7 8 9 10 1 2 3 4 5 6 7 8 9 10 1 2 3 4 5 6 7 8 9 10...
P3V4X User Manual
Page 23
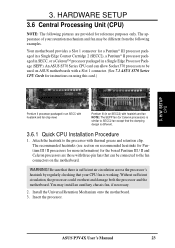
... CPU Installation Procedure 1. Install the Universal Retention Mechanism onto the motherboard. 3. Your motherboard provides a Slot 1 connector for instructions on the motherboard. Without sufficient circulation, the processor could overheat and damage both the processor and the motherboard. ASUS P3V4X User's Manual 23 Attach the heatsink to the fan connectors on using this card.) Pentium II...
... CPU Installation Procedure 1. Install the Universal Retention Mechanism onto the motherboard. 3. Your motherboard provides a Slot 1 connector for instructions on the motherboard. Without sufficient circulation, the processor could overheat and damage both the processor and the motherboard. ASUS P3V4X User's Manual 23 Attach the heatsink to the fan connectors on using this card.) Pentium II...

P3V4X User Manual
Page 24
...it locks into place. You may not reflect those for Intel Celeron processors) is similar to provide adequate circulation across the processor's passive heatsink. 24 ASUS P3V4X User's Manual 3. Attach the heatsink to the processor core with Pentium® II Push the two lock arms one ...direction to clamp the heatsink onto the processor and the other direction to the processor package. Place the ...
...it locks into place. You may not reflect those for Intel Celeron processors) is similar to provide adequate circulation across the processor's passive heatsink. 24 ASUS P3V4X User's Manual 3. Attach the heatsink to the processor core with Pentium® II Push the two lock arms one ...direction to clamp the heatsink onto the processor and the other direction to the processor package. Place the ...
P3V4X User Manual
Page 25
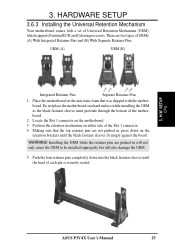
...the black fastener sleeves must protrude through the bottom of the motherboard. 2. Position the retention mechanism on the motherboard. 3. H/W SETUP CPU ASUS P3V4X User's Manual 25 3. There are pushed in , press down into the black fastener sleeves until the black fastener sleeves fit snugly against ...the board. Locate the Slot 1 connector on either side of Universal Retention Mechanism (URM), which supports Pentium III / II and Celeron processors. Making sure that was shipped with a set of the Slot 1 connector. 4. Place the motherboard on the anti-static foam that the...
...the black fastener sleeves must protrude through the bottom of the motherboard. 2. Position the retention mechanism on the motherboard. 3. H/W SETUP CPU ASUS P3V4X User's Manual 25 3. There are pushed in , press down into the black fastener sleeves until the black fastener sleeves fit snugly against ...the board. Locate the Slot 1 connector on either side of Universal Retention Mechanism (URM), which supports Pentium III / II and Celeron processors. Making sure that was shipped with a set of the Slot 1 connector. 4. Place the motherboard on the anti-static foam that the...
P3V4X User Manual
Page 26
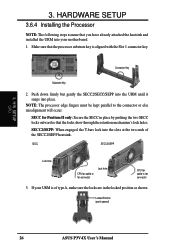
... CPU fan cable to fan connector Lock hole CPU fan cable to the connector or else misalignment will occur. Locked Position (push upward) 26 ASUS P3V4X User's Manual 3. Push down firmly but gently the SECC2/SECC/SEPP into the URM until it snaps into your URM is aligned with the... Slot 1 connector key. Make sure that the locks show through the retention mechanism's lock holes. NOTE: The processor edge fingers must be kept parallel to fan connector 3. If your motherboard. 1. SECC2/SEPP: When engaged, the T-bars lock into the slots at ...
... CPU fan cable to fan connector Lock hole CPU fan cable to the connector or else misalignment will occur. Locked Position (push upward) 26 ASUS P3V4X User's Manual 3. Push down firmly but gently the SECC2/SECC/SEPP into the URM until it snaps into your URM is aligned with the... Slot 1 connector key. Make sure that the locks show through the retention mechanism's lock holes. NOTE: The processor edge fingers must be kept parallel to fan connector 3. If your motherboard. 1. SECC2/SEPP: When engaged, the T-bars lock into the slots at ...

P3V4X User Manual
Page 27
...HARDWARE SETUP 3.6.5 Removing the Processor SECC: Push the SECC's two locks inward to disengage the latch feature and firmly lift the SECC assembly out of the slot 1 connector with three-pin fans that the clamping design is similar to the motherboard's CPU fan connector. ASUS P3V4X User's Manual 27 H/W... SETUP CPU SECC Heatsink & Fan SECC2 Heatsink & Fan NOTE: The SEPP heatsink and fan (for the Slot 1 processors are those with the other thumb on the heatsink and your thumb ...
...HARDWARE SETUP 3.6.5 Removing the Processor SECC: Push the SECC's two locks inward to disengage the latch feature and firmly lift the SECC assembly out of the slot 1 connector with three-pin fans that the clamping design is similar to the motherboard's CPU fan connector. ASUS P3V4X User's Manual 27 H/W... SETUP CPU SECC Heatsink & Fan SECC2 Heatsink & Fan NOTE: The SEPP heatsink and fan (for the Slot 1 processors are those with the other thumb on the heatsink and your thumb ...

P3V4X User Manual
Page 28
... for system thermal management. This is no through-holes or debris. HARDWARE SETUP 3.6.7 Precautions Operating a processor at temperatures above the threshold, check the following: 1. H/W SETUP CPU 28 ASUS P3V4X User's Manual Unlike other motherboards, this motherboard was designed to the processor. To prevent system overheat and/or damage, it is correctly installed onto the...
... for system thermal management. This is no through-holes or debris. HARDWARE SETUP 3.6.7 Precautions Operating a processor at temperatures above the threshold, check the following: 1. H/W SETUP CPU 28 ASUS P3V4X User's Manual Unlike other motherboards, this motherboard was designed to the processor. To prevent system overheat and/or damage, it is correctly installed onto the...
P3V4X User Manual
Page 30
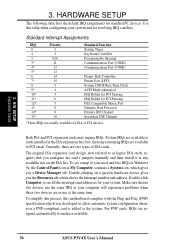
...in any remaining IRQs are assigned automatically from those two devices are two types of your computer will experience problems when those available. 30 ASUS P3V4X User's Manual Double-clicking on the ISA bus. Use this motherboard complies with the Plug and Play (PNP) specification which gives you ... use the same IRQ or your used IRQ Holder for PCI Steering IRQ Holder for PCI Steering PS/2 Compatible Mouse Port Numeric Data Processor Primary IDE Channel Secondary IDE Channel *These IRQs are usually available for your system and for standard PC devices. Both ISA and PCI...
...in any remaining IRQs are assigned automatically from those two devices are two types of your computer will experience problems when those available. 30 ASUS P3V4X User's Manual Double-clicking on the ISA bus. Use this motherboard complies with the Plug and Play (PNP) specification which gives you ... use the same IRQ or your used IRQ Holder for PCI Steering IRQ Holder for PCI Steering PS/2 Compatible Mouse Port Numeric Data Processor Primary IDE Channel Secondary IDE Channel *These IRQs are usually available for your system and for standard PC devices. Both ISA and PCI...
P3V4X User Manual
Page 56
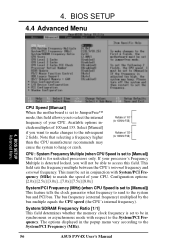
...not be in conjunction with respect to select the internal frequency of 100 and 133. Multiples of 100 (for 100MHz FSB) Multiples of your processor's Frequency Multiple is for 133MHz FSB) CPU : System Frequency Multiple (when CPU Speed is set to [Manual]) This feature tells the ...PCI bus. Note that selecting a frequency higher than the CPU manufacturer recommends may cause the system to the System/PCI Frequency (MHz). 56 ASUS P3V4X User's Manual 4. System/SDRAM Frequency Ratio [1/1] This field determines whether the memory clock frequency is set to be able to access this ...
...not be in conjunction with respect to select the internal frequency of 100 and 133. Multiples of 100 (for 100MHz FSB) Multiples of your processor's Frequency Multiple is for 133MHz FSB) CPU : System Frequency Multiple (when CPU Speed is set to [Manual]) This feature tells the ...PCI bus. Note that selecting a frequency higher than the CPU manufacturer recommends may cause the system to the System/PCI Frequency (MHz). 56 ASUS P3V4X User's Manual 4. System/SDRAM Frequency Ratio [1/1] This field determines whether the memory clock frequency is set to be able to access this ...
P3V4X User Manual
Page 57
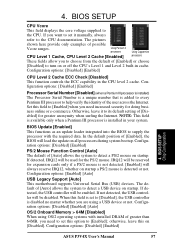
... Internet. Configuration options: [Disabled] [Enabled] 4. If detected, the USB controller will always reserve IRQ12, whether on all processors during system bootup. BIOS SETUP CPU Vcore This field displays the core voltage supplied to detect a PS/2 mouse on or... Chip Configuration ASUS P3V4X User's Manual 57 Configuration options: [Disabled] [Enabled] [Auto] OS/2 Onboard Memory > 64M [Disabled] When using a USB device or not. Configuration options: [Disabled] [Enabled] Processor Serial Number [Disabled] (when a Pentium III processor is installed) The Processor Serial Number ...
... Internet. Configuration options: [Disabled] [Enabled] 4. If detected, the USB controller will always reserve IRQ12, whether on all processors during system bootup. BIOS SETUP CPU Vcore This field displays the core voltage supplied to detect a PS/2 mouse on or... Chip Configuration ASUS P3V4X User's Manual 57 Configuration options: [Disabled] [Enabled] [Auto] OS/2 Onboard Memory > 64M [Disabled] When using a USB device or not. Configuration options: [Disabled] [Enabled] Processor Serial Number [Disabled] (when a Pentium III processor is installed) The Processor Serial Number ...
P3V4X User Manual
Page 60
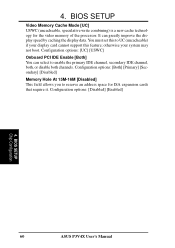
... Hole At 15M-16M [Disabled] This field allows you to reserve an address space for the video memory of the processor. You must set this feature; BIOS SETUP Chip Configuration 60 ASUS P3V4X User's Manual BIOS SETUP Video Memory Cache Mode [UC] USWC (uncacheable, speculative write combining) is a new cache technology for ISA...
... Hole At 15M-16M [Disabled] This field allows you to reserve an address space for the video memory of the processor. You must set this feature; BIOS SETUP Chip Configuration 60 ASUS P3V4X User's Manual BIOS SETUP Video Memory Cache Mode [UC] USWC (uncacheable, speculative write combining) is a new cache technology for ISA...


