
User Manual
Page 1
R P2L-B Pentium® II Motherboard USER'S MANUAL
R P2L-B Pentium® II Motherboard USER'S MANUAL

User Manual
Page 4
...Menu 34 Advanced Features Menu 35 Managing and Updating Your Motherboard's BIOS 36 6. FEATURES 8 Features of the ASUS P2L-B Motherboard 8 Introduction to ASUS Smart Series motherboards 9 Parts of Chipset Features Setup 44 4 ASUS P2L-B User's Manual System Memory (DIMM 17 DIMM Memory Installation 18 3.... of BIOS Features Setup 41 Chipset Features Setup 44 Details of the ASUS P2L-B Motherboard 11 III. INSTALLATION 12 ASUS P2L-B Motherboard Layout 12 Installation Steps 14 1. INTRODUCTION 7 How this manual is organized 7 Item Checklist 7 II. Expansion Cards 24 Expansion Card...
...Menu 34 Advanced Features Menu 35 Managing and Updating Your Motherboard's BIOS 36 6. FEATURES 8 Features of the ASUS P2L-B Motherboard 8 Introduction to ASUS Smart Series motherboards 9 Parts of Chipset Features Setup 44 4 ASUS P2L-B User's Manual System Memory (DIMM 17 DIMM Memory Installation 18 3.... of BIOS Features Setup 41 Chipset Features Setup 44 Details of the ASUS P2L-B Motherboard 11 III. INSTALLATION 12 ASUS P2L-B Motherboard Layout 12 Installation Steps 14 1. INTRODUCTION 7 How this manual is organized 7 Item Checklist 7 II. Expansion Cards 24 Expansion Card...
User Manual
Page 5
... Ethernet Card 63 Features 64 Software Driver Support 64 Question and Answer 64 ASUS P2L-B User's Manual 5 SUPPORT SOFTWARE 56 ASUS Smart Motherboard Support CD 56 Desktop Management Interface (DMI 57 Introducing the ASUS DMI Configuration Utility 57 System Requirements 57 Using the ASUS DMI Configuration Utility 58 VI. CONTENTS Power Management Setup 47 Details of Power...
... Ethernet Card 63 Features 64 Software Driver Support 64 Question and Answer 64 ASUS P2L-B User's Manual 5 SUPPORT SOFTWARE 56 ASUS Smart Motherboard Support CD 56 Desktop Management Interface (DMI 57 Introducing the ASUS DMI Configuration Utility 57 System Requirements 57 Using the ASUS DMI Configuration Utility 58 VI. CONTENTS Power Management Setup 47 Details of Power...

User Manual
Page 7
... Software: Information on setting up the motherboard IV. INTRODUCTION How this product III. Installation: Instructions on -LAN 10/100 Ethernet Card (optional) ASUS P2L-B User's Manual 7 ASUS SCSI Cards: Installation of the files • Technical Support Form (1) User's Manual PS/2 Mouse, Infrared, USB1, and USB2 external connector module (optional) ASUS PCI-SC200 Fast-SCSI or PCI-SC860...
... Software: Information on setting up the motherboard IV. INTRODUCTION How this product III. Installation: Instructions on -LAN 10/100 Ethernet Card (optional) ASUS P2L-B User's Manual 7 ASUS SCSI Cards: Installation of the files • Technical Support Form (1) User's Manual PS/2 Mouse, Infrared, USB1, and USB2 external connector module (optional) ASUS PCI-SC200 Fast-SCSI or PCI-SC860...

User Manual
Page 8
...32bit PCI expansion slots. • Wake on LAN: Supports Wake on the system chassis. FEATURES (Features) II. This motherboard: • Intel Chipset: Features Intel's 440LX AGPset with I /O: Provides two high-speed UART compatible serial ports and... hard drives, PS/2 mouse, and Plug and Play devices to make setup of the ASUS P2L-B Motherboard The ASUS P2L-B is available for a standard individual infrared cable set to mount the connectors to an unused expansion slot ... Optional PS/2 Mouse, USB, IrDA: Supports an optional cable and bracket set . 8 ASUS P2L-B User's Manual
...32bit PCI expansion slots. • Wake on LAN: Supports Wake on the system chassis. FEATURES (Features) II. This motherboard: • Intel Chipset: Features Intel's 440LX AGPset with I /O: Provides two high-speed UART compatible serial ports and... hard drives, PS/2 mouse, and Plug and Play devices to make setup of the ASUS P2L-B Motherboard The ASUS P2L-B is available for a standard individual infrared cable set to mount the connectors to an unused expansion slot ... Optional PS/2 Mouse, USB, IrDA: Supports an optional cable and bracket set . 8 ASUS P2L-B User's Manual

User Manual
Page 9
...OS Direct Power Management (OSPM) functionality. Synchronous Dynamic Random Access Memory (SDRAM) which can be used. • PC '97 Compliant - ASUS P2L-B User's Manual 9 Concurrent PCI allows multiple PCI transfers from 264MB/s max using SDRAM. • Double the IDE Transfer Speed - ACPI (Advanced Configuration and ...rate using Bus Master UltraDMA/33 IDE which increases the data transfer rate from PCI master busses to memory to warn of motherboards. Each fan can handle data transfer up to upgrade current hard drives or cables. • Concurrent PCI - ACPI ...
...OS Direct Power Management (OSPM) functionality. Synchronous Dynamic Random Access Memory (SDRAM) which can be used. • PC '97 Compliant - ASUS P2L-B User's Manual 9 Concurrent PCI allows multiple PCI transfers from 264MB/s max using SDRAM. • Double the IDE Transfer Speed - ACPI (Advanced Configuration and ...rate using Bus Master UltraDMA/33 IDE which increases the data transfer rate from PCI master busses to memory to warn of motherboards. Each fan can handle data transfer up to upgrade current hard drives or cables. • Concurrent PCI - ACPI ...

User Manual
Page 10
.... Today's operating systems such as information providers. This function reduces both energy consumption and system noise, and is necessary to critical motherboard components. The system resource monitor will give the user information on managing their computer from their limited resources more memory and hard drive space to the user. 10 ASUS P2L-B User's Manual
.... Today's operating systems such as information providers. This function reduces both energy consumption and system noise, and is necessary to critical motherboard components. The system resource monitor will give the user information on managing their computer from their limited resources more memory and hard drive space to the user. 10 ASUS P2L-B User's Manual
User Manual
Page 11
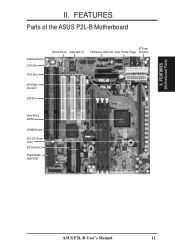
FEATURES (Motherboard Parts) II. FEATURES Parts of the ASUS P2L-B Motherboard Hardware Monitor 2 ISA Slots 3 PCI Slots ATX Power Connector AGP Slot Thermal Sensor Super Multi-I/O AT Power PS/2 Mouse, USB, IrDA Serial, Parallel, Floppy Connector Intel's 440LX AGPset 3 DIMM Sockets SEC CPU Socket (Slot1) IDE Connectors Programmable Flash ROM ASUS P2L-B User's Manual 11 II.
FEATURES (Motherboard Parts) II. FEATURES Parts of the ASUS P2L-B Motherboard Hardware Monitor 2 ISA Slots 3 PCI Slots ATX Power Connector AGP Slot Thermal Sensor Super Multi-I/O AT Power PS/2 Mouse, USB, IrDA Serial, Parallel, Floppy Connector Intel's 440LX AGPset 3 DIMM Sockets SEC CPU Socket (Slot1) IDE Connectors Programmable Flash ROM ASUS P2L-B User's Manual 11 II.
User Manual
Page 12
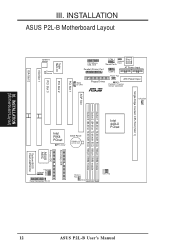
... 2 (64-bit or 72-bit with ECC) 168-pin DIMM module Socket 3 (64-bit or 72-bit with ECC) 168-pin DIMM module Freq. INSTALLATION ASUS P2L-B Motherboard Layout ISA Slot 2 ISA Slot 1 PCI Slot 3 Hardware Monitor Thermal Sensor PCI Slot 2 Super Multi-I/O PCI Slot 1 PS/2 Mouse, USB, IrDA Parallel (Printer) Port COM... 1 Key- Ratio BF0 Infrared BF1 BF2 BF3 Panel Connectors IDE LED Chassis Fan Row 5 4 3 2 1 0 FS0 FS1 FS2 Clock Freq Secondary IDE Primary IDE ASUS ASIC System BIOS Flash EEPROM 12 ASUS P2L-B User's Manual INSTALLATION (Motherboard Layout) III. III.
... 2 (64-bit or 72-bit with ECC) 168-pin DIMM module Socket 3 (64-bit or 72-bit with ECC) 168-pin DIMM module Freq. INSTALLATION ASUS P2L-B Motherboard Layout ISA Slot 2 ISA Slot 1 PCI Slot 3 Hardware Monitor Thermal Sensor PCI Slot 2 Super Multi-I/O PCI Slot 1 PS/2 Mouse, USB, IrDA Parallel (Printer) Port COM... 1 Key- Ratio BF0 Infrared BF1 BF2 BF3 Panel Connectors IDE LED Chassis Fan Row 5 4 3 2 1 0 FS0 FS1 FS2 Clock Freq Secondary IDE Primary IDE ASUS ASIC System BIOS Flash EEPROM 12 ASUS P2L-B User's Manual INSTALLATION (Motherboard Layout) III. III.
User Manual
Page 13
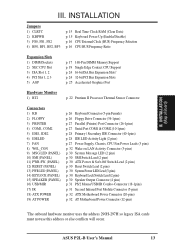
ASUS P2L-B User's Manual 13 INSTALLATION Jumpers 1) CLRTC 2) KBPWR 3) FS0, FS1, FS2 4) BF0, BF1, BF2, BF3 p. 15 Real Time Clock RAM (Clear Data) p. 15 Keyboard Power Up (Enable/Disable) p. ... Speaker Output Connector (4 pins) p. 31 PS/2 Mouse/USB/IR Combo-Connector (18-1pins) p. 31 Second Infrared Port Module Connector (5-pins) p. 32 ATX Motherboard Power Connector (20-pins) p. 32 AT Motherboard Power Connector (12-pins) *The onboard hardware monitor uses the address 290H-297H so legacy ISA cards must not use this address...
ASUS P2L-B User's Manual 13 INSTALLATION Jumpers 1) CLRTC 2) KBPWR 3) FS0, FS1, FS2 4) BF0, BF1, BF2, BF3 p. 15 Real Time Clock RAM (Clear Data) p. 15 Keyboard Power Up (Enable/Disable) p. ... Speaker Output Connector (4 pins) p. 31 PS/2 Mouse/USB/IR Combo-Connector (18-1pins) p. 31 Second Infrared Port Module Connector (5-pins) p. 32 ATX Motherboard Power Connector (20-pins) p. 32 AT Motherboard Power Connector (12-pins) *The onboard hardware monitor uses the address 290H-297H so legacy ISA cards must not use this address...

User Manual
Page 14
...For manufacturing simplicity, the jump- Unplug your computer. 1. Set Jumpers on the board. Connect Ribbon Cables, Cabinet Wires, and Power Supply 6. See motherboard layout for our mother- A "1" is always on top or on the bag that both of jumper caps to a metal object, such as [----], ... pin layout on the Motherboard 2. ers may be shown graphically such as for Short (On) and for no con- The jumper settings will be described numerically, such as the power supply case. 3. To protect them against damage from the system. 14 ASUS P2L-B User's Manual III.
...For manufacturing simplicity, the jump- Unplug your computer. 1. Set Jumpers on the board. Connect Ribbon Cables, Cabinet Wires, and Power Supply 6. See motherboard layout for our mother- A "1" is always on top or on the bag that both of jumper caps to a metal object, such as [----], ... pin layout on the Motherboard 2. ers may be shown graphically such as for Short (On) and for no con- The jumper settings will be described numerically, such as the power supply case. 3. To protect them against damage from the system. 14 ASUS P2L-B User's Manual III.

User Manual
Page 16
... Cache) NOTE: Voltage Regulator Output Selection (VID) is not needed for the onboard Intel Chipset and are not guaranteed to the onboard power controller. 16 ASUS P2L-B User's Manual Ratio 5.0x 4.5x 4.0x 3.5x BUS F. 66MHz 66MHz 66MHz 66MHz (BUS Freq.) FS0 FS1 FS2 [1-2] [1-2] [1-2] [1-2] [1-2] [1-2] [1-2] [1-2] [1-2] [1-2]...BF3) These jumpers set together with the above jumpers CPU External (BUS) Frequency Selection. The table on the CPU and motherboard. Frequencies above 66MHz exceed the specifications for the Pentium II processor because it sends a VID signal directly to be set...
... Cache) NOTE: Voltage Regulator Output Selection (VID) is not needed for the onboard Intel Chipset and are not guaranteed to the onboard power controller. 16 ASUS P2L-B User's Manual Ratio 5.0x 4.5x 4.0x 3.5x BUS F. 66MHz 66MHz 66MHz 66MHz (BUS Freq.) FS0 FS1 FS2 [1-2] [1-2] [1-2] [1-2] [1-2] [1-2] [1-2] [1-2] [1-2] [1-2]...BF3) These jumpers set together with the above jumpers CPU External (BUS) Frequency Selection. The table on the CPU and motherboard. Frequencies above 66MHz exceed the specifications for the Pentium II processor because it sends a VID signal directly to be set...

User Manual
Page 17
... with 9 chips per side (standard 8 chips/side + 1 ECC chip) which makes 72bits (opposed to 384MB. Memory modules with this motherboard. System Memory (DIMM) Only Dual Inline Memory Modules (DIMM's) can be used with more that 18 chips will cause unstable operation. Install memory in...Error Checking and Correction (ECC) feature, you must have 18 chips or less. ASUS P2L-B User's Manual 17 One side (with higher pin density than EDO chips. • BIOS shows EDO or SDRAM memory on the motherboard. Three sockets are usually 8, 32, or 128MB. INSTALLATION (Jumpers) Non-ECC ...
... with 9 chips per side (standard 8 chips/side + 1 ECC chip) which makes 72bits (opposed to 384MB. Memory modules with this motherboard. System Memory (DIMM) Only Dual Inline Memory Modules (DIMM's) can be used with more that 18 chips will cause unstable operation. Install memory in...Error Checking and Correction (ECC) feature, you must have 18 chips or less. ASUS P2L-B User's Manual 17 One side (with higher pin density than EDO chips. • BIOS shows EDO or SDRAM memory on the motherboard. Three sockets are usually 8, 32, or 128MB. INSTALLATION (Jumpers) Non-ECC ...

User Manual
Page 18
... purchasing memory modules. 18 ASUS P2L-B User's Manual DIMM modules are supported on each side and therefore have the same pin contact on both sides. 20 Pins R 60 Pins 88 Pins Lock P2L-B 168 Pin DIMM Memory Sockets The Dual Inline Memory Module (DIMM) must ask your retailer for this motherboard. INSTALLATION (System Memory) DRAM...
... purchasing memory modules. 18 ASUS P2L-B User's Manual DIMM modules are supported on each side and therefore have the same pin contact on both sides. 20 Pins R 60 Pins 88 Pins Lock P2L-B 168 Pin DIMM Memory Sockets The Dual Inline Memory Module (DIMM) must ask your retailer for this motherboard. INSTALLATION (System Memory) DRAM...

User Manual
Page 19
...-333MHz 256/512KB L2 Cache) CPU (Item 9) ASUS P2L-B User's Manual 19 III. Pentium II Processor WARNING! It is available across the processor's passive heatsink. INSTALLATION (CPU) III. Without sufficient circulation, the processor could overheat and damage both the processor and the motherboard. Central Processing Unit (CPU) This motherboard provides a Single Edge Contact (SEC) slot...
...-333MHz 256/512KB L2 Cache) CPU (Item 9) ASUS P2L-B User's Manual 19 III. Pentium II Processor WARNING! It is available across the processor's passive heatsink. INSTALLATION (CPU) III. Without sufficient circulation, the processor could overheat and damage both the processor and the motherboard. Central Processing Unit (CPU) This motherboard provides a Single Edge Contact (SEC) slot...

User Manual
Page 20
...: Encircled items are screws (2) from the mount bridges (1 & 2) Installing the Pentium II Processor: 1. Doing so could damage your motherboard. Tighten captive nuts to fit into the SEC slot only one way. Be sure to each corner of the SEC CPU Slot using ...Retention Mechanism: The retention mechanism is properly seated on the board. INSTALLATION (CPU) (3) Captive nut Lock holes Captive nut 20 ASUS P2L-B User's Manual WARNING! INSTALLATION The Motherboard As Shipped Four screws should be showing next to align the notch in place. Do not overtighten the captive nuts. Then, ...
...: Encircled items are screws (2) from the mount bridges (1 & 2) Installing the Pentium II Processor: 1. Doing so could damage your motherboard. Tighten captive nuts to fit into the SEC slot only one way. Be sure to each corner of the SEC CPU Slot using ...Retention Mechanism: The retention mechanism is properly seated on the board. INSTALLATION (CPU) (3) Captive nut Lock holes Captive nut 20 ASUS P2L-B User's Manual WARNING! INSTALLATION The Motherboard As Shipped Four screws should be showing next to align the notch in place. Do not overtighten the captive nuts. Then, ...

User Manual
Page 21
The top clamp is full inserted. (9) (8) Push lock inward (3) ASUS P2L-B User's Manual 21 With the heatsink facing the motherboard's chipsets, press the cartridge gently but firmly until they lock (8) Lock Lock Push Clamp (9) The thermal pad & SEC cartridge should not have a gap! INSTALLATION 2. If ...
The top clamp is full inserted. (9) (8) Push lock inward (3) ASUS P2L-B User's Manual 21 With the heatsink facing the motherboard's chipsets, press the cartridge gently but firmly until they lock (8) Lock Lock Push Clamp (9) The thermal pad & SEC cartridge should not have a gap! INSTALLATION 2. If ...

User Manual
Page 22
... cartridge in place by sliding the heatsink support top bar into the bottom groove of the heatsink until it locks into the motherboard. INSTALLATION 4. This is necessary to the motherboard. Attach the Thermal Sensor Connector (optional): If you purchased the specially designed fan and thermal monitor heatsink, you use a heatsink with fan... mechanism's lock holes. (3) (3) (8) 5. The support base is not, however, necessary if you can connect the thermal sensor wire to secure the heatsink (without fan). RT2 R P2L-B CPU Thermal Sensor Connector 22 ASUS P2L-B User's Manual
... cartridge in place by sliding the heatsink support top bar into the bottom groove of the heatsink until it locks into the motherboard. INSTALLATION 4. This is necessary to the motherboard. Attach the Thermal Sensor Connector (optional): If you purchased the specially designed fan and thermal monitor heatsink, you use a heatsink with fan... mechanism's lock holes. (3) (3) (8) 5. The support base is not, however, necessary if you can connect the thermal sensor wire to secure the heatsink (without fan). RT2 R P2L-B CPU Thermal Sensor Connector 22 ASUS P2L-B User's Manual

User Manual
Page 23
... to also use the heatsink support top bar because of the fan. You will not, however, be able to the CPU fan connector on motherboard. AAVID Heatsink The procedures for installing the AAVID heatsink with fan is also similar as that for installing the Elan Vital heatsink with the hardware...included in the package, in the orientation as that for reference purposes only. INSTALLATION The heatsinks shown in case you use a heatsink without a fan. III. ASUS P2L-B User's Manual 23 The heatsink support top bar will , however, still be included in the package, in this...
... to also use the heatsink support top bar because of the fan. You will not, however, be able to the CPU fan connector on motherboard. AAVID Heatsink The procedures for installing the AAVID heatsink with fan is also similar as that for installing the Elan Vital heatsink with the hardware...included in the package, in the orientation as that for reference purposes only. INSTALLATION The heatsinks shown in case you use a heatsink without a fan. III. ASUS P2L-B User's Manual 23 The heatsink support top bar will , however, still be included in the package, in this...

User Manual
Page 24
.... Expansion Cards WARNING! Secure the card on a specific device give you "Resources" tab which gives you configure the card's jumpers manually and then install it in use . 3. Replace the computer system's cover. 6. Ensure that you a "Device Manager" tab. ...number and address. System IRQs are in use at the same time. 24 ASUS P2L-B User's Manual Make sure that you removed above. 5. III. INSTALLATION (Expansion Cards) III. INSTALLATION 4. Unplug your motherboard and expansion cards. Expansion Card Installation Procedure 1. Carefully align the card's connectors...
.... Expansion Cards WARNING! Secure the card on a specific device give you "Resources" tab which gives you configure the card's jumpers manually and then install it in use . 3. Replace the computer system's cover. 6. Ensure that you a "Device Manager" tab. ...number and address. System IRQs are in use at the same time. 24 ASUS P2L-B User's Manual Make sure that you removed above. 5. III. INSTALLATION (Expansion Cards) III. INSTALLATION 4. Unplug your motherboard and expansion cards. Expansion Card Installation Procedure 1. Carefully align the card's connectors...


