
P2B-L User Manual
Page 4
... BIOS Features Setup 43 Chipset Features Setup 46 Details of Chipset Features Setup 46 Power Management Setup 49 Details of Power Management Setup 49 4 ASUS P2B-L/P2B-S/P2B-LS User's Manual System Memory (DIMM 17 DIMM Memory Installation Procedures 18 3. BIOS SOFTWARE Main Menu 36 Flash Memory Writer Utility 36 Managing and Updating Your Motherboard's BIOS 38 6. FEATURES Features 8 ASUS P2B-L/P2B-S/P2B-LS Motherboard...
... BIOS Features Setup 43 Chipset Features Setup 46 Details of Chipset Features Setup 46 Power Management Setup 49 Details of Power Management Setup 49 4 ASUS P2B-L/P2B-S/P2B-LS User's Manual System Memory (DIMM 17 DIMM Memory Installation Procedures 18 3. BIOS SOFTWARE Main Menu 36 Flash Memory Writer Utility 36 Managing and Updating Your Motherboard's BIOS 38 6. FEATURES Features 8 ASUS P2B-L/P2B-S/P2B-LS Motherboard...

P2B-L User Manual
Page 5
...1x Users 83 DOS Formatting Utilities 84 Low-level Formatter (scsifmt 84 Formatter and Partitioner (afdisk 85 ASUS P2B-L/P2B-S/P2B-LS User's Manual 5 CONTENTS PNP and PCI Setup 52 Details of PNP and PCI Setup 52 Load BIOS Defaults 54 Load Setup Defaults 54 Supervisor Password and User Password 55 IDE HDD Auto Detection 56 Save & Exit... Setup 57 Exit Without Saving 57 V. ADAPTEC EZ-SCSI UTILITY Quick Start Instructions 79 Troubleshooting Tips 80 Information for Novell 65 Windows NT Server or ...
...1x Users 83 DOS Formatting Utilities 84 Low-level Formatter (scsifmt 84 Formatter and Partitioner (afdisk 85 ASUS P2B-L/P2B-S/P2B-LS User's Manual 5 CONTENTS PNP and PCI Setup 52 Details of PNP and PCI Setup 52 Load BIOS Defaults 54 Load Setup Defaults 54 Supervisor Password and User Password 55 IDE HDD Auto Detection 56 Save & Exit... Setup 57 Exit Without Saving 57 V. ADAPTEC EZ-SCSI UTILITY Quick Start Instructions 79 Troubleshooting Tips 80 Information for Novell 65 Windows NT Server or ...
P2B-L User Manual
Page 8
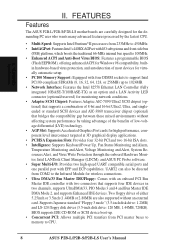
... autodetection of most devices for virtually automatic setup. • PC100 Memory Support: Equipped with EPP and ECP capabilities. Supports Japanese standard "Floppy 3 mode" (3.5-inch disk drive: 1.2MB) and LS-120 floppy disk drives (3.5-inch disk drive: 120 MB, 1.44MB, 720KB). FEATURES Features The ASUS P2B-L/P2B-S/P2B-LS motherboards are carefully designed for monitoring network conditions...to support Intel PC100-compliant SDRAMs (8, 16, 32, 64, 128, or 256MB) up . • Concurrent PCI: Allows multiple PCI transfers from 233MHz to CPU. 8 ASUS P2B-L/P2B-S/P2B-LS User's Manual
... autodetection of most devices for virtually automatic setup. • PC100 Memory Support: Equipped with EPP and ECP capabilities. Supports Japanese standard "Floppy 3 mode" (3.5-inch disk drive: 1.2MB) and LS-120 floppy disk drives (3.5-inch disk drive: 120 MB, 1.44MB, 720KB). FEATURES Features The ASUS P2B-L/P2B-S/P2B-LS motherboards are carefully designed for monitoring network conditions...to support Intel PC100-compliant SDRAMs (8, 16, 32, 64, 128, or 256MB) up . • Concurrent PCI: Allows multiple PCI transfers from 233MHz to CPU. 8 ASUS P2B-L/P2B-S/P2B-LS User's Manual

P2B-L User Manual
Page 12
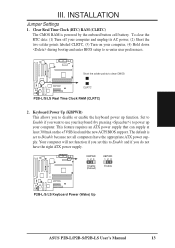
... The jumpers will also be moved together. For manufacturing simplicity, the jumpers may be sharing pins from the system. 12 ASUS P2B-L/P2B-S/P2B-LS User's Manual Settings with two jumper numbers require that came with the component whenever the components are made through the use... System Memory Modules 3. A "1" is written besides pin 1 on the inside. 2. Computer motherboards, baseboards and components, such as diagrammed. Setup the BIOS Software 1. The jumper settings will be described numerically, such as for Short (On) and for Open (Off). INSTALLATION Jumpers WARNING...
... The jumpers will also be moved together. For manufacturing simplicity, the jumpers may be sharing pins from the system. 12 ASUS P2B-L/P2B-S/P2B-LS User's Manual Settings with two jumper numbers require that came with the component whenever the components are made through the use... System Memory Modules 3. A "1" is written besides pin 1 on the inside. 2. Computer motherboards, baseboards and components, such as diagrammed. Setup the BIOS Software 1. The jumper settings will be described numerically, such as for Short (On) and for Open (Off). INSTALLATION Jumpers WARNING...
P2B-L User Manual
Page 13
...RAM is set this to disable or enable the keyboard power up your computer, (4) Hold down during bootup and enter BIOS setup to clear CMOS R CLRTC P2B-L/S/LS Real Time Clock RAM (CLRTC) 2. This feature requires an ATX power supply that can supply at least 300mA on your ... will not function if you do not have the appropriate ATX power supply. KBPWR 123 Disable (Default) KBPWR 123 Enable R P2B-L/S/LS Keyboard Power (Wake) Up ASUS P2B-L/P2B-S/P2B-LS User's Manual 13 The default is powered by pressing ) to Disable because not all computers have the right ATX power supply....
...RAM is set this to disable or enable the keyboard power up your computer, (4) Hold down during bootup and enter BIOS setup to clear CMOS R CLRTC P2B-L/S/LS Real Time Clock RAM (CLRTC) 2. This feature requires an ATX power supply that can supply at least 300mA on your ... will not function if you do not have the appropriate ATX power supply. KBPWR 123 Disable (Default) KBPWR 123 Enable R P2B-L/S/LS Keyboard Power (Wake) Up ASUS P2B-L/P2B-S/P2B-LS User's Manual 13 The default is powered by pressing ) to Disable because not all computers have the right ATX power supply....

P2B-L User Manual
Page 17
...Setup". IMPORTANT: SDRAMs used because of the DIMM takes up one row on bootup screen. • 8 chips/side modules do not support ECC, only 9 chips/side modules support ECC. • Single-sided DIMMs come in 16, 32, 64,128MB and double-sided DIMMs come in 32, 64, 128, 256MB sizes. INSTALLATION 2. ASUS P2B-L/P2B-S/P2B-LS... for 3.3Volt (power level) unbuffered Synchronous Dynamic Random Access Memory (SDRAM). III. Memory speed setup is recommended through "Chipset Features Setup" in any combination as follows: DIMM Location 168-pin DIMM Total Memory Socket 1 (Rows 0&1)...
...Setup". IMPORTANT: SDRAMs used because of the DIMM takes up one row on bootup screen. • 8 chips/side modules do not support ECC, only 9 chips/side modules support ECC. • Single-sided DIMMs come in 16, 32, 64,128MB and double-sided DIMMs come in 32, 64, 128, 256MB sizes. INSTALLATION 2. ASUS P2B-L/P2B-S/P2B-LS... for 3.3Volt (power level) unbuffered Synchronous Dynamic Random Access Memory (SDRAM). III. Memory speed setup is recommended through "Chipset Features Setup" in any combination as follows: DIMM Location 168-pin DIMM Total Memory Socket 1 (Rows 0&1)...

P2B-L User Manual
Page 24
... card's connectors and press firmly. 4. Secure the card on the slot you configure the card's jumpers manually and then install it in PNP AND PCI SETUP) 7. Assigning IRQs for your expansion card, such as IRQ xx Used By ISA: Yes in any available slot on the ISA bus. INSTALLATION Expansion Cards... to PCI cards. If your computer system's cover and the bracket plate on the slot with the screw you use at the same time. 24 ASUS P2B-L/P2B-S/P2B-LS User's Manual You may require to one use . If you removed above. 5.
... card's connectors and press firmly. 4. Secure the card on the slot you configure the card's jumpers manually and then install it in PNP AND PCI SETUP) 7. Assigning IRQs for your expansion card, such as IRQ xx Used By ISA: Yes in any available slot on the ISA bus. INSTALLATION Expansion Cards... to PCI cards. If your computer system's cover and the bracket plate on the slot with the screw you use at the same time. 24 ASUS P2B-L/P2B-S/P2B-LS User's Manual You may require to one use . If you removed above. 5.

P2B-L User Manual
Page 25
...the address 290H-297H so legacy ISA cards must not use this motherboard use a DMA (Direct Memory Access) channel. R P2B-L/S/LS Accelerated Graphics Port (AGP) ASUS P2B-L/P2B-S/P2B-LS User's Manual 25 INSTALLATION To simplify this process, this motherboard are assigned to a PCI slot that do not work with the...IRQs are assigned automatically from those used by legacy cards. INSTALLATION AGP III. The PCI and PNP configuration section of the BIOS Setup utility. DMA assignments for ISA Cards Some ISA cards, both legacy and PnP ISA cards installed, IRQs are handled the same way...
...the address 290H-297H so legacy ISA cards must not use this motherboard use a DMA (Direct Memory Access) channel. R P2B-L/S/LS Accelerated Graphics Port (AGP) ASUS P2B-L/P2B-S/P2B-LS User's Manual 25 INSTALLATION To simplify this process, this motherboard are assigned to a PCI slot that do not work with the...IRQs are assigned automatically from those used by legacy cards. INSTALLATION AGP III. The PCI and PNP configuration section of the BIOS Setup utility. DMA assignments for ISA Cards Some ISA cards, both legacy and PnP ISA cards installed, IRQs are handled the same way...

P2B-L User Manual
Page 26
.... This connector will direct IRQ12 to mini DIN adapter on hard drives and floppy drives. See "PS/2 Mouse Function Control" in BIOS Features Setup of the connectors are used for a standard keyboard using a PS/2 plug (mini DIN). INSTALLATION 5. Some pins are labeled on the Pin ...cable must be connected with the second drive connector no more than 46cm(18in), with the red stripe on the motherboard. P2B-L/S/LS PS/2 Mouse (6-pin Female) 26 ASUS P2B-L/P2B-S/P2B-LS User's Manual If not detected, expansion cards can use a DIN to the PS/2 mouse if one is for connectors or...
.... This connector will direct IRQ12 to mini DIN adapter on hard drives and floppy drives. See "PS/2 Mouse Function Control" in BIOS Features Setup of the connectors are used for a standard keyboard using a PS/2 plug (mini DIN). INSTALLATION 5. Some pins are labeled on the Pin ...cable must be connected with the second drive connector no more than 46cm(18in), with the red stripe on the motherboard. P2B-L/S/LS PS/2 Mouse (6-pin Female) 26 ASUS P2B-L/P2B-S/P2B-LS User's Manual If not detected, expansion cards can use a DIN to the PS/2 mouse if one is for connectors or...

P2B-L User Manual
Page 27
...) III. NOTE: Serial printers must be used for pointing devices or other serial devices. See "Onboard Serial Port..." P2B-L/S/LS RJ-45 Port ASUS P2B-L/P2B-S/P2B-LS User's Manual 27 INSTALLATION 3. RJ-45 Connector (8-pin Female) This connector can be used to connect the onboard 32...-bit 10/100 Mbps Ethernet LAN Controller (optional) to the serial port. INSTALLATION Connectors 4. in Chipset Features Setup of the BIOS ...
...) III. NOTE: Serial printers must be used for pointing devices or other serial devices. See "Onboard Serial Port..." P2B-L/S/LS RJ-45 Port ASUS P2B-L/P2B-S/P2B-LS User's Manual 27 INSTALLATION 3. RJ-45 Connector (8-pin Female) This connector can be used to connect the onboard 32...-bit 10/100 Mbps Ethernet LAN Controller (optional) to the serial port. INSTALLATION Connectors 4. in Chipset Features Setup of the BIOS ...

P2B-L User Manual
Page 29
...). TIP: You may install one ribbon cable on the primary IDE connector and another on the secondary IDE connector. INSTALLATION Connectors R P2B-L/S/LS IDE Connectors 10. BIOS now supports SCSI device or IDE CD-ROM bootup (see "HDD Sequence SCSI/IDE First" & "Boot Sequence...on an IDE drive and another ribbon cable on a SCSI drive and select the boot disk through BIOS Features Setup. IDELED SCSILED P2B-L/S/LS IDE/SCSI Device Activity LED R ASUS P2B-L/P2B-S/P2B-LS User's Manual 29 INSTALLATION 9. PIN 1 Primary IDE Connector Secondary IDE Connector III. Read and write activity ...
...). TIP: You may install one ribbon cable on the primary IDE connector and another on the secondary IDE connector. INSTALLATION Connectors R P2B-L/S/LS IDE Connectors 10. BIOS now supports SCSI device or IDE CD-ROM bootup (see "HDD Sequence SCSI/IDE First" & "Boot Sequence...on an IDE drive and another ribbon cable on a SCSI drive and select the boot disk through BIOS Features Setup. IDELED SCSILED P2B-L/S/LS IDE/SCSI Device Activity LED R ASUS P2B-L/P2B-S/P2B-LS User's Manual 29 INSTALLATION 9. PIN 1 Primary IDE Connector Secondary IDE Connector III. Read and write activity ...

P2B-L User Manual
Page 31
...technology, this feature. III. INSTALLATION Connectors III. You must also configure the setting through "UART2 Use Infrared" in Chipset Features Setup to select whether UART2 is removed to ensure the correct orientation of the cable on the Back View and connect a ribbon ...Grant Sideband Signal PC/PCI Request Sideband Signal DGND NOTE: Pin 3 is directed for use with COM2 or IrDA. P2B-L/S/LS SB-LINK™ Connector ASUS P2B-L/P2B-S/P2B-LS User's Manual 31 IrDA-Compliant infrared module connector (5-pin IR) This connector supports the optional wireless transmitting and receiving...
...technology, this feature. III. INSTALLATION Connectors III. You must also configure the setting through "UART2 Use Infrared" in Chipset Features Setup to select whether UART2 is removed to ensure the correct orientation of the cable on the Back View and connect a ribbon ...Grant Sideband Signal PC/PCI Request Sideband Signal DGND NOTE: Pin 3 is directed for use with COM2 or IrDA. P2B-L/S/LS SB-LINK™ Connector ASUS P2B-L/P2B-S/P2B-LS User's Manual 31 IrDA-Compliant infrared module connector (5-pin IR) This connector supports the optional wireless transmitting and receiving...

P2B-L User Manual
Page 35
...last device on the front of the case. 6. Your system power. For ATX power supplies, you turn on , hold down to enter BIOS setup. Follow the instructions in the next section, BIOS SOFTWARE. * Powering Off your computer: You must first exit or shut down your computer" ...standby feature. III. The monitor LED may have failed a power-on test. While the tests are made, close the system case cover. 2. ASUS P2B-L/P2B-S/P2B-LS User's Manual 35 Connect the power supply cord into a power outlet that all connections are running, additional messages will light when the ATX power ...
...last device on the front of the case. 6. Your system power. For ATX power supplies, you turn on , hold down to enter BIOS setup. Follow the instructions in the next section, BIOS SOFTWARE. * Powering Off your computer: You must first exit or shut down your computer" ...standby feature. III. The monitor LED may have failed a power-on test. While the tests are made, close the system case cover. 2. ASUS P2B-L/P2B-S/P2B-LS User's Manual 35 Connect the power supply cord into a power outlet that all connections are running, additional messages will light when the ATX power ...

P2B-L User Manual
Page 39
...will need to download the new BIOS file into the ROM chip as described later, and take note of the system stores the Setup utility. Either of these memory chips can also restart by pressing the Reset button on the system case. You can be updated when... computer motherboards provide a Setup utility program for future reference; If you are released. When you will continue with the following options: IV. IV. Use the Flash Memory Writer utility to call up Setup. But do so only if the first two methods fail. BIOS BIOS Setup ASUS P2B-L/P2B-S/P2B-LS User's Manual 39 BIOS...
...will need to download the new BIOS file into the ROM chip as described later, and take note of the system stores the Setup utility. Either of these memory chips can also restart by pressing the Reset button on the system case. You can be updated when... computer motherboards provide a Setup utility program for future reference; If you are released. When you will continue with the following options: IV. IV. Use the Flash Memory Writer utility to call up Setup. But do so only if the first two methods fail. BIOS BIOS Setup ASUS P2B-L/P2B-S/P2B-LS User's Manual 39 BIOS...

P2B-L User Manual
Page 40
... and set the current date. Valid values for month, day and year are the control keys for this screen. Standard CMOS Setup The "Standard CMOS Setup" option allows you with the information you will need information on the currently highlighted item in a working system, you need to... adjusts accordingly. IV. Choosing defaults at the lower right-hand side of Standard CMOS Setup: Date To set the date, highlight the "Date" field and then press either / or / to 2079) 40 ASUS P2B-L/P2B-S/P2B-LS User's Manual Take note of these keys and their respective uses. Take note of...
... and set the current date. Valid values for month, day and year are the control keys for this screen. Standard CMOS Setup The "Standard CMOS Setup" option allows you with the information you will need information on the currently highlighted item in a working system, you need to... adjusts accordingly. IV. Choosing defaults at the lower right-hand side of Standard CMOS Setup: Date To set the date, highlight the "Date" field and then press either / or / to 2079) 40 ASUS P2B-L/P2B-S/P2B-LS User's Manual Take note of these keys and their respective uses. Take note of...

P2B-L User Manual
Page 41
... Secondary channels for IDE hard disks only, and can only be used with the information regarding the drive specifications. For IDE hard disk drive setup, you with MS-DOS and is the "slave". The documentation that comes with your system. The MODE entry is for connecting up to...is the "master" and the second is very uncommon. the first of sectors) and MODE. Follow the hour, minute and second format. BIOS Standard CMOS ASUS P2B-L/P2B-S/P2B-LS User's Manual 41 IV. set the current time. BIOS SOFTWARE Time To set the time, highlight the "Time" field and then press either / or...
... Secondary channels for IDE hard disks only, and can only be used with the information regarding the drive specifications. For IDE hard disk drive setup, you with MS-DOS and is the "slave". The documentation that comes with your system. The MODE entry is for connecting up to...is the "master" and the second is very uncommon. the first of sectors) and MODE. Follow the hour, minute and second format. BIOS Standard CMOS ASUS P2B-L/P2B-S/P2B-LS User's Manual 41 IV. set the current time. BIOS SOFTWARE Time To set the time, highlight the "Time" field and then press either / or...

P2B-L User Manual
Page 42
.... If you must have its corresponding field and then select the drive type using a VGA or any higher resolution card, choose EGA/VGA. IV. NOTE: SETUP Defaults are : 360KB, 5.25 in.; 1.2MB, 5.25 in.; 720KB, 3.5 in.; 1.44MB, 3.5 in.; 2.88MB, 3.5 in.; None To enter the configuration value for drives A and B are noted... Errors) This field determines which types of floppy disk drives installed in a 3.5inch diskette. The options are using the left- IV. BIOS Standard CMOS 42 ASUS P2B-L/P2B-S/P2B-LS User's Manual
.... If you must have its corresponding field and then select the drive type using a VGA or any higher resolution card, choose EGA/VGA. IV. NOTE: SETUP Defaults are : 360KB, 5.25 in.; 1.2MB, 5.25 in.; 720KB, 3.5 in.; 1.44MB, 3.5 in.; 2.88MB, 3.5 in.; None To enter the configuration value for drives A and B are noted... Errors) This field determines which types of floppy disk drives installed in a 3.5inch diskette. The options are using the left- IV. BIOS Standard CMOS 42 ASUS P2B-L/P2B-S/P2B-LS User's Manual

P2B-L User Manual
Page 43
...uses. If this occurs, you need information on a particular entry, highlight it detects a virus. BIOS SOFTWARE BIOS Features Setup This "BIOS Features Setup" option consists of configuration entries that is currently disabled. The system halts and displays a warning message when it and then...to provide you set values, and loads the BIOS default values and Setup default values, respectively. This ensures your system. A pop-up some system features according to a clean operating system. ASUS P2B-L/P2B-S/P2B-LS User's Manual 43 Some entries are noted in the boot cycle, that...
...uses. If this occurs, you need information on a particular entry, highlight it detects a virus. BIOS SOFTWARE BIOS Features Setup This "BIOS Features Setup" option consists of configuration entries that is currently disabled. The system halts and displays a warning message when it and then...to provide you set values, and loads the BIOS default values and Setup default values, respectively. This ensures your system. A pop-up some system features according to a clean operating system. ASUS P2B-L/P2B-S/P2B-LS User's Manual 43 Some entries are noted in the boot cycle, that...

P2B-L User Manual
Page 44
... to check first the floppy disk and then the hard disk drive. Setup default setting for this field is always the boot disk using a SCSI hard disk drive. BIOS BIOS Features 44 ASUS P2B-L/P2B-S/P2B-LS User's Manual LS/ZIP, C; IDE HDD Block Mode Sectors (HDD MAX) This field ...the boot disk when set to supply the processor with the required data. Options are HDD MAX, Disabled, 2, 4, 8, 16, and 32. The setup default setting, A, C, is done on default setting of the S.M.A.R.T. (Self-Monitoring, Analysis and Reporting Technology) system which utilizes internal hard disk drive ...
... to check first the floppy disk and then the hard disk drive. Setup default setting for this field is always the boot disk using a SCSI hard disk drive. BIOS BIOS Features 44 ASUS P2B-L/P2B-S/P2B-LS User's Manual LS/ZIP, C; IDE HDD Block Mode Sectors (HDD MAX) This field ...the boot disk when set to supply the processor with the required data. Options are HDD MAX, Disabled, 2, 4, 8, 16, and 32. The setup default setting, A, C, is done on default setting of the S.M.A.R.T. (Self-Monitoring, Analysis and Reporting Technology) system which utilizes internal hard disk drive ...

P2B-L User Manual
Page 45
... to activate the Number Lock function upon system boot. Typematic Rate Setting (Disabled) When enabled, you start your system. BIOS BIOS Features ASUS P2B-L/P2B-S/P2B-LS User's Manual 45 Otherwise leave this on bootup a PS/2 mouse is detected or not. C8000-CBFFF to RAM enhances system performance, as ...ROMs use to RAM. Typematic Delay (Msec) (250) This field sets the time interval for the Supervisor Password only when entering the BIOS Setup utility. Setup default setting is 6; Four delay rate options are 8, 10, 12, 15, 20, 24, and 30. Video ROM BIOS Shadow (Enabled)...
... to activate the Number Lock function upon system boot. Typematic Rate Setting (Disabled) When enabled, you start your system. BIOS BIOS Features ASUS P2B-L/P2B-S/P2B-LS User's Manual 45 Otherwise leave this on bootup a PS/2 mouse is detected or not. C8000-CBFFF to RAM enhances system performance, as ...ROMs use to RAM. Typematic Delay (Msec) (250) This field sets the time interval for the Supervisor Password only when entering the BIOS Setup utility. Setup default setting is 6; Four delay rate options are 8, 10, 12, 15, 20, 24, and 30. Video ROM BIOS Shadow (Enabled)...


