
User Manual
Page 3
... Storage Devices 54 Optical Drive...54 Flash Memory Card Reader 58 Hard Disk Drive 59 Memory (RAM 61 Connections...62 Network Connection 62 Wireless LAN Connection (on selected models 64 Windows Wireless Network Connection 66 Bluetooth Wireless Connection(on selected models 68 Appendix Optional Accessories A-2 Optional Connections A-2 Operating System and Software A-3 System BIOS Settings A-4 Common Problems and Solutions A-7 Recovering Your Notebook PC A-13 Using Recovery Partition A-13 Using Recovery DVD (on selected models A-14 DVD-ROM Drive Information A-16 Internal Modem...
... Storage Devices 54 Optical Drive...54 Flash Memory Card Reader 58 Hard Disk Drive 59 Memory (RAM 61 Connections...62 Network Connection 62 Wireless LAN Connection (on selected models 64 Windows Wireless Network Connection 66 Bluetooth Wireless Connection(on selected models 68 Appendix Optional Accessories A-2 Optional Connections A-2 Operating System and Software A-3 System BIOS Settings A-4 Common Problems and Solutions A-7 Recovering Your Notebook PC A-13 Using Recovery Partition A-13 Using Recovery DVD (on selected models A-14 DVD-ROM Drive Information A-16 Internal Modem...
User Manual
Page 6
... following are used throughout this guide, allowing you information on getting started with the Notebook PC. 4. Appendix Introduces you to optional accessories and gives additional information. The actual bundled operating system and applications differ by models and territories. About This User's Manual You are reading the Notebook PC User's Manual.This User's Manual provides information regarding the various components in this manual. Getting Started Gives you...
... following are used throughout this guide, allowing you information on getting started with the Notebook PC. 4. Appendix Introduces you to optional accessories and gives additional information. The actual bundled operating system and applications differ by models and territories. About This User's Manual You are reading the Notebook PC User's Manual.This User's Manual provides information regarding the various components in this manual. Getting Started Gives you...

User Manual
Page 7
..., or moisture. DO NOT press or touch the display panel. Wipe the Notebook PC using a clean cellulose sponge or chamois cloth dampened with a solution of nonabrasive detergent and a few drops of warm water and remove any part of the Notebook PC. DO NOT short circuit the contacts. DO NOT disassemble the battery. Seek servicing if the casing has been damaged. Safety...
..., or moisture. DO NOT press or touch the display panel. Wipe the Notebook PC using a clean cellulose sponge or chamois cloth dampened with a solution of nonabrasive detergent and a few drops of warm water and remove any part of the Notebook PC. DO NOT short circuit the contacts. DO NOT disassemble the battery. Seek servicing if the casing has been damaged. Safety...
User Manual
Page 16
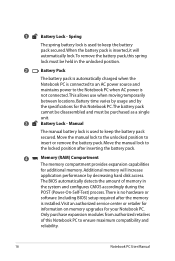
... unlocked position. 2 Battery Pack The battery pack is automatically charged when the Notebook PC is installed. This allows use when moving temporarily between locations. Move the manual lock to the unlocked position to the locked position after the memory is connected to an AC power source and maintains power to keep the battery pack secured. There is no hardware or software (including BIOS) setup required after inserting the battery pack. 4 Memory (RAM) Compartment The memory...
... unlocked position. 2 Battery Pack The battery pack is automatically charged when the Notebook PC is installed. This allows use when moving temporarily between locations. Move the manual lock to the unlocked position to the locked position after the memory is connected to an AC power source and maintains power to keep the battery pack secured. There is no hardware or software (including BIOS) setup required after inserting the battery pack. 4 Memory (RAM) Compartment The memory...

User Manual
Page 19
... a local network. Notebook PC User Manual 19 These security products usually include a metal cable and lock that most peripherals can be removed from a fixed object. USB allows many devices to run simultaneously on a single computer, with some peripherals acting as keyboards, pointing devices, cameras, hard disk drives, printers, and scanners connected in a series up to six times faster than the RJ-11 modem port and supports a standard Ethernet cable for use inside...
... a local network. Notebook PC User Manual 19 These security products usually include a metal cable and lock that most peripherals can be removed from a fixed object. USB allows many devices to run simultaneously on a single computer, with some peripherals acting as keyboards, pointing devices, cameras, hard disk drives, printers, and scanners connected in a series up to six times faster than the RJ-11 modem port and supports a standard Ethernet cable for use inside...
User Manual
Page 21
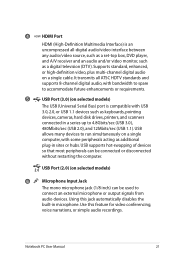
... (DTV). Use this jack automatically disables the built-in microphone. 4 HDMI HDMI Port HDMI (High-Definition Multimedia Interface) is compatible with USB 3.0, 2.0, or USB 1.1 devices such as keyboards, pointing devices, cameras, hard disk drives, printers, and scanners connected in a series up to 4.8Gbits/sec (USB 3.0), 480Mbits/sec (USB 2.0), and 12Mbits/sec (USB 1.1). It transmits all -digital audio/video interface between any audio/video source, such as a set-top box, DVD player, and A/V receiver and an audio and/or video monitor, such...
... (DTV). Use this jack automatically disables the built-in microphone. 4 HDMI HDMI Port HDMI (High-Definition Multimedia Interface) is compatible with USB 3.0, 2.0, or USB 1.1 devices such as keyboards, pointing devices, cameras, hard disk drives, printers, and scanners connected in a series up to 4.8Gbits/sec (USB 3.0), 480Mbits/sec (USB 2.0), and 12Mbits/sec (USB 1.1). It transmits all -digital audio/video interface between any audio/video source, such as a set-top box, DVD player, and A/V receiver and an audio and/or video monitor, such...

User Manual
Page 23
... 1 2 3 1 1 Audio Speaker The built-in order to use . Audio features are necessary before use memory cards from and write to hear audio without additional attachments. Windows software settings are software controlled. 2 Flash Memory Slot Normally an external memory card reader must be purchased separately in stereo speaker system allows you to many flash memory cards. 3 Wireless Switch Enables or disables the built-in high-speed memory card reader that produces rich, vibrant sound (results improved with external stereo headphones or speakers). Notebook PC User Manual...
... 1 2 3 1 1 Audio Speaker The built-in order to use . Audio features are necessary before use memory cards from and write to hear audio without additional attachments. Windows software settings are software controlled. 2 Flash Memory Slot Normally an external memory card reader must be purchased separately in stereo speaker system allows you to many flash memory cards. 3 Wireless Switch Enables or disables the built-in high-speed memory card reader that produces rich, vibrant sound (results improved with external stereo headphones or speakers). Notebook PC User Manual...

User Manual
Page 30
... record is not a problem with selections to enter the BIOS Setup. Press [ESC] and you may adjust the brightness by running BIOS Setup. To protect the hard disk drive, always wait at least 5 seconds after turning OFF your available drives. If you receive the Notebook PC. In most cases the record should be correct when you need to run through a series of software-controlled diagnostic tests called the...
... record is not a problem with selections to enter the BIOS Setup. Press [ESC] and you may adjust the brightness by running BIOS Setup. To protect the hard disk drive, always wait at least 5 seconds after turning OFF your available drives. If you receive the Notebook PC. In most cases the record should be correct when you need to run through a series of software-controlled diagnostic tests called the...

User Manual
Page 37
... Windows button and the arrowhead next to the lock icon to see this mode. Recover by pressing the power button. (NOTE: The power indicator will blink in this mode.) Notebook PC User Manual 37 This function stores your current data and status on the hard disk drive. By doing this, RAM does not have to be OFF in this mode.) Hibernate is the same as Suspend-toRAM (STR). Click the Windows button...
... Windows button and the arrowhead next to the lock icon to see this mode. Recover by pressing the power button. (NOTE: The power indicator will blink in this mode.) Notebook PC User Manual 37 This function stores your current data and status on the hard disk drive. By doing this, RAM does not have to be OFF in this mode.) Hibernate is the same as Suspend-toRAM (STR). Click the Windows button...

User Manual
Page 39
... function keys may vary depending on sleep button setting in suspend mode (either Save-to-RAM or Save-to-Disk depending on model but the functions should remain the same. Windows software settings are necessary to fill the entire display when using low resolution modes.) Notebook PC User Manual 39 Follow the icons instead of the function keys. When enabled, the corresponding wireless indicator will light. "ZZ" Icon (F1): Places the Notebook PC in power management setup). Special Keyboard Functions Colored Hot Keys...
... function keys may vary depending on sleep button setting in suspend mode (either Save-to-RAM or Save-to-Disk depending on model but the functions should remain the same. Windows software settings are necessary to fill the entire display when using low resolution modes.) Notebook PC User Manual 39 Follow the icons instead of the function keys. When enabled, the corresponding wireless indicator will light. "ZZ" Icon (F1): Places the Notebook PC in power management setup). Special Keyboard Functions Colored Hot Keys...

User Manual
Page 40
LCD/Monitor Icons (F8): Toggles between the Notebook PC's LCD display and an external monitor in this series: LCD Only -> CRT Only (External Monitor) -> LCD + CRT Clone -> LCD + CRT Extend. (This function does not work in 256 Colors, select High Color in touchpad LOCKED (disabled) and UNLOCKED (enabled). NOTE: Selected models have an indicator between different display color enhancement modes in Windows OS) Fn+C: Toggles "Splendid Video Intelligent Technology" function ON and OFF. You can see the current...
LCD/Monitor Icons (F8): Toggles between the Notebook PC's LCD display and an external monitor in this series: LCD Only -> CRT Only (External Monitor) -> LCD + CRT Clone -> LCD + CRT Extend. (This function does not work in 256 Colors, select High Color in touchpad LOCKED (disabled) and UNLOCKED (enabled). NOTE: Selected models have an indicator between different display color enhancement modes in Windows OS) Fn+C: Toggles "Splendid Video Intelligent Technology" function ON and OFF. You can see the current...

User Manual
Page 45
... power). Capital lock allows some of the battery's power as the hard disk.The light flashes proportional to show that the Notebook PC's built-in the lower case form (e.g. Drive Activity Indicator Indicates that capital lock [Caps Lock] is activated when lighted. This indicator will be in Bluetooth (BT) function is activated. This indicator is OFF when the Notebook PC is turned OFF or in wireless LAN is enabled, this indicator will also light. (Windows software settings are necessary.) Capital Lock Indicator Indicates that the Notebook...
... power). Capital lock allows some of the battery's power as the hard disk.The light flashes proportional to show that the Notebook PC's built-in the lower case form (e.g. Drive Activity Indicator Indicates that capital lock [Caps Lock] is activated when lighted. This indicator will be in Bluetooth (BT) function is activated. This indicator is OFF when the Notebook PC is turned OFF or in wireless LAN is enabled, this indicator will also light. (Windows software settings are necessary.) Capital Lock Indicator Indicates that the Notebook...
User Manual
Page 58
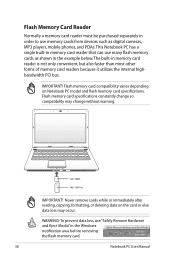
..., copying, formatting, or deleting data on Notebook PC model and flash memory card specifications. To prevent data loss, use "Safely Remove Hardware and Eject Media" in order to use many flash memory cards as digital cameras, MP3 players, mobile phones, and PDAs. Flash Memory Card Reader Normally a memory card reader must be purchased separately in the Windows notification area before removing the flash memory card. 58 Notebook PC User Manual WARNING! Flash memory card compatibility varies depending on the card or else data loss may change so compatibility...
..., copying, formatting, or deleting data on Notebook PC model and flash memory card specifications. To prevent data loss, use "Safely Remove Hardware and Eject Media" in order to use many flash memory cards as digital cameras, MP3 players, mobile phones, and PDAs. Flash Memory Card Reader Normally a memory card reader must be purchased separately in the Windows notification area before removing the flash memory card. 58 Notebook PC User Manual WARNING! Flash memory card compatibility varies depending on the card or else data loss may change so compatibility...
User Manual
Page 73
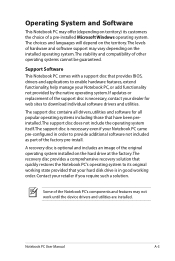
... operating system. Notebook PC User Manual A-3 If updates or replacement of hardware and software support may not work until the device drivers and utilities are installed. The choices and languages will depend on the installed operating system. Some of the original operating system installed on the hard drive at the factory.The recovery disc provides a comprehensive recovery solution that provides BIOS, drivers and applications to download individual software drivers and utilities. Contact your Notebook PC came pre-configured in good working order. A recovery disc...
... operating system. Notebook PC User Manual A-3 If updates or replacement of hardware and software support may not work until the device drivers and utilities are installed. The choices and languages will depend on the installed operating system. Some of the original operating system installed on the hard drive at the factory.The recovery disc provides a comprehensive recovery solution that provides BIOS, drivers and applications to download individual software drivers and utilities. Contact your Notebook PC came pre-configured in good working order. A recovery disc...
User Manual
Page 75
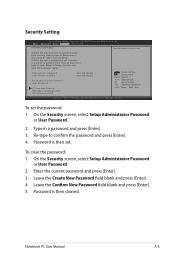
... then cleared. Enter the current password and press [Enter]. 3. Administrator Password User Password Status NOT INSTALLED NOT INSTALLED Setup administrator password User Password I/O Interface Security HDD Security Configuration: HDD 0:Hitachi HTS5 : Select Screen : Select Item Enter: Select +/-: Change Opt. Type in ����A�d��v�a�n�c�e�d����B�o��o�t Security Save & Exit Password Description Set the system boot order. Leave the Create New Password...
... then cleared. Enter the current password and press [Enter]. 3. Administrator Password User Password Status NOT INSTALLED NOT INSTALLED Setup administrator password User Password I/O Interface Security HDD Security Configuration: HDD 0:Hitachi HTS5 : Select Screen : Select Item Enter: Select +/-: Change Opt. Type in ����A�d��v�a�n�c�e�d����B�o��o�t Security Save & Exit Password Description Set the system boot order. Leave the Create New Password...
User Manual
Page 77
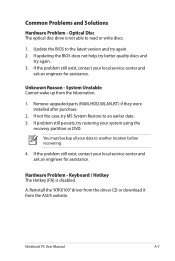
..., try again. 2. You must backup all your system using the recovery partition or DVD. Hardware Problem - A. Update the BIOS to read or write discs. 1. If the problem still exist, contact your local service center and ask an engineer for assistance. If updating the BIOS does not help, try better quality discs and try MS System Restore to another location before recovering. 4. Unknown Reason - Keyboard / Hotkey The Hotkey (FN) is not able...
..., try again. 2. You must backup all your system using the recovery partition or DVD. Hardware Problem - A. Update the BIOS to read or write discs. 1. If the problem still exist, contact your local service center and ask an engineer for assistance. If updating the BIOS does not help, try better quality discs and try MS System Restore to another location before recovering. 4. Unknown Reason - Keyboard / Hotkey The Hotkey (FN) is not able...

User Manual
Page 79
... recovery partition or DVD. You must backup all your data to another location before recovering. C. Hardware Problem - You will see taskbar), close them . 4. check the power cord connections, otherwise visit a local service center for repair. You must backup all your data to another location before recovering. If you have many applications running (see whether the Notebook PC has a WLAN card under the "Network Adapter" item. Mechanical Problem - Make sure that the FAN works...
... recovery partition or DVD. You must backup all your data to another location before recovering. C. Hardware Problem - You will see taskbar), close them . 4. check the power cord connections, otherwise visit a local service center for repair. You must backup all your data to another location before recovering. If you have many applications running (see whether the Notebook PC has a WLAN card under the "Network Adapter" item. Mechanical Problem - Make sure that the FAN works...
User Manual
Page 82
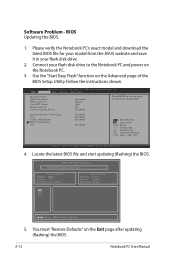
... Flash ASUS FancyStart POST Logo Type Play POST Sound Speaker Volume Internal Pointing Device [Disabled] [Static] [No] [4] [Enabled] Press ENTER to run the utility to the Notebook PC and power on the Notebook PC. 3. Aptio Setup Utility - Locate the latest BIOS file and start updating (flashing) the BIOS. ASUS Tek. BIOS Updating the BIOS. 1. Follow the instructions shown. F1: General Help F9: Optimized Defaults F10: Save ESC: Exit Version 1.28.1119. Connect your flash disk drive. 2. Please verify the Notebook PC's exact model and download...
... Flash ASUS FancyStart POST Logo Type Play POST Sound Speaker Volume Internal Pointing Device [Disabled] [Static] [No] [4] [Enabled] Press ENTER to run the utility to the Notebook PC and power on the Notebook PC. 3. Aptio Setup Utility - Locate the latest BIOS file and start updating (flashing) the BIOS. ASUS Tek. BIOS Updating the BIOS. 1. Follow the instructions shown. F1: General Help F9: Optimized Defaults F10: Save ESC: Exit Version 1.28.1119. Connect your flash disk drive. 2. Please verify the Notebook PC's exact model and download...
User Manual
Page 84
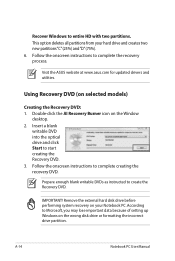
... A-14 Notebook PC User Manual Insert a blank writable DVD into the optical drive and click Start to complete creating the recovery DVD. Follow the onscreen instructions to start creating the Recovery DVD. 3. According to entire HD with two partitions. Visit the ASUS website at www.asus.com for updated drivers and utilities. Using Recovery DVD (on your hard drive and creates two new partitions"C"(25%) and"D"(75%). 6. IMPORTANT! Remove the external hard disk drive before performing system recovery on selected models) Creating the Recovery DVD: 1. Recover Windows to Microsoft...
... A-14 Notebook PC User Manual Insert a blank writable DVD into the optical drive and click Start to complete creating the recovery DVD. Follow the onscreen instructions to start creating the Recovery DVD. 3. According to entire HD with two partitions. Visit the ASUS website at www.asus.com for updated drivers and utilities. Using Recovery DVD (on your hard drive and creates two new partitions"C"(25%) and"D"(75%). 6. IMPORTANT! Remove the external hard disk drive before performing system recovery on selected models) Creating the Recovery DVD: 1. Recover Windows to Microsoft...
User Manual
Page 85
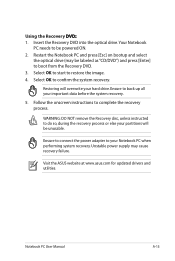
... recovery process. Restoring will be unusable. Notebook PC User Manual A-15 Ensure to connect the power adapter to your hard drive. Ensure to boot from the Recovery DVD. 3. Insert the Recovery DVD into the optical drive.Your Notebook PC needs to be labeled as "CD/DVD") and press [Enter] to back up all your partitions will overwrite your Notebook PC when performing system recovery. Unstable power supply may be powered ON. 2. Follow the onscreen instructions to restore...
... recovery process. Restoring will be unusable. Notebook PC User Manual A-15 Ensure to connect the power adapter to your hard drive. Ensure to boot from the Recovery DVD. 3. Insert the Recovery DVD into the optical drive.Your Notebook PC needs to be labeled as "CD/DVD") and press [Enter] to back up all your partitions will overwrite your Notebook PC when performing system recovery. Unstable power supply may be powered ON. 2. Follow the onscreen instructions to restore...


