User Guide
Page 3
Contents Safety information...iv About this guide...iv Package contents...vi N3150I-C / N3050I-C specifications summary vi Chapter 1: Product introduction 1.1 Before you proceed 1-1 1.2 Motherboard overview 1-2 1.3 Central Processing Unit (CPU 1-4 1.4 System memory 1-4 1.5 Expansion slots 1-7 1.6 Headers...1-8 1.7 Connectors 1-10 1.8 Software support 1-18 1.9 Windows® 7 and USB 3.0 driver installation 1-19 Chapter 2: BIOS information 2.1 Managing and updating your BIOS...
Contents Safety information...iv About this guide...iv Package contents...vi N3150I-C / N3050I-C specifications summary vi Chapter 1: Product introduction 1.1 Before you proceed 1-1 1.2 Motherboard overview 1-2 1.3 Central Processing Unit (CPU 1-4 1.4 System memory 1-4 1.5 Expansion slots 1-7 1.6 Headers...1-8 1.7 Connectors 1-10 1.8 Software support 1-18 1.9 Windows® 7 and USB 3.0 driver installation 1-19 Chapter 2: BIOS information 2.1 Managing and updating your BIOS...

User Guide
Page 8
viii N3150I-C / N3050I-C specifications summary Support DVD Form factor Drivers ASUS utilities EZ Update Anti-virus software (OEM version) Mini-ITX Form Factor, 6.7" x 6.7" (17cm x 17cm) Specifications are subject to change without notice.
viii N3150I-C / N3050I-C specifications summary Support DVD Form factor Drivers ASUS utilities EZ Update Anti-virus software (OEM version) Mini-ITX Form Factor, 6.7" x 6.7" (17cm x 17cm) Specifications are subject to change without notice.
User Guide
Page 15
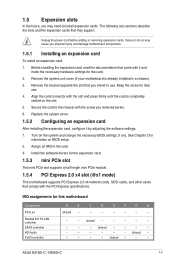
... Secure the card to the chassis with the slot and press firmly until the card is already installed in a chassis). 3. ASUS N3150I-C / N3050I-C 1-7 Remove the bracket opposite the slot that comply with it by adjusting the software settings. 1. Replace the system cover. ...1.5.2 Configuring an expansion card After installing the expansion card, configure it and make the necessary hardware settings for the card. 2. Install the software drivers...
... Secure the card to the chassis with the slot and press firmly until the card is already installed in a chassis). 3. ASUS N3150I-C / N3050I-C 1-7 Remove the bracket opposite the slot that comply with it by adjusting the software settings. 1. Replace the system cover. ...1.5.2 Configuring an expansion card After installing the expansion card, configure it and make the necessary hardware settings for the card. 2. Install the software drivers...
User Guide
Page 26
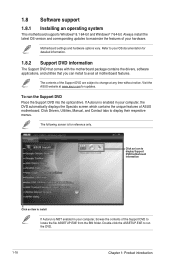
...options vary. Double-click the ASSETUP.EXE to change at www.asus.com for detailed information. 1.8.2 Support DVD information The Support DVD that comes with the motherboard package contains the drivers, software applications, and utilities that you can install to locate the... file ASSETUP.EXE from the BIN folder. The contents of ASUS motherboard. 1.8 Software support 1.8.1 Installing an operating system This motherboard ...
...options vary. Double-click the ASSETUP.EXE to change at www.asus.com for detailed information. 1.8.2 Support DVD information The Support DVD that comes with the motherboard package contains the drivers, software applications, and utilities that you can install to locate the... file ASSETUP.EXE from the BIN folder. The contents of ASUS motherboard. 1.8 Software support 1.8.1 Installing an operating system This motherboard ...

User Guide
Page 27
...ASUS support DVD • 1 x Windows® 7 64-bit installation source • 1 x SATA ODD • 1 x USB device (ODD or storage) The USB storage device requires 8 GB or more capacity. It is a guide on preloading USB 3.0 drivers...174; 7 64-bit installation DVD into a SATA ODD on your Braswell series platform. 4. Insert the ASUS support DVD into a USB ODD, or copy all files on the Windows® 7 64-bit installation...platform. 3. Method 1: Using SATA ODD & USB devices Load USB 3.0 drivers using the ASUS support DVD and install Windows® 7 64-bit using a USB device. 1.9 Windows® 7 ...
...ASUS support DVD • 1 x Windows® 7 64-bit installation source • 1 x SATA ODD • 1 x USB device (ODD or storage) The USB storage device requires 8 GB or more capacity. It is a guide on preloading USB 3.0 drivers...174; 7 64-bit installation DVD into a SATA ODD on your Braswell series platform. 4. Insert the ASUS support DVD into a USB ODD, or copy all files on the Windows® 7 64-bit installation...platform. 3. Method 1: Using SATA ODD & USB devices Load USB 3.0 drivers using the ASUS support DVD and install Windows® 7 64-bit using a USB device. 1.9 Windows® 7 ...

User Guide
Page 28
screen will be loaded automatically during installation startup. Follow the onscreen instructions to complete the Windows® 7 64-bit installation. 1-20 Chapter 1: Product introduction 6. The "Setup is loaded correctly. 7. The USB 3.0 driver will show up if the USB 3.0 driver is starting..."
screen will be loaded automatically during installation startup. Follow the onscreen instructions to complete the Windows® 7 64-bit installation. 1-20 Chapter 1: Product introduction 6. The "Setup is loaded correctly. 7. The USB 3.0 driver will show up if the USB 3.0 driver is starting..."

User Guide
Page 29
...folder into an ODD on your system. 3. Method 2: Using a modified Windows® 7 64-bit ISO Load USB 3.0 drivers and install Windows® 7 64-bit using a third-party ISO software. 2. Power on your working system, create an ISO image file ...of the ASUS supporting DVD to your system and press F8 during POST (Power-On Self Test) to create a modified Windows&#... 7 64-bit installation source using a modified Windows® 7 64-bit installation DVD. ASUS N3150I-C / N3050I-C 1-21
...folder into an ODD on your system. 3. Method 2: Using a modified Windows® 7 64-bit ISO Load USB 3.0 drivers and install Windows® 7 64-bit using a third-party ISO software. 2. Power on your working system, create an ISO image file ...of the ASUS supporting DVD to your system and press F8 during POST (Power-On Self Test) to create a modified Windows&#... 7 64-bit installation source using a modified Windows® 7 64-bit installation DVD. ASUS N3150I-C / N3050I-C 1-21

User Guide
Page 30
screen will be loaded automatically during installation startup. 7. The "Setup is loaded correctly. 9. Follow the onscreen instructions to complete the Windows® 7 64-bit installation. 1-22 Chapter 1: Product introduction Select the ODD as the boot device. 8. The USB 3.0 driver will show up if the USB 3.0 driver is starting..."
screen will be loaded automatically during installation startup. 7. The "Setup is loaded correctly. 9. Follow the onscreen instructions to complete the Windows® 7 64-bit installation. 1-22 Chapter 1: Product introduction Select the ODD as the boot device. 8. The USB 3.0 driver will show up if the USB 3.0 driver is starting..."
User Guide
Page 31
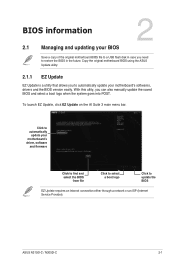
BIOS information 2 2.1 Managing and updating your motherboard's softwares, drivers and the BIOS version easily. Copy the original motherboard BIOS using the ASUS Update utility. 2.1.1 EZ Update EZ Update is a utility that allows you to automatically update your BIOS Save a copy of ...ISP (Internet Service Provider). To launch EZ Update, click EZ Update on the AI Suite 3 main menu bar. ASUS N3150I-C / N3050I-C 2-1 Click to automatically update your motherboard's driver, software and firmware Click to find and select the BIOS from file Click to select a boot logo Click to ...
BIOS information 2 2.1 Managing and updating your motherboard's softwares, drivers and the BIOS version easily. Copy the original motherboard BIOS using the ASUS Update utility. 2.1.1 EZ Update EZ Update is a utility that allows you to automatically update your BIOS Save a copy of ...ISP (Internet Service Provider). To launch EZ Update, click EZ Update on the AI Suite 3 main menu bar. ASUS N3150I-C / N3050I-C 2-1 Click to automatically update your motherboard's driver, software and firmware Click to find and select the BIOS from file Click to select a boot logo Click to ...

User Guide
Page 47
... Serial ATA features that shows a warning message during POST (Power-on random workloads by xHCI drivers for LPM (link power management) support with xHCI support. Configuration options: [Auto] [Floppy] [Forced FDD] [Hard Disk] [CD-ROM] ASUS N3150I-C / N3050I-C 2-17 Configuration options: [Disabled] [Enabled] S.M.A.R.T. SATA Mode Selection [AHCI] Allows you to set the previous...
... Serial ATA features that shows a warning message during POST (Power-on random workloads by xHCI drivers for LPM (link power management) support with xHCI support. Configuration options: [Auto] [Floppy] [Forced FDD] [Hard Disk] [CD-ROM] ASUS N3150I-C / N3050I-C 2-17 Configuration options: [Disabled] [Enabled] S.M.A.R.T. SATA Mode Selection [AHCI] Allows you to set the previous...

User Guide
Page 54
...] 2.7.4 Wait for the F1 key to enable or disable power-on Windows® display requrements. Network Stack Driver Support [Disabled] [Disabled] Select to skip the network stack driver from 0 to load the network stack driver during Normal Boot. This feature will be available until your computer enters the operating system. PS/2 Keyboard and...
...] 2.7.4 Wait for the F1 key to enable or disable power-on Windows® display requrements. Network Stack Driver Support [Disabled] [Disabled] Select to skip the network stack driver from 0 to load the network stack driver during Normal Boot. This feature will be available until your computer enters the operating system. PS/2 Keyboard and...
User Guide
Page 55
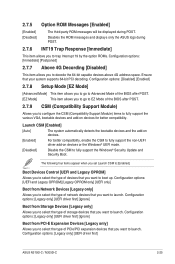
...you set Launch CSM to fully support the Windows® Security Update and Security Boot. Configuration options: [Legacy only] [UEFI driver first] ASUS N3150I-C / N3050I-C 2-25 The following four items appear when you want to launch. Configuration options: [UEFI and Legacy OPROM] [Legacy OPROM ... CSM (Compatibility Support Module) Allows you want to launch. Disables the ROM messages and displays only the ASUS logo during POST. Configuration options: [Legacy only] [UEFI driver first] [Ignore] Boot from Network Devices [Legacy only] Allows you to fully support the various VGA...
...you set Launch CSM to fully support the Windows® Security Update and Security Boot. Configuration options: [Legacy only] [UEFI driver first] ASUS N3150I-C / N3050I-C 2-25 The following four items appear when you want to launch. Configuration options: [UEFI and Legacy OPROM] [Legacy OPROM ... CSM (Compatibility Support Module) Allows you want to launch. Disables the ROM messages and displays only the ASUS logo during POST. Configuration options: [Legacy only] [UEFI driver first] [Ignore] Boot from Network Devices [Legacy only] Allows you to fully support the various VGA...

User Guide
Page 57
... in the operating system. Doing so may cause boot failures. Once the KEK is deleted, the db and the dbx cannot be loaded. ASUS N3150I-C / N3050I-C 2-27 Load Default KEK Select Yes to load the system default KEK or select No to delete the DBX file from a USB storage ...8226; The DB file must be formatted as a UEFI variable structure with time-based authenticated variable. • UEFI executable files include UEFI boot devices, drivers and applications. Key-exchange Key (KEK) refers to load a downloaded db from your system. Load Default db Select Yes to load the system default db...
... in the operating system. Doing so may cause boot failures. Once the KEK is deleted, the db and the dbx cannot be loaded. ASUS N3150I-C / N3050I-C 2-27 Load Default KEK Select Yes to load the system default KEK or select No to delete the DBX file from a USB storage ...8226; The DB file must be formatted as a UEFI variable structure with time-based authenticated variable. • UEFI executable files include UEFI boot devices, drivers and applications. Key-exchange Key (KEK) refers to load a downloaded db from your system. Load Default db Select Yes to load the system default db...


