
MAXIMUS VI HERO User's Manual
Page 4
... 3-34 3.6.7 Onboard Devices Configuration 3-35 3.6.8 APM 3-37 3.6.9 Network Stack 3-38 3.6.10 ROG Effects 3-38 3.7 Monitor menu 3-39 3.8 Boot menu 3-42 3.9 Tools menu 3-47 3.9.1 ASUS EZ Flash 2 Utility 3-47 3.9.2 ROG Secure Erase 3-47 3.9.3 ASUS O.C. Profile 3-49 3.9.4 ASUS SPD Information 3-50 3.9.5 ROG OC Panel H-Key Configure 3-50 3.10 Exit menu 3-52 3.11 Updating BIOS 3-53 3.11...
... 3-34 3.6.7 Onboard Devices Configuration 3-35 3.6.8 APM 3-37 3.6.9 Network Stack 3-38 3.6.10 ROG Effects 3-38 3.7 Monitor menu 3-39 3.8 Boot menu 3-42 3.9 Tools menu 3-47 3.9.1 ASUS EZ Flash 2 Utility 3-47 3.9.2 ROG Secure Erase 3-47 3.9.3 ASUS O.C. Profile 3-49 3.9.4 ASUS SPD Information 3-50 3.9.5 ROG OC Panel H-Key Configure 3-50 3.10 Exit menu 3-52 3.11 Updating BIOS 3-53 3.11...

MAXIMUS VI HERO User's Manual
Page 11
... Charger+ - ASUS Q-Connector - O.C. Profile - ASUS C.P.R. (CPU Parameter Recall) ASUS Q-Design - AI Suite III - AI Charger - ROG Exclusive Features Special Features Extreme Engine Digi+ III - ROG SSD Secure Erase - BIOS Print - GPU.DIMM Post - Disk Unlocker ASUS EZ DIY - USB BIOS Flashback - ASUS CrashFree BIOS 3 - ASUS EZ Flash 2 - ASUS Q-Code - ASUS Q-LED (CPU, DRAM, VGA, Boot Device LED) - ASUS Q-Slot - ASUS Q-DIMM...
... Charger+ - ASUS Q-Connector - O.C. Profile - ASUS C.P.R. (CPU Parameter Recall) ASUS Q-Design - AI Suite III - AI Charger - ROG Exclusive Features Special Features Extreme Engine Digi+ III - ROG SSD Secure Erase - BIOS Print - GPU.DIMM Post - Disk Unlocker ASUS EZ DIY - USB BIOS Flashback - ASUS CrashFree BIOS 3 - ASUS EZ Flash 2 - ASUS Q-Code - ASUS Q-LED (CPU, DRAM, VGA, Boot Device LED) - ASUS Q-Slot - ASUS Q-DIMM...
MAXIMUS VI HERO User's Manual
Page 40
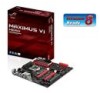
... settings. button Installing DIMMs that you download and update to the latest BIOS version from the ASUS website at www.asus.com. • If you that the BIOS has been restored to boot and load the BIOS default settings. function. • The MemOK! A message will appear ...during the tuning process, the system continues memory tuning after turning on the ASUS website at www.asus.com after the whole tuning process, the MEMOK_LED...
... settings. button Installing DIMMs that you download and update to the latest BIOS version from the ASUS website at www.asus.com. • If you that the BIOS has been restored to boot and load the BIOS default settings. function. • The MemOK! A message will appear ...during the tuning process, the system continues memory tuning after turning on the ASUS website at www.asus.com after the whole tuning process, the MEMOK_LED...

MAXIMUS VI HERO User's Manual
Page 41
... and enter the BIOS directly. • Turn off your system to go through POST (without having to press the key during boot-up. Chapter 1 ASUS MAXIMUS VI HERO 1-27 DirectKey button This feature allows your system and conveniently enter the BIOS during POST. Press the DirectKey button again or the...system will shut down. 4. Ensure to save your data before using the power-on button to allow your system to go to section 3.8 Boot Menu for details about setting the DirectKey default function. With DirectKey, you press the DirectKey button, your system. • Refer to the...
... and enter the BIOS directly. • Turn off your system to go through POST (without having to press the key during boot-up. Chapter 1 ASUS MAXIMUS VI HERO 1-27 DirectKey button This feature allows your system and conveniently enter the BIOS during POST. Press the DirectKey button again or the...system will shut down. 4. Ensure to save your data before using the power-on button to allow your system to go to section 3.8 Boot Menu for details about setting the DirectKey default function. With DirectKey, you press the DirectKey button, your system. • Refer to the...

MAXIMUS VI HERO User's Manual
Page 42
... can clear the CMOS memory of date, time, and system setup parameters by erasing the CMOS RTC RAM data. Shut down the key during the boot process and enter BIOS setup to clear the Real Time Clock (RTC) RAM in CMOS, which include system setup information such as system passwords. 1.2.7 Jumper... the RTC RAM: 1. Keep the cap on pins 2-3 for about 5-10 seconds, then move the jumper again to enable C.P.R. Removing the cap will cause system boot failure! • If the steps above do not need to clear the RTC when the system hangs due to pins 2-3. You can automatically reset parameter...
... can clear the CMOS memory of date, time, and system setup parameters by erasing the CMOS RTC RAM data. Shut down the key during the boot process and enter BIOS setup to clear the Real Time Clock (RTC) RAM in CMOS, which include system setup information such as system passwords. 1.2.7 Jumper... the RTC RAM: 1. Keep the cap on pins 2-3 for about 5-10 seconds, then move the jumper again to enable C.P.R. Removing the cap will cause system boot failure! • If the steps above do not need to clear the RTC when the system hangs due to pins 2-3. You can automatically reset parameter...

MAXIMUS VI HERO User's Manual
Page 44
This user-friendly design provides an intuitive way to locate the root problem within seconds. Chapter 1 1-30 Chapter 1: Product introduction 3. Q LED Q LEDs check key components (CPU, DRAM, VGA card, and booting devices) in sequence during motherboard booting process. If an error is found , the corresponding LED will continue lighting until the problem is solved.
This user-friendly design provides an intuitive way to locate the root problem within seconds. Chapter 1 1-30 Chapter 1: Product introduction 3. Q LED Q LEDs check key components (CPU, DRAM, VGA card, and booting devices) in sequence during motherboard booting process. If an error is found , the corresponding LED will continue lighting until the problem is solved.

MAXIMUS VI HERO User's Manual
Page 48
... Reset PPI is not available Reserved for future AMI error codes S3 Resume is stared (S3 Resume PPI is called by the DXE IPL) S3 Boot Script execution Video repost OS S3 wake vector call Reserved for future AMI progress codes S3 Resume Failed S3 Resume PPI not Found S3 Resume... Boot Script Error S3 OS Wake Error Reserved for future AMI error codes Recovery condition triggered by firmware (Auto recovery) Recovery condition triggered by user (Forced ...
... Reset PPI is not available Reserved for future AMI error codes S3 Resume is stared (S3 Resume PPI is called by the DXE IPL) S3 Boot Script execution Video repost OS S3 wake vector call Reserved for future AMI progress codes S3 Resume Failed S3 Resume PPI not Found S3 Resume... Boot Script Error S3 OS Wake Error Reserved for future AMI error codes Recovery condition triggered by firmware (Auto recovery) Recovery condition triggered by user (Forced ...

MAXIMUS VI HERO User's Manual
Page 49
... DXE SMM initialization is started PCH devices initialization PCH DXE Initialization (PCH module specific) ACPI module initialization CSM initialization Reserved for future AMI DXE codes Boot Device Selection (BDS) phase is started Driver connecting is started PCI Bus initialization is started PCI Bus Hot Plug Controller Initialization PCI Bus Enumeration PCI... Assign Resources Console Output devices connect Console input devices connect Super IO Initialization USB initialization is started USB Reset (continued on the next page) Chapter 1 ASUS MAXIMUS VI HERO 1-35
... DXE SMM initialization is started PCH devices initialization PCH DXE Initialization (PCH module specific) ACPI module initialization CSM initialization Reserved for future AMI DXE codes Boot Device Selection (BDS) phase is started Driver connecting is started PCI Bus initialization is started PCI Bus Hot Plug Controller Initialization PCI Bus Enumeration PCI... Assign Resources Console Output devices connect Console input devices connect Super IO Initialization USB initialization is started USB Reset (continued on the next page) Chapter 1 ASUS MAXIMUS VI HERO 1-35

MAXIMUS VI HERO User's Manual
Page 50
... Reserved for ASL (see ASL Status Codes section below) Setup Input Wait Reserved for ASL (see ASL Status Codes section below) Ready To Boot event Legacy Boot event Exit Boot Services event Runtime Set Virtual Address MAP Begin Runtime Set Virtual Address MAP End Legacy Option ROM Initialization System Reset USB hot plug...
... Reserved for ASL (see ASL Status Codes section below) Setup Input Wait Reserved for ASL (see ASL Status Codes section below) Ready To Boot event Legacy Boot event Exit Boot Services event Runtime Set Virtual Address MAP Begin Runtime Set Virtual Address MAP End Legacy Option ROM Initialization System Reset USB hot plug...

MAXIMUS VI HERO User's Manual
Page 51
Out of the Architectural Protocols are found Invalid password Error loading Boot Option (LoadImage returned error) Boot Option is failed (StartImage returned error) Flash update is failed Reset protocol is not available ACPI/ASL Checkpoints Code 0x01 0x02 0x03 0x04 0x05 0x10 ... waking up from the S3 sleep state System is in PIC mode. Interrupt controller is in APIC mode. System has transitioned into ACPI mode. Chapter 1 ASUS MAXIMUS VI HERO 1-37 Q-Code table Code D2 D3 D4 D5 D6 D7 D8 D9 DA DB DC Description PCH initialization error Some of Resources No Space for...
Out of the Architectural Protocols are found Invalid password Error loading Boot Option (LoadImage returned error) Boot Option is failed (StartImage returned error) Flash update is failed Reset protocol is not available ACPI/ASL Checkpoints Code 0x01 0x02 0x03 0x04 0x05 0x10 ... waking up from the S3 sleep state System is in PIC mode. Interrupt controller is in APIC mode. System has transitioned into ACPI mode. Chapter 1 ASUS MAXIMUS VI HERO 1-37 Q-Code table Code D2 D3 D4 D5 D6 D7 D8 D9 DA DB DC Description PCH initialization error Some of Resources No Space for...

MAXIMUS VI HERO User's Manual
Page 57
...;ly��u�n�i�t (PSU) that complies with more power-consuming devices. ASUS MAXIMUS VI HERO 1-43 Chapter 1 The system may become unstable or may not boot up if the power is inadequate. ATX power connectors (24-pin EATXPWR; 8-pin EATX12V)...65533;r�w�i�s�e�,�t�h�e��s�y�s�t�e�m� will not boot. If�y�o��u�w��a�n�t�t�o��u�s�e��tw...
...;ly��u�n�i�t (PSU) that complies with more power-consuming devices. ASUS MAXIMUS VI HERO 1-43 Chapter 1 The system may become unstable or may not boot up if the power is inadequate. ATX power connectors (24-pin EATXPWR; 8-pin EATX12V)...65533;r�w�i�s�e�,�t�h�e��s�y�s�t�e�m� will not boot. If�y�o��u�w��a�n�t�t�o��u�s�e��tw...
MAXIMUS VI HERO User's Manual
Page 71
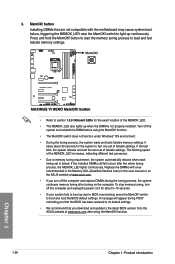
... Extract and rename the BIOS image file to the root directory of the USB flash disk drive. 4. Updating BIOS may have risks. Chapter 2 ASUS MAXIMUS VI HERO 2-11 To use USB BIOS Flashback: 1. ���D�o��w�n�l�o�a�d��th�e��l�... out, indicating that the BIOS Flashback function is completed. 2.2 BIOS update utility USB BIOS Flashback USB BIOS Flashback allows you to boot up, please contact your local ASUS Service Center. If the BIOS program is updated automatically.
... Extract and rename the BIOS image file to the root directory of the USB flash disk drive. 4. Updating BIOS may have risks. Chapter 2 ASUS MAXIMUS VI HERO 2-11 To use USB BIOS Flashback: 1. ���D�o��w�n�l�o�a�d��th�e��l�... out, indicating that the BIOS Flashback function is completed. 2.2 BIOS update utility USB BIOS Flashback USB BIOS Flashback allows you to boot up, please contact your local ASUS Service Center. If the BIOS program is updated automatically.

MAXIMUS VI HERO User's Manual
Page 77
... continuous beep followed by three short beeps One continuous beep followed by four short beeps Description VGA detected Quick boot set to the power connector at the back of the BIOS setting. Chapter 2 ASUS MAXIMUS VI HERO 2-17 If you do not see anything within 30 seconds from orange to a power outlet that all the...
... continuous beep followed by three short beeps One continuous beep followed by four short beeps Description VGA detected Quick boot set to the power connector at the back of the BIOS setting. Chapter 2 ASUS MAXIMUS VI HERO 2-17 If you do not see anything within 30 seconds from orange to a power outlet that all the...

MAXIMUS VI HERO User's Manual
Page 79
...and Output System) stores system hardware settings such as storage device configuration, overclocking settings, advanced power management, and boot device configuration that requires further BIOS settings or update. DO NOT change the BIOS settings only with the help ... BIOS settings apply to most conditions to instability or boot failure. When downloading or updating the BIOS file, rename it as your operating system. Chapter 3 ASUS MAXIMUS VI HERO 3-1 Chapter 3: BIOS setup BIOS setup 3.1 Knowing BIOS 3 The new ASUS UEFI BIOS is a Unified Extensible Interface that complies ...
...and Output System) stores system hardware settings such as storage device configuration, overclocking settings, advanced power management, and boot device configuration that requires further BIOS settings or update. DO NOT change the BIOS settings only with the help ... BIOS settings apply to most conditions to instability or boot failure. When downloading or updating the BIOS file, rename it as your operating system. Chapter 3 ASUS MAXIMUS VI HERO 3-1 Chapter 3: BIOS setup BIOS setup 3.1 Knowing BIOS 3 The new ASUS UEFI BIOS is a Unified Extensible Interface that complies ...
MAXIMUS VI HERO User's Manual
Page 81
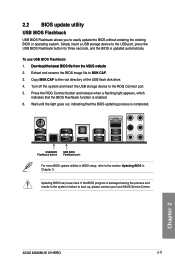
Refer to the Setup Mode item in section 3.8 Boot menu for the advanced BIOS settings. To access the Advanced Mode, click Exit/Advanced Mode, then select Advanced Mode or press hot key for details. ASUS MAXIMUS VI HERO 3-3 3.2.1 EZ Mode The EZ Mode provides you an overview of the selected ...mode on the right hand side • The boot device options vary depending on the devices you to select the display language,...
Refer to the Setup Mode item in section 3.8 Boot menu for the advanced BIOS settings. To access the Advanced Mode, click Exit/Advanced Mode, then select Advanced Mode or press hot key for details. ASUS MAXIMUS VI HERO 3-3 3.2.1 EZ Mode The EZ Mode provides you an overview of the selected ...mode on the right hand side • The boot device options vary depending on the devices you to select the display language,...

MAXIMUS VI HERO User's Manual
Page 82
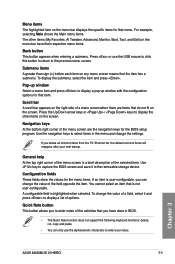
...figure below shows an example of the screen has the following sections for the detailed configurations. For changing the system boot configuration For configuring options for special functions For selecting the exit options and loading default settings 3-4 Chapter 3: BIOS setup...Advanced Mode The Advanced Mode provides advanced options for experienced end-users to the following main items: Extreme Tweaker Main Advanced Monitor Boot Tool Exit For changing the overclocking settings For changing the basic system configuration For changing the advanced system settings For displaying the ...
...figure below shows an example of the screen has the following sections for the detailed configurations. For changing the system boot configuration For configuring options for special functions For selecting the exit options and loading default settings 3-4 Chapter 3: BIOS setup...Advanced Mode The Advanced Mode provides advanced options for experienced end-users to the following main items: Extreme Tweaker Main Advanced Monitor Boot Tool Exit For changing the overclocking settings For changing the basic system configuration For changing the advanced system settings For displaying the ...
MAXIMUS VI HERO User's Manual
Page 83
...device. Configuration fields These fields show the values for that menu. You cannot select an item that do not fit on the screen. Chapter 3 ASUS MAXIMUS VI HERO 3-5 Submenu items A greater than sign (>) before each item on the menu bar have done in BIOS. • The Quick Note function does...submenu. To change the settings. Quick Note button This button allows you to display the other items (My Favorites, Ai Tweaker, Advanced, Monitor, Boot, Tool, and Exit) on any menu screen means that you delete all shortcut items from the F3: Shortcut list, the default shortcut items will...
...device. Configuration fields These fields show the values for that menu. You cannot select an item that do not fit on the screen. Chapter 3 ASUS MAXIMUS VI HERO 3-5 Submenu items A greater than sign (>) before each item on the menu bar have done in BIOS. • The Quick Note function does...submenu. To change the settings. Quick Note button This button allows you to display the other items (My Favorites, Ai Tweaker, Advanced, Monitor, Boot, Tool, and Exit) on any menu screen means that you delete all shortcut items from the F3: Shortcut list, the default shortcut items will...
MAXIMUS VI HERO User's Manual
Page 84
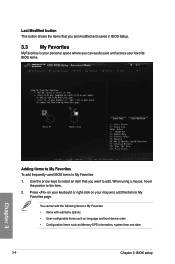
... to My Favorites: 1. You cannot add the following items to My Favorites: • Items with submenu options • User-configurable items such as language and boot device order • Configuration items such as Memory SPD Information, system time and date 3-6 Chapter 3: BIOS setup Last Modified button This button shows the items...
... to My Favorites: 1. You cannot add the following items to My Favorites: • Items with submenu options • User-configurable items such as language and boot device order • Configuration items such as Memory SPD Information, system time and date 3-6 Chapter 3: BIOS setup Last Modified button This button shows the items...

MAXIMUS VI HERO User's Manual
Page 91
...] - [-16] GPU.DIMM Post Automatically detects and displays the information about the devices or memory installed on the slots. Chapter 3 ASUS MAXIMUS VI HERO 3-13 Configuration options: [Auto] [+16] - [-16] CMD Sense Amplifier [Auto] Reducing usually helps overclocking and over -voltage. Configuration...] [Disable Both DIMMS] Scrambler Setting [Optimized ...] Set this item to [Optimized (ASUS)] to enable, disable or automatically set the MRC fast boot. Configuration options: [Optimized (ASUS)] [Default (MRC)] DQ Sense Amplifier [Auto] Reducing usually helps overclocking and over-...
...] - [-16] GPU.DIMM Post Automatically detects and displays the information about the devices or memory installed on the slots. Chapter 3 ASUS MAXIMUS VI HERO 3-13 Configuration options: [Auto] [+16] - [-16] CMD Sense Amplifier [Auto] Reducing usually helps overclocking and over -voltage. Configuration...] [Disable Both DIMMS] Scrambler Setting [Optimized ...] Set this item to [Optimized (ASUS)] to enable, disable or automatically set the MRC fast boot. Configuration options: [Optimized (ASUS)] [Default (MRC)] DQ Sense Amplifier [Auto] Reducing usually helps overclocking and over-...
MAXIMUS VI HERO User's Manual
Page 94
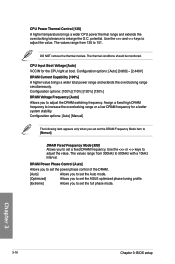
... [Auto] Allows you to 151. Use the or keys to enlarge the O.C. DRAM Fixed Frequency Mode [300] Allows you to set the ASUS optimized phase tuning profile. [Extreme] Allows you set set the full phase mode. Chapter 3 3-16 Chapter 3: BIOS setup DRAM Power Phase Control...power phase control of the DRAM. [Auto] Allows you to set the Auto mode. [Optimized] Allows you to adjust the DRAM switching frequency. CPU Input Boot Voltage [Auto] VCCIN for a better system stability. Configuration options: [Auto] [0.800] - [2.440V] DRAM Current Capability [100%] A higher value brings...
... [Auto] Allows you to 151. Use the or keys to enlarge the O.C. DRAM Fixed Frequency Mode [300] Allows you to set the ASUS optimized phase tuning profile. [Extreme] Allows you set set the full phase mode. Chapter 3 3-16 Chapter 3: BIOS setup DRAM Power Phase Control...power phase control of the DRAM. [Auto] Allows you to set the Auto mode. [Optimized] Allows you to adjust the DRAM switching frequency. CPU Input Boot Voltage [Auto] VCCIN for a better system stability. Configuration options: [Auto] [0.800] - [2.440V] DRAM Current Capability [100%] A higher value brings...


