
User Manual
Page 6
... 5-1 5.1.1 Requirements 5-1 5.1.2 Before you begin 5-1 5.1.3 Installing CrossFireX graphics cards 5-2 5.1.4 Installing the device drivers 5-3 5.1.5 Enabling the ATI® CrossFireX™ technology 5-3 5.2 NVIDIA® SLI™ technology 5-5 5.2.1 Requirements 5-5 5.2.2 Installing two SLI-ready graphics cards 5-5 5.2.3 Installing the device drivers 5-6 5.2.4 Enabling the NVIDIA® SLI™ technology 5-6 5.3 LucidLogix® Virtu™ solution 5-9 5.3.1 Hardware installation 5-9 5.3.2 Software configuration 5-11 vi
... 5-1 5.1.1 Requirements 5-1 5.1.2 Before you begin 5-1 5.1.3 Installing CrossFireX graphics cards 5-2 5.1.4 Installing the device drivers 5-3 5.1.5 Enabling the ATI® CrossFireX™ technology 5-3 5.2 NVIDIA® SLI™ technology 5-5 5.2.1 Requirements 5-5 5.2.2 Installing two SLI-ready graphics cards 5-5 5.2.3 Installing the device drivers 5-6 5.2.4 Enabling the NVIDIA® SLI™ technology 5-6 5.3 LucidLogix® Virtu™ solution 5-9 5.3.1 Hardware installation 5-9 5.3.2 Software configuration 5-11 vi

User Manual
Page 13
...the following parts: • Chapter 1: Product introduction This chapter describes the features of the switches, jumpers, and connectors on ASUS hardware and software products. It includes description of the motherboard and the new technology it supports. • Chapter 2: Hardware ... and configure multiple ATI® CrossFireX™ and NVIDIA® SLI™ graphics cards. Optional documentation Your product package may have to perform when installing system components. xiii ASUS websites The ASUS website provides updated information on the motherboard. • Chapter 3:...
...the following parts: • Chapter 1: Product introduction This chapter describes the features of the switches, jumpers, and connectors on ASUS hardware and software products. It includes description of the motherboard and the new technology it supports. • Chapter 2: Hardware ... and configure multiple ATI® CrossFireX™ and NVIDIA® SLI™ graphics cards. Optional documentation Your product package may have to perform when installing system components. xiii ASUS websites The ASUS website provides updated information on the motherboard. • Chapter 3:...

User Manual
Page 15
...x16 slots (@singlex16, dual x8) 1 x PCIe2.0 x4 slot Support NVIDIA® SLI™ / ATI CrossFireX™���T�e���c��h�...1600 MHz frequency as default. **** Refer to the physical characteristics of individual CPUs. Maximus IV GENE-Z specifications summary CPU Chipset Memory Expansion Slots Multi-GPU Technology Storage LAN LGA1155 socket ...65533;C�P�U��t�y�p�e�s�. **Refer to www.asus.com for Intel CPU support list Intel® Z68 Express Chipset Dual channel ...
...x16 slots (@singlex16, dual x8) 1 x PCIe2.0 x4 slot Support NVIDIA® SLI™ / ATI CrossFireX™���T�e���c��h�...1600 MHz frequency as default. **** Refer to the physical characteristics of individual CPUs. Maximus IV GENE-Z specifications summary CPU Chipset Memory Expansion Slots Multi-GPU Technology Storage LAN LGA1155 socket ...65533;C�P�U��t�y�p�e�s�. **Refer to www.asus.com for Intel CPU support list Intel® Z68 Express Chipset Dual channel ...

User Manual
Page 21
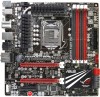
... you for the following items. Motherboard ROG Maximus IV GENE-Z Cables 1 x�R�O�G�C�o�nn�e�ct�ca�b�le 1 x SLI Cable 2 x 2-in-1 SATA 3Gb/s signal cables 1 x 2-in-1 SATA 6Gb/s signal cables Accessories 1�x�...guide If any of ASUS quality motherboards! 1.1 Welcome! Thank you start installing the motherboard, and hardware devices on it, check the items in your package with the list below. 1.2 Package contents Check your motherboard package for buying an ROG Maximus IV GENE-Z motherboard! The ...
... you for the following items. Motherboard ROG Maximus IV GENE-Z Cables 1 x�R�O�G�C�o�nn�e�ct�ca�b�le 1 x SLI Cable 2 x 2-in-1 SATA 3Gb/s signal cables 1 x 2-in-1 SATA 6Gb/s signal cables Accessories 1�x�...guide If any of ASUS quality motherboards! 1.1 Welcome! Thank you start installing the motherboard, and hardware devices on it, check the items in your package with the list below. 1.2 Package contents Check your motherboard package for buying an ROG Maximus IV GENE-Z motherboard! The ...

User Manual
Page 23
...of Green ASUS eco-friendly computing. Power consumption also goes down by reducing unnecessary hard drive spin, an important part of jaw-dropping graphics at a level previously unseen. Users with LucidLogix® Virtu™�! Fret no longer because with the ROG Maximus IV GENE-Z, you ...65533;o�n��b�o�a�r�d� GPU for increased graphics performance. SLI/CrossFire On-Demand Why choose when you plug a video connector directly to Quad-GPU SLI and Quad-GPU CrossFireX configuration. It uses an installed fast SSD (min 18.6GB ...
...of Green ASUS eco-friendly computing. Power consumption also goes down by reducing unnecessary hard drive spin, an important part of jaw-dropping graphics at a level previously unseen. Users with LucidLogix® Virtu™�! Fret no longer because with the ROG Maximus IV GENE-Z, you ...65533;o�n��b�o�a�r�d� GPU for increased graphics performance. SLI/CrossFire On-Demand Why choose when you plug a video connector directly to Quad-GPU SLI and Quad-GPU CrossFireX configuration. It uses an installed fast SSD (min 18.6GB ...

User Manual
Page 177
Multiple 5GPU This chapter describes how to install and configure multiple ATI® CrossFireX™ and NVIDIA® SLI™ graphics cards. technology support
Multiple 5GPU This chapter describes how to install and configure multiple ATI® CrossFireX™ and NVIDIA® SLI™ graphics cards. technology support

User Manual
Page 183
...website (http://www.nzone.com) for the latest certified graphics card and supported 3D application list. 5.2.2 Installing two SLI-ready graphics cards The following pictures are properly seated on the slots. If your system. Ensure that the cards... may vary with models, but the installation steps remain the same. 1. 5.2 NVIDIA® SLI™ technology The motherboard supports the NVIDIA® SLI™ (Scalable Link Interface) technology that allows you to Chapter 2 in this user manual for...graphics cards. Insert the two graphics card into the PCIEX16 slots. ROG Maximus IV GENE-Z 5-5
...website (http://www.nzone.com) for the latest certified graphics card and supported 3D application list. 5.2.2 Installing two SLI-ready graphics cards The following pictures are properly seated on the slots. If your system. Ensure that the cards... may vary with models, but the installation steps remain the same. 1. 5.2 NVIDIA® SLI™ technology The motherboard supports the NVIDIA® SLI™ (Scalable Link Interface) technology that allows you to Chapter 2 in this user manual for...graphics cards. Insert the two graphics card into the PCIEX16 slots. ROG Maximus IV GENE-Z 5-5

User Manual
Page 184
...Windows® desktop and select NVIDIA Control Panel. 4. com). 5.2.4 Enabling the NVIDIA® SLI™ technology After installing your PCI Express graphics card driver supports the NVIDIA® SLI™ technology. Connect two independent auxiliary power sources from the NVIDIA website (www.nvidia. ...Launching the NVIDIA Control Panel You can launch the NVIDIA Control Panel by the following two methods. Align and firmly insert the SLI bridge connector to the graphics card. Ensure that came with your graphics card package to install the device drivers. The NVIDIA ...
...Windows® desktop and select NVIDIA Control Panel. 4. com). 5.2.4 Enabling the NVIDIA® SLI™ technology After installing your PCI Express graphics card driver supports the NVIDIA® SLI™ technology. Connect two independent auxiliary power sources from the NVIDIA website (www.nvidia. ...Launching the NVIDIA Control Panel You can launch the NVIDIA Control Panel by the following two methods. Align and firmly insert the SLI bridge connector to the graphics card. Ensure that came with your graphics card package to install the device drivers. The NVIDIA ...

User Manual
Page 186
Enabling SLI settings From the NVIDIA Control Panel window, select Set SLI Configuration. Click Enable SLI and set the display for viewing SLI rendered content. B5. When done, click Apply. 5-8 Chapter 5: Multiple GPU technology support Select the NVIDIA GeForce tab, and then click Start the NVIDIA Control Panel. B4. The NVIDIA Control Panel window appears.
Enabling SLI settings From the NVIDIA Control Panel window, select Set SLI Configuration. Click Enable SLI and set the display for viewing SLI rendered content. B5. When done, click Apply. 5-8 Chapter 5: Multiple GPU technology support Select the NVIDIA GeForce tab, and then click Start the NVIDIA Control Panel. B4. The NVIDIA Control Panel window appears.


