
User Manual
Page 2
...be registered trademarks or copyrights of their respective companies, and are used only for backup purposes, without intent to infringe. ii ASUS PROVIDES THIS MANUAL "AS IS" WITHOUT WARRANTY OF ANY KIND, EITHER EXPRESS OR IMPLIED, INCLUDING BUT NOT LIMITED TO THE IMPLIED WARRANTIES OR CONDITIONS... OF MERCHANTABILITY OR FITNESS FOR A PARTICULAR PURPOSE. ASUS ASSUMES NO RESPONSIBILITY OR LIABILITY FOR ANY ERRORS OR INACCURACIES THAT MAY APPEAR IN THIS MANUAL, INCLUDING THE PRODUCTS AND SOFTWARE DESCRIBED IN IT. No part of this manual may or may be extended if: (1) the product ...
...be registered trademarks or copyrights of their respective companies, and are used only for backup purposes, without intent to infringe. ii ASUS PROVIDES THIS MANUAL "AS IS" WITHOUT WARRANTY OF ANY KIND, EITHER EXPRESS OR IMPLIED, INCLUDING BUT NOT LIMITED TO THE IMPLIED WARRANTIES OR CONDITIONS... OF MERCHANTABILITY OR FITNESS FOR A PARTICULAR PURPOSE. ASUS ASSUMES NO RESPONSIBILITY OR LIABILITY FOR ANY ERRORS OR INACCURACIES THAT MAY APPEAR IN THIS MANUAL, INCLUDING THE PRODUCTS AND SOFTWARE DESCRIBED IN IT. No part of this manual may or may be extended if: (1) the product ...

User Manual
Page 6
... operating system 4-1 4.2 Support DVD information 4-1 4.2.1 Running the support DVD 4-1 4.2.2 Drivers menu 4-2 4.2.3 Utilities menu 4-3 4.2.4 Make disk menu 4-4 4.2.5 Manual menu 4-5 4.2.6 Video menu 4-5 4.2.7 ASUS Contact information 4-6 4.2.8 Other information 4-6 4.3 Software information 4-8 4.3.1 Sound Blaster X-Fi audio utility 4-8 4.3.2 ASUS PC Probe II 4-12 4.3.3 ASUS AI Suite 4-18 vi Contents 3.5.7 ROG Connect 3-32 3.6 Power menu 3-33 3.6.1 Suspend Mode 3-33 3.6.2 Repost Video...
... operating system 4-1 4.2 Support DVD information 4-1 4.2.1 Running the support DVD 4-1 4.2.2 Drivers menu 4-2 4.2.3 Utilities menu 4-3 4.2.4 Make disk menu 4-4 4.2.5 Manual menu 4-5 4.2.6 Video menu 4-5 4.2.7 ASUS Contact information 4-6 4.2.8 Other information 4-6 4.3 Software information 4-8 4.3.1 Sound Blaster X-Fi audio utility 4-8 4.3.2 ASUS PC Probe II 4-12 4.3.3 ASUS AI Suite 4-18 vi Contents 3.5.7 ROG Connect 3-32 3.6 Power menu 3-33 3.6.1 Suspend Mode 3-33 3.6.2 Repost Video...

User Manual
Page 9
...and staples away from connectors, slots, sockets and circuitry. • Avoid dust, humidity, and temperature extremes. DO NOT throw the motherboard in municipal waste. These devices could interrupt the grounding circuit. • Ensure that the product (electrical and electronic equipment) should not... cables are unplugged. • Seek professional assistance before using an adapter or extension cord. If possible, disconnect all the manuals that the battery should not be placed in municipal waste. Check local regulations for the devices are connected. Contact a qualified...
...and staples away from connectors, slots, sockets and circuitry. • Avoid dust, humidity, and temperature extremes. DO NOT throw the motherboard in municipal waste. These devices could interrupt the grounding circuit. • Ensure that the product (electrical and electronic equipment) should not... cables are unplugged. • Seek professional assistance before using an adapter or extension cord. If possible, disconnect all the manuals that the battery should not be placed in municipal waste. Check local regulations for the devices are connected. Contact a qualified...

User Manual
Page 11
Used to help you complete a task. Keys enclosed in this manual. NOTE: Tips and additional information to emphasize a word or a phrase. IMPORTANT: Instructions that you must press the Enter or Return key. If you MUST follow ...
Used to help you complete a task. Keys enclosed in this manual. NOTE: Tips and additional information to emphasize a word or a phrase. IMPORTANT: Instructions that you must press the Enter or Return key. If you MUST follow ...
User Manual
Page 12
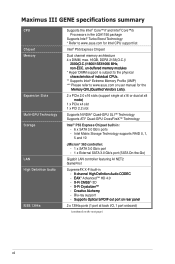
Maximus III GENE specifications summary CPU Chipset Memory Expansion Slots Multi-GPU Technology Storage LAN High Definition Audio IEEE 1394a Supports the Intel® Core™i7 and Intel® Core™i5 Processors in the LGA1156 package Supports Intel® Turbo Boost Technology * Refer to www.asus...;P�U��s�. ** Supports Intel® Extreme Memory Profile (XMP) *** Please refer to www.asus.com or user manual for the M��e�m��o�r�y Q�V�L�(�Q�u��a��...
Maximus III GENE specifications summary CPU Chipset Memory Expansion Slots Multi-GPU Technology Storage LAN High Definition Audio IEEE 1394a Supports the Intel® Core™i7 and Intel® Core™i5 Processors in the LGA1156 package Supports Intel® Turbo Boost Technology * Refer to www.asus...;P�U��s�. ** Supports Intel® Extreme Memory Profile (XMP) *** Please refer to www.asus.com or user manual for the M��e�m��o�r�y Q�V�L�(�Q�u��a��...
User Manual
Page 17
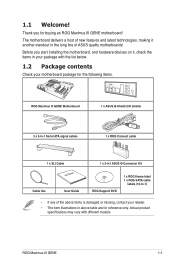
... Maximus III GENE Motherboard 1 x ASUS Q-Shield (I/O shield) 3 x 2-in-1 Serial ATA signal cables 1 x ROG Connect cable 1 x SLI Cable User Manual Cable ties User Guide 1 x 2-in1 ASUS Q-Connector Kit ROG Support DVD 1 x ROG theme label 1 x ROG SATA cable labels (12-in above table are for buying an ROG Maximus III GENE motherboard! Before you for reference only. ROG Maximus III GENE 1-1 Thank you start installing the motherboard...
... Maximus III GENE Motherboard 1 x ASUS Q-Shield (I/O shield) 3 x 2-in-1 Serial ATA signal cables 1 x ROG Connect cable 1 x SLI Cable User Manual Cable ties User Guide 1 x 2-in1 ASUS Q-Connector Kit ROG Support DVD 1 x ROG theme label 1 x ROG SATA cable labels (12-in above table are for buying an ROG Maximus III GENE motherboard! Before you for reference only. ROG Maximus III GENE 1-1 Thank you start installing the motherboard...
User Manual
Page 40
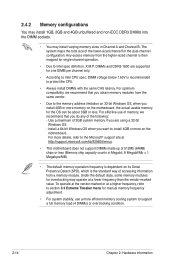
... to protect the CPU. • Always install DIMMs with the same CAS latency. Use a maximum of 3GB system memory if you are supported for manual memory frequency adjustment. • For system stability, use of memory, we recommend that you do any of 512Mb (64MB) chips or less (Memory ...into the DIMM sockets. • You may operate at a lower frequency than the vendor-marked value. For effective use a more memory on the motherboard, the actual usable memory for single-channel operation. • Due to the Microsoft® support site at http://support.microsoft.com/kb/929605/en-us...
... to protect the CPU. • Always install DIMMs with the same CAS latency. Use a maximum of 3GB system memory if you are supported for manual memory frequency adjustment. • For system stability, use of memory, we recommend that you do any of 512Mb (64MB) chips or less (Memory ...into the DIMM sockets. • You may operate at a lower frequency than the vendor-marked value. For effective use a more memory on the motherboard, the actual usable memory for single-channel operation. • Due to the Microsoft® support site at http://support.microsoft.com/kb/929605/en-us...

User Manual
Page 56
...disk drives and optical disc drives. See section 3.4.5 Storage Configuration for details. • Before creating a RAID set the Configure SATA as item in the motherboard support DVD. • You must install Windows® XP Service Pack 2 or later versions before using hot-plug and NCQ, set , refer to... section 4.5 RAID configurations or the manual bundled in the BIOS to [AHCI]. Intel® P55 Serial ATA connectors (7-pin SATA 1-6 [gray]) These connectors are for the Serial ATA signal...
...disk drives and optical disc drives. See section 3.4.5 Storage Configuration for details. • Before creating a RAID set the Configure SATA as item in the motherboard support DVD. • You must install Windows® XP Service Pack 2 or later versions before using hot-plug and NCQ, set , refer to... section 4.5 RAID configurations or the manual bundled in the BIOS to [AHCI]. Intel® P55 Serial ATA connectors (7-pin SATA 1-6 [gray]) These connectors are for the Serial ATA signal...
User Manual
Page 83
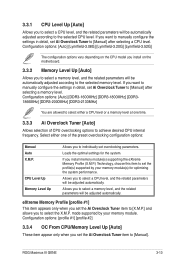
... overclocking configuration options: Manual Auto X.M.P. Configuration options: [profile #1] [profile #2] 3.3.4 OC From CPU/Memory Level Up [Auto] These item appear only when you set overclocking parameters. ROG Maximus III GENE 3-13 Configuration options: [Auto] [Lynnfield-3.08G] [Lynnfield-3.20G] [Lynnfield-3.52G] The configuration options vary depending on the CPU model you install on the motherboard. 3.3.2 Memory Level...
... overclocking configuration options: Manual Auto X.M.P. Configuration options: [profile #1] [profile #2] 3.3.4 OC From CPU/Memory Level Up [Auto] These item appear only when you set overclocking parameters. ROG Maximus III GENE 3-13 Configuration options: [Auto] [Lynnfield-3.08G] [Lynnfield-3.20G] [Lynnfield-3.52G] The configuration options vary depending on the CPU model you install on the motherboard. 3.3.2 Memory Level...

User Manual
Page 125
Click the video titles to open the folder of the user manual. Most user manual files are in Portable Document Format (PDF). ROG Maximus III GENE 4-5 4.2.5 Manual menu The Manuals menu contains a list of video clips. Install the Adobe® Acrobat® Reader from the Utilities menu before opening a user manual file. 4.2.6 Video menu Click the Video tab to display a list of supplementary user manuals. Click an item to watch ROG users' outstanding performances with ROG motherboards.
Click the video titles to open the folder of the user manual. Most user manual files are in Portable Document Format (PDF). ROG Maximus III GENE 4-5 4.2.5 Manual menu The Manuals menu contains a list of video clips. Install the Adobe® Acrobat® Reader from the Utilities menu before opening a user manual file. 4.2.6 Video menu Click the Video tab to display a list of supplementary user manuals. Click an item to watch ROG users' outstanding performances with ROG motherboards.

User Manual
Page 142
...the TurboV EVO is correctly installed, you will not be kept on the Windows notification area. Easy Mode Auto Tuning Mode Manual Mode Load profile Target values Start-up settings Undoes all changes without exiting and rebooting the OS. Refer to the CPU documentation...Setting a high voltage may damage the CPU permanently, and setting a low voltage may make the system unstable. 4.3.6 TurboV EVO ASUS TurboV EVO introduces TurboV and Turbo Key-two powerful tools that came with the motherboard package. Use the Save Profile function to [Auto] before adjusting CPU voltage settings.
...the TurboV EVO is correctly installed, you will not be kept on the Windows notification area. Easy Mode Auto Tuning Mode Manual Mode Load profile Target values Start-up settings Undoes all changes without exiting and rebooting the OS. Refer to the CPU documentation...Setting a high voltage may damage the CPU permanently, and setting a low voltage may make the system unstable. 4.3.6 TurboV EVO ASUS TurboV EVO introduces TurboV and Turbo Key-two powerful tools that came with the motherboard package. Use the Save Profile function to [Auto] before adjusting CPU voltage settings.

User Manual
Page 143
This is useful for you. ASUS TurboV Complete Manual Mode Click More setting to show advanced manual mode items. Advanced CPU, chipset and DRAM voltage settings Click to show / hide more settings ASUS TurboV Easy Mode Click the Easy Mode tab to hide most adjustable items. Simply adjust BCLK Frequency and let TurboV EVO adjust CPU Voltage, IMC Voltage and DRAM Bus Voltage for entry-level users who are not familiar with advanced overclocking settings. ROG Maximus III GENE 4-23
This is useful for you. ASUS TurboV Complete Manual Mode Click More setting to show advanced manual mode items. Advanced CPU, chipset and DRAM voltage settings Click to show / hide more settings ASUS TurboV Easy Mode Click the Easy Mode tab to hide most adjustable items. Simply adjust BCLK Frequency and let TurboV EVO adjust CPU Voltage, IMC Voltage and DRAM Bus Voltage for entry-level users who are not familiar with advanced overclocking settings. ROG Maximus III GENE 4-23

User Manual
Page 144
.... 1. Click the Auto Tuning tab and then click Start. You can also click More Setting first to start autooverclocking. 3. ASUS TurboV Auto Tuning Mode The Auto Tuning Mode allows smart auto-overclocking. An animation appears indicating the overclocking process. Installation of advanced...the system starts performance tuning and may reboot 2 to continue system tuning for TurboV EVO to 3 times. Please do not operate or manually restart the computer during the tuning process. • After restarting OS, a message appears indicating the current overclocking result. Follow the instructions...
.... 1. Click the Auto Tuning tab and then click Start. You can also click More Setting first to start autooverclocking. 3. ASUS TurboV Auto Tuning Mode The Auto Tuning Mode allows smart auto-overclocking. An animation appears indicating the overclocking process. Installation of advanced...the system starts performance tuning and may reboot 2 to continue system tuning for TurboV EVO to 3 times. Please do not operate or manually restart the computer during the tuning process. • After restarting OS, a message appears indicating the current overclocking result. Follow the instructions...
User Manual
Page 161
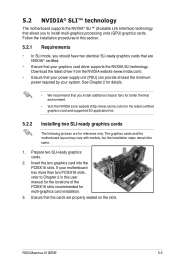
...steps remain the same. 1. Insert the two graphics card into the PCIEX16 slots. If your motherboard has more than two PCIEX16 slots, refer to Chapter 2 in this user manual for the locations of the PCIEX16 slots recommended for multi-graphics card installation. 3. Download the... technology The motherboard supports the NVIDIA® SLI™ (Scalable Link Interface) technology that allows you should have two identical SLI-ready graphics cards that are NVIDIA® certified. • Ensure that your graphics card driver supports the NVIDIA SLI technology. ROG Maximus III GENE 5-5 Ensure...
...steps remain the same. 1. Insert the two graphics card into the PCIEX16 slots. If your motherboard has more than two PCIEX16 slots, refer to Chapter 2 in this user manual for the locations of the PCIEX16 slots recommended for multi-graphics card installation. 3. Download the... technology The motherboard supports the NVIDIA® SLI™ (Scalable Link Interface) technology that allows you should have two identical SLI-ready graphics cards that are NVIDIA® certified. • Ensure that your graphics card driver supports the NVIDIA SLI technology. ROG Maximus III GENE 5-5 Ensure...


