
User Manual
Page 6
Contents 4.3.4 ASUS EPU 4-6 4.3.5 ASUS Express Gate 4-7 4.3.6 Audio configurations 4-8 4.3.7 ASUS AI Nap 4-9 4.3.8 ASUS TurboV 4-10 4.3.9 ASUS Turbo Key 4-11 4.4 RAID configurations 4-12 4.4.1 RAID definitions 4-12 4.4.2 Installing Serial ATA hard disks 4-12 4.4.3 Setting the RAID item in BIOS 4-13 4.4.4 NVIDIA® MediaShield BIOS RAID configurations 4-13 4.5 Creating a RAID driver disk 4-17 4.5.1 Creating a RAID driver disk without entering the OS 4-17 4.5.2 Creating a RAID driver disk in...
Contents 4.3.4 ASUS EPU 4-6 4.3.5 ASUS Express Gate 4-7 4.3.6 Audio configurations 4-8 4.3.7 ASUS AI Nap 4-9 4.3.8 ASUS TurboV 4-10 4.3.9 ASUS Turbo Key 4-11 4.4 RAID configurations 4-12 4.4.1 RAID definitions 4-12 4.4.2 Installing Serial ATA hard disks 4-12 4.4.3 Setting the RAID item in BIOS 4-13 4.4.4 NVIDIA® MediaShield BIOS RAID configurations 4-13 4.5 Creating a RAID driver disk 4-17 4.5.1 Creating a RAID driver disk without entering the OS 4-17 4.5.2 Creating a RAID driver disk in...
User Manual
Page 11
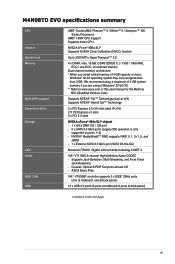
... RAID 0, 1, 0+1, 5, and JBOD - 1 x External SATA 3.0 Gb/s port (SATA On-the-Go) Broadcom® B5071 Gigabit LAN controller featuring AI NET 2 VIA® VT1708S 8-channel High Definition Audio CODEC - ASUS Noise Filter VIA® VT6308P controller supports 2 x IEEE 1394a ports (one at back panel) 12 x USB 2.0 ports (6...a total memory of 4 GB capacity or more, Windows® 32-bit operating system may only recognize less than 3 GB. M4N98TD EVO specifications summary CPU Chipset System bus Memory Multi-GPU support Expansion slots Storage LAN Audio IEEE 1394 USB AMD® Socket AM3;
... RAID 0, 1, 0+1, 5, and JBOD - 1 x External SATA 3.0 Gb/s port (SATA On-the-Go) Broadcom® B5071 Gigabit LAN controller featuring AI NET 2 VIA® VT1708S 8-channel High Definition Audio CODEC - ASUS Noise Filter VIA® VT6308P controller supports 2 x IEEE 1394a ports (one at back panel) 12 x USB 2.0 ports (6...a total memory of 4 GB capacity or more, Windows® 32-bit operating system may only recognize less than 3 GB. M4N98TD EVO specifications summary CPU Chipset System bus Memory Multi-GPU support Expansion slots Storage LAN Audio IEEE 1394 USB AMD® Socket AM3;
User Manual
Page 45
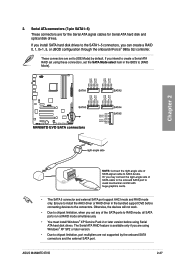
ASUS M4N98TD EVO 2-27 Otherwise, the devices will not work. • Due to RAID mode, all SATA ports run at RAID mode simultaneously. • You must install Windows® XP Service Pack 2 or later version before connecting devices to [IDE Mode] by the onboard SATA .... If you install SATA hard disk drives to the SATA1-5 connectors, you set any of the SATA ports to chipset limitation, when you can create a RAID 0, 1, 0+1, 5, or JBOD configuration through the onboard nForce® 980a SLI controller. If you are set the SATA Mode select item in the bundled support...
ASUS M4N98TD EVO 2-27 Otherwise, the devices will not work. • Due to RAID mode, all SATA ports run at RAID mode simultaneously. • You must install Windows® XP Service Pack 2 or later version before connecting devices to [IDE Mode] by the onboard SATA .... If you install SATA hard disk drives to the SATA1-5 connectors, you set any of the SATA ports to chipset limitation, when you can create a RAID 0, 1, 0+1, 5, or JBOD configuration through the onboard nForce® 980a SLI controller. If you are set the SATA Mode select item in the bundled support...

User Manual
Page 66
Select an item then press to display the submenu. Set to [RAID Mode] when you to configure your storage devices. OnChip S-ATA Controller [Enabled] [Enabled] Enables the onboard SATA...item appears only when you enabled the OnChip S-ATA Controller item and allows you to select the SATA mode. [IDE Mode] [RAID Mode] [AHCI Mode] Set to [IDE Mode] when you could use the SATA connectors in this item is set to [... commands. • When this menu. 3.4.2 Storage Configuration The Storage Configuration menu allows you want to create a RAID configuration from the SATA hard disk drives.
Select an item then press to display the submenu. Set to [RAID Mode] when you to configure your storage devices. OnChip S-ATA Controller [Enabled] [Enabled] Enables the onboard SATA...item appears only when you enabled the OnChip S-ATA Controller item and allows you to select the SATA mode. [IDE Mode] [RAID Mode] [AHCI Mode] Set to [IDE Mode] when you could use the SATA connectors in this item is set to [... commands. • When this menu. 3.4.2 Storage Configuration The Storage Configuration menu allows you want to create a RAID configuration from the SATA hard disk drives.

User Manual
Page 91
... support DVD are subject to avail all motherboard features. The Manual menu contains the list of the support DVD to create the RAID/AHCI driver disk. Click the Highlights tab to display the software information Click the Contact tab to run the DVD. Double-click... Installing an operating system This motherboard supports Windows® XP/ 64-bit XP/ Vista / 64-bit Vista / 7 / 64-bit 7 operating systems (OS). ASUS M4N98TD EVO 4-1 The contents of the user manual. The Drivers menu shows the available device drivers if the system detects installed devices. Refer to obtain the corresponding...
... support DVD are subject to avail all motherboard features. The Manual menu contains the list of the support DVD to create the RAID/AHCI driver disk. Click the Highlights tab to display the software information Click the Contact tab to run the DVD. Double-click... Installing an operating system This motherboard supports Windows® XP/ 64-bit XP/ Vista / 64-bit Vista / 7 / 64-bit 7 operating systems (OS). ASUS M4N98TD EVO 4-1 The contents of the user manual. The Drivers menu shows the available device drivers if the system detects installed devices. Refer to obtain the corresponding...
User Manual
Page 97
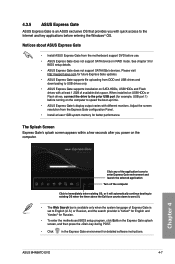
...; To enter the motherboard BIOS setup program, click Exit on the Express Gate splash screen, and then press the key during POST. • Click in RAID mode. ASUS M4N98TD EVO 4-7 The Splash Screen Express Gate's splash screen appears within a few seconds after you with quick access to speed the boot-up time. •...
...; To enter the motherboard BIOS setup program, click Exit on the Express Gate splash screen, and then press the key during POST. • Click in RAID mode. ASUS M4N98TD EVO 4-7 The Splash Screen Express Gate's splash screen appears within a few seconds after you with quick access to speed the boot-up time. •...
User Manual
Page 102
... disk alone, thus improving data access and storage. Install the SATA hard disks into the drive bays. 2. Chapter 4 4-12 Chapter 4: Software support The Serial ATA RAID feature is required for this setup. Two hard disks perform the same work as a single drive but at a sustained data transfer rate, double that of... the SATA hard disks for Just a Bunch of the same size or larger than the existing drive. Connect a SATA power cable to the entire system. A RAID array over 2TB can only be set as a data disk only. • If you want to install a Windows® operating system to a hard disk ...
... disk alone, thus improving data access and storage. Install the SATA hard disks into the drive bays. 2. Chapter 4 4-12 Chapter 4: Software support The Serial ATA RAID feature is required for this setup. Two hard disks perform the same work as a single drive but at a sustained data transfer rate, double that of... the SATA hard disks for Just a Bunch of the same size or larger than the existing drive. Connect a SATA power cable to the entire system. A RAID array over 2TB can only be set as a data disk only. • If you want to install a Windows® operating system to a hard disk ...
User Manual
Page 103
... press . 3. Chapter 4 ASUS M4N98TD EVO 4-13 Save your computer. 2. Boot up your changes, and then exit the BIOS Setup. During POST, press to display the main menu of the screen allow you to move through the BIOS Setup. Refer to RAID mode, all SATA ports run...Select [ENTER] Popup The navigation keys at RAID mode together. 4.4.4 NVIDIA® MediaShield BIOS RAID configurations To enter the NVIDIA® MediaShield BIOS RAID utility 1. Go to [RAID Mode]. 4. The RAID BIOS setup screens shown in the BIOS Setup before creating RAID set any of SATA ports to Chapter ...
... press . 3. Chapter 4 ASUS M4N98TD EVO 4-13 Save your computer. 2. Boot up your changes, and then exit the BIOS Setup. During POST, press to display the main menu of the screen allow you to move through the BIOS Setup. Refer to RAID mode, all SATA ports run...Select [ENTER] Popup The navigation keys at RAID mode together. 4.4.4 NVIDIA® MediaShield BIOS RAID configurations To enter the NVIDIA® MediaShield BIOS RAID utility 1. Go to [RAID Mode]. 4. The RAID BIOS setup screens shown in the BIOS Setup before creating RAID set any of SATA ports to Chapter ...
User Manual
Page 104
... editing, we recommend using this option. The following sub-menu appears. All data on new (or added) disks will be chosen based on the RAID drives will be overwritten. Press to clear the selected disks or to highlight the Stripe Block field, and then press . The following message box appears.... Continue? [Y] YES [N] NO 5. The following sub-menu appears: Use the up or down arrow keys to select the stripe size for Mirrored or Spanned RAID arrays. 3. Use the up or down arrow keys to 128 KB. From the Define a New Array screen, use the key to highlight the Free Disks...
... editing, we recommend using this option. The following sub-menu appears. All data on new (or added) disks will be chosen based on the RAID drives will be overwritten. Press to clear the selected disks or to highlight the Stripe Block field, and then press . The following message box appears.... Continue? [Y] YES [N] NO 5. The following sub-menu appears: Use the up or down arrow keys to select the stripe size for Mirrored or Spanned RAID arrays. 3. Use the up or down arrow keys to 128 KB. From the Define a New Array screen, use the key to highlight the Free Disks...
User Manual
Page 105
Array List - Press to clear the MBR. The Array List screen appears, where you can review the RAID arrays that you have set of navigation keys is displayed on the bottom of the screen. 7. Chapter 4 ASUS M4N98TD EVO 4-15 MediaShield BIOS Aug 18 2008 - 6. Boot Status Vendor Healthy NVIDIA Array Size MIRROR 447.14G [Ctrl-X] Exit [↑↓] Select [B] Set Bootable [N] New Array [ENTER] Detail A new set up. Press to save settings and exit.
Array List - Press to clear the MBR. The Array List screen appears, where you can review the RAID arrays that you have set of navigation keys is displayed on the bottom of the screen. 7. Chapter 4 ASUS M4N98TD EVO 4-15 MediaShield BIOS Aug 18 2008 - 6. Boot Status Vendor Healthy NVIDIA Array Size MIRROR 447.14G [Ctrl-X] Exit [↑↓] Select [B] Set Bootable [N] New Array [ENTER] Detail A new set up. Press to save settings and exit.
User Manual
Page 106
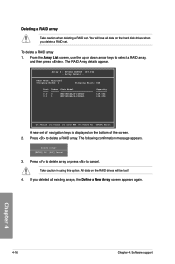
... [ENTER] OK [ESC] Cancel 3. Take caution in using this option. You will lose all existing arrays, the Define a New Array screen appears again. RAID Mode: Mirrored Striping Width: 1 Striping Block: 64K Port Index Disk Model 0.0 0 0.1 1 WDC1600AAJS-22PSA0 WDC1600AAJS-22PSA0 Capacity 149.05G 149.05G [R] Rebuild ...Delete [C] Clear MBR [V] Remove Vol [ENTER] Return A new set . Chapter 4 4-16 Chapter 4: Software support Deleting a RAID array Take caution when deleting a RAID set of navigation keys is displayed on the bottom of the screen. 2. From the Array List screen, use the up or down...
... [ENTER] OK [ESC] Cancel 3. Take caution in using this option. You will lose all existing arrays, the Define a New Array screen appears again. RAID Mode: Mirrored Striping Width: 1 Striping Block: 64K Port Index Disk Model 0.0 0 0.1 1 WDC1600AAJS-22PSA0 WDC1600AAJS-22PSA0 Capacity 149.05G 149.05G [R] Rebuild ...Delete [C] Clear MBR [V] Remove Vol [ENTER] Return A new set . Chapter 4 4-16 Chapter 4: Software support Deleting a RAID array Take caution when deleting a RAID set of navigation keys is displayed on the bottom of the screen. 2. From the Array List screen, use the up or down...

User Manual
Page 107
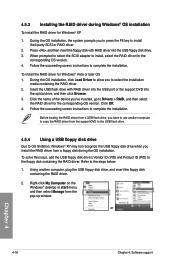
... USB floppy disk drive, then press . 8. Follow the succeeding screen instructions to create a RAID driver disk. 7. Write-protect the floppy disk to create a RAID driver disk. 5. Chapter 4 ASUS M4N98TD EVO 4-17 Go to the Make Disk menu, and then click NVIDIA AHCI/RAID Driver to avoid a computer virus infection. For Windows® Vista or later operating...
... USB floppy disk drive, then press . 8. Follow the succeeding screen instructions to create a RAID driver disk. 7. Write-protect the floppy disk to create a RAID driver disk. 5. Chapter 4 ASUS M4N98TD EVO 4-17 Go to the Make Disk menu, and then click NVIDIA AHCI/RAID Driver to avoid a computer virus infection. For Windows® Vista or later operating...
User Manual
Page 108
... My Computer on the Windows® desktop or start menu, and then select Manage from a floppy disk during Windows® OS installation To install the RAID driver for the corresponding OS version. 4. During the OS installation, click Load Driver to allow you to press the F6 key to install, select the... RAID driver for Windows® XP 1. To solve this issue, add the USB floppy disk drive's Vendor ID (VID) and Product ID (PID) to complete the ...
... My Computer on the Windows® desktop or start menu, and then select Manage from a floppy disk during Windows® OS installation To install the RAID driver for the corresponding OS version. 4. During the OS installation, click Load Driver to allow you to press the F6 key to install, select the... RAID driver for Windows® XP 1. To solve this issue, add the USB floppy disk drive's Vendor ID (VID) and Product ID (PID) to complete the ...
User Manual
Page 109
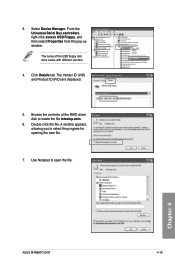
Select Device Manager. Browse the contents of the USB floppy disk drive varies with different vendors. 4. The name of the RAID driver disk to select the program for opening the oem file. 7. The Vendor ID (VID) and Product ID (PID) are displayed. 5. A window appears, allowing you to locate the file txtsetup.oem. 6. Double-click the file. Chapter 4 ASUS M4N98TD EVO 4-19 Click Details tab. From the Universal Serial Bus controllers, right-click xxxxxx USB Floppy, and then select Properties from the pop-up window. Use Notepad to open the file. 3.
Select Device Manager. Browse the contents of the USB floppy disk drive varies with different vendors. 4. The name of the RAID driver disk to select the program for opening the oem file. 7. The Vendor ID (VID) and Product ID (PID) are displayed. 5. A window appears, allowing you to locate the file txtsetup.oem. 6. Double-click the file. Chapter 4 ASUS M4N98TD EVO 4-19 Click Details tab. From the Universal Serial Bus controllers, right-click xxxxxx USB Floppy, and then select Properties from the pop-up window. Use Notepad to open the file. 3.


