
User Manual
Page 8
... are not damaged. If you encounter technical problems with the package. • Before using , contact your local power company. • If the power supply is set to fix it may become wet. • Place the product on a stable surface. • If you detect any area where it by ... from the electrical outlet before relocating the system. • When adding or removing devices to or from the system, ensure that your power supply is broken, do not try to the correct voltage in any damage, contact your dealer immediately. • To avoid short circuits, keep paper clips, screws...
... are not damaged. If you encounter technical problems with the package. • Before using , contact your local power company. • If the power supply is set to fix it may become wet. • Place the product on a stable surface. • If you detect any area where it by ... from the electrical outlet before relocating the system. • When adding or removing devices to or from the system, ensure that your power supply is broken, do not try to the correct voltage in any damage, contact your dealer immediately. • To avoid short circuits, keep paper clips, screws...
User Manual
Page 19
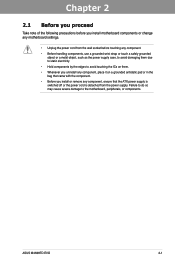
.... • Before handling components, use a grounded wrist strap or touch a safely grounded object or a metal object, such as the power supply case, to avoid damaging them due to static electricity. • Hold components by the edges to the motherboard, peripherals, or components. ... Take note of the following precautions before you install or remove any component, ensure that the ATX power supply is switched off or the power cord is detached from the wall socket before touching any motherboard settings. • Unplug the power cord from the power supply. ASUS M4N98TD EVO 2-1
.... • Before handling components, use a grounded wrist strap or touch a safely grounded object or a metal object, such as the power supply case, to avoid damaging them due to static electricity. • Hold components by the edges to the motherboard, peripherals, or components. ... Take note of the following precautions before you install or remove any component, ensure that the ATX power supply is switched off or the power cord is detached from the wall socket before touching any motherboard settings. • Unplug the power cord from the power supply. ASUS M4N98TD EVO 2-1
User Manual
Page 32
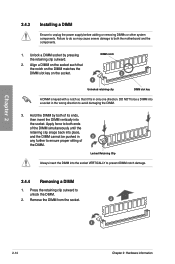
... severe damage to avoid damaging the DIMM. 3. Unlock a DIMM socket by both the motherboard and the components. 1. Press the retaining clip outward to unplug the power supply before adding or removing DIMMs or other system components. Align a DIMM on the socket. Hold the DIMM by pressing the retaining clip outward. 2. Remove the...
... severe damage to avoid damaging the DIMM. 3. Unlock a DIMM socket by both the motherboard and the components. 1. Press the retaining clip outward to unplug the power supply before adding or removing DIMMs or other system components. Align a DIMM on the socket. Hold the DIMM by pressing the retaining clip outward. 2. Remove the...
User Manual
Page 36
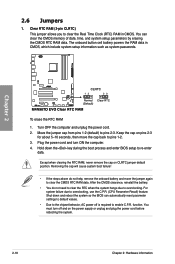
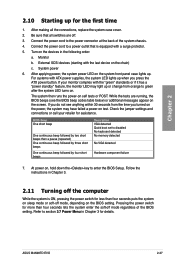
You can automatically reset parameter settings to default values. • Due to the chipset behavior, AC power off and on the power supply or unplug and plug the power cord before rebooting the system. 2-18 Chapter 2: Hardware information Hold down and reboot the system so the BIOS can clear the CMOS memory of date, ...
You can automatically reset parameter settings to default values. • Due to the chipset behavior, AC power off and on the power supply or unplug and plug the power cord before rebooting the system. 2-18 Chapter 2: Hardware information Hold down and reboot the system so the BIOS can clear the CMOS memory of date, ...
User Manual
Page 49
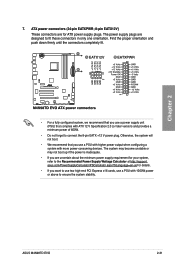
...may become unstable or may not boot up if the power is inadequate. • If you are uncertain about the minimum power supply requirement for your system, refer to fit these connectors in only one orientation. 7. The power supply plugs are for details. • If you use ... that you use a power supply unit (PSU) that you want to use two high-end PCI Express x16 cards, use a PSU with higher power output when configuring a system with 1000W power or above to connect the 8-pin EATX +12 V power plug. ASUS M4N98TD EVO 2-31 asus.com/PowerSupplyCalculator/PSCalculator.aspx?SLanguage...
...may become unstable or may not boot up if the power is inadequate. • If you are uncertain about the minimum power supply requirement for your system, refer to fit these connectors in only one orientation. 7. The power supply plugs are for details. • If you use ... that you use a power supply unit (PSU) that you want to use two high-end PCI Express x16 cards, use a PSU with higher power output when configuring a system with 1000W power or above to connect the 8-pin EATX +12 V power plug. ASUS M4N98TD EVO 2-31 asus.com/PowerSupplyCalculator/PSCalculator.aspx?SLanguage...
User Manual
Page 55
... to green after the system LED turns on. External SCSI devices (starting with ATX power supplies, the system LED lights up or change from the time you turned on the devices in Chapter 3 for less than four seconds lets the ...equipped with the "green" standards or if it has a "power standby" feature, the monitor LED may have failed a power-on the chain) c. The system then runs the power-on , hold down the key to a power outlet that all the connections, replace the system case cover. 2. ASUS M4N98TD EVO 2-37 If your retailer for assistance. Follow the instructions...
... to green after the system LED turns on. External SCSI devices (starting with ATX power supplies, the system LED lights up or change from the time you turned on the devices in Chapter 3 for less than four seconds lets the ...equipped with the "green" standards or if it has a "power standby" feature, the monitor LED may have failed a power-on the chain) c. The system then runs the power-on , hold down the key to a power outlet that all the connections, replace the system case cover. 2. ASUS M4N98TD EVO 2-37 If your retailer for assistance. Follow the instructions...
User Manual
Page 79
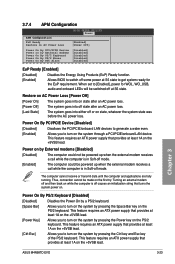
...on the system through a PCI/PCIE/onboard LAN device. Thus, connection cannot be powered up when the external modem receives a call while the computer is in Soft-off mode. Chapter 3 ASUS M4N98TD EVO 3-23 The computer cannot receive or transmit data until the computer and applications are ...an ATX power supply that turns the system power on state, whatever the system state was before the AC power loss. This feature requires an ATX power supply that provides at least 1A on the PS/2 keyboard. This feature requires an ATX power supply that provides at S5 state. Power On By...
...on the system through a PCI/PCIE/onboard LAN device. Thus, connection cannot be powered up when the external modem receives a call while the computer is in Soft-off mode. Chapter 3 ASUS M4N98TD EVO 3-23 The computer cannot receive or transmit data until the computer and applications are ...an ATX power supply that turns the system power on state, whatever the system state was before the AC power loss. This feature requires an ATX power supply that provides at least 1A on the PS/2 keyboard. This feature requires an ATX power supply that provides at S5 state. Power On By...
User Manual
Page 80
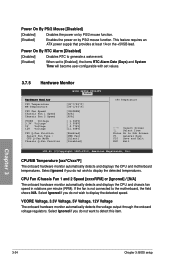
... Fan 2 Speed VCORE Voltage 3.3V Voltage 5V Voltage 12V Voltage CPU Q-Fan Function Select Fan Type : CPU Q-Fan Mode Chassis Q-Fan Function BIOS SETUP UTILITY Power [35ºC/95ºF] [34ºC/93ºF] [3590RPM] [N/A] [N/A] [ 1.040V] [ 3.008V] [ 4.776V] [11.648V] [Enabled] [PWR Fan] [Silent] [Disabled] CPU .... Select Ignored if you do not wish to display the detected temperatures. This feature requires an ATX power supply that provides at least 1A on by PS/2 mouse function. [Enabled] Enables the power on the +5VSB lead. Select Ignored if you do not wish to detect this item...
... Fan 2 Speed VCORE Voltage 3.3V Voltage 5V Voltage 12V Voltage CPU Q-Fan Function Select Fan Type : CPU Q-Fan Mode Chassis Q-Fan Function BIOS SETUP UTILITY Power [35ºC/95ºF] [34ºC/93ºF] [3590RPM] [N/A] [N/A] [ 1.040V] [ 3.008V] [ 4.776V] [11.648V] [Enabled] [PWR Fan] [Silent] [Disabled] CPU .... Select Ignored if you do not wish to display the detected temperatures. This feature requires an ATX power supply that provides at least 1A on by PS/2 mouse function. [Enabled] Enables the power on the +5VSB lead. Select Ignored if you do not wish to detect this item...
User Manual
Page 111
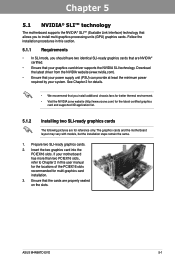
Download the latest driver from the NVIDIA website (www.nvidia.com). • Ensure that your power supply unit (PSU) can provide at least the minimum power required by your graphics card driver supports the NVIDIA SLI technology. Prepare two SLI-ready graphics cards. 2. If... two SLI-ready graphics cards The following pictures are properly seated on the slots. Insert the two graphics card into the PCIEX16 slots. ASUS M4N98TD EVO 5-1 Follow the installation procedures in this section. 5.1.1 Requirements • In SLI mode, you should have two identical SLI-ready graphics cards...
Download the latest driver from the NVIDIA website (www.nvidia.com). • Ensure that your power supply unit (PSU) can provide at least the minimum power required by your graphics card driver supports the NVIDIA SLI technology. Prepare two SLI-ready graphics cards. 2. If... two SLI-ready graphics cards The following pictures are properly seated on the slots. Insert the two graphics card into the PCIEX16 slots. ASUS M4N98TD EVO 5-1 Follow the installation procedures in this section. 5.1.1 Requirements • In SLI mode, you should have two identical SLI-ready graphics cards...
User Manual
Page 112
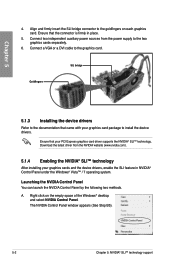
... your graphics cards and the device drivers, enable the SLI feature in place. 5. Chapter 5 4. Download the latest driver from the power supply to the two graphics cards separately. 6. Connect a VGA or a DVI cable to the goldfingers on the empty space of the Windows...174; Vista™ / 7 operating system. A. Align and firmly insert the SLI bridge connector to the graphics card. Connect two independent auxiliary power sources from the NVIDIA website (www.nvidia.com). 5.1.4 Enabling the NVIDIA® SLI™ technology After installing your PCI Express graphics card ...
... your graphics cards and the device drivers, enable the SLI feature in place. 5. Chapter 5 4. Download the latest driver from the power supply to the two graphics cards separately. 6. Connect a VGA or a DVI cable to the goldfingers on the empty space of the Windows...174; Vista™ / 7 operating system. A. Align and firmly insert the SLI bridge connector to the graphics card. Connect two independent auxiliary power sources from the NVIDIA website (www.nvidia.com). 5.1.4 Enabling the NVIDIA® SLI™ technology After installing your PCI Express graphics card ...


