
User Manual
Page 1
Motherboard
Motherboard

User Manual
Page 1
M4N78 Motherboard
M4N78 Motherboard

User Manual
Page 3
Contents Notices...vi Safety information vii About this guide vii M4N78 specifications summary ix Chapter 1: Product introduction 1.1 Welcome 1-1 1.2 Package contents 1-1 1.3 Special features 1-1 1.3.1 Product highlights 1-1 1.3.2 Innovative ASUS features 1-3 1.4 Before you proceed 1-5 Onboard LED 1-5 1.5 Motherboard overview 1-6 1.5.1 Placement direction 1-6 1.5.2 Screw holes 1-6 1.5.3 Motherboard layout 1-7 1.5.4 Layout contents 1-7 1.6 Central Processing Unit (CPU 1-8 1.6.1 Installing the CPU 1-8 1.6.2 Installing the heatsink and fan 1-10...
Contents Notices...vi Safety information vii About this guide vii M4N78 specifications summary ix Chapter 1: Product introduction 1.1 Welcome 1-1 1.2 Package contents 1-1 1.3 Special features 1-1 1.3.1 Product highlights 1-1 1.3.2 Innovative ASUS features 1-3 1.4 Before you proceed 1-5 Onboard LED 1-5 1.5 Motherboard overview 1-6 1.5.1 Placement direction 1-6 1.5.2 Screw holes 1-6 1.5.3 Motherboard layout 1-7 1.5.4 Layout contents 1-7 1.6 Central Processing Unit (CPU 1-8 1.6.1 Installing the CPU 1-8 1.6.2 Installing the heatsink and fan 1-10...
User Manual
Page 6
... assure compliance with manufacturer's instructions, may cause harmful interference to the following two conditions: • This device may cause undesired operation. DO NOT throw the motherboard in accordance with FCC regulations.
... assure compliance with manufacturer's instructions, may cause harmful interference to the following two conditions: • This device may cause undesired operation. DO NOT throw the motherboard in accordance with FCC regulations.

User Manual
Page 7
...guide is organized This guide contains the following parts: • Chapter 1: Product introduction This chapter describes the features of the motherboard and the new technology it , carefully read all power cables are unplugged. • Seek professional assistance before the signal ...retailer. Contact a qualified service technician or your area. Detailed descriptions of the electrical outlet you need when installing and configuring the motherboard. These devices could interrupt the grounding circuit. • Ensure that came with the product, contact a qualified service technician or ...
...guide is organized This guide contains the following parts: • Chapter 1: Product introduction This chapter describes the features of the motherboard and the new technology it , carefully read all power cables are unplugged. • Seek professional assistance before the signal ...retailer. Contact a qualified service technician or your area. Detailed descriptions of the electrical outlet you need when installing and configuring the motherboard. These devices could interrupt the grounding circuit. • Ensure that came with the product, contact a qualified service technician or ...

User Manual
Page 9
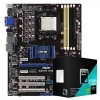
... 2.5 (continued on the motherboard. 1 x PCI Express...M4N78 specifications summary CPU Chipset System bus Memory Expansion slots Storage Audio USB LAN BIOS AMD® Phenom™ X4 / Phenom™ X3 / Athlon™ X2 / Athlon™ / Sempron™ processors (socket AM2+/AM2) Compatible with Phenom™ II / Athlon™ X4 / Athlon™ X3 / Athlon™ X2...240-pin DIMM slots support maximum 16GB unbuffered ECC and non-ECC DDR2 1066*/800/667MHz memory modules * Due to AMD CPU limitation, DDR2 1066 is supported by AM2+/AM3 CPU for one DIMM per channel only. ** Refer to www.asus...
... 2.5 (continued on the motherboard. 1 x PCI Express...M4N78 specifications summary CPU Chipset System bus Memory Expansion slots Storage Audio USB LAN BIOS AMD® Phenom™ X4 / Phenom™ X3 / Athlon™ X2 / Athlon™ / Sempron™ processors (socket AM2+/AM2) Compatible with Phenom™ II / Athlon™ X4 / Athlon™ X3 / Athlon™ X2...240-pin DIMM slots support maximum 16GB unbuffered ECC and non-ECC DDR2 1066*/800/667MHz memory modules * Due to AMD CPU limitation, DDR2 1066 is supported by AM2+/AM3 CPU for one DIMM per channel only. ** Refer to www.asus...
User Manual
Page 11
... for buying an ASUS® M4N78 motherboard! The motherboard delivers a host of new features and latest technologies, making it , check the items in the long line of the above items is damaged or missing, contact your retailer. 1.3 1.3.1 Special features Product highlights AMD® Socket AM2+ Phenom™ FX / Phenom™ II/ Athlon™/ CPU support This...
... for buying an ASUS® M4N78 motherboard! The motherboard delivers a host of new features and latest technologies, making it , check the items in the long line of the above items is damaged or missing, contact your retailer. 1.3 1.3.1 Special features Product highlights AMD® Socket AM2+ Phenom™ FX / Phenom™ II/ Athlon™/ CPU support This...
User Manual
Page 12
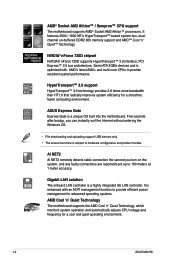
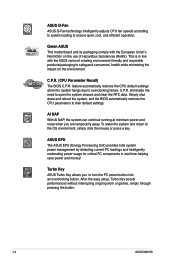
... to provide excellent system performance. ASUS Express Gate Express Gate is a highly integrated Gb LAN controller. AMD® Socket AM2 Athlon™ / Sempron™ CPU support The motherboard supports AMD® Socket AM2 Athlon™ processors. AI NET2 AI...8482; 3.0 technology provides 2.6 times more bandwidth than HT1.0 that radically improves system efficiency for a cool and quiet operating environment. 1-2 ASUS M4N78 NVIDIA® nForce 720D chipset NVIDIA® nForce 720D supports HyperTransport™ 3.0 interface, PCI Express™ 2.0 bus archetecture, Serial ...
... to provide excellent system performance. ASUS Express Gate Express Gate is a highly integrated Gb LAN controller. AMD® Socket AM2 Athlon™ / Sempron™ CPU support The motherboard supports AMD® Socket AM2 Athlon™ processors. AI NET2 AI...8482; 3.0 technology provides 2.6 times more bandwidth than HT1.0 that radically improves system efficiency for a cool and quiet operating environment. 1-2 ASUS M4N78 NVIDIA® nForce 720D chipset NVIDIA® nForce 720D supports HyperTransport™ 3.0 interface, PCI Express™ 2.0 bus archetecture, Serial ...

User Manual
Page 13
...motherboard supports the hard drives based on the SATA 3Gb/s storage specification. Backwards compatible with current USB 1.1 peripherals, USB 2.0 delivers transfer speeds up to the ASUS website at 480Mb/s, for the supported CPU models. Innovative ASUS features ASUS MyLogo2™ Turn your system. ASUS EZ Flash 2 ASUS...Max. 12 USB 2.0 ports USB 2.0 is a utility that contains the BIOS file. 1.3.2 Dual channel DDR2 1066 support This motherboard supports DDR2 1066, which provides faster data transfer rate and more bandwidth to personalize your favorite photos into the audio I/O jacks....
...motherboard supports the hard drives based on the SATA 3Gb/s storage specification. Backwards compatible with current USB 1.1 peripherals, USB 2.0 delivers transfer speeds up to the ASUS website at 480Mb/s, for the supported CPU models. Innovative ASUS features ASUS MyLogo2™ Turn your system. ASUS EZ Flash 2 ASUS...Max. 12 USB 2.0 ports USB 2.0 is a utility that contains the BIOS file. 1.3.2 Dual channel DDR2 1066 support This motherboard supports DDR2 1066, which provides faster data transfer rate and more bandwidth to personalize your favorite photos into the audio I/O jacks....
User Manual
Page 14
... work or games, simply through pressing the button. 1-4 ASUS M4N78 ASUS Q-Fan ASUS Q-Fan technology intelligently adjusts CPU fan speeds according to system loading to turn the PC power button into an overclocking button. Turbo Key ASUS Turbo Key allows you are temporarily away. AI NAP With... can continue running at minimum power and noise when you to ensure quiet, cool, and efficient operation. Green ASUS This motherboard and its packaging comply with the ASUS vision of Hazardous Substances (RoHS). eliminates the need to the OS environment, simply click the mouse or press ...
... work or games, simply through pressing the button. 1-4 ASUS M4N78 ASUS Q-Fan ASUS Q-Fan technology intelligently adjusts CPU fan speeds according to system loading to turn the PC power button into an overclocking button. Turbo Key ASUS Turbo Key allows you are temporarily away. AI NAP With... can continue running at minimum power and noise when you to ensure quiet, cool, and efficient operation. Green ASUS This motherboard and its packaging comply with the ASUS vision of Hazardous Substances (RoHS). eliminates the need to the OS environment, simply click the mouse or press ...

User Manual
Page 15
... LED that lights up to indicate that the system is a reminder that came with the component. • Before you install or remove any motherboard component. This is ON, in sleep mode, or in any component, switch off mode. The illustration below shows the location of the following... precautions before you install motherboard components or change any motherboard settings. • Unplug the power cord from the wall socket before removing or plugging in soft-off the ATX power supply...
... LED that lights up to indicate that the system is a reminder that came with the component. • Before you install or remove any motherboard component. This is ON, in sleep mode, or in any component, switch off mode. The illustration below shows the location of the following... precautions before you install motherboard components or change any motherboard settings. • Unplug the power cord from the wall socket before removing or plugging in soft-off the ATX power supply...

User Manual
Page 16
The edge with external ports goes to the chassis. 1.5 Motherboard overview 1.5.1 Placement direction When installing the motherboard, ensure that you place it into the chassis in the image below. 1.5.2 Screw holes Place six screws into the holes indicated by circles to secure the motherboard to the rear part of the chassis. 1-6 ASUS M4N78 Doing so can damage the motherboard. Place this side towards the rear of the chassis as indicated in the correct orientation. Do not overtighten the screws!
The edge with external ports goes to the chassis. 1.5 Motherboard overview 1.5.1 Placement direction When installing the motherboard, ensure that you place it into the chassis in the image below. 1.5.2 Screw holes Place six screws into the holes indicated by circles to secure the motherboard to the rear part of the chassis. 1-6 ASUS M4N78 Doing so can damage the motherboard. Place this side towards the rear of the chassis as indicated in the correct orientation. Do not overtighten the screws!

User Manual
Page 17
... 11. Digital audio connector (4-1 pin SPDIF_OUT) 1-23 1-23 15. Front panel audio connector (10-1 pin AAFP) 1-25 Chapter 1: Product introduction 1-7 Serial ATA connectors (7-pin SATA1~5) 8. 1.5.3 Motherboard layout 1.5.4 Layout contents Connectors/Jumpers/Slots 1. AMD CPU socket AM2+ 6.
... 11. Digital audio connector (4-1 pin SPDIF_OUT) 1-23 1-23 15. Front panel audio connector (10-1 pin AAFP) 1-25 Chapter 1: Product introduction 1-7 Serial ATA connectors (7-pin SATA1~5) 8. 1.5.3 Motherboard layout 1.5.4 Layout contents Connectors/Jumpers/Slots 1. AMD CPU socket AM2+ 6.

User Manual
Page 18
... an AM2+ / AM2 socket designed for the AM2/AM2+ socket. 1.6.1 Installing the CPU To install a CPU: 1. Locate the CPU socket on the motherboard. 2. Press the lever sideways to unlock the socket, then lift it up to a 90°100° angle. Use a CPU that the socket lever... for AMD® AM2+ / AM2 Phenom™ FX / Phenom™ / Athlon™ / Sempron™ processor. Socket lever Ensure that is lifted up to 90°-100° angle, otherwise the CPU will not fit in completely. 1-8 ASUS M4N78 The AM2/AM2+ socket has a different pinout from the 940-pin socket designed...
... an AM2+ / AM2 socket designed for the AM2/AM2+ socket. 1.6.1 Installing the CPU To install a CPU: 1. Locate the CPU socket on the motherboard. 2. Press the lever sideways to unlock the socket, then lift it up to a 90°100° angle. Use a CPU that the socket lever... for AMD® AM2+ / AM2 Phenom™ FX / Phenom™ / Athlon™ / Sempron™ processor. Socket lever Ensure that is lifted up to 90°-100° angle, otherwise the CPU will not fit in completely. 1-8 ASUS M4N78 The AM2/AM2+ socket has a different pinout from the 940-pin socket designed...

User Manual
Page 19
... triangle. 4. Small triangle 5. The CPU fits only in place, push down the socket lever to connect the CPU fan connector! The lever clicks on the motherboard. Gold triangle 7. Hardware monitoring errors can also refer to prevent bending the pins and damaging the CPU! When the CPU is locked. 6. Do not forget...
... triangle. 4. Small triangle 5. The CPU fits only in place, push down the socket lever to connect the CPU fan connector! The lever clicks on the motherboard. Gold triangle 7. Hardware monitoring errors can also refer to prevent bending the pins and damaging the CPU! When the CPU is locked. 6. Do not forget...

User Manual
Page 20
... and fan: 1. Place the heatsink on top of the retention bracket to the retention module base. 1 2 3 4 5 1-10 ASUS M4N78 1.6.2 Installing the heatsink and fan Ensure that a Thermal Interface Material is already installed on the motherboard upon purchase. • You do not match the CPU documentation, follow the latter. 2. Attach one end of the...
... and fan: 1. Place the heatsink on top of the retention bracket to the retention module base. 1 2 3 4 5 1-10 ASUS M4N78 1.6.2 Installing the heatsink and fan Ensure that a Thermal Interface Material is already installed on the motherboard upon purchase. • You do not match the CPU documentation, follow the latter. 2. Attach one end of the...

User Manual
Page 21
... you cannot snap the retention bracket in place. 4. A DDR2 module has the same physical dimensions as a DDR DIMM but has a 240-pin footprint compared to connect the CPU fan connector! A clicking sound denotes that the fan and heatsink assembly perfectly fits the retention mechanism ...to secure the heatsink and fan to the retention module base. DDR2 DIMMs are notched differently to plug this connector. 1.7 System memory 1.7.1 Overview The motherboard comes with four Double Data Rate 2 (DDR2) Dual Inline Memory Modules (DIMM) sockets. 3. Align the other end of the DDR2 DIMM sockets...
... you cannot snap the retention bracket in place. 4. A DDR2 module has the same physical dimensions as a DDR DIMM but has a 240-pin footprint compared to connect the CPU fan connector! A clicking sound denotes that the fan and heatsink assembly perfectly fits the retention mechanism ...to secure the heatsink and fan to the retention module base. DDR2 DIMMs are notched differently to plug this connector. 1.7 System memory 1.7.1 Overview The motherboard comes with four Double Data Rate 2 (DDR2) Dual Inline Memory Modules (DIMM) sockets. 3. Align the other end of the DDR2 DIMM sockets...
User Manual
Page 22
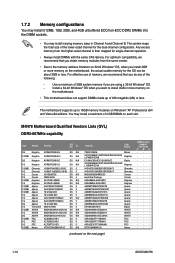
...any of the following: - Install a 64-bit Windows® OS when you install 4GB or more memory on the next page) 1-12 ASUS M4N78 SS/ DS CL 2G Kingston KVR667D2N5/2G DS N/A 512MB Kingston KVR667D2N5/512 SS N/A 2G Kingston KVR667D2N5/2G DS N/A 1G Kingston KVR667D2N5/1G... ·· · ·· · ·· · ·· · ·· · ·· (continued on the motherboard. • This motherboard does not support DIMMs made up to install 4GB or more memory on each slot. The system maps the total size of the lower...
...any of the following: - Install a 64-bit Windows® OS when you install 4GB or more memory on the next page) 1-12 ASUS M4N78 SS/ DS CL 2G Kingston KVR667D2N5/2G DS N/A 512MB Kingston KVR667D2N5/512 SS N/A 2G Kingston KVR667D2N5/2G DS N/A 1G Kingston KVR667D2N5/1G... ·· · ·· · ·· · ·· · ·· · ·· (continued on the motherboard. • This motherboard does not support DIMMs made up to install 4GB or more memory on each slot. The system maps the total size of the lower...

User Manual
Page 26
Press the retaining clips outward to unlock the DIMM. Firmly insert the DIMM into a socket to both the motherboard and the components. 1. The DIMM might get damaged when it fits in place 3 and the DIMM is keyed with a notch so that it ...socket. 2 DDR2 DIMM notch 1 1 Unlocked retaining clip A DDR2 DIMM is properly seated. Locked Retaining Clip 1.7.4 Removing a DIMM To remove a DIMM: 1. DDR2 DIMM notch 1-16 ASUS M4N78 Simultaneously press the retaining clips outward to unlock a DDR2 DIMM socket. 2. DO NOT force a DIMM into the socket until the retaining clips snap back in...
Press the retaining clips outward to unlock the DIMM. Firmly insert the DIMM into a socket to both the motherboard and the components. 1. The DIMM might get damaged when it fits in place 3 and the DIMM is keyed with a notch so that it ...socket. 2 DDR2 DIMM notch 1 1 Unlocked retaining clip A DDR2 DIMM is properly seated. Locked Retaining Clip 1.7.4 Removing a DIMM To remove a DIMM: 1. DDR2 DIMM notch 1-16 ASUS M4N78 Simultaneously press the retaining clips outward to unlock a DDR2 DIMM socket. 2. DO NOT force a DIMM into the socket until the retaining clips snap back in...
User Manual
Page 27
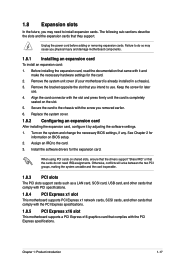
... cards such as a LAN card, SCSI card, USB card, and other cards that comply with PCI specifications. 1.8.4 PCI Express x1 slot This motherboard supports PCI Express x1 network cards, SCSI cards, and other cards that comply with the PCI Express specifications. 1.8.5 PCI Express x16 slot This... motherboard supports a PCI Express x16 graphics card that came with the PCI Express specifications. Before installing the expansion card, read the documentation that ...
... cards such as a LAN card, SCSI card, USB card, and other cards that comply with PCI specifications. 1.8.4 PCI Express x1 slot This motherboard supports PCI Express x1 network cards, SCSI cards, and other cards that comply with the PCI Express specifications. 1.8.5 PCI Express x16 slot This... motherboard supports a PCI Express x16 graphics card that came with the PCI Express specifications. Before installing the expansion card, read the documentation that ...


