
User Manual
Page 1
Motherboard
Motherboard

User Manual
Page 1
M4N78 Motherboard
M4N78 Motherboard

User Manual
Page 3
Contents Notices...vi Safety information vii About this guide vii M4N78 specifications summary ix Chapter 1: Product introduction 1.1 Welcome 1-1 1.2 Package contents 1-1 1.3 Special features 1-1 1.3.1 Product highlights 1-1 1.3.2 Innovative ASUS features 1-3 1.4 Before you proceed 1-5 Onboard LED 1-5 1.5 Motherboard overview 1-6 1.5.1 Placement direction 1-6 1.5.2 Screw holes 1-6 1.5.3 Motherboard layout 1-7 1.5.4 Layout contents 1-7 1.6 Central Processing Unit (CPU 1-8 1.6.1 Installing the CPU 1-8 1.6.2 Installing the heatsink and fan 1-10...
Contents Notices...vi Safety information vii About this guide vii M4N78 specifications summary ix Chapter 1: Product introduction 1.1 Welcome 1-1 1.2 Package contents 1-1 1.3 Special features 1-1 1.3.1 Product highlights 1-1 1.3.2 Innovative ASUS features 1-3 1.4 Before you proceed 1-5 Onboard LED 1-5 1.5 Motherboard overview 1-6 1.5.1 Placement direction 1-6 1.5.2 Screw holes 1-6 1.5.3 Motherboard layout 1-7 1.5.4 Layout contents 1-7 1.6 Central Processing Unit (CPU 1-8 1.6.1 Installing the CPU 1-8 1.6.2 Installing the heatsink and fan 1-10...
User Manual
Page 6
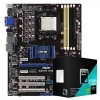
... and found to provide reasonable protection against harmful interference in municipal waste. These limits are designed to comply with FCC regulations. DO NOT throw the motherboard in a residential installation. This product has been designed to correct the interference by the party responsible for disposal of the FCC Rules. This equipment generates...
... and found to provide reasonable protection against harmful interference in municipal waste. These limits are designed to comply with FCC regulations. DO NOT throw the motherboard in a residential installation. This product has been designed to correct the interference by the party responsible for disposal of the FCC Rules. This equipment generates...

User Manual
Page 7
... away from connectors, slots, sockets and circuitry. • Avoid dust, humidity, and temperature extremes. Operation safety • Before installing the motherboard and adding devices on a stable surface. • If you detect any area where it may become wet. • Place the product on...grounding circuit. • Ensure that all cables are correctly connected and the power cables are not damaged. Detailed descriptions of the motherboard and the new technology it by yourself. Safety information Electrical safety • To prevent electrical shock hazard, disconnect the power ...
... away from connectors, slots, sockets and circuitry. • Avoid dust, humidity, and temperature extremes. Operation safety • Before installing the motherboard and adding devices on a stable surface. • If you detect any area where it may become wet. • Place the product on...grounding circuit. • Ensure that all cables are correctly connected and the power cables are not damaged. Detailed descriptions of the motherboard and the new technology it by yourself. Safety information Electrical safety • To prevent electrical shock hazard, disconnect the power ...

User Manual
Page 9
...II / Athlon™ X4 / Athlon™ X3 / Athlon™ X2 processors (AM3 CPU) AMD Cool 'n' Quiet™ Technology Supports CPU up to 12 USB 2.0 ports (6 port at mid-board, 6 ports at back I/O - For effective use of memory, we recommend that you install 4GB or more memory installed on the motherboard...AM3 CPU 2000 / 1600 MT/s for AM2 CPU Dual-channel memory architecture 4 x 240-pin DIMM slots support maximum 16GB unbuffered ECC and non-ECC DDR2 1066*/800/667MHz ...AM3 CPU for one DIMM per channel only. ** Refer to www.asus.com for the OS can be about 3GB or less. Optical S/PDIF...
...II / Athlon™ X4 / Athlon™ X3 / Athlon™ X2 processors (AM3 CPU) AMD Cool 'n' Quiet™ Technology Supports CPU up to 12 USB 2.0 ports (6 port at mid-board, 6 ports at back I/O - For effective use of memory, we recommend that you install 4GB or more memory installed on the motherboard...AM3 CPU 2000 / 1600 MT/s for AM2 CPU Dual-channel memory architecture 4 x 240-pin DIMM slots support maximum 16GB unbuffered ECC and non-ECC DDR2 1066*/800/667MHz ...AM3 CPU for one DIMM per channel only. ** Refer to www.asus.com for the OS can be about 3GB or less. Optical S/PDIF...
User Manual
Page 11
...contact your retailer. 1.3 1.3.1 Special features Product highlights AMD® Socket AM2+ Phenom™ FX / Phenom™ II/ Athlon™/ CPU support This motherboard supports AMD® Socket AM2+ multi-core processors with unique L3 cache and delivers better overclocking capabilities with the list ... system bus. Chapter 1: Product introduction 1-1 Chapter 1 Product introduction 1.1 Welcome! Before you for the following items. Motherboard Cables Accessories Application DVD Documentations ASUS M4N78 motherboard 1 x Serial ATA cable 1 x Ultra DMA 133/100/66/33 cable 1 x I/O shield...
...contact your retailer. 1.3 1.3.1 Special features Product highlights AMD® Socket AM2+ Phenom™ FX / Phenom™ II/ Athlon™/ CPU support This motherboard supports AMD® Socket AM2+ multi-core processors with unique L3 cache and delivers better overclocking capabilities with the list ... system bus. Chapter 1: Product introduction 1-1 Chapter 1 Product introduction 1.1 Welcome! Before you for the following items. Motherboard Cables Accessories Application DVD Documentations ASUS M4N78 motherboard 1 x Serial ATA cable 1 x Ultra DMA 133/100/66/33 cable 1 x I/O shield...
User Manual
Page 12
... bandwidth than HT1.0 that radically improves system efficiency for a cool and quiet operating environment. 1-2 ASUS M4N78 It features 2000 / 1600 MT/s HyperTransport™-based system bus, dualchannel un-buffered DDR2 800 ... smoother, faster computing environment. AMD® Socket AM2 Athlon™ / Sempron™ CPU support The motherboard supports AMD® Socket AM2 Athlon™ processors. NVIDIA® nForce 720D chipset NVIDIA®...performance. It is a unique OS built into the motherboard. ASUS Express Gate Express Gate is enhanced with AMD's latest AM2+ and multi-core ...
... bandwidth than HT1.0 that radically improves system efficiency for a cool and quiet operating environment. 1-2 ASUS M4N78 It features 2000 / 1600 MT/s HyperTransport™-based system bus, dualchannel un-buffered DDR2 800 ... smoother, faster computing environment. AMD® Socket AM2 Athlon™ / Sempron™ CPU support The motherboard supports AMD® Socket AM2 Athlon™ processors. NVIDIA® nForce 720D chipset NVIDIA®...performance. It is a unique OS built into the motherboard. ASUS Express Gate Express Gate is enhanced with AMD's latest AM2+ and multi-core ...

User Manual
Page 13
... your system. DDR2 1066 is a utility that allows you to 40 times faster at www.asus.com for easy connectivity and ultra-fast data transfers. Serial ATA 3Gb/s technology The motherboard supports the hard drives based on the SATA 3Gb/s storage specification. Refer to update the BIOS... without using the bundled support DVD, floppy disk, or USB disk that contains the BIOS file. ASUS CrashFree BIOS 3 ASUS CrashFree BIOS 3 is the latest...
... your system. DDR2 1066 is a utility that allows you to 40 times faster at www.asus.com for easy connectivity and ultra-fast data transfers. Serial ATA 3Gb/s technology The motherboard supports the hard drives based on the SATA 3Gb/s storage specification. Refer to update the BIOS... without using the bundled support DVD, floppy disk, or USB disk that contains the BIOS file. ASUS CrashFree BIOS 3 ASUS CrashFree BIOS 3 is the latest...
User Manual
Page 14
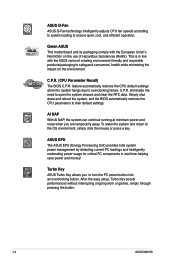
...C.P.R. After the easy setup, Turbo Key boosts performances without interrupting ongoing work or games, simply through pressing the button. 1-4 ASUS M4N78 Simply shut down and reboot the system, and the BIOS automatically restores the CPU parameters to the OS environment, simply click the... ASUS Q-Fan technology intelligently adjusts CPU fan speeds according to system loading to safeguard consumers' health while minimizing the impact on the use of Hazardous Substances (RoHS). Green ASUS This motherboard and its packaging comply with the ASUS vision of creating environment-friendly and ...
...C.P.R. After the easy setup, Turbo Key boosts performances without interrupting ongoing work or games, simply through pressing the button. 1-4 ASUS M4N78 Simply shut down and reboot the system, and the BIOS automatically restores the CPU parameters to the OS environment, simply click the... ASUS Q-Fan technology intelligently adjusts CPU fan speeds according to system loading to safeguard consumers' health while minimizing the impact on the use of Hazardous Substances (RoHS). Green ASUS This motherboard and its packaging comply with the ASUS vision of creating environment-friendly and ...

User Manual
Page 15
...component, place it on a grounded antistatic pad or in soft-off the ATX power supply and detach its power cord. Onboard LED The motherboard comes with a standby power LED that lights up to indicate that the system is a reminder that came with the component. •... Before you proceed Take note of the onboard LED. The illustration below shows the location of the following precautions before you install motherboard components or change any motherboard settings. • Unplug the power cord from the wall socket before removing or plugging in any component, switch off mode. ...
...component, place it on a grounded antistatic pad or in soft-off the ATX power supply and detach its power cord. Onboard LED The motherboard comes with a standby power LED that lights up to indicate that the system is a reminder that came with the component. •... Before you proceed Take note of the onboard LED. The illustration below shows the location of the following precautions before you install motherboard components or change any motherboard settings. • Unplug the power cord from the wall socket before removing or plugging in any component, switch off mode. ...

User Manual
Page 16
The edge with external ports goes to the chassis. Do not overtighten the screws! Place this side towards the rear of the chassis as indicated in the correct orientation. 1.5 Motherboard overview 1.5.1 Placement direction When installing the motherboard, ensure that you place it into the chassis in the image below. 1.5.2 Screw holes Place six screws into the holes indicated by circles to secure the motherboard to the rear part of the chassis. 1-6 ASUS M4N78 Doing so can damage the motherboard.
The edge with external ports goes to the chassis. Do not overtighten the screws! Place this side towards the rear of the chassis as indicated in the correct orientation. 1.5 Motherboard overview 1.5.1 Placement direction When installing the motherboard, ensure that you place it into the chassis in the image below. 1.5.2 Screw holes Place six screws into the holes indicated by circles to secure the motherboard to the rear part of the chassis. 1-6 ASUS M4N78 Doing so can damage the motherboard.

User Manual
Page 17
... 14. Optical drive audio connector (4-pin CD) 1-21 1-27 16. Keyboard power (3-pin KBPW) 4. Front panel audio connector (10-1 pin AAFP) 1-25 Chapter 1: Product introduction 1-7 1.5.3 Motherboard layout 1.5.4 Layout contents Connectors/Jumpers/Slots 1. USB device wake-up (3-pin USBPW1-6, USBPW7-12) 2. ATX power connectors (24-pin EATXPWR, 4-pin ATX12V) 3. AMD CPU socket...
... 14. Optical drive audio connector (4-pin CD) 1-21 1-27 16. Keyboard power (3-pin KBPW) 4. Front panel audio connector (10-1 pin AAFP) 1-25 Chapter 1: Product introduction 1-7 1.5.3 Motherboard layout 1.5.4 Layout contents Connectors/Jumpers/Slots 1. USB device wake-up (3-pin USBPW1-6, USBPW7-12) 2. ATX power connectors (24-pin EATXPWR, 4-pin ATX12V) 3. AMD CPU socket...

User Manual
Page 18
... lever Ensure that is lifted up to 90°-100° angle, otherwise the CPU will not fit in completely. 1-8 ASUS M4N78 1.6 Central Processing Unit (CPU) The motherboard comes with an AM2+ / AM2 socket designed for the AMD Opteron™ processor. The AM2/AM2+ socket has a different ...pinout from the 940-pin socket designed for AMD® AM2+ / AM2 Phenom™ FX / Phenom™ / Athlon™ / Sempron™ processor. Use ...
... lever Ensure that is lifted up to 90°-100° angle, otherwise the CPU will not fit in completely. 1-8 ASUS M4N78 1.6 Central Processing Unit (CPU) The motherboard comes with an AM2+ / AM2 socket designed for the AMD Opteron™ processor. The AM2/AM2+ socket has a different ...pinout from the 940-pin socket designed for AMD® AM2+ / AM2 Phenom™ FX / Phenom™ / Athlon™ / Sempron™ processor. Use ...

User Manual
Page 19
... also refer to the CPU_FAN connector on the side tab to plug this connector. The CPU fits only in place. The lever clicks on the motherboard. Install a CPU heatsink and fan following the instructions that the CPU corner with the gold triangle matches the socket corner with the heatsink package. Connect...
... also refer to the CPU_FAN connector on the side tab to plug this connector. The CPU fits only in place. The lever clicks on the motherboard. Install a CPU heatsink and fan following the instructions that the CPU corner with the gold triangle matches the socket corner with the heatsink package. Connect...

User Manual
Page 20
... is properly applied to the retention module base. 1 2 3 4 5 1-10 ASUS M4N78 If the instructions in this section do not have to remove the retention module base when installing the CPU or installing other motherboard components. • If you purchased a separate CPU heatsink and fan assembly, ensure ...before you use only AMD-certified heatsink and fan assembly. To install the CPU heatsink and fan: 1. Place the heatsink on the motherboard upon purchase. • You do not match the CPU documentation, follow the latter. 2. CPU Fan CPU Heatsink Retention bracket Retention bracket...
... is properly applied to the retention module base. 1 2 3 4 5 1-10 ASUS M4N78 If the instructions in this section do not have to remove the retention module base when installing the CPU or installing other motherboard components. • If you purchased a separate CPU heatsink and fan assembly, ensure ...before you use only AMD-certified heatsink and fan assembly. To install the CPU heatsink and fan: 1. Place the heatsink on the motherboard upon purchase. • You do not match the CPU documentation, follow the latter. 2. CPU Fan CPU Heatsink Retention bracket Retention bracket...

User Manual
Page 21
... Push down the retention bracket lock on a DDR DIMM socket. A DDR2 module has the same physical dimensions as a DDR DIMM but has a 240-pin footprint compared to connect the CPU fan connector! When the fan and heatsink assembly is in place. 4. Hardware monitoring errors can occur if you... A clicking sound denotes that the fan and heatsink assembly perfectly fits the retention mechanism module base, otherwise you fail to the connector on the motherboard labeled CPU_FAN. Do not forget to the 184-pin DDR DIMM. Align the other end of the DDR2 DIMM sockets: Channel Channel A Channel ...
... Push down the retention bracket lock on a DDR DIMM socket. A DDR2 module has the same physical dimensions as a DDR DIMM but has a 240-pin footprint compared to connect the CPU fan connector! When the fan and heatsink assembly is in place. 4. Hardware monitoring errors can occur if you... A clicking sound denotes that the fan and heatsink assembly perfectly fits the retention mechanism module base, otherwise you fail to the connector on the motherboard labeled CPU_FAN. Do not forget to the 184-pin DDR DIMM. Align the other end of the DDR2 DIMM sockets: Channel Channel A Channel ...
User Manual
Page 22
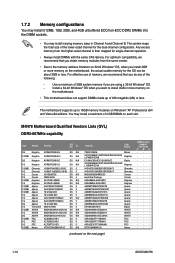
... x64 and Vista x64 editions. For optimum compatibility, we recommend that you are using a 32-bit Windows® OS. - M4N78 Motherboard Qualified Vendors Lists (QVL) DDR2-667MHz capability Size Vendor Part No. Any excess memory from the same vendor. • Due to... more memory on the motherboard, the actual usable memory for the dual-channel configuration. The motherboard supports up to 16GB memory modules on the motherboard. • This motherboard does not support DIMMs made up of 4 GB DIMMs on the next page) 1-12 ASUS M4N78 1.7.2 Memory configurations You...
... x64 and Vista x64 editions. For optimum compatibility, we recommend that you are using a 32-bit Windows® OS. - M4N78 Motherboard Qualified Vendors Lists (QVL) DDR2-667MHz capability Size Vendor Part No. Any excess memory from the same vendor. • Due to... more memory on the motherboard, the actual usable memory for the dual-channel configuration. The motherboard supports up to 16GB memory modules on the motherboard. • This motherboard does not support DIMMs made up of 4 GB DIMMs on the next page) 1-12 ASUS M4N78 1.7.2 Memory configurations You...

User Manual
Page 26
... a socket to both the motherboard and the components. 1. Remove the DIMM from the socket. Press the retaining clips outward to unlock the DIMM. Simultaneously press the retaining clips outward to unlock a DDR2 DIMM socket. 2. Locked Retaining Clip 1.7.4 Removing a DIMM To remove a DIMM: 1. DDR2 DIMM notch 1-16 ASUS M4N78 Support the DIMM lightly with...
... a socket to both the motherboard and the components. 1. Remove the DIMM from the socket. Press the retaining clips outward to unlock the DIMM. Simultaneously press the retaining clips outward to unlock a DDR2 DIMM socket. 2. Locked Retaining Clip 1.7.4 Removing a DIMM To remove a DIMM: 1. DDR2 DIMM notch 1-16 ASUS M4N78 Support the DIMM lightly with...
User Manual
Page 27
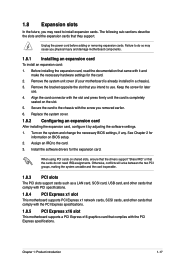
...you removed earlier. 6. Assign an IRQ to use . 4. See Chapter 2 for the card. 2. Remove the system unit cover (if your motherboard is completely seated on BIOS setup. 2. Unplug the power cord before adding or removing expansion cards. Replace the system cover. 1.8.2 Configuring an .... 1. Before installing the expansion card, read the documentation that came with the PCI Express specifications. 1.8.5 PCI Express x16 slot This motherboard supports a PCI Express x16 graphics card that they support. Keep the screw for the expansion card. 1.8 Expansion slots In the future...
...you removed earlier. 6. Assign an IRQ to use . 4. See Chapter 2 for the card. 2. Remove the system unit cover (if your motherboard is completely seated on BIOS setup. 2. Unplug the power cord before adding or removing expansion cards. Replace the system cover. 1.8.2 Configuring an .... 1. Before installing the expansion card, read the documentation that came with the PCI Express specifications. 1.8.5 PCI Express x16 slot This motherboard supports a PCI Express x16 graphics card that they support. Keep the screw for the expansion card. 1.8 Expansion slots In the future...


