User Manual
Page 3
...Safety information...viii About this guide...ix M4A88TD-V EVO specifications summary xi Chapter 1: Product introduction 1.1 Welcome!...1-1 1.2 Package contents 1-1 1.3 Special features 1-2 1.3.1 Product highlights 1-2 1.3.2 ASUS Xtreme Design-Hybrid Processor 1-2 1.3.3 ASUS Xtreme Design-Hybrid Switches 1-3 1.3.4 ASUS Xtreme Design-Hybrid OS 1-3 1.3.5 ASUS unique features 1-3 Chapter 2: Hardware information 2.1 Before you proceed 2-1 2.2 Motherboard overview 2-2 2.2.1 Motherboard layout 2-2 2.2.2 Layout contents 2-3 2.2.3 Placement direction 2-4 2.2.4 Screw holes...
...Safety information...viii About this guide...ix M4A88TD-V EVO specifications summary xi Chapter 1: Product introduction 1.1 Welcome!...1-1 1.2 Package contents 1-1 1.3 Special features 1-2 1.3.1 Product highlights 1-2 1.3.2 ASUS Xtreme Design-Hybrid Processor 1-2 1.3.3 ASUS Xtreme Design-Hybrid Switches 1-3 1.3.4 ASUS Xtreme Design-Hybrid OS 1-3 1.3.5 ASUS unique features 1-3 Chapter 2: Hardware information 2.1 Before you proceed 2-1 2.2 Motherboard overview 2-2 2.2.1 Motherboard layout 2-2 2.2.2 Layout contents 2-3 2.2.3 Placement direction 2-4 2.2.4 Screw holes...
User Manual
Page 7
... by turning the equipment off and on a circuit different from digital apparatus set out in our products at ASUS REACH website at http://green.asus.com/english/REACH.htm. REACH Complying with the REACH (Registration, Evaluation, Authorisation, and Restriction of Chemicals) ...particular installation. If this equipment. This class B digital apparatus complies with manufacturer's instructions, may cause undesired operation. DO NOT throw the motherboard in municipal waste. vii E5889_M4A88TD-V EVO_Contents V2.7 7 5/26/10 4:03:19 PM This symbol of parts and recycling. Notices Federal...
... by turning the equipment off and on a circuit different from digital apparatus set out in our products at ASUS REACH website at http://green.asus.com/english/REACH.htm. REACH Complying with the REACH (Registration, Evaluation, Authorisation, and Restriction of Chemicals) ...particular installation. If this equipment. This class B digital apparatus complies with manufacturer's instructions, may cause undesired operation. DO NOT throw the motherboard in municipal waste. vii E5889_M4A88TD-V EVO_Contents V2.7 7 5/26/10 4:03:19 PM This symbol of parts and recycling. Notices Federal...
User Manual
Page 8
... any damage, contact your dealer immediately. • To avoid short circuits, keep paper clips, screws, and staples away from the motherboard, ensure that your power supply is broken, do not try to the correct voltage in your retailer. Operation safety • Before installing the... motherboard and adding devices on a stable surface. • If you add a device. • Before connecting or removing signal cables from connectors, slots, ...
... any damage, contact your dealer immediately. • To avoid short circuits, keep paper clips, screws, and staples away from the motherboard, ensure that your power supply is broken, do not try to the correct voltage in your retailer. Operation safety • Before installing the... motherboard and adding devices on a stable surface. • If you add a device. • Before connecting or removing signal cables from connectors, slots, ...

User Manual
Page 9
... supports. • Chapter 2: Hardware information This chapter lists the hardware setup procedures that you need when installing and configuring the motherboard. It includes description of the switches, jumpers, and connectors on ASUS hardware and software products. Where to find more information Refer to change system settings through the BIOS Setup menus. These...
... supports. • Chapter 2: Hardware information This chapter lists the hardware setup procedures that you need when installing and configuring the motherboard. It includes description of the switches, jumpers, and connectors on ASUS hardware and software products. Where to find more information Refer to change system settings through the BIOS Setup menus. These...

User Manual
Page 15
Actual product specifications may vary with 6.0 Gb/s label 2 x Serial ATA 3.0 Gb/s cables 1 x Ultra DMA 133/ 100/66 cable 1 x ASUS Q-Shield 1 x 2-in-1 ASUS Q-Connector kit • If any of ASUS quality motherboards! Chapter 1 Chapter 1: Chapter 1 Product introduction 1.1 Welcome! Before you for reference only. ASUS M4A88TD-V EVO E5889_M4A88TD-V EVO_Contents V2.1 1 1-1 5/26/10 4:03:29 PM Thank you start installing the...
Actual product specifications may vary with 6.0 Gb/s label 2 x Serial ATA 3.0 Gb/s cables 1 x Ultra DMA 133/ 100/66 cable 1 x ASUS Q-Shield 1 x 2-in-1 ASUS Q-Connector kit • If any of ASUS quality motherboards! Chapter 1 Chapter 1: Chapter 1 Product introduction 1.1 Welcome! Before you for reference only. ASUS M4A88TD-V EVO E5889_M4A88TD-V EVO_Contents V2.1 1 1-1 5/26/10 4:03:29 PM Thank you start installing the...
User Manual
Page 16
...motherboard also supports AMD® CPUs in the 45nm manufacturing process. CrossFireX™ allows higher antialiasing, anisotropic filtering, shading, and texture settings. AMD® SB850 Chipset The AMD® SB850 Southbridge natively supports the next generation SATA 6.0 Gb/s data transfer rate and PCI Express 2.0 interface. 1.3.2 ASUS Xtreme Design-Hybrid Processor* TurboV EVO... the system to achieve world O.C. Dual-Channel DDR3 2000 (O.C.) / 1333 / 1066 support This motherboard supports DDR3 memory that automates overclocking to achieve a total system level up to support up . ...
...motherboard also supports AMD® CPUs in the 45nm manufacturing process. CrossFireX™ allows higher antialiasing, anisotropic filtering, shading, and texture settings. AMD® SB850 Chipset The AMD® SB850 Southbridge natively supports the next generation SATA 6.0 Gb/s data transfer rate and PCI Express 2.0 interface. 1.3.2 ASUS Xtreme Design-Hybrid Processor* TurboV EVO... the system to achieve world O.C. Dual-Channel DDR3 2000 (O.C.) / 1333 / 1066 support This motherboard supports DDR3 memory that automates overclocking to achieve a total system level up to support up . ...
User Manual
Page 17
... Design To fully unleash the next-generation AM3 CPU's potential, this motherboard has adopted the brand new 8-phase VRM power design, which delivers high power efficiency and supreme overclocking ability. ASUS M4A88TD-V EVO E5889_M4A88TD-V EVO_Contents V2.3 3 1-3 5/26/10 4:03:30 PM ASUS EPU The ASUS EPU (Energy Processing Unit) provides total system power management by simply...
... Design To fully unleash the next-generation AM3 CPU's potential, this motherboard has adopted the brand new 8-phase VRM power design, which delivers high power efficiency and supreme overclocking ability. ASUS M4A88TD-V EVO E5889_M4A88TD-V EVO_Contents V2.3 3 1-3 5/26/10 4:03:30 PM ASUS EPU The ASUS EPU (Energy Processing Unit) provides total system power management by simply...
User Manual
Page 18
... not only upgrade the visual enjoyment for the ultimate overclocking configuration. 1-4 E5889_M4A88TD-V EVO_Contents V2.4 4 Chapter 1: Product Introduction 5/26/10 4:03:30 PM Profile The motherboard features the ASUS O.C. Profile that allows you to fine-tune the CPU/NB voltage in 0.003125V steps and DRAM voltage in the CMOS or a separate file, giving...
... not only upgrade the visual enjoyment for the ultimate overclocking configuration. 1-4 E5889_M4A88TD-V EVO_Contents V2.4 4 Chapter 1: Product Introduction 5/26/10 4:03:30 PM Profile The motherboard features the ASUS O.C. Profile that allows you to fine-tune the CPU/NB voltage in 0.003125V steps and DRAM voltage in the CMOS or a separate file, giving...
User Manual
Page 19
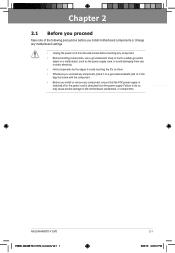
Chapter 2 ASUS M4A88TD-V EVO E5889_M4A88TD-V EVO_Contents V2.1 1 2-1 5/26/10 4:03:31 PM Failure to do so may cause severe damage to avoid touching the ICs on them. • Whenever ... cord is detached from the power supply. Chapter 2: Chapter 2 Hardware information 2.1 Before you proceed Take note of the following precautions before you install motherboard components or change any motherboard settings. • Unplug the power cord from the wall socket before touching any component. • Before handling components, use a grounded wrist strap or...
Chapter 2 ASUS M4A88TD-V EVO E5889_M4A88TD-V EVO_Contents V2.1 1 2-1 5/26/10 4:03:31 PM Failure to do so may cause severe damage to avoid touching the ICs on them. • Whenever ... cord is detached from the power supply. Chapter 2: Chapter 2 Hardware information 2.1 Before you proceed Take note of the following precautions before you install motherboard components or change any motherboard settings. • Unplug the power cord from the wall socket before touching any component. • Before handling components, use a grounded wrist strap or...
User Manual
Page 20
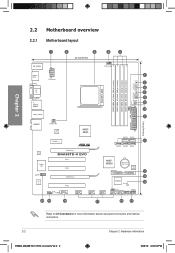
Chapter 2 2.2 Motherboard overview 2.2.1 Motherboard layout 1 2 3 2 4 24.4cm(9.6in) KB_USB56 CPU_FAN SPDIFO_ HDMI EATX12V VGA DVI F_ ESATA_ USB34 LAN1_USB12 SOCKET AM3 DDR3 DIMM_A1 (64bit, 240-pin module) DDR3 DIMM_A2 (... Key II 2 O2LED2 5 6 O2LED1 7 8 MemOK! 9 10 1 30.5cm(12.0in) EATXPWR AUDIO CHA_FAN ICS 477C AMD® 880G PCIEX1_1 SATA5 SATA2 11 PCIEX16_1 RTL 8111E M4A88TD-V EVO SATA6 SATA3 SATA1 Super I/O PCI1 PCI2 AAFP ALC 892 PCIEX16_2 SPDIF_OUT COM1 PCI3 USB1314 AMD® SB850 PRI_EIDE Lithium Cell CMOS Power 16Mb BIOS USB1112...
Chapter 2 2.2 Motherboard overview 2.2.1 Motherboard layout 1 2 3 2 4 24.4cm(9.6in) KB_USB56 CPU_FAN SPDIFO_ HDMI EATX12V VGA DVI F_ ESATA_ USB34 LAN1_USB12 SOCKET AM3 DDR3 DIMM_A1 (64bit, 240-pin module) DDR3 DIMM_A2 (... Key II 2 O2LED2 5 6 O2LED1 7 8 MemOK! 9 10 1 30.5cm(12.0in) EATXPWR AUDIO CHA_FAN ICS 477C AMD® 880G PCIEX1_1 SATA5 SATA2 11 PCIEX16_1 RTL 8111E M4A88TD-V EVO SATA6 SATA3 SATA1 Super I/O PCI1 PCI2 AAFP ALC 892 PCIEX16_2 SPDIF_OUT COM1 PCI3 USB1314 AMD® SB850 PRI_EIDE Lithium Cell CMOS Power 16Mb BIOS USB1112...
User Manual
Page 22
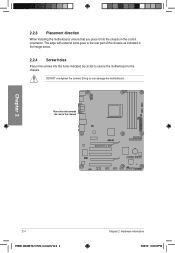
DO NOT overtighten the screws! 2.2.3 Placement direction When installing the motherboard, ensure that you place it into the chassis in the image below. 2.2.4 Screw holes Place nine screws into the holes indicated by circles to secure the motherboard to the chassis. Place this side towards the rear of the chassis as indicated in the correct orientation. The edge with external ports goes to the rear part of the chassis M4A88TD-V EVO Chapter 2 2-4 E5889_M4A88TD-V EVO_Contents V2.4 4 Chapter 2: Hardware information 5/26/10 4:03:35 PM Doing so can damage the motherboard.
DO NOT overtighten the screws! 2.2.3 Placement direction When installing the motherboard, ensure that you place it into the chassis in the image below. 2.2.4 Screw holes Place nine screws into the holes indicated by circles to secure the motherboard to the chassis. Place this side towards the rear of the chassis as indicated in the correct orientation. The edge with external ports goes to the rear part of the chassis M4A88TD-V EVO Chapter 2 2-4 E5889_M4A88TD-V EVO_Contents V2.4 4 Chapter 2: Hardware information 5/26/10 4:03:35 PM Doing so can damage the motherboard.
User Manual
Page 23
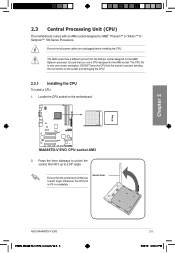
...prevent bending the connectors on the motherboard. Ensure that the socket lever is lifted up to a 90º angle. Locate the CPU socket on the socket and damaging the CPU! 2.3.1 Installing the CPU To install a CPU: 1. M4A88TD-V EVO M4A88TD-V EVO CPU socket AM3 2. Press the... will not fit in only one correct orientation. Chapter 2 2.3 Central Processing Unit (CPU) The motherboard comes with an AM3 socket designed for the AMD Opteron processor. Socket lever ASUS M4A88TD-V EVO E5889_M4A88TD-V EVO_Contents V2.5 5 2-5 5/26/10 4:03:41 PM Ensure that all power cables are...
...prevent bending the connectors on the motherboard. Ensure that the socket lever is lifted up to a 90º angle. Locate the CPU socket on the socket and damaging the CPU! 2.3.1 Installing the CPU To install a CPU: 1. M4A88TD-V EVO M4A88TD-V EVO CPU socket AM3 2. Press the... will not fit in only one correct orientation. Chapter 2 2.3 Central Processing Unit (CPU) The motherboard comes with an AM3 socket designed for the AMD Opteron processor. Socket lever ASUS M4A88TD-V EVO E5889_M4A88TD-V EVO_Contents V2.5 5 2-5 5/26/10 4:03:41 PM Ensure that all power cables are...
User Manual
Page 25
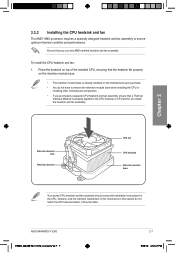
ASUS M4A88TD-V EVO E5889_M4A88TD-V EVO_Contents V2.7 7 2-7 5/26/10 4:03:47 PM 2.3.2 Installing the CPU heatsink and fan The AMD® AM3 processor requires a specially designed heatsink and fan assembly to remove the retention module base when installing the CPU or installing other motherboard components. • If you purchased a separate CPU heatsink... condition and performance. To install the CPU heatsink and fan: 1. Ensure that a Thermal Interface Material is already installed on the motherboard upon purchase. • You do not match the CPU documentation, follow the latter.
ASUS M4A88TD-V EVO E5889_M4A88TD-V EVO_Contents V2.7 7 2-7 5/26/10 4:03:47 PM 2.3.2 Installing the CPU heatsink and fan The AMD® AM3 processor requires a specially designed heatsink and fan assembly to remove the retention module base when installing the CPU or installing other motherboard components. • If you purchased a separate CPU heatsink... condition and performance. To install the CPU heatsink and fan: 1. Ensure that a Thermal Interface Material is already installed on the motherboard upon purchase. • You do not match the CPU documentation, follow the latter.
User Manual
Page 27
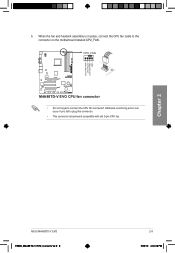
When the fan and heatsink assembly is backward compatible with old 3-pin CPU fan. Hardware monitoring errors can occur if you fail to plug this connector. • This connector is in place, connect the CPU fan cable to connect the CPU fan connector! ASUS M4A88TD-V EVO E5889_M4A88TD-V EVO_Contents V2.9 9 2-9 5/26/10 4:03:49 PM CPU FAN PWM CPU FAN IN CPU FAN PWR GND Chapter 2 5. CPU_FAN M4A88TD-V EVO M4A88TD-V EVO CPU fan connector • Do not forget to the connector on the motherboard labeled CPU_FAN.
When the fan and heatsink assembly is backward compatible with old 3-pin CPU fan. Hardware monitoring errors can occur if you fail to plug this connector. • This connector is in place, connect the CPU fan cable to connect the CPU fan connector! ASUS M4A88TD-V EVO E5889_M4A88TD-V EVO_Contents V2.9 9 2-9 5/26/10 4:03:49 PM CPU FAN PWM CPU FAN IN CPU FAN PWR GND Chapter 2 5. CPU_FAN M4A88TD-V EVO M4A88TD-V EVO CPU fan connector • Do not forget to the connector on the motherboard labeled CPU_FAN.
User Manual
Page 28
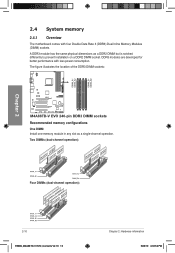
... with four Double Data Rate 3 (DDR3) Dual Inline Memory Modules (DIMM) sockets. Chapter 2 2.4 System memory 2.4.1 Overview The motherboard comes with less power consumption. The figure illustrates the location of the DDR3 DIMM sockets: M4A88TD-V EVO M4A88TD-V EVO 240-pin DDR3 DIMM sockets Recommended memory configurations One DIMM: Install one memory module in any slot as...
... with four Double Data Rate 3 (DDR3) Dual Inline Memory Modules (DIMM) sockets. Chapter 2 2.4 System memory 2.4.1 Overview The motherboard comes with less power consumption. The figure illustrates the location of the DDR3 DIMM sockets: M4A88TD-V EVO M4A88TD-V EVO 240-pin DDR3 DIMM sockets Recommended memory configurations One DIMM: Install one memory module in any slot as...
User Manual
Page 29
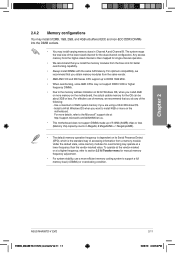
... may install varying memory sizes in Megabit, 8 Megabit/Mb = 1 Megabyte/MB). • The default memory operation frequency is dependent on the motherboard. Under the default state, some AMD CPUs may not support DDR3 1600 or higher frequency DIMMs. • Due to DDR3 1066 MHz. •...and Channel B. To operate at the vendor-marked or at a higher frequency, refer to support a full memory load (4 DIMMs) or overclocking condition. ASUS M4A88TD-V EVO E5889_M4A88TD-V EVO_Contents V2.11 11 2-11 5/26/10 4:03:52 PM For effective use a more on its Serial Presence Detect (SPD), which is...
... may install varying memory sizes in Megabit, 8 Megabit/Mb = 1 Megabyte/MB). • The default memory operation frequency is dependent on the motherboard. Under the default state, some AMD CPUs may not support DDR3 1600 or higher frequency DIMMs. • Due to DDR3 1066 MHz. •...and Channel B. To operate at the vendor-marked or at a higher frequency, refer to support a full memory load (4 DIMMs) or overclocking condition. ASUS M4A88TD-V EVO E5889_M4A88TD-V EVO_Contents V2.11 11 2-11 5/26/10 4:03:52 PM For effective use a more on its Serial Presence Detect (SPD), which is...

User Manual
Page 30
OCZ QCZ3P18004GK 4096MB(Kit of 2) SS - Chapter 2 M4A88TD-V EVO Motherboard Qualified Vendors Lists (QVL) DDR3 2000 (O.C.) MHz capability Vendor Part No. Size SS/DS Chip Brand Chip No. Timing 8-8-8-27 8-8-8-27 Voltage 1.9V 1.9V DIMM ...
OCZ QCZ3P18004GK 4096MB(Kit of 2) SS - Chapter 2 M4A88TD-V EVO Motherboard Qualified Vendors Lists (QVL) DDR3 2000 (O.C.) MHz capability Vendor Part No. Size SS/DS Chip Brand Chip No. Timing 8-8-8-27 8-8-8-27 Voltage 1.9V 1.9V DIMM ...
User Manual
Page 34
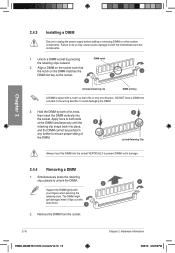
... so may cause severe damage to both ends of the DIMM simultaneously until the 3 retaining clip snaps back into the socket VERTICALLY to both the motherboard and the components. 1.
... so may cause severe damage to both ends of the DIMM simultaneously until the 3 retaining clip snaps back into the socket VERTICALLY to both the motherboard and the components. 1.
User Manual
Page 35
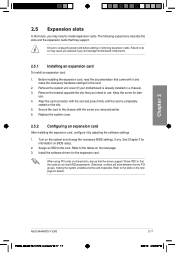
... PCI cards on the slot. 5. Refer to install expansion cards. Ensure to the card. Remove the system unit cover (if your motherboard is completely seated on shared slots, ensure that the drivers support "Share IRQ" or that came with it by adjusting the software settings...system cover. 2.5.2 Configuring an expansion card After installing the expansion card, configure it and make the necessary hardware settings for the card. 2. ASUS M4A88TD-V EVO E5889_M4A88TD-V EVO_Contents V2.17 17 2-17 5/26/10 4:04:06 PM Refer to use . 4. Remove the bracket opposite the slot that they...
... PCI cards on the slot. 5. Refer to install expansion cards. Ensure to the card. Remove the system unit cover (if your motherboard is completely seated on shared slots, ensure that the drivers support "Share IRQ" or that came with it by adjusting the software settings...system cover. 2.5.2 Configuring an expansion card After installing the expansion card, configure it and make the necessary hardware settings for the card. 2. ASUS M4A88TD-V EVO E5889_M4A88TD-V EVO_Contents V2.17 17 2-17 5/26/10 4:04:06 PM Refer to use . 4. Remove the bracket opposite the slot that they...
User Manual
Page 36
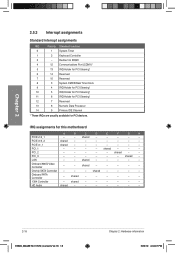
... PCI Steering* 11 6 IRQ Holder for PCI Steering* 12 7 Reserved 13 8 Numeric Data Processor 14 9 Primary IDE Channel * These IRQs are usually available for this motherboard A B C D E F G H PCIE x16_1 - - shared - - - shared - - - - - Onboard PATA Controller - PCIE x1_1 shared - - - - - - - LAN - - shared - - - - - - 1394 Controller - shared - shared - - - - PCI_1 - - - - shared - - - - - PCI_2...
... PCI Steering* 11 6 IRQ Holder for PCI Steering* 12 7 Reserved 13 8 Numeric Data Processor 14 9 Primary IDE Channel * These IRQs are usually available for this motherboard A B C D E F G H PCIE x16_1 - - shared - - - shared - - - - - Onboard PATA Controller - PCIE x1_1 shared - - - - - - - LAN - - shared - - - - - - 1394 Controller - shared - shared - - - - PCI_1 - - - - shared - - - - - PCI_2...


