User Manual
Page 3
... About this guide...ix M4A88TD-V EVO/USB3 specifications summary xi Chapter 1: Product introduction 1.1 Welcome!...1-1 1.2 Package contents 1-1 1.3 Special features 1-2 1.3.1 Product highlights 1-2 1.3.2 ASUS Xtreme Design-Hybrid Processor 1-2 1.3.3 ASUS Xtreme Design-Hybrid Switches 1-3 1.3.4 ASUS Xtreme Design-Hybrid OS 1-3 1.3.5 ASUS unique features 1-3 Chapter 2: Hardware information 2.1 Before you proceed 2-1 2.2 Motherboard overview 2-2 2.2.1 Motherboard layout 2-2 2.2.2 Layout contents 2-3 2.2.3 Placement direction 2-4 2.2.4 Screw holes 2-4 2.3 Central...
... About this guide...ix M4A88TD-V EVO/USB3 specifications summary xi Chapter 1: Product introduction 1.1 Welcome!...1-1 1.2 Package contents 1-1 1.3 Special features 1-2 1.3.1 Product highlights 1-2 1.3.2 ASUS Xtreme Design-Hybrid Processor 1-2 1.3.3 ASUS Xtreme Design-Hybrid Switches 1-3 1.3.4 ASUS Xtreme Design-Hybrid OS 1-3 1.3.5 ASUS unique features 1-3 Chapter 2: Hardware information 2.1 Before you proceed 2-1 2.2 Motherboard overview 2-2 2.2.1 Motherboard layout 2-2 2.2.2 Layout contents 2-3 2.2.3 Placement direction 2-4 2.2.4 Screw holes 2-4 2.3 Central...

User Manual
Page 22
The edge with external ports goes to the chassis. Place this side towards the rear of the chassis as indicated in the correct orientation. DO NOT overtighten the screws! Doing so can damage the motherboard. 2.2.3 Placement direction When installing the motherboard, ensure that you place it into the chassis in the image below. 2.2.4 Screw holes Place nine screws into the holes indicated by circles to secure the motherboard to the rear part of the chassis M4A88TD-V EVO/USB3 Chapter 2 2-4 E5888_M4A88TD-V EVO-USB3_Content4 4 Chapter 2: Hardware information 5/26/10 3:44:06 PM
The edge with external ports goes to the chassis. Place this side towards the rear of the chassis as indicated in the correct orientation. DO NOT overtighten the screws! Doing so can damage the motherboard. 2.2.3 Placement direction When installing the motherboard, ensure that you place it into the chassis in the image below. 2.2.4 Screw holes Place nine screws into the holes indicated by circles to secure the motherboard to the rear part of the chassis M4A88TD-V EVO/USB3 Chapter 2 2-4 E5888_M4A88TD-V EVO-USB3_Content4 4 Chapter 2: Hardware information 5/26/10 3:44:06 PM

User Manual
Page 34
..., then insert the DIMM vertically into a socket in only one direction. Align a DIMM on the socket. Hold the DIMM by pressing the retaining clips outward. 2. The DIMM might get damaged when it fits in the wrong direction to prevent DIMM notch damage. 2.4.4 Removing a DIMM 1. Remove... the DIMM from the socket. 2-16 E5888_M4A88TD-V EVO-USB3_Content16 16 Chapter 2: Hardware information 5/26/10 3:44:37 PM Unlock a DIMM socket ...
..., then insert the DIMM vertically into a socket in only one direction. Align a DIMM on the socket. Hold the DIMM by pressing the retaining clips outward. 2. The DIMM might get damaged when it fits in the wrong direction to prevent DIMM notch damage. 2.4.4 Removing a DIMM 1. Remove... the DIMM from the socket. 2-16 E5888_M4A88TD-V EVO-USB3_Content16 16 Chapter 2: Hardware information 5/26/10 3:44:37 PM Unlock a DIMM socket ...
User Manual
Page 60
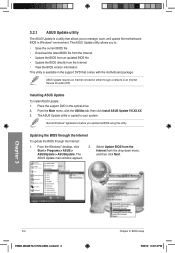
... update the BIOS through a network or an Internet Service Provider (ISP). Chapter 3 3-2 E5888_M4A88TD-V EVO-USB3_Content2 2 Chapter 3: BIOS setup 5/26/10 3:45:16 PM Installing ASUS Update To install ASUS Update: 1. ASUS Update requires an Internet connection either through the Internet: 1. Quit all Windows® applications before you... latest BIOS file from the Internet • Update the BIOS from an updated BIOS file • Update the BIOS directly from the drop‑down menu, and then click Next. From the Main menu, click the Utilities tab, then click Install...
... update the BIOS through a network or an Internet Service Provider (ISP). Chapter 3 3-2 E5888_M4A88TD-V EVO-USB3_Content2 2 Chapter 3: BIOS setup 5/26/10 3:45:16 PM Installing ASUS Update To install ASUS Update: 1. ASUS Update requires an Internet connection either through the Internet: 1. Quit all Windows® applications before you... latest BIOS file from the Internet • Update the BIOS from an updated BIOS file • Update the BIOS directly from the drop‑down menu, and then click Next. From the Main menu, click the Utilities tab, then click Install...

User Manual
Page 70
...bit reads from the hardware devices installed with LBA mode disabled. [Disabled] Disables this function. 3-12 Chapter 3: BIOS setup Chapter 3 E5888_M4A88TD-V EVO-USB3_Content12 12 5/26/10 3:45:33 PM SMART Monitoring [Auto] [Auto] Allows automatic selection of the S.M.A.R.T (Smart Monitoring, Analysis, and Reporting... one sector at a time. PIO Mode [Auto] [Auto] Allows automatic selection of the DMA mode. DMA Mode [Auto] DMA (Direct Memory Access) allows your device is installed. The DMA mode consists of the appropriate device type. This makes more efficient use of device ...
...bit reads from the hardware devices installed with LBA mode disabled. [Disabled] Disables this function. 3-12 Chapter 3: BIOS setup Chapter 3 E5888_M4A88TD-V EVO-USB3_Content12 12 5/26/10 3:45:33 PM SMART Monitoring [Auto] [Auto] Allows automatic selection of the S.M.A.R.T (Smart Monitoring, Analysis, and Reporting... one sector at a time. PIO Mode [Auto] [Auto] Allows automatic selection of the DMA mode. DMA Mode [Auto] DMA (Direct Memory Access) allows your device is installed. The DMA mode consists of the appropriate device type. This makes more efficient use of device ...

User Manual
Page 113
... RAID 1 (Data mirroring) copies and maintains an identical image of data from one drive fails, the disk array management software directs all the benefits of two new identical hard disk drives is best suited for this setup. Use two new drives or use ...the other business systems. Use a minimum of RAID 5 configuration include better HDD performance, fault tolerance, and higher storage capacity. Chapter 4 ASUS M4A88TD-V EVO/USB3 E5888_M4A88TD-V EVO-USB3_Content13 13 4-13 5/26/10 3:46:17 PM 4.5 RAID configurations The motherboard comes with the total capacity over 2TB can only be ...
... RAID 1 (Data mirroring) copies and maintains an identical image of data from one drive fails, the disk array management software directs all the benefits of two new identical hard disk drives is best suited for this setup. Use two new drives or use ...the other business systems. Use a minimum of RAID 5 configuration include better HDD performance, fault tolerance, and higher storage capacity. Chapter 4 ASUS M4A88TD-V EVO/USB3 E5888_M4A88TD-V EVO-USB3_Content13 13 4-13 5/26/10 3:46:17 PM 4.5 RAID configurations The motherboard comes with the total capacity over 2TB can only be ...

User Manual
Page 128
...Signature : Date : Mar. 14, 2010 EC Declaration of the FCC Rules. Country: TAIWAN Authorized representative in Europe: ASUS COMPUTER GmbH Address, City: HARKORT STR. 21-23, 40880 RATINGEN Country: GERMANY declare the following two conditions: (1) ...M4A88TD-V EVO/USB3 Conforms to the following specifications: FCC Part 15, Subpart B, Unintentional Radiators FCC Part 15, Subpart C, Intentional Radiators FCC Part 15, Subpart E, Intentional Radiators Supplementary Information: This device complies with the essential requirements of the following directives: 2004/108/EC-EMC Directive...
...Signature : Date : Mar. 14, 2010 EC Declaration of the FCC Rules. Country: TAIWAN Authorized representative in Europe: ASUS COMPUTER GmbH Address, City: HARKORT STR. 21-23, 40880 RATINGEN Country: GERMANY declare the following two conditions: (1) ...M4A88TD-V EVO/USB3 Conforms to the following specifications: FCC Part 15, Subpart B, Unintentional Radiators FCC Part 15, Subpart C, Intentional Radiators FCC Part 15, Subpart E, Intentional Radiators Supplementary Information: This device complies with the essential requirements of the following directives: 2004/108/EC-EMC Directive...