
User Manual
Page 2
The Turbo Unlocker monitor on system load. 6. Install ASUS TurboV EVO from the support DVD that came with the motherboard package. 2. Turbo Unlocker is set to OFF by default, allowing to you adjust the ratio of your system. 1. In the ASUS TurboV EVO window, click More Settings, and then click CPU Ratio. 3. Click ON to continue...
The Turbo Unlocker monitor on system load. 6. Install ASUS TurboV EVO from the support DVD that came with the motherboard package. 2. Turbo Unlocker is set to OFF by default, allowing to you adjust the ratio of your system. 1. In the ASUS TurboV EVO window, click More Settings, and then click CPU Ratio. 3. Click ON to continue...

User Manual
Page 1
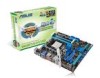
M4A88TD-M EVO Motherboard
M4A88TD-M EVO Motherboard

User Manual
Page 3
Contents Notices...vi Safety information...vii About this guide...vii M4A88TD-M EVO specifications summary...ix Chapter 1: 1.1 1.2 1.3 Welcome!...1-1 Package contents...1-1 Special features...1-1 1.3.1 1.3.2 Product highlights...1-1 Innovative ASUS features...1-3 Product introduction 1.4 1.5 Before you proceed...1-6 Motherboard overview...1-6 1.5.1 1.5.2 1.5.3 1.5.4 1.6.1 1.6.2 1.7.1 1.7.2 1.7.3 1.7.4 1.8.1 1.8.2 1.8.3 1.8.4 1.8.5 Placement direction...1-6 Screw holes...1-6 Motherboard layout...1-7 Layout contents...1-7 Installing the CPU...1-8 Installing the heatsink ...
Contents Notices...vi Safety information...vii About this guide...vii M4A88TD-M EVO specifications summary...ix Chapter 1: 1.1 1.2 1.3 Welcome!...1-1 Package contents...1-1 Special features...1-1 1.3.1 1.3.2 Product highlights...1-1 Innovative ASUS features...1-3 Product introduction 1.4 1.5 Before you proceed...1-6 Motherboard overview...1-6 1.5.1 1.5.2 1.5.3 1.5.4 1.6.1 1.6.2 1.7.1 1.7.2 1.7.3 1.7.4 1.8.1 1.8.2 1.8.3 1.8.4 1.8.5 Placement direction...1-6 Screw holes...1-6 Motherboard layout...1-7 Layout contents...1-7 Installing the CPU...1-8 Installing the heatsink ...

User Manual
Page 13
... check the items in your package with the list below. 1.2 Package contents ASUS M4A88TD-M EVO motherboard 2 x Serial ATA 6Gb/s cables 1 x Ultra DMA 133/100/66 cable 1 x Q-Shield ASUS motherboard Support DVD User Manual Check your retailer. 1.3 1.3.1 Special features Product highlights AMD... line of the above items is damaged or missing, contact your motherboard package for buying an ASUS® M4A88TD-M EVO motherboard! ASUS M4A88TD-M EVO 1-1 Product introduction Thank you start installing the motherboard, and hardware devices on it another standout in the new 45nm ...
... check the items in your package with the list below. 1.2 Package contents ASUS M4A88TD-M EVO motherboard 2 x Serial ATA 6Gb/s cables 1 x Ultra DMA 133/100/66 cable 1 x Q-Shield ASUS motherboard Support DVD User Manual Check your retailer. 1.3 1.3.1 Special features Product highlights AMD... line of the above items is damaged or missing, contact your motherboard package for buying an ASUS® M4A88TD-M EVO motherboard! ASUS M4A88TD-M EVO 1-1 Product introduction Thank you start installing the motherboard, and hardware devices on it another standout in the new 45nm ...

User Manual
Page 15
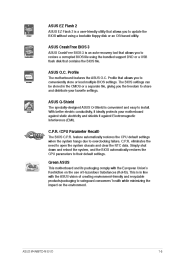
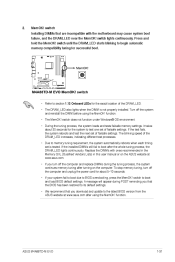
...without performing complicated BIOS changes. S/PDIF digital sound ready This motherboard provides convenient connectivity to analog format and keeps the best signal quality. 1.3.2 1 2 Innovative ASUS features Core Unlocker ASUS Core Unlocker simplifies the activation of overclockers-from die-hard ... offers more options to advanced overclockers to unleash extra processing capabilities. Simply activate a dedicated switch on the motherboard to achieve world O.C. ASUS M4A88TD-M EVO 1-3 record. Even O.C. GPU Boost GPU Boost overclocks the integrated GPU in real time for the discrete...
...without performing complicated BIOS changes. S/PDIF digital sound ready This motherboard provides convenient connectivity to analog format and keeps the best signal quality. 1.3.2 1 2 Innovative ASUS features Core Unlocker ASUS Core Unlocker simplifies the activation of overclockers-from die-hard ... offers more options to advanced overclockers to unleash extra processing capabilities. Simply activate a dedicated switch on the motherboard to achieve world O.C. ASUS M4A88TD-M EVO 1-3 record. Even O.C. GPU Boost GPU Boost overclocks the integrated GPU in real time for the discrete...
User Manual
Page 17
...conductivity, it ideally protects your favorite settings. eliminates the need to overclocking failure. C.P.R. (CPU Parameter Recall) The BIOS C.P.R. ASUS M4A88TD-M EVO 1-5 feature automatically restores the CPU default settings when the system hangs due to open the system chassis and clear the RTC... restore a corrupted BIOS file using a bootable floppy disk or an OS-based utility. Green ASUS This motherboard and its packaging comply with the ASUS vision of creating environment-friendly and recyclable products/packaging to safeguard consumers' health while minimizing the...
...conductivity, it ideally protects your favorite settings. eliminates the need to overclocking failure. C.P.R. (CPU Parameter Recall) The BIOS C.P.R. ASUS M4A88TD-M EVO 1-5 feature automatically restores the CPU default settings when the system hangs due to open the system chassis and clear the RTC... restore a corrupted BIOS file using a bootable floppy disk or an OS-based utility. Green ASUS This motherboard and its packaging comply with the ASUS vision of creating environment-friendly and recyclable products/packaging to safeguard consumers' health while minimizing the...

User Manual
Page 19
... audio connector (4-1 pin SPDIF_OUT) 21. ATX power connectors (24-pin EATXPWR, 4-pin ATX12V) 3. IDE connector (40-1 pin PRI_EIDE) ASUS M4A88TD-M EVO 1-7 Turbo Key II LED (02LED2) 5. USB connectors (10-1 pin USB78, USB910, USB1112, USB1314) 17. 1.5.3 Motherboard layout 1.5.4 Layout contents Page Connectors/Jumpers/Slots/LED 1-29 1-23 1-32 1-34 1-8 1-11 1-27 1-25 1-33 1-31 1-24...
... audio connector (4-1 pin SPDIF_OUT) 21. ATX power connectors (24-pin EATXPWR, 4-pin ATX12V) 3. IDE connector (40-1 pin PRI_EIDE) ASUS M4A88TD-M EVO 1-7 Turbo Key II LED (02LED2) 5. USB connectors (10-1 pin USB78, USB910, USB1112, USB1314) 17. 1.5.3 Motherboard layout 1.5.4 Layout contents Page Connectors/Jumpers/Slots/LED 1-29 1-23 1-32 1-34 1-8 1-11 1-27 1-25 1-33 1-31 1-24...
User Manual
Page 21
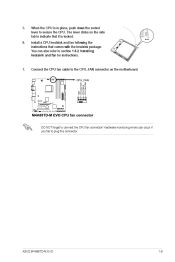
When the CPU is in place, push down the socket lever to indicate that comes with the heatsink package. You can occur if you fail to section 1.6.2 Installing heatsink and fan for instructions. ASUS M4A88TD-M EVO 1-9 Install a CPU heatsink and fan following the instructions that it is locked. The lever clicks on the motherboard. 7. Hardware monitoring errors can also refer to plug this connector. Connect the CPU fan cable to connect the CPU fan connector! DO NOT forget to the CPU_FAN connector on the side tab to secure the CPU. 5. 6.
When the CPU is in place, push down the socket lever to indicate that comes with the heatsink package. You can occur if you fail to section 1.6.2 Installing heatsink and fan for instructions. ASUS M4A88TD-M EVO 1-9 Install a CPU heatsink and fan following the instructions that it is locked. The lever clicks on the motherboard. 7. Hardware monitoring errors can also refer to plug this connector. Connect the CPU fan cable to connect the CPU fan connector! DO NOT forget to the CPU_FAN connector on the side tab to secure the CPU. 5. 6.
User Manual
Page 23
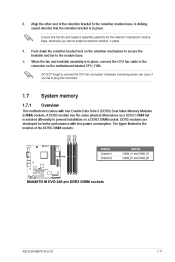
...the retention mechanism module base, otherwise you fail to the retention module base. Push down the retention bracket lock on the motherboard labeled CPU_FAN. DDR3 modules are developed for better performance with four Double Data Rate 3 (DDR3) Dual Inline Memory Modules ... Channel Channel A Channel B Sockets DIMM_A1 and DIMM_A2 DIMM_B1 and DIMM_B2 ASUS M4A88TD-M EVO 1-11 The figure illustrates the location of the retention bracket to plug this connector. 1.7 1.7.1 System memory Overview This motherboard comes with less power consumption. DO NOT forget to prevent installation on...
...the retention mechanism module base, otherwise you fail to the retention module base. Push down the retention bracket lock on the motherboard labeled CPU_FAN. DDR3 modules are developed for better performance with four Double Data Rate 3 (DDR3) Dual Inline Memory Modules ... Channel Channel A Channel B Sockets DIMM_A1 and DIMM_A2 DIMM_B1 and DIMM_B2 ASUS M4A88TD-M EVO 1-11 The figure illustrates the location of the retention bracket to plug this connector. 1.7 1.7.1 System memory Overview This motherboard comes with less power consumption. DO NOT forget to prevent installation on...
User Manual
Page 24
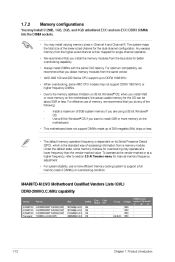
...1066 MHz. • When overclocking, some memory modules for overclocking may install varying memory sizes in Channel A and Channel B. M4A88TD-M EVO Motherboard Qualified Vendors Lists (QVL) DDR3-2000(O.C.)MHz capability Vendor KINGSTON KINGSTON KINGSTON Transcend Part No. For effective use a more memory on... adjustment. • For system stability, use of memory, we recommend that you install 4GB or more memory on the motherboard, the actual usable memory for better overclocking capability. • Always install DIMMs with the same CAS latency. KHX2000C8D3T1K3/3GX(...
...1066 MHz. • When overclocking, some memory modules for overclocking may install varying memory sizes in Channel A and Channel B. M4A88TD-M EVO Motherboard Qualified Vendors Lists (QVL) DDR3-2000(O.C.)MHz capability Vendor KINGSTON KINGSTON KINGSTON Transcend Part No. For effective use a more memory on... adjustment. • For system stability, use of memory, we recommend that you install 4GB or more memory on the motherboard, the actual usable memory for better overclocking capability. • Always install DIMMs with the same CAS latency. KHX2000C8D3T1K3/3GX(...
User Manual
Page 29
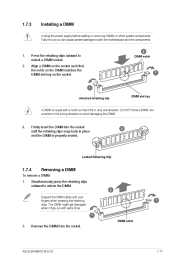
... Retaining Clip 1.7.4 1. To remove a DIMM: Removing a DIMM Simultaneously press the retaining clips outward to unlock a DIMM socket. DIMM notch ASUS M4A88TD-M EVO 1-17 Remove the DIMM from the socket. Align a DIMM on the socket such that it flips out with your fingers when pressing the ... the DIMM lightly with extra force. 2 1 1 2. The DIMM might get damaged when it fits in the wrong direction to both the motherboard and the components. 1. 2. Press the retaining clips outward to unlock the DIMM. Firmly insert the DIMM into a socket in only one direction...
... Retaining Clip 1.7.4 1. To remove a DIMM: Removing a DIMM Simultaneously press the retaining clips outward to unlock a DIMM socket. DIMM notch ASUS M4A88TD-M EVO 1-17 Remove the DIMM from the socket. Align a DIMM on the socket such that it flips out with your fingers when pressing the ... the DIMM lightly with extra force. 2 1 1 2. The DIMM might get damaged when it fits in the wrong direction to both the motherboard and the components. 1. 2. Press the retaining clips outward to unlock the DIMM. Firmly insert the DIMM into a socket in only one direction...

User Manual
Page 33
...an external Serial ATA hard disk drive. USB 2.0 ports 1 and 2. This port connects to configure the settings. 12. DVI-D port. ASUS M4A88TD-M EVO 1-21 IEEE 1394a port. See section 2.3.4 SATA Configuration for any DVI-D compatible device and is HDCP compliant allowing playback of HD DVD,...Speaker Out Side Speaker Out Ensure the audio device of sound playback is Realtek High Definition Audio (the name may be different based on your motherboard: Dual display outputs DVI + D-Sub DVI + HDMI HDMI + D-Sub Supported Not supported • During POST, only the monitor connected to...
...an external Serial ATA hard disk drive. USB 2.0 ports 1 and 2. This port connects to configure the settings. 12. DVI-D port. ASUS M4A88TD-M EVO 1-21 IEEE 1394a port. See section 2.3.4 SATA Configuration for any DVI-D compatible device and is HDCP compliant allowing playback of HD DVD,...Speaker Out Side Speaker Out Ensure the audio device of sound playback is Realtek High Definition Audio (the name may be different based on your motherboard: Dual display outputs DVI + D-Sub DVI + HDMI HDMI + D-Sub Supported Not supported • During POST, only the monitor connected to...
User Manual
Page 39
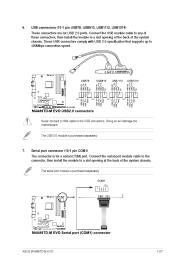
...USB connectors (10-1 pin USB78, USB910, USB1112, USB1314) Never connect a 1394 cable to 480Mbps connection speed. Doing so will damage the motherboard! These USB connectors comply with USB 2.0 specification that supports up to the USB connectors. Connect the serial port module cable to the connector, ... of the system chassis. The connector is for USB 2.0 ports. 6. The serial port module is purchased separately. 7. Serial port connector (10-1 pin COM1) ASUS M4A88TD-M EVO 1-27 These connectors are for a serial (COM) port. The USB 2.0 module is purchased separately.
...USB connectors (10-1 pin USB78, USB910, USB1112, USB1314) Never connect a 1394 cable to 480Mbps connection speed. Doing so will damage the motherboard! These USB connectors comply with USB 2.0 specification that supports up to the USB connectors. Connect the serial port module cable to the connector, ... of the system chassis. The connector is for USB 2.0 ports. 6. The serial port module is purchased separately. 7. Serial port connector (10-1 pin COM1) ASUS M4A88TD-M EVO 1-27 These connectors are for a serial (COM) port. The USB 2.0 module is purchased separately.
User Manual
Page 41
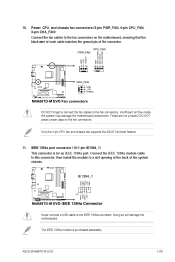
.... This connector is purchased separately. Insufficient air flow inside the system may damage the motherboard components. IEEE 1394a port connector (10-1 pin IE1394_1) Never connect a USB cable to the fan connectors. ASUS M4A88TD-M EVO 1-29 Doing so will damage the motherboard. DO NOT forget to connect the fan cables to the IEEE 1394a connector. Connect...
.... This connector is purchased separately. Insufficient air flow inside the system may damage the motherboard components. IEEE 1394a port connector (10-1 pin IE1394_1) Never connect a USB cable to the fan connectors. ASUS M4A88TD-M EVO 1-29 Doing so will damage the motherboard. DO NOT forget to connect the fan cables to the IEEE 1394a connector. Connect...
User Manual
Page 43
... begin automatic memory compatibility tuning for the system to the latest BIOS version from the ASUS website at www.asus.com. • If you download and update to test one set of failsafe settings. ASUS M4A88TD-M EVO 1-31 MemOK! switch does not function under Windows® OS environment. • ...MemOK! The blinking speed of the DRAM_LED. • The DRAM_LED also lights when the DIMM is tested. Replace the DIMMs with the motherboard may cause system boot failure, and the DRAM_LED near the MemOK! If the installed DIMMs still fail to memory tuning requirement, the ...
... begin automatic memory compatibility tuning for the system to the latest BIOS version from the ASUS website at www.asus.com. • If you download and update to test one set of failsafe settings. ASUS M4A88TD-M EVO 1-31 MemOK! switch does not function under Windows® OS environment. • ...MemOK! The blinking speed of the DRAM_LED. • The DRAM_LED also lights when the DIMM is tested. Replace the DIMMs with the motherboard may cause system boot failure, and the DRAM_LED near the MemOK! If the installed DIMMs still fail to memory tuning requirement, the ...
User Manual
Page 45
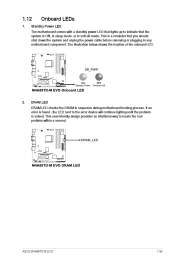
...error device will continue lighting until the problem is solved. DRAM LED ASUS M4A88TD-M EVO 1-33 This is a reminder that the system is found , the LED next to locate the root problem within a second. DRAM LED checks the DRAM in any motherboard component. If an error is ON, in sleep mode, or in... soft-off mode. The motherboard comes with a standby power LED that lights up to indicate that you should shut down the system ...
...error device will continue lighting until the problem is solved. DRAM LED ASUS M4A88TD-M EVO 1-33 This is a reminder that the system is found , the LED next to locate the root problem within a second. DRAM LED checks the DRAM in any motherboard component. If an error is ON, in sleep mode, or in... soft-off mode. The motherboard comes with a standby power LED that lights up to indicate that you should shut down the system ...

User Manual
Page 47
...Click Drivers, Utilities, Make Disk, Manual, and Contact tabs to avail all motherboard features. ASUS M4A88TD-M EVO 1-35 Support DVD information To run the DVD. Click an icon to display Support DVD/motherboard information Click an item to locate the file ASSETUP.EXE from the BIN folder... computer, browse the contents of your hardware. • Motherboard settings and hardware options vary. The contents of ASUS motherboard. If Autorun is for reference only. Double-click the ASSETUP.EXE to change at www.asus.com for better compatibility and system stability. 1.13.2 The...
...Click Drivers, Utilities, Make Disk, Manual, and Contact tabs to avail all motherboard features. ASUS M4A88TD-M EVO 1-35 Support DVD information To run the DVD. Click an icon to display Support DVD/motherboard information Click an item to locate the file ASSETUP.EXE from the BIN folder... computer, browse the contents of your hardware. • Motherboard settings and hardware options vary. The contents of ASUS motherboard. If Autorun is for reference only. Double-click the ASSETUP.EXE to change at www.asus.com for better compatibility and system stability. 1.13.2 The...

User Manual
Page 49
..., select the BIOS version that comes with the motherboard package. ASUS M4A88TD-M EVO 2-1 b. c. From the Windows® desktop, click Start > Programs > ASUS > ASUS Update > ASUS Update to download then click Next. Select Update BIOS from the Internet a. ASUS Update utility Installing ASUS Update To install ASUS Update: 1. 2. 3. Click the Utilities tab, then click ASUS Update. The Drivers menu appears. Follow the...
..., select the BIOS version that comes with the motherboard package. ASUS M4A88TD-M EVO 2-1 b. c. From the Windows® desktop, click Start > Programs > ASUS > ASUS Update > ASUS Update to download then click Next. Select Update BIOS from the Internet a. ASUS Update utility Installing ASUS Update To install ASUS Update: 1. 2. 3. Click the Utilities tab, then click ASUS Update. The Drivers menu appears. Follow the...

User Manual
Page 51
... support DVD to the floppy disk drive, if supported. The utility automatically checks the devices for details. • This function supports USB flash disks with motherboard models. ASUS CrashFree BIOS Recovering the BIOS To recover the BIOS: 1. 2. 3. 4. Turn off the system after the utility completes the updating process and turn on the... process. You can cause system boot failure! Turn on again. When found, the utility reads the BIOS file and starts flashing the corrupted BIOS file. ASUS M4A88TD-M EVO 2-3
... support DVD to the floppy disk drive, if supported. The utility automatically checks the devices for details. • This function supports USB flash disks with motherboard models. ASUS CrashFree BIOS Recovering the BIOS To recover the BIOS: 1. 2. 3. 4. Turn off the system after the utility completes the updating process and turn on the... process. You can cause system boot failure! Turn on again. When found, the utility reads the BIOS file and starts flashing the corrupted BIOS file. ASUS M4A88TD-M EVO 2-3
User Manual
Page 55
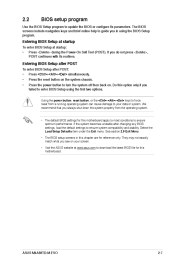
... program Use the BIOS Setup program to enter BIOS Setup using the BIOS Setup program. Do this motherboard. ASUS M4A88TD-M EVO 2-7 We recommend that you in this motherboard apply to most conditions to your screen. • Visit the ASUS website at startup: • Press during the Power-On Self Test (POST). Using the power button, reset...
... program Use the BIOS Setup program to enter BIOS Setup using the BIOS Setup program. Do this motherboard. ASUS M4A88TD-M EVO 2-7 We recommend that you in this motherboard apply to most conditions to your screen. • Visit the ASUS website at startup: • Press during the Power-On Self Test (POST). Using the power button, reset...


