User Manual
Page 3
......vi Safety information vii About this guide vii M4A88T-V EVO Series specifications summary ix Chapter 1: Product introduction 1.1 Welcome 1-1 1.2 Package contents 1-1 1.3 Special features 1-1 1.3.1 Product highlights 1-1 1.3.2 Innovative ASUS features 1-3 1.4 Before you proceed 1-6 1.5 Motherboard overview 1-7 1.5.1 Placement direction 1-7 1.5.2 Screw holes 1-7 1.5.3 Motherboard layout 1-7 1.5.4 Layout contents 1-8 1.6 Central Processing Unit (CPU 1-9 1.6.1 Installing the CPU 1-9 1.6.2 Installing the heatsink and fan 1-11 1.7 System memory...
......vi Safety information vii About this guide vii M4A88T-V EVO Series specifications summary ix Chapter 1: Product introduction 1.1 Welcome 1-1 1.2 Package contents 1-1 1.3 Special features 1-1 1.3.1 Product highlights 1-1 1.3.2 Innovative ASUS features 1-3 1.4 Before you proceed 1-6 1.5 Motherboard overview 1-7 1.5.1 Placement direction 1-7 1.5.2 Screw holes 1-7 1.5.3 Motherboard layout 1-7 1.5.4 Layout contents 1-8 1.6 Central Processing Unit (CPU 1-9 1.6.1 Installing the CPU 1-9 1.6.2 Installing the heatsink and fan 1-11 1.7 System memory...
User Manual
Page 4
Contents 1.13 Software support 1-37 1.13.1 Installing an operating system 1-37 1.13.2 Support DVD information 1-37 Chapter 2: BIOS information 2.1 Managing and updating your BIOS 2-1 2.1.1 ASUS Update utility 2-1 2.1.2 ASUS EZ Flash 2 2-2 2.1.3 ASUS CrashFree BIOS 3 2-3 2.1.4 ASUS BIOS Updater 2-4 2.2 BIOS setup program 2-7 2.2.1 BIOS menu screen 2-8 2.2.2 Menu bar 2-8 2.2.3 Navigation keys 2-8 2.2.4 Menu items 2-9 2.2.5 Submenu items 2-9 2.2.6 Configuration fields 2-9 2.2.7 Pop-up window 2-9 2.2.8 Scroll...
Contents 1.13 Software support 1-37 1.13.1 Installing an operating system 1-37 1.13.2 Support DVD information 1-37 Chapter 2: BIOS information 2.1 Managing and updating your BIOS 2-1 2.1.1 ASUS Update utility 2-1 2.1.2 ASUS EZ Flash 2 2-2 2.1.3 ASUS CrashFree BIOS 3 2-3 2.1.4 ASUS BIOS Updater 2-4 2.2 BIOS setup program 2-7 2.2.1 BIOS menu screen 2-8 2.2.2 Menu bar 2-8 2.2.3 Navigation keys 2-8 2.2.4 Menu items 2-9 2.2.5 Submenu items 2-9 2.2.6 Configuration fields 2-9 2.2.7 Pop-up window 2-9 2.2.8 Scroll...
User Manual
Page 6
...wheeled bin indicates that the product (electrical and electronic equipment) should not be placed in our products at ASUS REACH website at http://csr.asus.com/english/REACH.htm. This symbol of the FCC Rules. REACH Complying with the limits for connection of.... These limits are designed to which the receiver is no guarantee that to provide reasonable protection against harmful interference in a particular installation. If this equipment. vi Notices Federal Communications Commission Statement This device complies with Canadian ICES-003. However, there is connected. ...
...wheeled bin indicates that the product (electrical and electronic equipment) should not be placed in our products at ASUS REACH website at http://csr.asus.com/english/REACH.htm. This symbol of the FCC Rules. REACH Complying with the limits for connection of.... These limits are designed to which the receiver is no guarantee that to provide reasonable protection against harmful interference in a particular installation. If this equipment. vi Notices Federal Communications Commission Statement This device complies with Canadian ICES-003. However, there is connected. ...
User Manual
Page 7
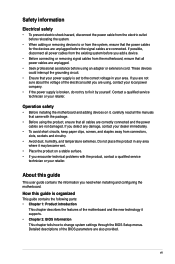
... and the new technology it may become wet. • Place the product on a stable surface. • If you need when installing and configuring the motherboard. vii Operation safety • Before installing the motherboard and adding devices on it, carefully read all cables are correctly connected and the power cables are also provided...
... and the new technology it may become wet. • Place the product on a stable surface. • If you need when installing and configuring the motherboard. vii Operation safety • Before installing the motherboard and adding devices on it, carefully read all cables are correctly connected and the power cables are also provided...
User Manual
Page 9
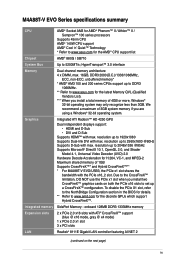
...-ECC, unbuffered memory* * AMD® AM3 100 and 200 series CPUs support up to DDR3 1066MHz. ** Refer to www.asus.com for the latest Memory QVL (Qualified Vendors List). *** When you install two CrossFireX™ graphics cards on the next page) ix Integrated ATI Radeon™ HD 4250 GPU Dual independent displays.... SidePort Memory - onboard 128MB DDR3 1333MHz memory 2 x PCIe 2.0 x16 slots with max. We recommend a maximum of 1GB Supports CrossFireX™* and Hybrid CrossFireX™** * For M4A88T-V EVO/USB3, the PCIe x1 slot shares the bandwidth with max.
...-ECC, unbuffered memory* * AMD® AM3 100 and 200 series CPUs support up to DDR3 1066MHz. ** Refer to www.asus.com for the latest Memory QVL (Qualified Vendors List). *** When you install two CrossFireX™ graphics cards on the next page) ix Integrated ATI Radeon™ HD 4250 GPU Dual independent displays.... SidePort Memory - onboard 128MB DDR3 1333MHz memory 2 x PCIe 2.0 x16 slots with max. We recommend a maximum of 1GB Supports CrossFireX™* and Hybrid CrossFireX™** * For M4A88T-V EVO/USB3, the PCIe x1 slot shares the bandwidth with max.
User Manual
Page 13
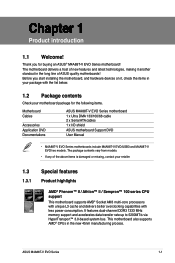
... M4A88T-V EVO/USB3 and M4A88T-V EVO two models. The package contents vary from models. • If any of new features and latest technologies, making it , check the items in your motherboard package for buying an ASUS® M4A88T-V EVO Series motherboard! This motherboard also supports AMD® CPUs in the long line of ASUS quality motherboards! Thank you start installing...
... M4A88T-V EVO/USB3 and M4A88T-V EVO two models. The package contents vary from models. • If any of new features and latest technologies, making it , check the items in your motherboard package for buying an ASUS® M4A88T-V EVO Series motherboard! This motherboard also supports AMD® CPUs in the long line of ASUS quality motherboards! Thank you start installing...
User Manual
Page 15
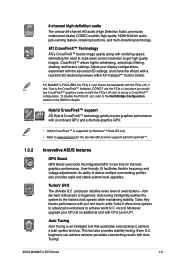
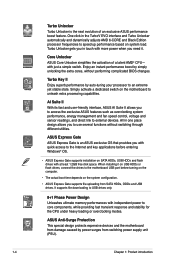
..., anisotropic filtering, shading, and texture settings. For M4A88T-V EVO/USB3, the PCIe x1 slot shares the bandwidth with just one touch; Due to the CrossFireX™ limitation, DO NOT use the PCIe x1 slot when you install two CrossFireX™ graphics cards on both the PCIe... level of overclockers-from die-hard enthusiasts to deliver multiple overclocking profiles also provides rapid and stable system-level upgrades. record. ASUS M4A88T-V EVO Series 1-3 ATI CrossFireX™ Technology ATI's CrossFireX™ boosts image quality along with rendering speed, eliminating the need to scale...
..., anisotropic filtering, shading, and texture settings. For M4A88T-V EVO/USB3, the PCIe x1 slot shares the bandwidth with just one touch; Due to the CrossFireX™ limitation, DO NOT use the PCIe x1 slot when you install two CrossFireX™ graphics cards on both the PCIe... level of overclockers-from die-hard enthusiasts to deliver multiple overclocking profiles also provides rapid and stable system-level upgrades. record. ASUS M4A88T-V EVO Series 1-3 ATI CrossFireX™ Technology ATI's CrossFireX™ boosts image quality along with rendering speed, eliminating the need to scale...
User Manual
Page 16
...HDDs or flash drives, connect the drives to the motherboard USB port before entering Windows® OS. • ASUS Express Gate supports installation on the system configuration. • ASUS Express Gate supports file uploading from switching power supply unit (PSU). 1-4 Chapter 1: Product introduction Turbo Unlocker Turbo ... an ASUS exclusive OS that provides you with quick access to the Internet and key applications before turning on the computer. • The actual boot time depends on SATA HDDs, USB HDDs and flash drives with more power when you in the TurboV EVO interface...
...HDDs or flash drives, connect the drives to the motherboard USB port before entering Windows® OS. • ASUS Express Gate supports installation on the system configuration. • ASUS Express Gate supports file uploading from switching power supply unit (PSU). 1-4 Chapter 1: Product introduction Turbo Unlocker Turbo ... an ASUS exclusive OS that provides you with quick access to the Internet and key applications before turning on the computer. • The actual boot time depends on SATA HDDs, USB HDDs and flash drives with more power when you in the TurboV EVO interface...
User Manual
Page 18
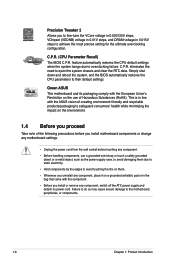
...achieve the most precise setting for the ultimate overclocking configuration. C.P.R. Green ASUS This motherboard and its packaging comply with the European Union's Restriction on the use of the following precautions before you install motherboard components or change any motherboard settings. • Unplug the power...and clear the RTC data. eliminates the need to safeguard consumers' health while minimizing the impact on the environment. 1.4 Before you install or remove any component, place it on them due to static electricity. • Hold components by the edges to avoid touching ...
...achieve the most precise setting for the ultimate overclocking configuration. C.P.R. Green ASUS This motherboard and its packaging comply with the European Union's Restriction on the use of the following precautions before you install motherboard components or change any motherboard settings. • Unplug the power...and clear the RTC data. eliminates the need to safeguard consumers' health while minimizing the impact on the environment. 1.4 Before you install or remove any component, place it on them due to static electricity. • Hold components by the edges to avoid touching ...
User Manual
Page 19
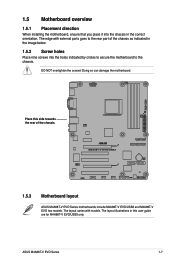
... orientation. The layout varies with external ports goes to the chassis. Place this user guide are for M4A88T-V EVO/USB3 only. M4A88T-V EVO/USB3 1.5.3 Motherboard layout ASUS M4A88T-V EVO Series motherboards include M4A88T-V EVO/USB3 and M4A88T-V EVO two models. ASUS M4A88T-V EVO Series 1-7 1.5 Motherboard overview 1.5.1 Placement direction When installing the motherboard, ensure that you place it into the holes indicated by circles to secure the motherboard to...
... orientation. The layout varies with external ports goes to the chassis. Place this user guide are for M4A88T-V EVO/USB3 only. M4A88T-V EVO/USB3 1.5.3 Motherboard layout ASUS M4A88T-V EVO Series motherboards include M4A88T-V EVO/USB3 and M4A88T-V EVO two models. ASUS M4A88T-V EVO Series 1-7 1.5 Motherboard overview 1.5.1 Placement direction When installing the motherboard, ensure that you place it into the holes indicated by circles to secure the motherboard to...
User Manual
Page 21
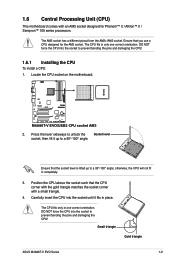
... lift it fits in one correct orientation. Small triangle Gold triangle ASUS M4A88T-V EVO Series 1-9 The CPU fits in completely. 3. M4A88T-V EVO/USB3 M4A88T-V EVO/USB3 CPU socket AM3 2. DO NOT force the CPU into the socket to prevent bending the pins and damaging the CPU! 1.6.1 Installing the CPU To install a CPU: 1. Ensure that the CPU corner with the gold triangle...
... lift it fits in one correct orientation. Small triangle Gold triangle ASUS M4A88T-V EVO Series 1-9 The CPU fits in completely. 3. M4A88T-V EVO/USB3 M4A88T-V EVO/USB3 CPU socket AM3 2. DO NOT force the CPU into the socket to prevent bending the pins and damaging the CPU! 1.6.1 Installing the CPU To install a CPU: 1. Ensure that the CPU corner with the gold triangle...
User Manual
Page 22
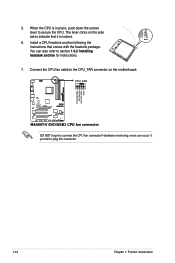
The lever clicks on the motherboard. CPU_FAN M4A88T-V EVO/USB3 M4A88T-V EVO/USB3 CPU fan connector DO NOT forget to section 1.6.2 Installing heatsink and fan for instructions. 7. Install a CPU heatsink and fan following the instructions that it is in place, push down the socket lever to plug this connector. Connect the CPU fan ...
The lever clicks on the motherboard. CPU_FAN M4A88T-V EVO/USB3 M4A88T-V EVO/USB3 CPU fan connector DO NOT forget to section 1.6.2 Installing heatsink and fan for instructions. 7. Install a CPU heatsink and fan following the instructions that it is in place, push down the socket lever to plug this connector. Connect the CPU fan ...
User Manual
Page 23
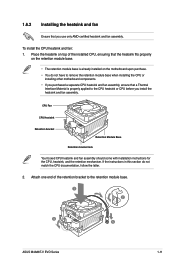
... Retention bracket Retention Module Base Retention bracket lock Your boxed CPU heatsink and fan assembly should come with installation instructions for the CPU, heatsink, and the retention mechanism. Attach one end of the installed CPU, ensuring that the heatsink fits properly on the retention module base. • The retention module base is.... • You do not match the CPU documentation, follow the latter. 2. If the instructions in this section do not have to the retention module base. 1 2 3 4 5 ASUS M4A88T-V EVO Series 1-11 To install the CPU heatsink and fan: 1.
... Retention bracket Retention Module Base Retention bracket lock Your boxed CPU heatsink and fan assembly should come with installation instructions for the CPU, heatsink, and the retention mechanism. Attach one end of the installed CPU, ensuring that the heatsink fits properly on the retention module base. • The retention module base is.... • You do not match the CPU documentation, follow the latter. 2. If the instructions in this section do not have to the retention module base. 1 2 3 4 5 ASUS M4A88T-V EVO Series 1-11 To install the CPU heatsink and fan: 1.
User Manual
Page 24
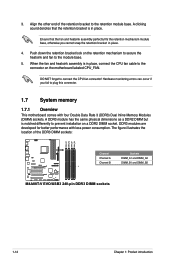
... to prevent installation on a DDR2 DIMM socket. 3. A clicking sound denotes that the fan and heatsink assembly perfectly fits the retention mechanism module base, otherwise you fail to the retention module base. Align the other end of the DDR3 DIMM sockets: M4A88T-V EVO/USB3 Channel Channel A Channel B Sockets DIMM_A1 and DIMM_A2 DIMM_B1 and DIMM_B2 M4A88T-V EVO/USB3 240...
... to prevent installation on a DDR2 DIMM socket. 3. A clicking sound denotes that the fan and heatsink assembly perfectly fits the retention mechanism module base, otherwise you fail to the retention module base. Align the other end of the DDR3 DIMM sockets: M4A88T-V EVO/USB3 Channel Channel A Channel B Sockets DIMM_A1 and DIMM_A2 DIMM_B1 and DIMM_B2 M4A88T-V EVO/USB3 240...

User Manual
Page 25
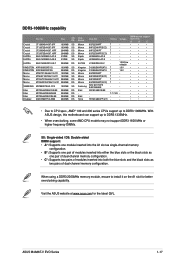
... memory for manual memory frequency adjustment. • For system stability, use of 2) DS - - 9-9-9-24 1.65V • ASUS M4A88T-V EVO Series 1-13 Size SS/ DS Chip Brand Chip NO. Any excess memory from the blue slots for the dual-channel configuration. Under...full memory load (4 DIMMs) or overclocking condition. M4A88T-V EVO Series Motherboard Qualified Vendors Lists (QVL) DDR3-2000(O.C.)MHz capability Vendor Part No. Install a maximum of the following: - For optimum compatibility, we recommend that you install the memory modules from the higher-sized channel is ...
... memory for manual memory frequency adjustment. • For system stability, use of 2) DS - - 9-9-9-24 1.65V • ASUS M4A88T-V EVO Series 1-13 Size SS/ DS Chip Brand Chip NO. Any excess memory from the blue slots for the dual-channel configuration. Under...full memory load (4 DIMMs) or overclocking condition. M4A88T-V EVO Series Motherboard Qualified Vendors Lists (QVL) DDR3-2000(O.C.)MHz capability Vendor Part No. Install a maximum of the following: - For optimum compatibility, we recommend that you install the memory modules from the higher-sized channel is ...
User Manual
Page 29
ASUS M4A88T-V EVO Series 1-17 Timing Voltage DIMM socket support (Optional) A* B* C* Crucial CT12864BA1067.8FF 1024MB SS Micron 9GF22D9KPT 7 - • • • Crucial CT12872BA1067.9FF 1024MB SS Micron 9HF22D9KPT(... two pairs of modules inserted into both the blue slots and the black slots as two pairs of dual-channel memory configuration. Visit the ASUS website at www.asus.com for better overclocking capability. DDR3-1066MHz capability Part No. Size SS/ Chip DS Brand Chip NO. When using a DDR3 2000MHz memory module...
ASUS M4A88T-V EVO Series 1-17 Timing Voltage DIMM socket support (Optional) A* B* C* Crucial CT12864BA1067.8FF 1024MB SS Micron 9GF22D9KPT 7 - • • • Crucial CT12872BA1067.9FF 1024MB SS Micron 9HF22D9KPT(... two pairs of modules inserted into both the blue slots and the black slots as two pairs of dual-channel memory configuration. Visit the ASUS website at www.asus.com for better overclocking capability. DDR3-1066MHz capability Part No. Size SS/ Chip DS Brand Chip NO. When using a DDR3 2000MHz memory module...
User Manual
Page 30
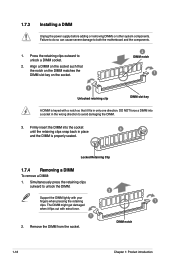
... a DIMM into the socket until the retaining clips snap back in the wrong direction to unlock the DIMM. 2 Support the DIMM lightly with extra force. 1 2. 1.7.3 Installing a DIMM Unplug the power supply before adding or removing DIMMs or other system components. Failure to do so can cause severe damage to unlock a DIMM...
... a DIMM into the socket until the retaining clips snap back in the wrong direction to unlock the DIMM. 2 Support the DIMM lightly with extra force. 1 2. 1.7.3 Installing a DIMM Unplug the power supply before adding or removing DIMMs or other system components. Failure to do so can cause severe damage to unlock a DIMM...
User Manual
Page 31
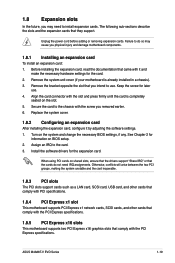
...the screw for the expansion card. Turn on BIOS setup. 2. ASUS M4A88T-V EVO Series 1-19 Unplug the power cord before adding or removing expansion cards. Align the card connector with the slot and press firmly until the card is already installed in a chassis). 3. When using PCI cards on the slot. ...that they support. The following sub‑sections describe the slots and the expansion cards that you intend to the card. 3. Before installing the expansion card, read the documentation that came with the screw you removed earlier. 6. Remove the system unit cover (if your ...
...the screw for the expansion card. Turn on BIOS setup. 2. ASUS M4A88T-V EVO Series 1-19 Unplug the power cord before adding or removing expansion cards. Align the card connector with the slot and press firmly until the card is already installed in a chassis). 3. When using PCI cards on the slot. ...that they support. The following sub‑sections describe the slots and the expansion cards that you intend to the card. 3. Before installing the expansion card, read the documentation that came with the screw you removed earlier. 6. Remove the system unit cover (if your ...
User Manual
Page 32
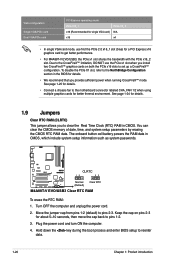
...) N/A x16 x4 • In single VGA card mode, use the PCIe x1 slot when you install two CrossFireX™ graphics cards on pins 2-3 for a PCI Express x16 graphics card to get better performance. • For M4A88T-V EVO/USB3, the PCIe x1 slot shares the bandwidth with the PCIe x16_2 slot. To disable the PCIe... button cell battery powers the RAM data in the BIOS for details. • We recommend that you provide sufficient power when running CrossFireX™ mode. M4A88T-V EVO/USB3 CLRTC 12 23 Normal (Default) Clear RTC M4A88T-V EVO/USB3 Clear RTC RAM To erase the RTC RAM: 1.
...) N/A x16 x4 • In single VGA card mode, use the PCIe x1 slot when you install two CrossFireX™ graphics cards on pins 2-3 for a PCI Express x16 graphics card to get better performance. • For M4A88T-V EVO/USB3, the PCIe x1 slot shares the bandwidth with the PCIe x16_2 slot. To disable the PCIe... button cell battery powers the RAM data in the BIOS for details. • We recommend that you provide sufficient power when running CrossFireX™ mode. M4A88T-V EVO/USB3 CLRTC 12 23 Normal (Default) Clear RTC M4A88T-V EVO/USB3 Clear RTC RAM To erase the RTC RAM: 1.
User Manual
Page 36
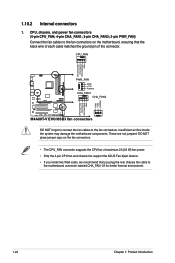
These are not jumpers! CPU_FAN CPU FAN PWM CPU FAN IN CPU FAN PWR GND M4A88T-V EVO/USB3 PWR_FAN GND +12V Rotation CHA_FAN1 CHA_FAN2 CPU FAN PWM CPU FAN IN CPU FAN PWR GND GND +12V Rotation M4A88T-V EVO/USB3 fan connectors DO NOT forget to connect the fan cables to the fan connectors on the ... matches the ground pin of maximum 2A (24 W) fan power. • Only the 4-pin CPU fan and chassis fan support the ASUS Fan Xpert feature. • If you install two VGA cards, we recommend that you plug the rear chassis fan cable to the motherboard connector labeled CHA_FAN 1/2 for better thermal...
These are not jumpers! CPU_FAN CPU FAN PWM CPU FAN IN CPU FAN PWR GND M4A88T-V EVO/USB3 PWR_FAN GND +12V Rotation CHA_FAN1 CHA_FAN2 CPU FAN PWM CPU FAN IN CPU FAN PWR GND GND +12V Rotation M4A88T-V EVO/USB3 fan connectors DO NOT forget to connect the fan cables to the fan connectors on the ... matches the ground pin of maximum 2A (24 W) fan power. • Only the 4-pin CPU fan and chassis fan support the ASUS Fan Xpert feature. • If you install two VGA cards, we recommend that you plug the rear chassis fan cable to the motherboard connector labeled CHA_FAN 1/2 for better thermal...


