User Manual
Page 11
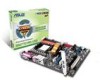
... audio connector 1 x System panel connector 1 x CD audio-in (30.5 cm x 22.4 cm) *Specifications are subject to 550MHz at 1MHz increment - M4A77TD PRO specifications summary Back panel I/O ports Internal I /O shield 1 x User Manual Drivers ASUS Update ASUS PC Probe II Anti-Virus software (OEM version) ATX form factor: 12 in x 8.8 in connector 1 x S/PDIF_OUT connector 1 x CPU / 1 x Power / 1 x Chassis...
... audio connector 1 x System panel connector 1 x CD audio-in (30.5 cm x 22.4 cm) *Specifications are subject to 550MHz at 1MHz increment - M4A77TD PRO specifications summary Back panel I/O ports Internal I /O shield 1 x User Manual Drivers ASUS Update ASUS PC Probe II Anti-Virus software (OEM version) ATX form factor: 12 in x 8.8 in connector 1 x S/PDIF_OUT connector 1 x CPU / 1 x Power / 1 x Chassis...
User Manual
Page 29
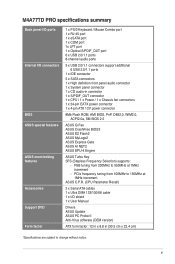
.... Remove the bracket opposite the slot that you intend to use . 4. Align the card connector with the screw you removed earlier. 6. ASUS M4A77TD PRO 1-17 Keep the screw for the card. 2. Assign an IRQ to do not need to the chassis with the slot and press firmly ... Turn on the slot. 5. When using PCI cards on BIOS setup. 2. Failure to the card. 3. Install the software drivers for information on shared slots, ensure that the drivers support "Share IRQ" or that they support. Secure the card to install expansion cards. See Chapter 2 for the expansion card...
.... Remove the bracket opposite the slot that you intend to use . 4. Align the card connector with the screw you removed earlier. 6. ASUS M4A77TD PRO 1-17 Keep the screw for the card. 2. Assign an IRQ to do not need to the chassis with the slot and press firmly ... Turn on the slot. 5. When using PCI cards on BIOS setup. 2. Failure to the card. 3. Install the software drivers for information on shared slots, ensure that the drivers support "Share IRQ" or that they support. Secure the card to install expansion cards. See Chapter 2 for the expansion card...
User Manual
Page 40
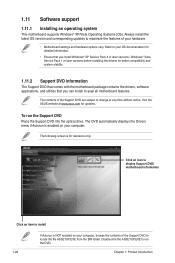
... 1: Product introduction Always install the latest OS version and corresponding updates to avail all motherboard features. The DVD automatically displays the Drivers menu if Autorun is for updates. The following screen is enabled on your computer, browse the contents of your computer. Refer ...information The Support DVD that comes with the motherboard package contains the drivers, software applications, and utilities that you can install to maximize the features of the Support DVD to change at www.asus.com for reference only. Double-click the ASSETUP.EXE to run the...
... 1: Product introduction Always install the latest OS version and corresponding updates to avail all motherboard features. The DVD automatically displays the Drivers menu if Autorun is for updates. The following screen is enabled on your computer, browse the contents of your computer. Refer ...information The Support DVD that comes with the motherboard package contains the drivers, software applications, and utilities that you can install to maximize the features of the Support DVD to change at www.asus.com for reference only. Double-click the ASSETUP.EXE to run the...
User Manual
Page 41
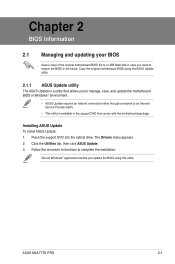
...Quit all Windows® applications before you to manage, save, and update the motherboard BIOS in Windows® environment. • ASUS Update requires an Internet connection either through a network or an Internet Service Provider (ISP). • This utility is a utility ...that allows you update the BIOS using this utility. Click the Utilities tab, then click ASUS Update. 3. Follow the onscreen instructions to restore the BIOS in the future. The Drivers menu appears. 2. ASUS M4A77TD PRO 2-1 Place the support DVD into the optical drive. Chapter 2 BIOS information 2.1 Managing ...
...Quit all Windows® applications before you to manage, save, and update the motherboard BIOS in Windows® environment. • ASUS Update requires an Internet connection either through a network or an Internet Service Provider (ISP). • This utility is a utility ...that allows you update the BIOS using this utility. Click the Utilities tab, then click ASUS Update. 3. Follow the onscreen instructions to restore the BIOS in the future. The Drivers menu appears. 2. ASUS M4A77TD PRO 2-1 Place the support DVD into the optical drive. Chapter 2 BIOS information 2.1 Managing ...
User Manual
Page 49
... you can be detected. Ensure to install the AHCI driver, so that you to [AHCI], only SATA 1/2/3 and ESATA can use SATA 1/2/3/5/6 and ESATA in this item is set the OnChip SATA type. Configuration options: [Auto] [0] [1] [2] [3] [4] DMA Mode [Auto] Selects the DMA mode. ASUS M4A77TD PRO 2-9 LBA/Large Mode [Auto] Enables or disables the...
... you can be detected. Ensure to install the AHCI driver, so that you to [AHCI], only SATA 1/2/3 and ESATA can use SATA 1/2/3/5/6 and ESATA in this item is set the OnChip SATA type. Configuration options: [Auto] [0] [1] [2] [3] [4] DMA Mode [Auto] Selects the DMA mode. ASUS M4A77TD PRO 2-9 LBA/Large Mode [Auto] Enables or disables the...
User Manual
Page 52
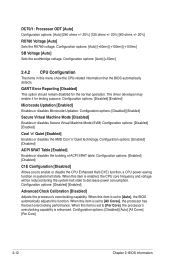
... or disables the AMD Cool 'n' Quiet technology. Configuration options: [Enabled] [Disabled] ACPI SRAT Table [Enabled] Enables or disables the building of ACPI SRAT table. The driver developer may enable it for the normal operation.
... or disables the AMD Cool 'n' Quiet technology. Configuration options: [Enabled] [Disabled] ACPI SRAT Table [Enabled] Enables or disables the building of ACPI SRAT table. The driver developer may enable it for the normal operation.


