User Manual
Page 6
...4-13 4.4.1 RAID definitions 4-13 4.4.2 Installing Serial ATA hard disks 4-14 4.4.3 Setting the RAID item in BIOS 4-14 4.4.4 AMD® Option ROM Utility 4-15 4.5 Creating a RAID driver disk 4-18 4.5.1 Creating a RAID driver disk without entering the OS 4-18 4.5.2 Creating a RAID/SATA driver disk in Windows 4-18 Chapter 5: ATI® CrossFireX™ technology support 5.1 ATI® CrossFireX™ technology 5-1 5.1.1 Requirements 5-1 5.1.2 Before you begin 5-1 5.1.3 Installing CrossFireX™ graphics cards 5-2 5.1.4 Installing the device drivers 5-3 5.1.5 Enabling the...
...4-13 4.4.1 RAID definitions 4-13 4.4.2 Installing Serial ATA hard disks 4-14 4.4.3 Setting the RAID item in BIOS 4-14 4.4.4 AMD® Option ROM Utility 4-15 4.5 Creating a RAID driver disk 4-18 4.5.1 Creating a RAID driver disk without entering the OS 4-18 4.5.2 Creating a RAID/SATA driver disk in Windows 4-18 Chapter 5: ATI® CrossFireX™ technology support 5.1 ATI® CrossFireX™ technology 5-1 5.1.1 Requirements 5-1 5.1.2 Before you begin 5-1 5.1.3 Installing CrossFireX™ graphics cards 5-2 5.1.4 Installing the device drivers 5-3 5.1.5 Enabling the...
User Manual
Page 18
... your favorite settings. Q-Fan 2 ASUS Q-Fan 2 technology intelligently adjusts both CPU fan and chassis fan speeds according to system loading to the motherboard. This unique module eliminates the trouble of the north bridge chipset through high efficient heat-exchange. Fanless Design-Stylish Heatsink Design The streamline-shaped heatsink features 0-dB thermal solution that allows users to install computer components, update the BIOS or back up your house. ASUS EZ DIY ASUS EZ DIY...
... your favorite settings. Q-Fan 2 ASUS Q-Fan 2 technology intelligently adjusts both CPU fan and chassis fan speeds according to system loading to the motherboard. This unique module eliminates the trouble of the north bridge chipset through high efficient heat-exchange. Fanless Design-Stylish Heatsink Design The streamline-shaped heatsink features 0-dB thermal solution that allows users to install computer components, update the BIOS or back up your house. ASUS EZ DIY ASUS EZ DIY...

User Manual
Page 42
... before you change the jumper setting. Set to pins 1-2 to halt. Chapter 2 Pins 2-3 (Default) Pins 1-2 (OV Enabled) OV_CPU 0.80V - 1.70V up to 1.90V • Before you install a new CPU and have not booted for extra-high overvoltage ability, use the BIOS items introduced in BIOS. For system failure due to the wrong setting of this jumper. • Refer to 3.5 Ai Tweaker menu for more information about the CPU overvoltage setting. • DO...
... before you change the jumper setting. Set to pins 1-2 to halt. Chapter 2 Pins 2-3 (Default) Pins 1-2 (OV Enabled) OV_CPU 0.80V - 1.70V up to 1.90V • Before you install a new CPU and have not booted for extra-high overvoltage ability, use the BIOS items introduced in BIOS. For system failure due to the wrong setting of this jumper. • Refer to 3.5 Ai Tweaker menu for more information about the CPU overvoltage setting. • DO...

User Manual
Page 59
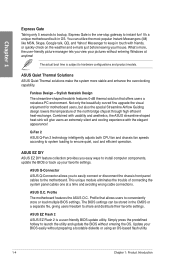
... disk or USB flash disk. 3. Inappropriate settings of BIOS, DO NOT manually update the BIOS. Chapter 3 ASUS M4A78-E 3-1 However, BIOS updating is no problem using a bootable floppy disk or the motherboard support DVD when the BIOS file fails or gets corrupted. Inappropriate BIOS updating may result to instability or failure to boot. ASUS EZ Flash 2: Updates the BIOS using the ASUS Update utility. Refer to ensure optimum performance. If there is potentially risky. ASUS CrashFree BIOS 3: Updates the BIOS using the current version of the BIOS may result in Windows...
... disk or USB flash disk. 3. Inappropriate settings of BIOS, DO NOT manually update the BIOS. Chapter 3 ASUS M4A78-E 3-1 However, BIOS updating is no problem using a bootable floppy disk or the motherboard support DVD when the BIOS file fails or gets corrupted. Inappropriate BIOS updating may result to instability or failure to boot. ASUS EZ Flash 2: Updates the BIOS using the ASUS Update utility. Refer to ensure optimum performance. If there is potentially risky. ASUS CrashFree BIOS 3: Updates the BIOS using the current version of the BIOS may result in Windows...
User Manual
Page 60
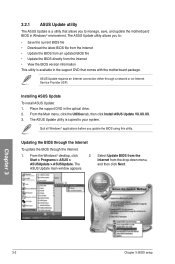
Place the support DVD in the support DVD that allows you to manage, save, and update the motherboard BIOS in Windows® environment. Updating the BIOS through the Internet To update the BIOS through a network or an Internet Service Provider (ISP). Chapter 3 3-2 Chapter 3: BIOS setup ASUS Update requires an Internet connection either through the Internet: 1. The ASUS Update utility is a utility that comes with the motherboard package. Start > Programs > ASUS > ASUSUpdate > ASUSUpdate. Installing ASUS Update To install ASUS Update: 1. Quit all Windows® applications...
Place the support DVD in the support DVD that allows you to manage, save, and update the motherboard BIOS in Windows® environment. Updating the BIOS through the Internet To update the BIOS through a network or an Internet Service Provider (ISP). Chapter 3 3-2 Chapter 3: BIOS setup ASUS Update requires an Internet connection either through the Internet: 1. The ASUS Update utility is a utility that comes with the motherboard package. Start > Programs > ASUS > ASUSUpdate > ASUSUpdate. Installing ASUS Update To install ASUS Update: 1. Quit all Windows® applications...

User Manual
Page 67
... presence of floppy drive installed. Main BIOS SETUP UTILITY SATA 1 Device : Hard Disk Vendor : HDT722516DLA380 Size 164.7GB LBA Mode : Supported Block Mode : 16Sectors PIO Mode : 4 Async DMA : MultiWord DMA-2 Ultra DMA : Ultra DMA-6 SMART Monitoring:Supported LBA/Large Mode [Auto] Block(Multi-sector Transfer)M [Auto] PIO Mode [Auto] DMA Mode [Auto] SMART Monitoring [Auto] 32Bit Data Transfer [Enabled] Select the type of the basic system information. 3.4 Main menu When you enter the BIOS Setup program, the Main menu screen appears...
... presence of floppy drive installed. Main BIOS SETUP UTILITY SATA 1 Device : Hard Disk Vendor : HDT722516DLA380 Size 164.7GB LBA Mode : Supported Block Mode : 16Sectors PIO Mode : 4 Async DMA : MultiWord DMA-2 Ultra DMA : Ultra DMA-6 SMART Monitoring:Supported LBA/Large Mode [Auto] Block(Multi-sector Transfer)M [Auto] PIO Mode [Auto] DMA Mode [Auto] SMART Monitoring [Auto] 32Bit Data Transfer [Enabled] Select the type of the basic system information. 3.4 Main menu When you enter the BIOS Setup program, the Main menu screen appears...
User Manual
Page 69
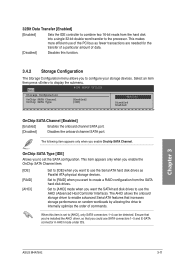
... a single 32-bit double word transfer to the processor. Set to [RAID] when you want the SATA hard disk drives to use SATA connectors 1-5 and E-SATA connector in AHCI mode under OS. The AHCI allows the onboard storage driver to enable advanced Serial ATA features that you to set to [AHCI], only SATA connectors 1-4 can be detected. Main BIOS SETUP UTILITY Storage Configuration OnChip SATA Channel OnChip SATA Type [Enabled] [IDE] Options Disabled Enabled OnChip SATA Channel [Enabled] [Enabled] Enables the onboard channel SATA port. [Disabled] Disables the onboard channel SATA port...
... a single 32-bit double word transfer to the processor. Set to [RAID] when you want the SATA hard disk drives to use SATA connectors 1-5 and E-SATA connector in AHCI mode under OS. The AHCI allows the onboard storage driver to enable advanced Serial ATA features that you to set to [AHCI], only SATA connectors 1-4 can be detected. Main BIOS SETUP UTILITY Storage Configuration OnChip SATA Channel OnChip SATA Type [Enabled] [IDE] Options Disabled Enabled OnChip SATA Channel [Enabled] [Enabled] Enables the onboard channel SATA port. [Disabled] Disables the onboard channel SATA port...

User Manual
Page 70
BIOS SETUP UTILITY Main Ai Tweaker Advanced Power Boot Tools Exit Configure System Frequency/Voltage AI Overclocking Tuner [Auto] DRAM Frequency Control [Auto] HT Link Speed [Auto] ******* Please key in this chapter vary depending on the CPU and DIMM model you to individually set overclocking parameters. Chapter 3 3-12 Chapter 3: BIOS setup Main BIOS SETUP UTILITY BIOS Information Version : 0305 Build Date: 01/08/09 Processor Type : AMD Phenom(tm) 9550 Quad-Core Processor Speed : 2200MHz System Memory Usable Size : 1792MB 3.5 Ai ...
BIOS SETUP UTILITY Main Ai Tweaker Advanced Power Boot Tools Exit Configure System Frequency/Voltage AI Overclocking Tuner [Auto] DRAM Frequency Control [Auto] HT Link Speed [Auto] ******* Please key in this chapter vary depending on the CPU and DIMM model you to individually set overclocking parameters. Chapter 3 3-12 Chapter 3: BIOS setup Main BIOS SETUP UTILITY BIOS Information Version : 0305 Build Date: 01/08/09 Processor Type : AMD Phenom(tm) 9550 Quad-Core Processor Speed : 2200MHz System Memory Usable Size : 1792MB 3.5 Ai ...

User Manual
Page 72
Configuration options: [Channel] [Chip Select] Chapter 3 3-14 Chapter 3: BIOS setup Configuration options: [Disabled] [Enabled] Power Down Mode [Channel] Allows you enable the previous item. This item appears only when you to set the AI Overclocking Tuner item to [Manual]. 3.5.8 Memory Configuration Ai Tweaker BIOS SETUP UTILITY Memory Configuration Bank Interleaving Channel Interleaving MemClk Tristate C3/ATLVID Memory Hole Remapping DCT Unganged Mode Power Down Enable [Auto] [XOR of Address bit] [Disabled] [Enabled] [Auto] [Disabled] Enable Bank ...
Configuration options: [Channel] [Chip Select] Chapter 3 3-14 Chapter 3: BIOS setup Configuration options: [Disabled] [Enabled] Power Down Mode [Channel] Allows you enable the previous item. This item appears only when you to set the AI Overclocking Tuner item to [Manual]. 3.5.8 Memory Configuration Ai Tweaker BIOS SETUP UTILITY Memory Configuration Bank Interleaving Channel Interleaving MemClk Tristate C3/ATLVID Memory Hole Remapping DCT Unganged Mode Power Down Enable [Auto] [XOR of Address bit] [Disabled] [Enabled] [Auto] [Disabled] Enable Bank ...
User Manual
Page 76
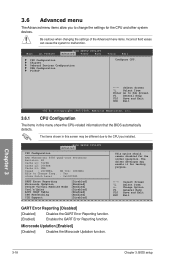
... operation. BIOS SETUP UTILITY Advanced CPU Configuration AMD Phenom(tm) 9550 Quad-Core Processor Revision: B3 Cache L1: 512KB Cache L2: 2048KB Cache L3: 2MB Speed : 2200MHz, NB Clk: 1800MHz Able to Change Freq. : Yes uCode Patch Level : 0x100008D GART Error Reporting Microcode Updation Secure Virtual Machine Mode Cool'n'Quiet ACPI SRAT Table CPU Prefetching C1E Support [Disabled] [Enabled] [Enabled] [Disabled] [Enabled] [Enabled] [Disabled] This option should remain disabled for the CPU and other system devices. Change Option F1 General...
... operation. BIOS SETUP UTILITY Advanced CPU Configuration AMD Phenom(tm) 9550 Quad-Core Processor Revision: B3 Cache L1: 512KB Cache L2: 2048KB Cache L3: 2MB Speed : 2200MHz, NB Clk: 1800MHz Able to Change Freq. : Yes uCode Patch Level : 0x100008D GART Error Reporting Microcode Updation Secure Virtual Machine Mode Cool'n'Quiet ACPI SRAT Table CPU Prefetching C1E Support [Disabled] [Enabled] [Enabled] [Disabled] [Enabled] [Enabled] [Disabled] This option should remain disabled for the CPU and other system devices. Change Option F1 General...

User Manual
Page 78
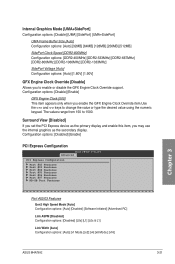
.... Set to [User] to adjust the DRAM BG Scrub sub-item manually. RS780D Configuration BIOS SETUP UTILITY Advanced NorthBridge2 Chipset Configuration Internal Graphics Configuration PCI Express Configuration Primary Video Controller [PCI-E] Internal Graphics Conf Internal Graphics Configuration BIOS SETUP UTILITY Advanced Internal Graphics Configuration Internal Graphics Mode UMA Frame Buffer Size SidePort Clock Speed SidePort Voltage GFX Engine Clock Override [UMA+SidePort] [Auto] [DDR2-800MHz] [Auto] [Disable] Surround View [Auto] Options Disable UMA...
.... Set to [User] to adjust the DRAM BG Scrub sub-item manually. RS780D Configuration BIOS SETUP UTILITY Advanced NorthBridge2 Chipset Configuration Internal Graphics Configuration PCI Express Configuration Primary Video Controller [PCI-E] Internal Graphics Conf Internal Graphics Configuration BIOS SETUP UTILITY Advanced Internal Graphics Configuration Internal Graphics Mode UMA Frame Buffer Size SidePort Clock Speed SidePort Voltage GFX Engine Clock Override [UMA+SidePort] [Auto] [DDR2-800MHz] [Auto] [Disable] Surround View [Auto] Options Disable UMA...
User Manual
Page 79
... item.Use the and keys to 1500. Configuration options: [Disabled] [Enable] PCI Express Configuration BIOS SETUP UTILITY Advanced PCI Express Configuration Port #02 Features Port #03 Features Port #04 Features Port #05 Features Port #06 Features Port #07 Features NB-SB Port Features Port #02/03 Features Gen2 High Speed Mode [Auto] Configuration options: [Auto] [Disabled] [Software Initiated] [Advertised RC] Link ASPM [Disabled] Configuration options: [Disabled] [L0s] [L1] [L0s & L1] Link Width [Auto] Configuration options: [Auto] [x1 Mode.] [x2] [x4] [x8 Mode.] [x16] Chapter 3 ASUS M4A78...
... item.Use the and keys to 1500. Configuration options: [Disabled] [Enable] PCI Express Configuration BIOS SETUP UTILITY Advanced PCI Express Configuration Port #02 Features Port #03 Features Port #04 Features Port #05 Features Port #06 Features Port #07 Features NB-SB Port Features Port #02/03 Features Gen2 High Speed Mode [Auto] Configuration options: [Auto] [Disabled] [Software Initiated] [Advertised RC] Link ASPM [Disabled] Configuration options: [Disabled] [L0s] [L1] [L0s & L1] Link Width [Auto] Configuration options: [Auto] [x1 Mode.] [x2] [x4] [x8 Mode.] [x16] Chapter 3 ASUS M4A78...
User Manual
Page 82
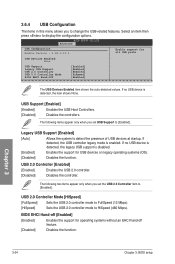
...all USB ports USB Devices Enabled None USB Support Legacy USB Support USB 2.0 Controller USB 2.0 Controller Mode BIOS EHCI Hand-Off [Enabled] [Enabled] [Enabled] [HiSpeed] [Enabled] The USB Devices Enabled item shows the auto-detected values. The following two items appear only when you set the USB 2.0 Controller item to detect the presence of USB devices at startup. Legacy USB Support [Enabled] [Auto] Allows the system to [Enabled]. The following items appear only when you set USB Support to change the USB-related features. BIOS SETUP UTILITY Advanced USB...
...all USB ports USB Devices Enabled None USB Support Legacy USB Support USB 2.0 Controller USB 2.0 Controller Mode BIOS EHCI Hand-Off [Enabled] [Enabled] [Enabled] [HiSpeed] [Enabled] The USB Devices Enabled item shows the auto-detected values. The following two items appear only when you set the USB 2.0 Controller item to detect the presence of USB devices at startup. Legacy USB Support [Enabled] [Auto] Allows the system to [Enabled]. The following items appear only when you set USB Support to change the USB-related features. BIOS SETUP UTILITY Advanced USB...
User Manual
Page 89
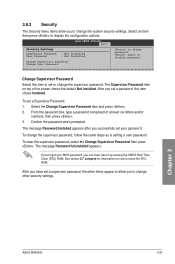
...display the configuration options. Confirm the password when prompted. BIOS SETUP UTILITY Boot Security Settings Supervisor Password : Not Installed User Password : Not Installed Change Supervisor Password Change User Passward to change the supervisor password, follow the same steps as in setting a user password. From the password box, type a password composed of the screen shows the default Not Installed. If you forget your password. Select the Change Supervisor Password item and press . 2. Select an item then press to disable password. After you can clear clear...
...display the configuration options. Confirm the password when prompted. BIOS SETUP UTILITY Boot Security Settings Supervisor Password : Not Installed User Password : Not Installed Change Supervisor Password Change User Passward to change the supervisor password, follow the same steps as in setting a user password. From the password box, type a password composed of the screen shows the default Not Installed. If you forget your password. Select the Change Supervisor Password item and press . 2. Select an item then press to disable password. After you can clear clear...
User Manual
Page 97
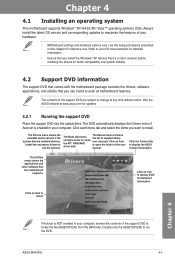
... install the Windows® XP Service Pack 2 or later versions before installing the drivers for reference only. Click each menu tab and select the items you can install to your computer. The Manual menu contains the list of the support DVD to install Chapter 4 If Autorun is enabled in your hardware. • Motherboard settings and hardware options vary. Click an icon to display DVD/ motherboard information Click an item to locate the file...
... install the Windows® XP Service Pack 2 or later versions before installing the drivers for reference only. Click each menu tab and select the items you can install to your computer. The Manual menu contains the list of the support DVD to install Chapter 4 If Autorun is enabled in your hardware. • Motherboard settings and hardware options vary. Click an icon to display DVD/ motherboard information Click an item to locate the file...
User Manual
Page 102
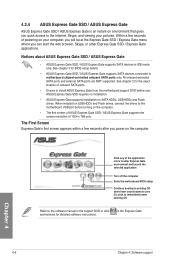
... ports are NOT supported. See chapter 2 for detailed software instructions. See chapter 3 for BIOS setup details. • ASUS Express Gate SSD / ASUS Express Gate supports SATA devices connected to the software manual in the support DVD or click environment for the exact location of powering on USB HDDs and Flash drives, connect the drives to zero (0); The First Screen Express Gate's first screen appears within a few seconds of onboard SATA ports. • Ensure to install ASUS Express Gate from the motherboard support DVD before turning on SATA HDDs, USB HDDs and Flash drives...
... ports are NOT supported. See chapter 2 for detailed software instructions. See chapter 3 for BIOS setup details. • ASUS Express Gate SSD / ASUS Express Gate supports SATA devices connected to the software manual in the support DVD or click environment for the exact location of powering on USB HDDs and Flash drives, connect the drives to zero (0); The First Screen Express Gate's first screen appears within a few seconds of onboard SATA ports. • Ensure to install ASUS Express Gate from the motherboard support DVD before turning on SATA HDDs, USB HDDs and Flash drives...
User Manual
Page 110
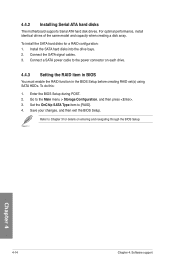
... to the power connector on entering and navigating through the BIOS Setup. 4.4.2 Installing Serial ATA hard disks The motherboard supports Serial ATA hard disk drives. Connect a SATA power cable to Chapter 3 for a RAID configuration: 1. Connect the SATA signal cables. 3. To install the SATA hard disks for details on each drive. 4.4.3 Setting the RAID item in BIOS You must enable the RAID function in the BIOS Setup before creating RAID set(s) using SATA HDDs. Set the OnChip SATA Type item to the Main menu > Storage Configuration, and then press . 3. Save your changes, and then...
... to the power connector on entering and navigating through the BIOS Setup. 4.4.2 Installing Serial ATA hard disks The motherboard supports Serial ATA hard disk drives. Connect a SATA power cable to Chapter 3 for a RAID configuration: 1. Connect the SATA signal cables. 3. To install the SATA hard disks for details on each drive. 4.4.3 Setting the RAID item in BIOS You must enable the RAID function in the BIOS Setup before creating RAID set(s) using SATA HDDs. Set the OnChip SATA Type item to the Main menu > Storage Configuration, and then press . 3. Save your changes, and then...
User Manual
Page 114
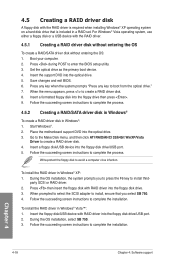
...Place the motherboard support DVD into the floppy drive then press . 9. Insert a formatted floppy disk into the optical drive. 3. 4.5 Creating a RAID driver disk A floppy disk with the RAID driver is included in Windows®: 1. For Windows® Vista operating system, use either a floppy disk or a USB device with RAID driver into the floppy disk drive. 3. Boot your computer. 2. When the menu appears, press to complete the installation. Press then insert the floppy disk with RAID driver into the floppy disk drive/USB port. 2. Follow the succeeding screen instructions to...
...Place the motherboard support DVD into the floppy drive then press . 9. Insert a formatted floppy disk into the optical drive. 3. 4.5 Creating a RAID driver disk A floppy disk with the RAID driver is included in Windows®: 1. For Windows® Vista operating system, use either a floppy disk or a USB device with RAID driver into the floppy disk drive. 3. Boot your computer. 2. When the menu appears, press to complete the installation. Press then insert the floppy disk with RAID driver into the floppy disk drive/USB port. 2. Follow the succeeding screen instructions to...
User Manual
Page 119
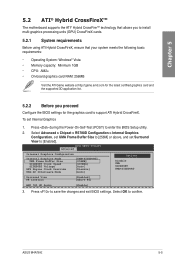
...-board graphics card RAM: 256MB Visit the ATI Game website at http://game.amd.com for the latest certified graphics card and the supported 3D application list. 5.2.2 Before you proceed Configure the BIOS settings for the graphics card to confirm. BIOS SETUP UTILITY Advanced Internal Graphics Configuration Internal Graphics Mode UMA Frame Buffer Size SIDEPORT Clock Speed SIDEPORT Voltage GFX Engine Clock Override UMA-SP Interleave Mode [UMA+SIDEPORT] [256MB] [667MHz] [Auto] [Disable] [Auto] Options Disable UMA SIDEPORT UMA+SIDEPORT Surround View FB Location [Enabled...
...-board graphics card RAM: 256MB Visit the ATI Game website at http://game.amd.com for the latest certified graphics card and the supported 3D application list. 5.2.2 Before you proceed Configure the BIOS settings for the graphics card to confirm. BIOS SETUP UTILITY Advanced Internal Graphics Configuration Internal Graphics Mode UMA Frame Buffer Size SIDEPORT Clock Speed SIDEPORT Voltage GFX Engine Clock Override UMA-SP Interleave Mode [UMA+SIDEPORT] [256MB] [667MHz] [Auto] [Disable] [Auto] Options Disable UMA SIDEPORT UMA+SIDEPORT Surround View FB Location [Enabled...
User Manual
Page 120
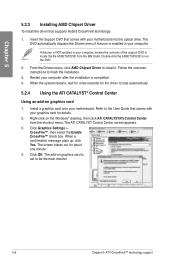
... onscreen instructions to install it. The ATI CATALYST Control Center screen appears. 3. The screen blacks out for the driver to load automatically. 5.2.4 Using the ATI CATALYST® Control Center Using an add-on graphics card 1. If Autorun is set to locate the file ASSETUP.EXE from the shortcut menu. Restart your computer after the installation is enabled in your computer, browse the contents of the support DVD to be the main monitor...
... onscreen instructions to install it. The ATI CATALYST Control Center screen appears. 3. The screen blacks out for the driver to load automatically. 5.2.4 Using the ATI CATALYST® Control Center Using an add-on graphics card 1. If Autorun is set to locate the file ASSETUP.EXE from the shortcut menu. Restart your computer after the installation is enabled in your computer, browse the contents of the support DVD to be the main monitor...


