
User Manual
Page 4
... computer 3-2 3.2.1 Using the OS shut down function 3-2 3.2.2 Using the dual function power switch 3-2 Chapter 4: BIOS setup 4.1 Managing and updating your BIOS 4-1 4.1.1 ASUS Update utility 4-1 4.1.2 Creating a bootable floppy disk 4-4 4.1.3 ASUS EZ Flash 2 utility 4-5 4.1.4 Updating the BIOS 4-6 4.1.5 Saving the current BIOS file 4-8 4.2 BIOS setup program 4-9 4.2.1 BIOS menu screen 4-10 4.2.2 Menu bar 4-10 4.2.3 Legend bar 4-11 4.2.4 Menu items 4-11 4.2.5 Sub-menu...
... computer 3-2 3.2.1 Using the OS shut down function 3-2 3.2.2 Using the dual function power switch 3-2 Chapter 4: BIOS setup 4.1 Managing and updating your BIOS 4-1 4.1.1 ASUS Update utility 4-1 4.1.2 Creating a bootable floppy disk 4-4 4.1.3 ASUS EZ Flash 2 utility 4-5 4.1.4 Updating the BIOS 4-6 4.1.5 Saving the current BIOS file 4-8 4.2 BIOS setup program 4-9 4.2.1 BIOS menu screen 4-10 4.2.2 Menu bar 4-10 4.2.3 Legend bar 4-11 4.2.4 Menu items 4-11 4.2.5 Sub-menu...
User Manual
Page 9
... you have been added by your dealer. Refer to change system settings through the BIOS Setup menus. It includes description of the switches, jumpers, and connectors on ASUS hardware and software products. These documents are also provided. • Chapter 5: Software... support This chapter describes the contents of shutting down the system. • Chapter 4: BIOS setup This chapter tells how to the ASUS contact information. 2. ASUS websites The ASUS website provides updated information on the motherboard. • Chapter 3: Powering up This chapter describes the ...
... you have been added by your dealer. Refer to change system settings through the BIOS Setup menus. It includes description of the switches, jumpers, and connectors on ASUS hardware and software products. These documents are also provided. • Chapter 5: Software... support This chapter describes the contents of shutting down the system. • Chapter 4: BIOS setup This chapter tells how to the ASUS contact information. 2. ASUS websites The ASUS website provides updated information on the motherboard. • Chapter 3: Powering up This chapter describes the ...
User Manual
Page 13
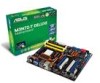
M3N72-D specifications summary Rear panel I/O ports 1 x PS/2 keyboard port (purple) 1 x S/PDIF Out (Coaxial) 1 x HDMI Out 1 x IEEE 1394a port 1 x LAN (RJ-45) 6 x USB 2.0/1.1 8-channel audio I/O Internal I/O connectors 3 x ... in 1 x 24-pin ATX Power connector 1 x 4-pin ATX 12V Power connector 1 x System Panel (Q-Connector) BIOS features 8 Mb Flash ROM, Award BIOS, PnP, DMI 2.0, WfM2.0, SM BIOS 2.5, ACPI 2.0, ASUS EZ Flash 2 Support DVD contents Drivers Express Gate ASUS PC Probe II ASUS Update Anti-virus Utility (OEM version) Form factor ATX form factor: 12 in x 9.6 in (30...
M3N72-D specifications summary Rear panel I/O ports 1 x PS/2 keyboard port (purple) 1 x S/PDIF Out (Coaxial) 1 x HDMI Out 1 x IEEE 1394a port 1 x LAN (RJ-45) 6 x USB 2.0/1.1 8-channel audio I/O Internal I/O connectors 3 x ... in 1 x 24-pin ATX Power connector 1 x 4-pin ATX 12V Power connector 1 x System Panel (Q-Connector) BIOS features 8 Mb Flash ROM, Award BIOS, PnP, DMI 2.0, WfM2.0, SM BIOS 2.5, ACPI 2.0, ASUS EZ Flash 2 Support DVD contents Drivers Express Gate ASUS PC Probe II ASUS Update Anti-virus Utility (OEM version) Form factor ATX form factor: 12 in x 9.6 in (30...
User Manual
Page 21
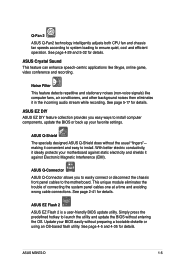
...protects your favorite settings. See page 2-41 for details. Simply press the predefined hotkey to install. ASUS M3N72-D 1-5 See page 5-17 for details. ASUS EZ DIY ASUS EZ DIY feature collection provides you to easily connect or disconnect the chassis front panel cables to ensure ...of connecting the system panel cables one at a time and avoiding wrong cable connections. ASUS EZ Flash 2 ASUS EZ Flash 2 is a user-friendly BIOS update utility. ASUS Q-Shield The specially designed ASUS Q-Shield does without preparing a bootable diskette or using an OS-based flash utility. ...
...protects your favorite settings. See page 2-41 for details. Simply press the predefined hotkey to install. ASUS M3N72-D 1-5 See page 5-17 for details. ASUS EZ DIY ASUS EZ DIY feature collection provides you to easily connect or disconnect the chassis front panel cables to ensure ...of connecting the system panel cables one at a time and avoiding wrong cable connections. ASUS EZ Flash 2 ASUS EZ Flash 2 is a user-friendly BIOS update utility. ASUS Q-Shield The specially designed ASUS Q-Shield does without preparing a bootable diskette or using an OS-based flash utility. ...

User Manual
Page 22
... the RTC data. Smart Support DVD This feature provides a checklist that allows the user to the BIOS default settings in Windows environment without the hassle of booting the BIOS. ASUS MyLogo 2™ This feature allows you to overclock the CPU speed in case the system hangs due... to convert your favorite photo into a 256-color boot logo for details. 1.3.3 ASUS intelligent performance and overclocking features Precision Tweaker ...
... the RTC data. Smart Support DVD This feature provides a checklist that allows the user to the BIOS default settings in Windows environment without the hassle of booting the BIOS. ASUS MyLogo 2™ This feature allows you to overclock the CPU speed in case the system hangs due... to convert your favorite photo into a 256-color boot logo for details. 1.3.3 ASUS intelligent performance and overclocking features Precision Tweaker ...
User Manual
Page 45
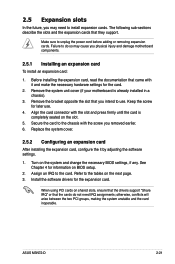
...card: 1. Make sure to the card. Failure to install expansion cards. Refer to the chassis with it by adjusting the software settings. 1. ASUS M3N72-D 2-21 Remove the system unit cover (if your motherboard is completely seated on the slot. 5. Keep the screw for the expansion card. ...Secure the card to the tables on BIOS setup. 2. See Chapter 4 for the card. 2. Align the card connector with the slot and press firmly until the card is already installed in...
...card: 1. Make sure to the card. Failure to install expansion cards. Refer to the chassis with it by adjusting the software settings. 1. ASUS M3N72-D 2-21 Remove the system unit cover (if your motherboard is completely seated on the slot. 5. Keep the screw for the expansion card. ...Secure the card to the tables on BIOS setup. 2. See Chapter 4 for the card. 2. Align the card connector with the slot and press firmly until the card is already installed in...
User Manual
Page 49
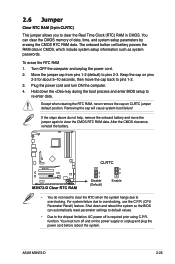
... the cap will cause system boot failure! Shut down the key during the boot process and enter BIOS setup to clear the CMOS RTC RAM data. Hold down and reboot the system so the BIOS can clear the CMOS memory of date, time, and system setup parameters by erasing the CMOS RTC... the C.P.R. (CPU Parameter Recall) feature. The onboard button cell battery powers the RAM data in CMOS. Turn OFF the computer and unplug the power cord. 2. ASUS M3N72-D 2-25
... the cap will cause system boot failure! Shut down the key during the boot process and enter BIOS setup to clear the CMOS RTC RAM data. Hold down and reboot the system so the BIOS can clear the CMOS memory of date, time, and system setup parameters by erasing the CMOS RTC... the C.P.R. (CPU Parameter Recall) feature. The onboard button cell battery powers the RAM data in CMOS. Turn OFF the computer and unplug the power cord. 2. ASUS M3N72-D 2-25
User Manual
Page 51
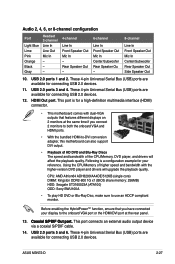
... DVD player, and drivers will upgrade the playback quality. CPU: AMD Athlon64 ADH3200IAA4DE/512KB (single core) DIMM: Kingston DDR2-800 1G x1 (BIOS share memory: 256MB) HDD: Seagate ST3160023A (ATA100) ODD: Sony BWU100A • To play HD DVD or Blu-Ray Disc, make sure ... Front Speaker Out Mic In Center/Subwoofer Rear Speaker Out Side Speaker Out 10. Following is for connecting USB 2.0 devices. 12. USB 2.0 ports 5 and 6. ASUS M3N72-D 2-27 USB 2.0 ports 1 and 2. Audio 2, 4, 6, or 8-channel configuration Port Light Blue Lime Pink Orange Black Gray Headset 2-channel Line In Line Out...
... DVD player, and drivers will upgrade the playback quality. CPU: AMD Athlon64 ADH3200IAA4DE/512KB (single core) DIMM: Kingston DDR2-800 1G x1 (BIOS share memory: 256MB) HDD: Seagate ST3160023A (ATA100) ODD: Sony BWU100A • To play HD DVD or Blu-Ray Disc, make sure ... Front Speaker Out Mic In Center/Subwoofer Rear Speaker Out Side Speaker Out 10. Following is for connecting USB 2.0 devices. 12. USB 2.0 ports 5 and 6. ASUS M3N72-D 2-27 USB 2.0 ports 1 and 2. Audio 2, 4, 6, or 8-channel configuration Port Light Blue Lime Pink Orange Black Gray Headset 2-channel Line In Line Out...
User Manual
Page 55
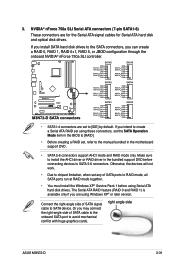
...run at RAID mode together. • You must install the Windows XP® Service Pack 1 before connecting devices to the manual bundled in the BIOS to [RAID]. • Before creating a RAID set using Windows XP® or later version. If you install SATA hard disk drives to ...set the SATA Operation Mode item in the motherboard support DVD. • SATA 5-6 connectors support AHCI mode and RAID mode only. right angle side ASUS M3N72-D 2-31 NVIDIA® nForce 750a SLI Serial ATA connectors (7-pin SATA1-6) These connectors are using these connectors, set any of SATA ports to [IDE...
...run at RAID mode together. • You must install the Windows XP® Service Pack 1 before connecting devices to the manual bundled in the BIOS to [RAID]. • Before creating a RAID set using Windows XP® or later version. If you install SATA hard disk drives to ...set the SATA Operation Mode item in the motherboard support DVD. • SATA 5-6 connectors support AHCI mode and RAID mode only. right angle side ASUS M3N72-D 2-31 NVIDIA® nForce 750a SLI Serial ATA connectors (7-pin SATA1-6) These connectors are using these connectors, set any of SATA ports to [IDE...
User Manual
Page 61
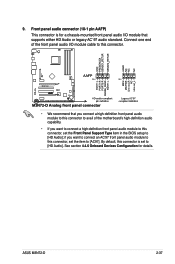
... audio module to [HD Audio]. Front panel audio connector (10-1 pin AAFP) This connector is set the Front Panel Support Type item in the BIOS setup to [AC97]. ASUS M3N72-D 2-37 9. See section 4.4.6 Onboard Devices Configuration for a chassis-mounted front panel audio I/O module that you connect a high-definition front panel audio module to...
... audio module to [HD Audio]. Front panel audio connector (10-1 pin AAFP) This connector is set the Front Panel Support Type item in the BIOS setup to [AC97]. ASUS M3N72-D 2-37 9. See section 4.4.6 Onboard Devices Configuration for a chassis-mounted front panel audio I/O module that you connect a high-definition front panel audio module to...
User Manual
Page 64
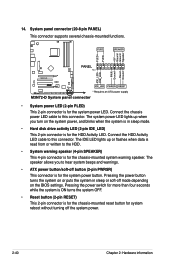
14. The speaker allows you turn on the BIOS settings. Connect the HDD Activity LED cable to hear system beeps and warnings. • ATX power button/soft-off button (2-pin PWRSR) This connector is ...
14. The speaker allows you turn on the BIOS settings. Connect the HDD Activity LED cable to hear system beeps and warnings. • ATX power button/soft-off button (2-pin PWRSR) This connector is ...
User Manual
Page 69
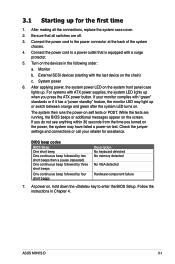
... or call your monitor complies with a surge protector. 5. After applying power, the system power LED on the chain) c. ASUS M3N72-D 3-1 After making all switches are running, the BIOS beeps or additional messages appear on . Be sure that is equipped with "green" standards or if it has a "power ... failed a power-on , hold down the key to a power outlet that all the connections, replace the system case cover. 2. BIOS beep codes BIOS Beep One short beep One continuous beep followed by two short beeps then a pause (repeated) One continuous beep followed by three short beeps...
... or call your monitor complies with a surge protector. 5. After applying power, the system power LED on the chain) c. ASUS M3N72-D 3-1 After making all switches are running, the BIOS beeps or additional messages appear on . Be sure that is equipped with "green" standards or if it has a "power ... failed a power-on , hold down the key to a power outlet that all the connections, replace the system case cover. 2. BIOS beep codes BIOS Beep One short beep One continuous beep followed by two short beeps then a pause (repeated) One continuous beep followed by three short beeps...

User Manual
Page 70
... While the system is ON, pressing the power switch for less than four seconds lets the system enter the soft-off mode regardless of the BIOS setting. If you are using Windows® XP: 1. Refer to section 4.5 Power Menu in Chapter 4 for more than four seconds puts the system to sleep... . Click the Turn Off button to soft-off after Windows® shuts down the computer. 3. The power supply should turn off mode, depending on the BIOS setting. Click the Start button then select ShutDown. 2.
... While the system is ON, pressing the power switch for less than four seconds lets the system enter the soft-off mode regardless of the BIOS setting. If you are using Windows® XP: 1. Refer to section 4.5 Power Menu in Chapter 4 for more than four seconds puts the system to sleep... . Click the Turn Off button to soft-off after Windows® shuts down the computer. 3. The power supply should turn off mode, depending on the BIOS setting. Click the Start button then select ShutDown. 2.
User Manual
Page 71
Detailed descriptions of the BIOS ChapBtIeOrS4:se4tup parameters are also provided. This chapter tells how to change the system settings through the BIOS Setup menus.
Detailed descriptions of the BIOS ChapBtIeOrS4:se4tup parameters are also provided. This chapter tells how to change the system settings through the BIOS Setup menus.
User Manual
Page 72
Chapter summary 4 4.1 Managing and updating your BIOS 4-1 4.2 BIOS setup program 4-9 4.3 Main menu 4-13 4.4 Advanced menu 4-18 4.5 Power menu 4-27 4.6 Boot menu 4-31 4.7 Tools menu 4-35 4.8 Exit menu 4-37 ASUS M3N72-D
Chapter summary 4 4.1 Managing and updating your BIOS 4-1 4.2 BIOS setup program 4-9 4.3 Main menu 4-13 4.4 Advanced menu 4-18 4.5 Power menu 4-27 4.6 Boot menu 4-31 4.7 Tools menu 4-35 4.8 Exit menu 4-37 ASUS M3N72-D
User Manual
Page 73
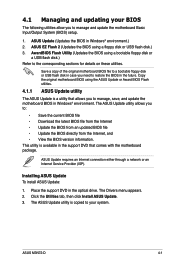
... following utilities allow you need to : • Save the current BIOS file • Download the latest BIOS file from the Internet • Update the BIOS from an updated BIOS file • Update the BIOS directly from the Internet, and • View the BIOS version information. ASUS M3N72-D 4-1 This utility is available in the support DVD that allows you...
... following utilities allow you need to : • Save the current BIOS file • Download the latest BIOS file from the Internet • Update the BIOS from an updated BIOS file • Update the BIOS directly from the Internet, and • View the BIOS version information. ASUS M3N72-D 4-1 This utility is available in the support DVD that allows you...
User Manual
Page 74
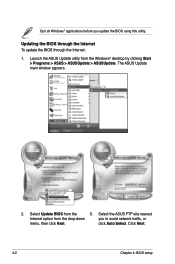
Quit all Windows® applications before you to avoid network traffic, or menu, then click Next. Select Update BIOS from the Windows® desktop by clicking Start > Programs > ASUS > ASUSUpdate > ASUSUpdate. Select the ASUS FTP site nearest Internet option from the drop‑down you update the BIOS using this utility. Updating the BIOS through the Internet To update the BIOS through the Internet: 1. Click Next. 4-2 Chapter 4: BIOS setup click Auto Select. Launch the ASUS Update utility from the 3. The ASUS Update main window appears. 2.
Quit all Windows® applications before you to avoid network traffic, or menu, then click Next. Select Update BIOS from the Windows® desktop by clicking Start > Programs > ASUS > ASUSUpdate > ASUSUpdate. Select the ASUS FTP site nearest Internet option from the drop‑down you update the BIOS using this utility. Updating the BIOS through the Internet To update the BIOS through the Internet: 1. Click Next. 4-2 Chapter 4: BIOS setup click Auto Select. Launch the ASUS Update utility from the 3. The ASUS Update main window appears. 2.

User Manual
Page 75
..., then click Next. 3. M3N72-D.bin M3N72-D ASUS M3N72-D 4-3 Select Update BIOS from a file option from the Open window, then click Open. 4. Follow the screen instructions to complete the update process. 4. Follow the screen instructions to complete the update process. The ASUS Update utility is capable of updating itself through a BIOS file: 1. Updating the BIOS through a BIOS file To update...
..., then click Next. 3. M3N72-D.bin M3N72-D ASUS M3N72-D 4-3 Select Update BIOS from a file option from the Open window, then click Open. 4. Follow the screen instructions to complete the update process. 4. Follow the screen instructions to complete the update process. The ASUS Update utility is capable of updating itself through a BIOS file: 1. Updating the BIOS through a BIOS file To update...
User Manual
Page 76
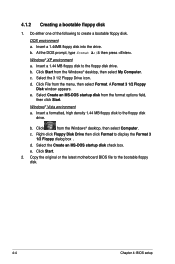
... disk to the floppy disk drive. c. Right-click Floppy Disk Drive then click Format to the bootable floppy disk. 4-4 Chapter 4: BIOS setup c. Click Start. 2. Copy the original or the latest motherboard BIOS file to display the Format 3 1/2 Floppy dialog box . Select the 3 1/2 Floppy Drive icon. d. Select Create an MS-DOS startup disk...
... disk to the floppy disk drive. c. Right-click Floppy Disk Drive then click Format to the bootable floppy disk. 4-4 Chapter 4: BIOS setup c. Click Start. 2. Copy the original or the latest motherboard BIOS file to display the Format 3 1/2 Floppy dialog box . Select the 3 1/2 Floppy Drive icon. d. Select Create an MS-DOS startup disk...
User Manual
Page 77
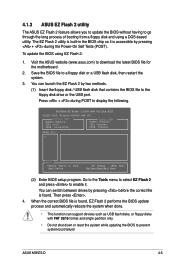
...and using EZ Flash 2: 1. Then press . 4. To update the BIOS using a DOS‑based utility. Go to the Tools menu to select EZ Flash 2 and press to the floppy disk drive or the USB port. ASUS M3N72-D 4-5 When the correct BIOS file is accessible by two methods. (1) Insert the floppy disk / USB... flash disk that contains the BIOS file to enable it. The EZ Flash 2 utility is built-in the...
...and using EZ Flash 2: 1. Then press . 4. To update the BIOS using a DOS‑based utility. Go to the Tools menu to select EZ Flash 2 and press to the floppy disk drive or the USB port. ASUS M3N72-D 4-5 When the correct BIOS file is accessible by two methods. (1) Insert the floppy disk / USB... flash disk that contains the BIOS file to enable it. The EZ Flash 2 utility is built-in the...


