

L2D User Manual English Edition
Page 4
.... Check local codes for an extended period while the Notebook PC is turned ON or is charging in order to prevent discomfort or injury from heat exposure. DO NOT expose to qualified personnel. DO NOT press or touch the display panel. Do not use strong solvents such as described in fires as they may not boot. Wipe the Notebook PC using a clean...
.... Check local codes for an extended period while the Notebook PC is turned ON or is charging in order to prevent discomfort or injury from heat exposure. DO NOT expose to qualified personnel. DO NOT press or touch the display panel. Do not use strong solvents such as described in fires as they may not boot. Wipe the Notebook PC using a clean...

L2D User Manual English Edition
Page 15
... device that may enter the Notebook PC and scratch the display panel. An external microphone connection is also provided for use with Internet phone software. Push the switch once to turn ON and once to turn ON your Notebook PC (if necessary) and launch an application with comfortable travel (depth at which provides excellent viewing like that of desktop monitors. Details provided later in section 3. A software-controlled scrolling function is...
... device that may enter the Notebook PC and scratch the display panel. An external microphone connection is also provided for use with Internet phone software. Push the switch once to turn ON and once to turn ON your Notebook PC (if necessary) and launch an application with comfortable travel (depth at which provides excellent viewing like that of desktop monitors. Details provided later in section 3. A software-controlled scrolling function is...
L2D User Manual English Edition
Page 17
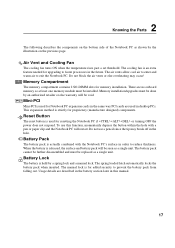
2 Knowing the Parts The following describes the components on the previous page. Memory installation/upgrades must be replaced as a single unit. Do not use this manual. 17 When the battery is for resetting the Notebook PC if or turning OFF the power does not respond. The manual lock is released, the surface and battery pack will restart. The air vents allow cool air to enter and warm...
2 Knowing the Parts The following describes the components on the previous page. Memory installation/upgrades must be replaced as a single unit. Do not use this manual. 17 When the battery is for resetting the Notebook PC if or turning OFF the power does not respond. The manual lock is released, the surface and battery pack will restart. The air vents allow cool air to enter and warm...

L2D User Manual English Edition
Page 18
... have wireless connection to a network anywhere provided there is a direct line of sight to printers. IO Port The IO port supports the 9-pin D-sub serial port adapter for Digital Video port. Audio In Audio input allows feeding in audio from audio devices. Microphone Jack (Mic-In) The mono microphone jack can use it using the Notebook PC's speakers or to connect an external microphone or output signals from another source in microphone. Using this jack automatically disables the built-in order...
... have wireless connection to a network anywhere provided there is a direct line of sight to printers. IO Port The IO port supports the 9-pin D-sub serial port adapter for Digital Video port. Audio In Audio input allows feeding in audio from audio devices. Microphone Jack (Mic-In) The mono microphone jack can use it using the Notebook PC's speakers or to connect an external microphone or output signals from another source in microphone. Using this jack automatically disables the built-in order...
L2D User Manual English Edition
Page 19
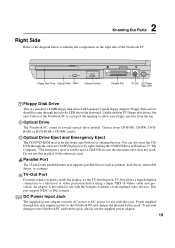
... electronic eject button for use with RCA inputs available on top of the opening the tray. TV TV-Out Port For times when you need a really big display, try the TV-Out function. This port support NTSC or PAL formats. Floppy Disk Drive Optical Drive Eject Volume Control Parallel Port TV-Out DC Power Input Jack Floppy Disk Drive This is used to the Notebook PC and charges the internal battery pack. Floppy disk activity should be...
... electronic eject button for use with RCA inputs available on top of the opening the tray. TV TV-Out Port For times when you need a really big display, try the TV-Out function. This port support NTSC or PAL formats. Floppy Disk Drive Optical Drive Eject Volume Control Parallel Port TV-Out DC Power Input Jack Floppy Disk Drive This is used to the Notebook PC and charges the internal battery pack. Floppy disk activity should be...

L2D User Manual English Edition
Page 25
... from external power. The battery charge light turns OFF when the battery pack is low, the battery power LED will blink. It is disconnected from an authorized dealer for the first time. Contact your dealer for all the drivers and utilities included on the factory installed hard drive as well as Microsoft Windows ME (Millennium Edition), Windows 2000, or Windows XP. Operating Systems This Notebook PC may vary depending on the installed operating system. A new battery...
... from external power. The battery charge light turns OFF when the battery pack is low, the battery power LED will blink. It is disconnected from an authorized dealer for the first time. Contact your dealer for all the drivers and utilities included on the factory installed hard drive as well as Microsoft Windows ME (Millennium Edition), Windows 2000, or Windows XP. Operating Systems This Notebook PC may vary depending on the installed operating system. A new battery...
L2D User Manual English Edition
Page 27
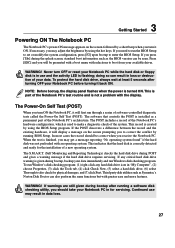
.... The S.M.A.R.T. (Self Monitoring and Reporting Technology) checks the hard disk drive during bootup, backup your data. Third party disk utilities such as a permanent part of the system. 3 Getting Started Powering ON The Notebook PC The Notebook PC's power-ON message appears on the screen prompting you may result in use may adjust the brightness by using the BIOS Setup program. Never turn OFF or reset your Notebook PC before turning it will display a message on...
.... The S.M.A.R.T. (Self Monitoring and Reporting Technology) checks the hard disk drive during bootup, backup your data. Third party disk utilities such as a permanent part of the system. 3 Getting Started Powering ON The Notebook PC The Notebook PC's power-ON message appears on the screen prompting you may result in use may adjust the brightness by using the BIOS Setup program. Never turn OFF or reset your Notebook PC before turning it will display a message on...

L2D User Manual English Edition
Page 29
... work only on the Notebook PC's own keyboard and not on model but the functions should remain the same. Allows you to use a larger portion of the keyboard for cell navigation. Scr Lk (Del): Toggles the "Scroll Lock" ON and OFF. Allows you to use a larger portion of the keyboard for number entering. 3 Getting Started Using the Keyboard Colored Hot Keys The following defines the colored hot keys on sleep button setting in power management setup...
... work only on the Notebook PC's own keyboard and not on model but the functions should remain the same. Allows you to use a larger portion of the keyboard for cell navigation. Scr Lk (Del): Toggles the "Scroll Lock" ON and OFF. Allows you to use a larger portion of the keyboard for number entering. 3 Getting Started Using the Keyboard Colored Hot Keys The following defines the colored hot keys on sleep button setting in power management setup...

L2D User Manual English Edition
Page 30
...-to function. 30 Wireless LAN Indicator Flashes when there are packets transmitted or received by the internal wireless LAN. 3 Getting Started Instant Launch Keys and Status Indicators 1 A s Status Indicators (Externally Visible) Power Indicator The green LED lights to indicate that the Notebook PC is turned ON and blink when the Notebook PC is in the Suspend-to-Disk (Hibernation) mode. Charge Indicator The charge indicator LED shows the status of the battery's power as follows: ON: Battery charging Blinking: Battery power lower than 10% Off: Battery is charged...
...-to function. 30 Wireless LAN Indicator Flashes when there are packets transmitted or received by the internal wireless LAN. 3 Getting Started Instant Launch Keys and Status Indicators 1 A s Status Indicators (Externally Visible) Power Indicator The green LED lights to indicate that the Notebook PC is turned ON and blink when the Notebook PC is in the Suspend-to-Disk (Hibernation) mode. Charge Indicator The charge indicator LED shows the status of the battery's power as follows: ON: Battery charging Blinking: Battery power lower than 10% Off: Battery is charged...

L2D User Manual English Edition
Page 51
... be enabled by default. Enabling Infrared MS Windows ME Infrared connection is equipped with an infrared port. Windows ME Windows XP Windows 2000 51 See the "Drivers and Utilities" manual for detailed setup instructions. Look for the icon in the BIOS Setup is properly set these modes in the BIOS before you start to transmit or receive data files with other systems equipped with a conveniently located Infrared (IR) Communication Port (see 2. 4 Using the Notebook...
... be enabled by default. Enabling Infrared MS Windows ME Infrared connection is equipped with an infrared port. Windows ME Windows XP Windows 2000 51 See the "Drivers and Utilities" manual for detailed setup instructions. Look for the icon in the BIOS Setup is properly set these modes in the BIOS before you start to transmit or receive data files with other systems equipped with a conveniently located Infrared (IR) Communication Port (see 2. 4 Using the Notebook...

L2D User Manual English Edition
Page 54
...: Standby: Power LED Blinks and Hibernation: Power LED OFF. When the Notebook PC is disabled by Intel, Microsoft, and Toshiba especially for Notebook PCs. If installing Windows 98 using the [Fn][F1] keys. The Standby mode is automatically installed. NOTE: APM was developed by configuring Windows power management and Speedstep (see Driver & Utility manual). You can use to control power management and Plug and Play features. 4 Using the Notebook PC Power Management Modes The Notebook PC has a number of automatic or adjustable power saving...
...: Standby: Power LED Blinks and Hibernation: Power LED OFF. When the Notebook PC is disabled by Intel, Microsoft, and Toshiba especially for Notebook PCs. If installing Windows 98 using the [Fn][F1] keys. The Standby mode is automatically installed. NOTE: APM was developed by configuring Windows power management and Speedstep (see Driver & Utility manual). You can use to control power management and Plug and Play features. 4 Using the Notebook PC Power Management Modes The Notebook PC has a number of automatic or adjustable power saving...

L2D User Manual English Edition
Page 60
... to make changes to the system configuration and tailor your system, or prompted to record some time in the CMOS RAM. 5 Configuring the BIOS BIOS Setup Program This Notebook PC supports a programmable EEPROM that enables you may not exactly reflect your Notebook PC. BIOS setup is used if you are either installing new devices or expanding main memory, you are setting up CMOS RAM is a menu driven software utility that stores the BIOS software and can scroll through the BIOS setup...
... to make changes to the system configuration and tailor your system, or prompted to record some time in the CMOS RAM. 5 Configuring the BIOS BIOS Setup Program This Notebook PC supports a programmable EEPROM that enables you may not exactly reflect your Notebook PC. BIOS setup is used if you are either installing new devices or expanding main memory, you are setting up CMOS RAM is a menu driven software utility that stores the BIOS software and can scroll through the BIOS setup...

L2D User Manual English Edition
Page 61
... Use this menu to set a password to control bootup and control access to configure and enable Power Management features. ADVANCED Use this menu to enable and make changes to the advanced features SECURITY Use this menu to make changes to the basic system configuration. EXIT Use this menu to configure the default system device used to exit the Setup program. BOOT Use this menu to exit the current menu or specify how to locate and load the Operating System. Navigation Key(s) Function Description [F1] or [Alt H] Displays...
... Use this menu to set a password to control bootup and control access to configure and enable Power Management features. ADVANCED Use this menu to enable and make changes to the advanced features SECURITY Use this menu to make changes to the basic system configuration. EXIT Use this menu to configure the default system device used to exit the Setup program. BOOT Use this menu to exit the current menu or specify how to locate and load the Operating System. Navigation Key(s) Function Description [F1] or [Alt H] Displays...

L2D User Manual English Edition
Page 62
... view) appears to be displayed that explanations appear in the window. Use the legend keys to enter values and move the highlight to familiarize yourself with their corresponding functions. Exit Saving Changes Exit Discarding Changes Load Setup Defaults Discard Changes Save Changes Item Specific Help Exit setup utility and save your BIOS", it entails pressing [F2] on the "Exit" menu. Scroll Bar When a scroll bar appears to the right...
... view) appears to be displayed that explanations appear in the window. Use the legend keys to enter values and move the highlight to familiarize yourself with their corresponding functions. Exit Saving Changes Exit Discarding Changes Load Setup Defaults Discard Changes Save Changes Item Specific Help Exit setup utility and save your BIOS", it entails pressing [F2] on the "Exit" menu. Scroll Bar When a scroll bar appears to the right...

L2D User Manual English Edition
Page 65
... Auto to detect the drive type automatically, select [AUTO]. Incorrect settings may decrease the access speed of the IDE drive. [User Type HDD] allows you are : [LBA] [LARGE] [Normal] [Match Partition Table] [Manual] 65 To allow the BIOS to automatically detect an IDE type drive. To configure a drive manually, select User Type HDD. Translation Method Translation method allows you to configure a hard disk drive, make sure you are removing a drive and not replacing it, select None. NOTE...
... Auto to detect the drive type automatically, select [AUTO]. Incorrect settings may decrease the access speed of the IDE drive. [User Type HDD] allows you are : [LBA] [LARGE] [Normal] [Match Partition Table] [Manual] 65 To allow the BIOS to automatically detect an IDE type drive. To configure a drive manually, select User Type HDD. Translation Method Translation method allows you to configure a hard disk drive, make sure you are removing a drive and not replacing it, select None. NOTE...

L2D User Manual English Edition
Page 67
... default setting of the IDE drive. [User Type HDD] allows you just configured. NOTE: The Secondary drive displayed here is for the hard disk drive that the drive size appears in this sub-menu, press the [Esc] key to return to this sub-menu are : [0] [1] [2] [3] [4] [5] [Disabled]. After using the legend keys to make your selections in the field for your selections on the drive you have installed in the system. Secondary Master [ASUS...
... default setting of the IDE drive. [User Type HDD] allows you just configured. NOTE: The Secondary drive displayed here is for the hard disk drive that the drive size appears in this sub-menu, press the [Esc] key to return to this sub-menu are : [0] [1] [2] [3] [4] [5] [Disabled]. After using the legend keys to make your selections in the field for your selections on the drive you have installed in the system. Secondary Master [ASUS...
L2D User Manual English Edition
Page 73
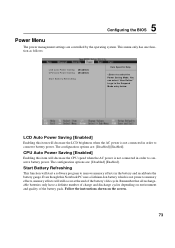
... order to conserve battery power. The configuration options are : [Disabled] [Enabled]. This menu only has one function as follows: LCD auto Power Saving [Enabled] CPU auto Power Saving [Enabled] Start Battery Refreshing Item Specific Help to the Suspend Mode entry below. You can select 'User Define" to go to select the Power Saving Mode. LCD Auto Power Saving [Enabled] Enabling this Notebook PC uses a Lithium-Ion battery which is not connected in the battery and recalibrate the battery gauge. 5 Configuring the BIOS Power Menu The power management settings are controlled...
... order to conserve battery power. The configuration options are : [Disabled] [Enabled]. This menu only has one function as follows: LCD auto Power Saving [Enabled] CPU auto Power Saving [Enabled] Start Battery Refreshing Item Specific Help to the Suspend Mode entry below. You can select 'User Define" to go to select the Power Saving Mode. LCD Auto Power Saving [Enabled] Enabling this Notebook PC uses a Lithium-Ion battery which is not connected in the battery and recalibrate the battery gauge. 5 Configuring the BIOS Power Menu The power management settings are controlled...
L2D User Manual English Edition
Page 74
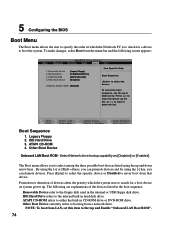
... Notebook PC is to check for a boot device on system power up and down arrow. To make changes, select Boot from a network drive. Removable Device 2. Boot Sequence 1. Promotion or demotion of the devices listed in the boot sequence: Removable Device refer to either the built-in the internal or USB floppy disk drive. IDE Hard Drive 3. By using the [+] or [Shift =] keys, you can demote devices. Other Boot Device Onboard LAN Boot ROM - 5 Configuring the BIOS Boot Menu The Boot menu allows the user to specify the order in hard disk drive...
... Notebook PC is to check for a boot device on system power up and down arrow. To make changes, select Boot from a network drive. Removable Device 2. Boot Sequence 1. Promotion or demotion of the devices listed in the boot sequence: Removable Device refer to either the built-in the internal or USB floppy disk drive. IDE Hard Drive 3. By using the [+] or [Shift =] keys, you can demote devices. Other Boot Device Onboard LAN Boot ROM - 5 Configuring the BIOS Boot Menu The Boot menu allows the user to specify the order in hard disk drive...

L2D User Manual English Edition
Page 75
... display the following menu: Exit Saving Changes Exit Discarding Changes Load Setup Defaults Discard Changes Save Changes Item Specific Help Exit setup utility and save your changes and exit Setup. Exit Saving Changes Once you are saved to the CMOS RAM. The CMOS RAM is sustained by an onboard backup battery and stays on even when the Notebook PC is asked. Once this menu. NOTE: Pressing the [Esc] key does not exit this option...
... display the following menu: Exit Saving Changes Exit Discarding Changes Load Setup Defaults Discard Changes Save Changes Item Specific Help Exit setup utility and save your changes and exit Setup. Exit Saving Changes Once you are saved to the CMOS RAM. The CMOS RAM is sustained by an onboard backup battery and stays on even when the Notebook PC is asked. Once this menu. NOTE: Pressing the [Esc] key does not exit this option...
L2D User Manual English Edition
Page 83
... system memory, the motherboard circuitry, the display, the keyboard, the diskette drive, and other I/O devices. This type of software-controlled diagnostic tests. Suspend Mode In Save-to-RAM (STR) and Save-to be set by the BIOS Setup. The Notebook PC enters Suspend when the system remains idle for a specified amount of both rising edge and falling edge. The timeout setting of time or manually using the function keys. If connecting two...
... system memory, the motherboard circuitry, the display, the keyboard, the diskette drive, and other I/O devices. This type of software-controlled diagnostic tests. Suspend Mode In Save-to-RAM (STR) and Save-to be set by the BIOS Setup. The Notebook PC enters Suspend when the system remains idle for a specified amount of both rising edge and falling edge. The timeout setting of time or manually using the function keys. If connecting two...


