User Guide
Page 9
... This chapter describes the features of the standard package. ASUS websites The ASUS website provides updated information on the motherboard. • Chapter 3: Powering up This chapter describes the power up , creating, and configuring RAID sets using the available utilities. • Chapter 6: Driver...to perform when installing system components. Refer to change system settings through the BIOS Setup menus. Optional documentation Your product package may include optional documentation, such as warranty flyers, that you need when installing and configuring the motherboard. ix...
... This chapter describes the features of the standard package. ASUS websites The ASUS website provides updated information on the motherboard. • Chapter 3: Powering up This chapter describes the power up , creating, and configuring RAID sets using the available utilities. • Chapter 6: Driver...to perform when installing system components. Refer to change system settings through the BIOS Setup menus. Optional documentation Your product package may include optional documentation, such as warranty flyers, that you need when installing and configuring the motherboard. ix...

User Guide
Page 11
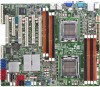
...software RAID 0, 1, 10 & 5 SAS Controller Optional: ASUS PIKE 1064E 4-port SAS RAID card ASUS PIKE 1068E 8-port SAS RAID card ASUS PIKE 1078 8-port SAS HW RAID card ASUS PIKE 6480 8-port SAS RAID card ASUS PIKE 2008 8-port SAS2 6G RAID card ASUS PIKE 2008/IMR 8-port SAS2 6G RAID ... Slot 1 1 x PIKE Slot for Stroage expansion SATA Controller AMD® SP5100: - 6 SATA2 300MB/s ports PROMISE® SW RAID (For Linux/Windows) - KCMA-D8 specifications summary Processor Support / System Bus 2 x socket C32 (LGA 1207) 4/6 Core AMD® Opteron™ 4100 Series HyperTransport™...
...software RAID 0, 1, 10 & 5 SAS Controller Optional: ASUS PIKE 1064E 4-port SAS RAID card ASUS PIKE 1068E 8-port SAS RAID card ASUS PIKE 1078 8-port SAS HW RAID card ASUS PIKE 6480 8-port SAS RAID card ASUS PIKE 2008 8-port SAS2 6G RAID card ASUS PIKE 2008/IMR 8-port SAS2 6G RAID ... Slot 1 1 x PIKE Slot for Stroage expansion SATA Controller AMD® SP5100: - 6 SATA2 300MB/s ports PROMISE® SW RAID (For Linux/Windows) - KCMA-D8 specifications summary Processor Support / System Bus 2 x socket C32 (LGA 1207) 4/6 Core AMD® Opteron™ 4100 Series HyperTransport™...

User Guide
Page 15
... motherboard package for buying an ASUS® KCMA-D8 motherboard! Thermal sensor cable 2 -- Optional items PIKE 1064E PIKE 1068E PIKE 1078 PIKE 6480 PIKE 2008 PIKE 2008/IMR ASMB4-iKVM Description LSI 4 port SAS RAID card LSI 8 port SAS RAID card LSI 8 port SAS RAID card with Hardware RAID 5, 6, 50, 60 Marvell 8 port SAS RAID card LSI 8 port SAS2...
... motherboard package for buying an ASUS® KCMA-D8 motherboard! Thermal sensor cable 2 -- Optional items PIKE 1064E PIKE 1068E PIKE 1078 PIKE 6480 PIKE 2008 PIKE 2008/IMR ASMB4-iKVM Description LSI 4 port SAS RAID card LSI 8 port SAS RAID card LSI 8 port SAS RAID card with Hardware RAID 5, 6, 50, 60 Marvell 8 port SAS RAID card LSI 8 port SAS2...

User Guide
Page 41
... choose and change your needs. These slots support VGA cards and various server class high performance add-on your preferred SAS solution easily. ASUS KCMA-D8 2-23 Install an optional ASUS PIKE RAID card based on cards. 2.5.5 PCI Express x8 slot (x4 link) The onboard PCI Express x8 slot supports cards that comply with the PCI...
... choose and change your needs. These slots support VGA cards and various server class high performance add-on your preferred SAS solution easily. ASUS KCMA-D8 2-23 Install an optional ASUS PIKE RAID card based on cards. 2.5.5 PCI Express x8 slot (x4 link) The onboard PCI Express x8 slot supports cards that comply with the PCI...

User Guide
Page 42
Locate the PIKE RAID card slot on your motherboard. 1. 2.5.8 Installing an ASUS PIKE RAID card Follow the steps below to install an optional ASUS RAID card on the motherboard. 2. Ensure that it is completely seated on the PIKE RAID card slot. 2-24 Chapter 2: Hardware information Insert the RAID card into the PIKE RAID card slot. Align the golden fingers of the RAID card with the PIKE RAID card slot. 3.
Locate the PIKE RAID card slot on your motherboard. 1. 2.5.8 Installing an ASUS PIKE RAID card Follow the steps below to install an optional ASUS RAID card on the motherboard. 2. Ensure that it is completely seated on the PIKE RAID card slot. 2-24 Chapter 2: Hardware information Insert the RAID card into the PIKE RAID card slot. Align the golden fingers of the RAID card with the PIKE RAID card slot. 3.

User Guide
Page 77
... following two items appear only when you install the optical dirve to the SATA connectors 5/6 and set them to [IDE] mode. SATA Port1 - ASUS KCMA-D8 4-13 Configuration options: [IDE] [RAID] [AHCI] • If you want to use the Serial ATA hard disk drives as Parallel ATA physical storage devices, keep the default setting [IDE...
... following two items appear only when you install the optical dirve to the SATA connectors 5/6 and set them to [IDE] mode. SATA Port1 - ASUS KCMA-D8 4-13 Configuration options: [IDE] [RAID] [AHCI] • If you want to use the Serial ATA hard disk drives as Parallel ATA physical storage devices, keep the default setting [IDE...

User Guide
Page 111
... system. 3. ASUS KCMA-D8 5-5 During POST, press + to the Serial ATA connectors supported by the Promise RAID. To enter the FastBuild Utility: 1. FastBuild (tm) Utility (c) 2004-2010 Promise Technology, Inc. [ Main Menu ] View Drive Assignment .......[ 1 ] LD View / LD Define Menu .....[ 2 ] Delete LD Menu 3 ] Controller Configuration .....[ 4 ] [ Keys Available ] Press 1..4 to Select Option [ESC]Exit The RAID BIOS...
... system. 3. ASUS KCMA-D8 5-5 During POST, press + to the Serial ATA connectors supported by the Promise RAID. To enter the FastBuild Utility: 1. FastBuild (tm) Utility (c) 2004-2010 Promise Technology, Inc. [ Main Menu ] View Drive Assignment .......[ 1 ] LD View / LD Define Menu .....[ 2 ] Delete LD Menu 3 ] Controller Configuration .....[ 4 ] [ Keys Available ] Press 1..4 to Select Option [ESC]Exit The RAID BIOS...

User Guide
Page 112
... 2 ] Delete LD Menu 3 ] Controller Configuration .....[ 4 ] [ Keys Available ] Press 1..4 to enter the LD View Menu. From the main control panel, press to to Select Option FastBuild (tm) Utility (c) 2004-2010 Promise Technology, Inc. [ LD View Menu ] [ESC]Exit < There is no any LD > [ Keys Available ] [↑] Up [↓]... Down [PaUp/PaDn] Switch Page [Ctrl+C] Define LD [Enter] View LD [Ctrl+V] View JBOD Disk [ESC] Exit 5-6 Chapter 5: RAID configuration 5.2.1 Creating a RAID set (RAID 0, RAID 1, RAID 10, RAID 5, SPAN or JBOD) To create a RAID set: 1.
... 2 ] Delete LD Menu 3 ] Controller Configuration .....[ 4 ] [ Keys Available ] Press 1..4 to enter the LD View Menu. From the main control panel, press to to Select Option FastBuild (tm) Utility (c) 2004-2010 Promise Technology, Inc. [ LD View Menu ] [ESC]Exit < There is no any LD > [ Keys Available ] [↑] Up [↓]... Down [PaUp/PaDn] Switch Page [Ctrl+C] Define LD [Enter] View LD [Ctrl+V] View JBOD Disk [ESC] Exit 5-6 Chapter 5: RAID configuration 5.2.1 Creating a RAID set (RAID 0, RAID 1, RAID 10, RAID 5, SPAN or JBOD) To create a RAID set: 1.

User Guide
Page 113
... 3G 250.05 Assignment N N N N [ Keys Available ] [↑] Up [↓] Down [PaUp/PaDn] Switch Page [Space] Change Option [Ctrl+Y] Save [ESC] Exit ASUS KCMA-D8 5-7 Use to set Read Policy to Read Cache and Write Policy to select a desired RAID mode. Press + to define an LD and use to WriteBack. FastBuild (tm) Utility (c) 2004-2010 Promise...
... 3G 250.05 Assignment N N N N [ Keys Available ] [↑] Up [↓] Down [PaUp/PaDn] Switch Page [Space] Change Option [Ctrl+Y] Save [ESC] Exit ASUS KCMA-D8 5-7 Use to set Read Policy to Read Cache and Write Policy to select a desired RAID mode. Press + to define an LD and use to WriteBack. FastBuild (tm) Utility (c) 2004-2010 Promise...

User Guide
Page 114
....A 3G 250.05 Assignment Y Y N N [ Keys Available ] [↑] Up [↓] Down [PaUp/PaDn] Switch Page [Space] Change Option [Ctrl+Y] Save [ESC] Exit 5-8 Chapter 5: RAID configuration FastBuild (tm) Utility (c) 2004-2010 Promise Technology, Inc. [ LD Define Menu ] LD No LD Name LD 1 Logical Drive... N [ Keys Available ] [↑] Up [↓] Down [PaUp/PaDn] Switch Page [Space] Change Option [Ctrl+Y] Save [ESC] Exit 5. After you have selected desired disks for the RAID set . After you have selected the desired RAID mode, use the down arrow key to select desired disks for the...
....A 3G 250.05 Assignment Y Y N N [ Keys Available ] [↑] Up [↓] Down [PaUp/PaDn] Switch Page [Space] Change Option [Ctrl+Y] Save [ESC] Exit 5-8 Chapter 5: RAID configuration FastBuild (tm) Utility (c) 2004-2010 Promise Technology, Inc. [ LD Define Menu ] LD No LD Name LD 1 Logical Drive... N [ Keys Available ] [↑] Up [↓] Down [PaUp/PaDn] Switch Page [Space] Change Option [Ctrl+Y] Save [ESC] Exit 5. After you have selected desired disks for the RAID set . After you have selected the desired RAID mode, use the down arrow key to select desired disks for the...

User Guide
Page 115
...Available ] [↑] Up [↓] Down [PaUp/PaDn] Switch Page [Space] Change Option [Ctrl+Y] Save [ESC] Exit 7. Press to continue. Press + to continue. ...RAID 1 2 Stripe Block 128 KB Gigabyte Boundary ON Read Policy Read Cache Initialization Write Policy Fast WriteBack Port:ID 01:01 02:01 03:01 04:01 [ Drives Assignments ] DriveFaMsotdeIlnitializatCiaopnabOipltiitoineshas beeCnapsaeclietcyt(eGdB.) HHHDDDTTTXXXXXXI HDTXX05 Assignment Y Y N N [ Keys Available ] [↑] Up [↓] Down [PaUp/PaDn] Switch Page [Space] Change Option [Ctrl+Y] Save [ESC] Exit ASUS KCMA-D8...
...Available ] [↑] Up [↓] Down [PaUp/PaDn] Switch Page [Space] Change Option [Ctrl+Y] Save [ESC] Exit 7. Press to continue. Press + to continue. ...RAID 1 2 Stripe Block 128 KB Gigabyte Boundary ON Read Policy Read Cache Initialization Write Policy Fast WriteBack Port:ID 01:01 02:01 03:01 04:01 [ Drives Assignments ] DriveFaMsotdeIlnitializatCiaopnabOipltiitoineshas beeCnapsaeclietcyt(eGdB.) HHHDDDTTTXXXXXXI HDTXX05 Assignment Y Y N N [ Keys Available ] [↑] Up [↓] Down [PaUp/PaDn] Switch Page [Space] Change Option [Ctrl+Y] Save [ESC] Exit ASUS KCMA-D8...

User Guide
Page 116
... Y N N [ Keys Available ] [↑] Up [↓] Down [PaUp/PaDn] Switch Page [Space] Change Option [0-9] Input Capacity [Enter] Save [BackSpace] Delete [Esc] Exit 5-10 Chapter 5: RAID configuration Use the number keys to use maximum capacity... [ Keys Available ] [↑] Up [↓] Down [PaUp/PaDn...] Switch Page [Space] Change Option Fast Initializing... 9. FastBuild (tm) Utility (c) 2004-2010 Promise Technology, Inc. [ LD Define Menu ] LD No LD Name LD 1 Logical Drive 1 RAID Mode Drv RAID 1 2 Stripe Block Gigabyte Boundary Read Policy 128 KB ON ...
... Y N N [ Keys Available ] [↑] Up [↓] Down [PaUp/PaDn] Switch Page [Space] Change Option [0-9] Input Capacity [Enter] Save [BackSpace] Delete [Esc] Exit 5-10 Chapter 5: RAID configuration Use the number keys to use maximum capacity... [ Keys Available ] [↑] Up [↓] Down [PaUp/PaDn...] Switch Page [Space] Change Option Fast Initializing... 9. FastBuild (tm) Utility (c) 2004-2010 Promise Technology, Inc. [ LD Define Menu ] LD No LD Name LD 1 Logical Drive 1 RAID Mode Drv RAID 1 2 Stripe Block Gigabyte Boundary Read Policy 128 KB ON ...

User Guide
Page 118
...;] Down [PaUp/PaDn] Switch Page [Del/Alt+D] Delete LD [Ctrl+V] View JBOD Disk [ESC] Exit 5-12 Chapter 5: RAID configuration From the main control panel, press to to Select Option [ESC]Exit 2. 5.2.2 Deleting a RAID set To delete a RAID set . FastBuild (tm) Utility (c) 2004-2010 Promise Technology, Inc. [ Main Menu ] View Drive Assignment .......[ 1 ] LD View / LD...
...;] Down [PaUp/PaDn] Switch Page [Del/Alt+D] Delete LD [Ctrl+V] View JBOD Disk [ESC] Exit 5-12 Chapter 5: RAID configuration From the main control panel, press to to Select Option [ESC]Exit 2. 5.2.2 Deleting a RAID set To delete a RAID set . FastBuild (tm) Utility (c) 2004-2010 Promise Technology, Inc. [ Main Menu ] View Drive Assignment .......[ 1 ] LD View / LD...

User Guide
Page 120
....05 249.99 Assignment Free Free Free Free [ Keys Available ] [Ctrl+H] Full Erase [ESC] Exit [↑] Up [↓] Down [PaUp/PaDn] Switch Page 5-14 Chapter 5: RAID configuration FastBuild (tm) Utility (c) 2004-2010 Promise Technology, Inc. [ Main Menu ] View Drive Assignment .......[ 1 ] LD View / LD Define Menu .....[ 2 ] Delete LD Menu 3 ] Controller Configuration .....[ 4 ] [ Keys.... The drive assignment is displayed as shown. 5.2.3 Viewing the Drive Assignment To view the drive assignment: 1. From the main control panel, press to to Select Option [ESC]Exit 2.
....05 249.99 Assignment Free Free Free Free [ Keys Available ] [Ctrl+H] Full Erase [ESC] Exit [↑] Up [↓] Down [PaUp/PaDn] Switch Page 5-14 Chapter 5: RAID configuration FastBuild (tm) Utility (c) 2004-2010 Promise Technology, Inc. [ Main Menu ] View Drive Assignment .......[ 1 ] LD View / LD Define Menu .....[ 2 ] Delete LD Menu 3 ] Controller Configuration .....[ 4 ] [ Keys.... The drive assignment is displayed as shown. 5.2.3 Viewing the Drive Assignment To view the drive assignment: 1. From the main control panel, press to to Select Option [ESC]Exit 2.
User Guide
Page 128
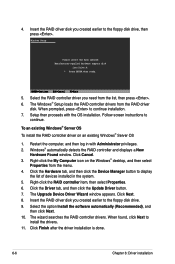
... item, then select Properties. 6. The Upgrade Device Driver Wizard window appears. The wizard searches the RAID controller drivers. Follow screen instructions to continue installation. 7. Select the option Install the software automatically (Recommended), and then click Next. 10. Windows Setup Please insert the disk ...Click the Driver tab, and then click the Update Driver button. 7. Click Next. 8. Select the RAID controller driver you need from the RAID driver disk. Insert the RAID driver disk you created earlier to install the drivers. 11. 4. Right-click the My Computer icon...
... item, then select Properties. 6. The Upgrade Device Driver Wizard window appears. The wizard searches the RAID controller drivers. Follow screen instructions to continue installation. 7. Select the option Install the software automatically (Recommended), and then click Next. 10. Windows Setup Please insert the disk ...Click the Driver tab, and then click the Update Driver button. 7. Click Next. 8. Select the RAID controller driver you need from the RAID driver disk. Insert the RAID driver disk you created earlier to install the drivers. 11. 4. Right-click the My Computer icon...
User Guide
Page 130
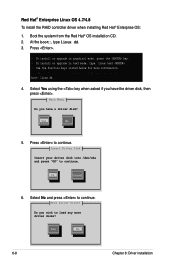
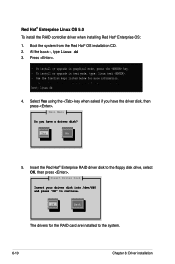
...Disks? Insert Driver Disk Insert your driver disk into /dev/sda and press "OK" to continue. Red Hat® Enterprise Linux OS 4.7/4.8 To install the RAID controller driver when installing Red Hat® Enterprise OS: 1. Boot the system from the Red Hat® OS installation CD. 2. Main Menu Do you wish... to continue. Press to load any more information. [F1-Main] [F2-Options] [F3-General] [F4-Kernel] [F5-Rescue] boot: linux dd 4. Do you have the driver disk, then press . At the boot:, type linux dd...
...Disks? Insert Driver Disk Insert your driver disk into /dev/sda and press "OK" to continue. Red Hat® Enterprise Linux OS 4.7/4.8 To install the RAID controller driver when installing Red Hat® Enterprise OS: 1. Boot the system from the Red Hat® OS installation CD. 2. Main Menu Do you wish... to continue. Press to load any more information. [F1-Main] [F2-Options] [F3-General] [F4-Kernel] [F5-Rescue] boot: linux dd 4. Do you have the driver disk, then press . At the boot:, type linux dd...
User Guide
Page 132
... Press . - Select Yes using the key when asked if you have the driver disk, then press . Use the function keys listed below for the RAID card are installed to the system. 6-10 Chapter 6: Driver installation Insert Driver Disk Insert your driver disk into /dev/fd0 and press "OK" to ...Hat® OS installation CD. 2. To install or upgrade in text mode, type: linux text . - OK Back The drivers for more information. [F1-Main] [F2-Options] [F3-General] [F4-Kernel] [F5-Rescue] boot: linux dd 4. Main Menu Do you have a driver disk? Red Hat® Enterprise Linux OS 5.0 To ...
... Press . - Select Yes using the key when asked if you have the driver disk, then press . Use the function keys listed below for the RAID card are installed to the system. 6-10 Chapter 6: Driver installation Insert Driver Disk Insert your driver disk into /dev/fd0 and press "OK" to ...Hat® OS installation CD. 2. To install or upgrade in text mode, type: linux text . - OK Back The drivers for more information. [F1-Main] [F2-Options] [F3-General] [F4-Kernel] [F5-Rescue] boot: linux dd 4. Main Menu Do you have a driver disk? Red Hat® Enterprise Linux OS 5.0 To ...
User Guide
Page 134
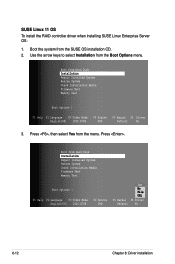
Boot the system from Hard Disk Installation Repair Installed System Rescue System Check Installation Media Firmware Test Memory Test Boot Options | F1 Help F2 Language F3 Video Mode English(US) 1024 X768 F4 Source DVD Yes No File URL F5 Kernel F6 Driver Default No 6-... 2. Boot from the menu. Press , then select Yes from Hard Disk Installation Repair Installed System Rescue System Check Installation Media Firmware Test Memory Test Boot Options | F1 Help F2 Language F3 Video Mode F4 Source F5 Kernel F6 Driver English(US) 1024 X768 DVD Default No 3. Press . Use the arrow keys...
Boot the system from Hard Disk Installation Repair Installed System Rescue System Check Installation Media Firmware Test Memory Test Boot Options | F1 Help F2 Language F3 Video Mode English(US) 1024 X768 F4 Source DVD Yes No File URL F5 Kernel F6 Driver Default No 6-... 2. Boot from the menu. Press , then select Yes from Hard Disk Installation Repair Installed System Rescue System Check Installation Media Firmware Test Memory Test Boot Options | F1 Help F2 Language F3 Video Mode F4 Source F5 Kernel F6 Driver English(US) 1024 X768 DVD Default No 3. Press . Use the arrow keys...

User Guide
Page 135
.... Select OK, then press . 4. Boot from Hard Disk Installation Repair Installed System Rescue System Check Installation Media Firmware Test Memory Test Boot Options acpi=off apic=bigsmp brokenmodules=ahci in Boot Options field, and press . Insert the RAID driver disk to the floppy disk drive. sda: USB Floppy Other device OK Back ASUS KCMA-D8 6-13
.... Select OK, then press . 4. Boot from Hard Disk Installation Repair Installed System Rescue System Check Installation Media Firmware Test Memory Test Boot Options acpi=off apic=bigsmp brokenmodules=ahci in Boot Options field, and press . Insert the RAID driver disk to the floppy disk drive. sda: USB Floppy Other device OK Back ASUS KCMA-D8 6-13


