Motherboard DIY Troubleshooting Guide
Page 59
ASUS K8V-XE Motherboard 2-21 Hammer Vid control [Startup] Legt die Hammer Voltage ID-Kontrolle fest. Konfigurationsoptionen: [Enabled] [Disabled] Für diese Funktion wird der AMD CPU-Kü...
ASUS K8V-XE Motherboard 2-21 Hammer Vid control [Startup] Legt die Hammer Voltage ID-Kontrolle fest. Konfigurationsoptionen: [Enabled] [Disabled] Für diese Funktion wird der AMD CPU-Kü...
Motherboard DIY Troubleshooting Guide
Page 61
... [4096] Plug & Play O/S [No] BIOS konfiguriert alle Geräte des Systems, wenn [No] gewählt wurde. Konfigurationsoptionen: [No] [Yes] ASUS K8V-XE Motherboard 2-23 Konfigurationsoptionen: [By Auto] [Mode 0] [Mode 1] [Mode 2] [Mode 3] [Mode 4] Primary Display Adapter [PCI] Legt das primäre Boorgerät fest...
... [4096] Plug & Play O/S [No] BIOS konfiguriert alle Geräte des Systems, wenn [No] gewählt wurde. Konfigurationsoptionen: [No] [Yes] ASUS K8V-XE Motherboard 2-23 Konfigurationsoptionen: [By Auto] [Mode 0] [Mode 1] [Mode 2] [Mode 3] [Mode 4] Primary Display Adapter [PCI] Legt das primäre Boorgerät fest...

K8V-XE User's Manual for English Edition
Page 14
...; processor and the VIA K8T890 chipset to 3GB of system memory with the list below. 1.2 Package contents ASUS K8V-XE motherboard ASUS motherboard support CD Check your retailer. 1-2 Chapter 1: Product introduction 1.1 Welcome! The motherboard combines the powers of ASUS quality motherboards! The motherboard delivers a host of new features and latest technologies making it , check the items in the world of...
...; processor and the VIA K8T890 chipset to 3GB of system memory with the list below. 1.2 Package contents ASUS K8V-XE motherboard ASUS motherboard support CD Check your retailer. 1-2 Chapter 1: Product introduction 1.1 Welcome! The motherboard combines the powers of ASUS quality motherboards! The motherboard delivers a host of new features and latest technologies making it , check the items in the world of...

K8V-XE User's Manual for English Edition
Page 15
... protection, and reduced total cost of new features, including Native Command Queueing (NCQ), and Power Management (PM) Implementation Algorithm. ASUS K8V-XE motherboard 1-3 This processor is backward compatible with lower pin count, reduced voltage requirement. This processor provides a dramatic leap forward in ...PDIF technology turns your computer into a high-end entertainment system with a host of ownership and development. S/PDIF out The motherboard supports the S/PDIF technology through the Serial ATA interfaces. The AMD Sempron™ is based on USB 2.0. Serial ATA ...
... protection, and reduced total cost of new features, including Native Command Queueing (NCQ), and Power Management (PM) Implementation Algorithm. ASUS K8V-XE motherboard 1-3 This processor is backward compatible with lower pin count, reduced voltage requirement. This processor provides a dramatic leap forward in ...PDIF technology turns your computer into a high-end entertainment system with a host of ownership and development. S/PDIF out The motherboard supports the S/PDIF technology through the Serial ATA interfaces. The AMD Sempron™ is based on USB 2.0. Serial ATA ...
K8V-XE User's Manual for English Edition
Page 17
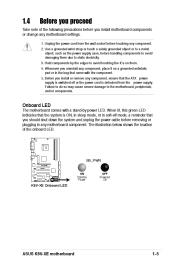
...wrist strap or touch a safely grounded object or to a metal object, such as the power supply case, before you install motherboard components or change any component, ensure that the ATX power supply is switched off or the power cord is ON, in ...motherboard settings. 2. Before you should shut down the system and unplug the power cable before touching any motherboard component. Failure to do so may cause severe damage to avoid touching the ICs on a grounded antistatic pad or in any component. SB_PWR K8V -XE R ON Standby Power OFF Powered Off K8V-XE Onboard LED ASUS K8V-XE motherboard...
...wrist strap or touch a safely grounded object or to a metal object, such as the power supply case, before you install motherboard components or change any component, ensure that the ATX power supply is switched off or the power cord is ON, in ...motherboard settings. 2. Before you should shut down the system and unplug the power cable before touching any motherboard component. Failure to do so may cause severe damage to avoid touching the ICs on a grounded antistatic pad or in any component. SB_PWR K8V -XE R ON Standby Power OFF Powered Off K8V-XE Onboard LED ASUS K8V-XE motherboard...

K8V-XE User's Manual for English Edition
Page 19
1.5.2 Placement direction When installing the motherboard, make sure that you place it into the chassis in the image below. 1.5.3 Screw holes Place six (6) screws into the holes indicated by circles to secure the motherboard to the rear part of the chassis K8V -XE R ASUS K8V-XE motherboard 1-7 Do not overtighten the screws! Doing so may damage the motherboard. Place this side towards the rear of the chassis as indicated in the correct orientation. The edge with external ports goes to the chassis.
1.5.2 Placement direction When installing the motherboard, make sure that you place it into the chassis in the image below. 1.5.3 Screw holes Place six (6) screws into the holes indicated by circles to secure the motherboard to the rear part of the chassis K8V -XE R ASUS K8V-XE motherboard 1-7 Do not overtighten the screws! Doing so may damage the motherboard. Place this side towards the rear of the chassis as indicated in the correct orientation. The edge with external ports goes to the chassis.

K8V-XE User's Manual for English Edition
Page 21
... fits only in place. Install specifically designed heatsink and fan assembly. Position the CPU above the socket such that it is locked. 6. ASUS K8V-XE motherboard 1-9 Carefully insert the CPU into the socket to install a CPU. 1. DO NOT force the CPU into the socket until it up to 90°-100... secure the CPU. Unlock the socket by pressing the lever sideways, then lift it fits in one correct orientation. The lever clicks on the motherboard. 2.
... fits only in place. Install specifically designed heatsink and fan assembly. Position the CPU above the socket such that it is locked. 6. ASUS K8V-XE motherboard 1-9 Carefully insert the CPU into the socket to install a CPU. 1. DO NOT force the CPU into the socket until it up to 90°-100... secure the CPU. Unlock the socket by pressing the lever sideways, then lift it fits in one correct orientation. The lever clicks on the motherboard. 2.

K8V-XE User's Manual for English Edition
Page 23
Memory Frequency Sockets DIMM1 populated populated ---populated populated DIMM2 -populated populated -populated -populated DIMM3 ---populated populated populated populated Frequency 400MHz 400MHz 400MHz 400MHz 400MHz 400MHz 333MHz ASUS K8V-XE motherboard 1-11
Memory Frequency Sockets DIMM1 populated populated ---populated populated DIMM2 -populated populated -populated -populated DIMM3 ---populated populated populated populated Frequency 400MHz 400MHz 400MHz 400MHz 400MHz 400MHz 333MHz ASUS K8V-XE motherboard 1-11
K8V-XE User's Manual for English Edition
Page 25
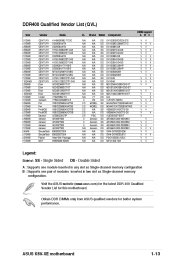
... 512MB 256MB 512MB 512MB 256MB 256MB 512MB 512MB 56MB 512MB 024MB 512MB V V V Legend: Side(s): SS - Obtain DDR DIMMs only from ASUS qualified vendors for this motherboard. Single Sided DS - Double Sided A : Supports one module inserted in any slot as Single-channel memory configuration B : Supports... one pair of modules inserted in two slot as Single-channel memory configuration. Visit the ASUS website (www.asus.com) for the latest DDR 400 Qualified Vendor List for better system performance. ASUS K8V-XE motherboard 1-13
... 512MB 256MB 512MB 512MB 256MB 256MB 512MB 512MB 56MB 512MB 024MB 512MB V V V Legend: Side(s): SS - Obtain DDR DIMMs only from ASUS qualified vendors for this motherboard. Single Sided DS - Double Sided A : Supports one module inserted in any slot as Single-channel memory configuration B : Supports... one pair of modules inserted in two slot as Single-channel memory configuration. Visit the ASUS website (www.asus.com) for the latest DDR 400 Qualified Vendor List for better system performance. ASUS K8V-XE motherboard 1-13

K8V-XE User's Manual for English Edition
Page 27
shared INT C - - shared shared - ASUS K8V-XE motherboard 1-15 Otherwise, conflicts will arise between the two PCI groups, making the system unstable and the card inoperable. 1.8.3 PCI slots The PCI slots ... PCI cards on shared slots, ensure that the drivers support "Share IRQ" or that comply with PCI specifications. shared - 1.8.2 IRQ assignments for this motherboard PCI slot 1 PCI slot 2 PCI slot 3 LAN Onboard Audio Onboard USB Onboard RAID INT A shared INT B - shared - - shared -
shared INT C - - shared shared - ASUS K8V-XE motherboard 1-15 Otherwise, conflicts will arise between the two PCI groups, making the system unstable and the card inoperable. 1.8.3 PCI slots The PCI slots ... PCI cards on shared slots, ensure that the drivers support "Share IRQ" or that comply with PCI specifications. shared - 1.8.2 IRQ assignments for this motherboard PCI slot 1 PCI slot 2 PCI slot 3 LAN Onboard Audio Onboard USB Onboard RAID INT A shared INT B - shared - - shared -
K8V-XE User's Manual for English Edition
Page 29
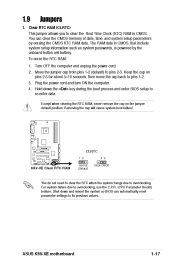
... RTC RAM, never remove the cap on pins 2-3 for about 5~10 seconds, then move the cap back to its previous values. K8V -XE R CLRTC 1 2 2 3 Clear CMOS K8V-XE Clear RTC RAM Normal (Default) You do not need to clear the RTC when the system hangs due to overclocking, use the ... the RTC RAM: 1. Turn OFF the computer and unplug the power cord. 2. Plug the power cord and turn ON the computer. 4. ASUS K8V-XE motherboard 1-17 Keep the cap on the jumper default position. Removing the cap will cause system boot failure! You can automatically reset parameter settings to pins...
... RTC RAM, never remove the cap on pins 2-3 for about 5~10 seconds, then move the cap back to its previous values. K8V -XE R CLRTC 1 2 2 3 Clear CMOS K8V-XE Clear RTC RAM Normal (Default) You do not need to clear the RTC when the system hangs due to overclocking, use the ... the RTC RAM: 1. Turn OFF the computer and unplug the power cord. 2. Plug the power cord and turn ON the computer. 4. ASUS K8V-XE motherboard 1-17 Keep the cap on the jumper default position. Removing the cap will cause system boot failure! You can automatically reset parameter settings to pins...

K8V-XE User's Manual for English Edition
Page 31
...Line In (light blue) jack connects a tape player or other devices. 3. In 6-channel mode, the function of this jack becomes Front Speaker Out. 6. ASUS K8V-XE motherboard 1-19 This 25-pin port connects a parallel printer, a scanner, or other audio sources. Microphone jack. Parallel port. This port allows connection to the table ... table. RJ-45 port. The functions of this jack becomes Rear Speaker Out. 1.10 Connectors This section describes and illustrates the motherboard rear panel and internal connectors. 1.10.1 Rear panel connectors 1 2 3 4 5 6 12 11 10 9 8 7 1.
...Line In (light blue) jack connects a tape player or other devices. 3. In 6-channel mode, the function of this jack becomes Front Speaker Out. 6. ASUS K8V-XE motherboard 1-19 This 25-pin port connects a parallel printer, a scanner, or other audio sources. Microphone jack. Parallel port. This port allows connection to the table ... table. RJ-45 port. The functions of this jack becomes Rear Speaker Out. 1.10 Connectors This section describes and illustrates the motherboard rear panel and internal connectors. 1.10.1 Rear panel connectors 1 2 3 4 5 6 12 11 10 9 8 7 1.

K8V-XE User's Manual for English Edition
Page 33
...drive connector (34-1 pin FLOPPY) This connector supports the provided floppy drive ribbon cable. After connecting one end to the motherboard, connect the other end to the floppy drive. (Pin 5 is removed to match the covered hole on the UltraATA ... 1. Pin 20 on the floppy ribbon cable to PIN 1. 2. FLOPPY K8V -XE R PIN 1 NOTE: Orient the red markings on each IDE connector is intentional. K8V-XE Floppy Disk Drive Connector ASUS K8V-XE motherboard 1-21 K8V -XE R PRI_IDE SEC_IDE K8V-XE IDE Connectors NOTE: Orient the red markings (usually zigzag) on the UltraATA...
...drive connector (34-1 pin FLOPPY) This connector supports the provided floppy drive ribbon cable. After connecting one end to the motherboard, connect the other end to the floppy drive. (Pin 5 is removed to match the covered hole on the UltraATA ... 1. Pin 20 on the floppy ribbon cable to PIN 1. 2. FLOPPY K8V -XE R PIN 1 NOTE: Orient the red markings on each IDE connector is intentional. K8V-XE Floppy Disk Drive Connector ASUS K8V-XE motherboard 1-21 K8V -XE R PRI_IDE SEC_IDE K8V-XE IDE Connectors NOTE: Orient the red markings (usually zigzag) on the UltraATA...

K8V-XE User's Manual for English Edition
Page 35
... may install the USB module in the chassis front panel. CPU_FAN GND +12V Rotation K8V -XE R CHA_FAN GND +12V Rotation K8V-XE Fan Connectors 6. USB+5V USB_P6USB_P6+ GND NC K8V -XE R USB56 K8V-XE USB 2.0 Connectors USB+5V USB_P5USB_P5+ GND • The USB 2.0 module is available...~740mA (8.88W max.) or a total of the connector. Connect the fan cables to the fan connectors. You may damage the motherboard components. ASUS K8V-XE motherboard USB+5V USB_P7USB_P7+ GND 1 USB78 1 USB+5V USB_P8USB_P8+ GND NC 1-23 These are inadequate, a USB header is purchased separately...
... may install the USB module in the chassis front panel. CPU_FAN GND +12V Rotation K8V -XE R CHA_FAN GND +12V Rotation K8V-XE Fan Connectors 6. USB+5V USB_P6USB_P6+ GND NC K8V -XE R USB56 K8V-XE USB 2.0 Connectors USB+5V USB_P5USB_P5+ GND • The USB 2.0 module is available...~740mA (8.88W max.) or a total of the connector. Connect the fan cables to the fan connectors. You may damage the motherboard components. ASUS K8V-XE motherboard USB+5V USB_P7USB_P7+ GND 1 USB78 1 USB+5V USB_P8USB_P8+ GND NC 1-23 These are inadequate, a USB header is purchased separately...

K8V-XE User's Manual for English Edition
Page 37
...(16-1 pin GAME) This connector is for a chassis-mounted front panel audio I /O module cable to avail of the system chassis. ASUS K8V-XE motherboard MIC2 MICPWR Line out_R NC Line out_L 1-25 Front panel audio connector (10-1 pin AAFP) This connector is purchased separately . 7. Connect...GAME/MIDI port connects a joystick or game pad for playing games, and MIDI devices for playing or editing audio files. 6. K8V -XE R The Game/MIDI port is for a GAME/MIDI port. Azalia compliant definition GND PRESENCE# SENSE1_RETUR SENSE2_RETUR AGND +5VA BLINE_OUT_R MIDI_IN J2B2 ...
...(16-1 pin GAME) This connector is for a chassis-mounted front panel audio I /O module cable to avail of the system chassis. ASUS K8V-XE motherboard MIC2 MICPWR Line out_R NC Line out_L 1-25 Front panel audio connector (10-1 pin AAFP) This connector is purchased separately . 7. Connect...GAME/MIDI port connects a joystick or game pad for playing games, and MIDI devices for playing or editing audio files. 6. K8V -XE R The Game/MIDI port is for a GAME/MIDI port. Azalia compliant definition GND PRESENCE# SENSE1_RETUR SENSE2_RETUR AGND +5VA BLINE_OUT_R MIDI_IN J2B2 ...

K8V-XE User's Manual for English Edition
Page 41
...2. When the A:> appears, replace the bootable floppy disk with the latest BIOS file. 3. Copy the original (or the latest) motherboard BIOS to a floppy disk. Save only the updated BIOS file in DOS mode using the bootable floppy disk you created earlier.... 4. e. AwardBIOS Flash Utility for ASUS V1.01 (C) Phoenix Technologies Ltd. c. At the prompt, type awdflash then press . All Rights Reserved For K8T890-8251-K8V-XE-00 DATE: 01/05/2006 Flash Type - ASUS K8V-XE motherboard 2-3 Click Start, then select Run. PMC Pm49FL004T LPC...
...2. When the A:> appears, replace the bootable floppy disk with the latest BIOS file. 3. Copy the original (or the latest) motherboard BIOS to a floppy disk. Save only the updated BIOS file in DOS mode using the bootable floppy disk you created earlier.... 4. e. AwardBIOS Flash Utility for ASUS V1.01 (C) Phoenix Technologies Ltd. c. At the prompt, type awdflash then press . All Rights Reserved For K8T890-8251-K8V-XE-00 DATE: 01/05/2006 Flash Type - ASUS K8V-XE motherboard 2-3 Click Start, then select Run. PMC Pm49FL004T LPC...

K8V-XE User's Manual for English Edition
Page 43
....bin Message: Please Wait! 4. AwardBIOS Flash Utility for the current BIOS file in the Save current BIOS as field, then press . ASUS K8V-XE motherboard 2-5 2.1.3 Saving the current BIOS file You can load the current BIOS file when the BIOS file gets corrupted during the fl... file to the floppy disk, then returns to File! All Rights Reserved For K8T890-8251-K8V-XE-00 DATE: 01/05/2006 Flash Type - Type a filename for ASUS V1.01 (C) Phoenix Technologies Ltd. PMC Pm49FL004T LPC/FWH File Name to Program: 0110.bin Now Backup ...
....bin Message: Please Wait! 4. AwardBIOS Flash Utility for the current BIOS file in the Save current BIOS as field, then press . ASUS K8V-XE motherboard 2-5 2.1.3 Saving the current BIOS file You can load the current BIOS file when the BIOS file gets corrupted during the fl... file to the floppy disk, then returns to File! All Rights Reserved For K8T890-8251-K8V-XE-00 DATE: 01/05/2006 Flash Type - Type a filename for ASUS V1.01 (C) Phoenix Technologies Ltd. PMC Pm49FL004T LPC/FWH File Name to Program: 0110.bin Now Backup ...

K8V-XE User's Manual for English Edition
Page 45
... Detecting IDE ATAPI device... Restart the system after the utility completes the updating process. Award BootBlock BIOS v1.0 Copyright (c) 2000, Award Software, Inc. ASUS K8V-XE motherboard 2-7 Visit the ASUS website (www.asus.com) to download the latest BIOS file. Recovering the BIOS from a floppy disk To recover the BIOS from the optical drive, then... original or updated BIOS file. Remove any CD from the support CD: 1. The recovered BIOS may not be the latest BIOS version for this motherboard.
... Detecting IDE ATAPI device... Restart the system after the utility completes the updating process. Award BootBlock BIOS v1.0 Copyright (c) 2000, Award Software, Inc. ASUS K8V-XE motherboard 2-7 Visit the ASUS website (www.asus.com) to download the latest BIOS file. Recovering the BIOS from a floppy disk To recover the BIOS from the optical drive, then... original or updated BIOS file. Remove any CD from the support CD: 1. The recovered BIOS may not be the latest BIOS version for this motherboard.

K8V-XE User's Manual for English Edition
Page 47
...information. ASUS K8V-XE motherboard 2-9 Installing ASUS Update To install ASUS Update: 1. The Drivers menu appears. 2. See page 5-3 for the Utilities screen menu. 3. The ASUS Update utility is copied to your system. Click the Utilities tab, then click Install ASUS Update VX.XX.XX. The ASUS Update utility... Internet Service Provider (ISP). 2.1.6 ASUS Update utility • Save the current BIOS file The ASUS Update is a utility that allows you to manage, save, and update the motherboard BIOS in the support CD that comes with the motherboard package. Place the support CD in...
...information. ASUS K8V-XE motherboard 2-9 Installing ASUS Update To install ASUS Update: 1. The Drivers menu appears. 2. See page 5-3 for the Utilities screen menu. 3. The ASUS Update utility is copied to your system. Click the Utilities tab, then click Install ASUS Update VX.XX.XX. The ASUS Update utility... Internet Service Provider (ISP). 2.1.6 ASUS Update utility • Save the current BIOS file The ASUS Update is a utility that allows you to manage, save, and update the motherboard BIOS in the support CD that comes with the motherboard package. Place the support CD in...

K8V-XE User's Manual for English Edition
Page 49
... is capable of updating itself through a BIOS file: 1. Updating the BIOS through a BIOS file To update the BIOS through the Internet. The ASUS Update main window appears. 2. ASUS K8V-XE motherboard 2-11 Follow the screen instructions to complete the update process. 4. From the FTP site, select the BIOS version that you wish to avail...
... is capable of updating itself through a BIOS file: 1. Updating the BIOS through a BIOS file To update the BIOS through the Internet. The ASUS Update main window appears. 2. ASUS K8V-XE motherboard 2-11 Follow the screen instructions to complete the update process. 4. From the FTP site, select the BIOS version that you wish to avail...


