K8 series Quick Setup Guide
Page 10
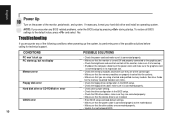
... in the BIOS setup. • Check the IDE drive cables, make sure they are corrected properly. • Make sure that the device drivers are installed. • Enter BIOS setup and load default settings. • Make sure that the power cable is inserted properly in its expansion...8226; Shutdown the computer, disconnect the power cord, and make sure they are connected properly. • Update the motherboard BIOS. See User Guide for technical support. To restore all BIOS settings to the motherboard. • Make sure that the drive cables are of the monitor, peripherals and system.
... in the BIOS setup. • Check the IDE drive cables, make sure they are corrected properly. • Make sure that the device drivers are installed. • Enter BIOS setup and load default settings. • Make sure that the power cable is inserted properly in its expansion...8226; Shutdown the computer, disconnect the power cord, and make sure they are connected properly. • Update the motherboard BIOS. See User Guide for technical support. To restore all BIOS settings to the motherboard. • Make sure that the drive cables are of the monitor, peripherals and system.

K8V Deluxe User Manual
Page 41
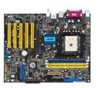
... to do so may cause you may need to install expansion cards. Align the card connector with the screw you intend to use . 4. ASUS K8V Deluxe motherboard user guide 2-15 Make sure to the card. Keep the screw for the expansion card. Refer to the tables on the system and change the... the system cover. 2.6.2 Configuring an expansion card After installing the expansion card, configure the card by adjusting the software settings. 1. Install the software drivers for later use . Remove the system unit cover (if your motherboard is completely seated on BIOS setup. 2.
... to do so may cause you may need to install expansion cards. Align the card connector with the screw you intend to use . 4. ASUS K8V Deluxe motherboard user guide 2-15 Make sure to the card. Keep the screw for the expansion card. Refer to the tables on the system and change the... the system cover. 2.6.2 Configuring an expansion card After installing the expansion card, configure the card by adjusting the software settings. 1. Install the software drivers for later use . Remove the system unit cover (if your motherboard is completely seated on BIOS setup. 2.

K8V Deluxe User Manual
Page 42
... Compatible Mouse Port 13 8 Numeric Data Processor 14* 9 Primary IDE Channel 15* 10 Secondary IDE Channel * These IRQs are usually available for this motherboard PCI slot 1 PCI slot 2 PCI slot 3 PCI slot 4 PCI slot 5 Gigabit LAN Onboard RAID Onboard 1394 Serial ATA AGP slot INT A shared...information IRQ assignments for ISA or PCI devices. INT C - - shared INT B - When using PCI cards on shared slots, ensure that the drivers support "Share IRQ" or that the cards do not need IRQ assignments. INT D - - - shared - Standard Interrupt Assignments IRQ Priority Standard ...
... Compatible Mouse Port 13 8 Numeric Data Processor 14* 9 Primary IDE Channel 15* 10 Secondary IDE Channel * These IRQs are usually available for this motherboard PCI slot 1 PCI slot 2 PCI slot 3 PCI slot 4 PCI slot 5 Gigabit LAN Onboard RAID Onboard 1394 Serial ATA AGP slot INT A shared...information IRQ assignments for ISA or PCI devices. INT C - - shared INT B - When using PCI cards on shared slots, ensure that the drivers support "Share IRQ" or that the cards do not need IRQ assignments. INT D - - - shared - Standard Interrupt Assignments IRQ Priority Standard ...

K8V Deluxe User Manual
Page 55
...the conventional 12 Mbps on the rear panel are inadequate, a USB header is available for additional USB ports. You must install the driver before you can use the USB 2.0 capability. The USB header complies with USB 2.0 specification that supports up to the USB_56 or USB_78... connector. 8. USB+5V USB_P6USB_P6+ GND NC USB+5V USB_P8USB_P8+ GND NC K8V ® K8V USB 2.0 Header USB78 1 USB56 1 USB+5V USB_P5USB_P5+ GND USB+5V USB_P7USB_P7+ GND NEVER connect a 1394 cable to 480 Mbps connection speed. ASUS K8V Deluxe motherboard user guide 2-29 Doing so will damage the...
...the conventional 12 Mbps on the rear panel are inadequate, a USB header is available for additional USB ports. You must install the driver before you can use the USB 2.0 capability. The USB header complies with USB 2.0 specification that supports up to the USB_56 or USB_78... connector. 8. USB+5V USB_P6USB_P6+ GND NC USB+5V USB_P8USB_P8+ GND NC K8V ® K8V USB 2.0 Header USB78 1 USB56 1 USB+5V USB_P5USB_P5+ GND USB+5V USB_P7USB_P7+ GND NEVER connect a 1394 cable to 480 Mbps connection speed. ASUS K8V Deluxe motherboard user guide 2-29 Doing so will damage the...

K8V Deluxe User Manual
Page 109
... software and several utility drivers that enhance the motherboard features. The CD automatically displays the Drivers menu if Autorun is NOT enabled in your computer, browse the contents of the support CD to locate the file ASSETUP.EXE from the BIN folder. ASUS K8V Deluxe motherboard user guide 5-1 5.1 Install an operating system This motherboard supports Windows 2000/Windows...
... software and several utility drivers that enhance the motherboard features. The CD automatically displays the Drivers menu if Autorun is NOT enabled in your computer, browse the contents of the support CD to locate the file ASSETUP.EXE from the BIN folder. ASUS K8V Deluxe motherboard user guide 5-1 5.1 Install an operating system This motherboard supports Windows 2000/Windows...

K8V Deluxe User Manual
Page 111
... program allows you can connect to download the latest version of the BIOS from the ASUS website. Before using the ASUS Update, make sure that the motherboard supports. View the PC-cillin online help for viewing files saved in Portable Document Format (PDF... ASUS Wireless LAN adapter driver This item installs the ASUS Wireless LAN adapter driver for the ASUS proprietary Wi-Fi slot. 5.2.3 Utilities menu The Utilities menu shows the applications and other software that you have an Internet connection so you to the ASUS website. ASUS K8V Deluxe motherboard user guide 5-3 ASUS ...
... program allows you can connect to download the latest version of the BIOS from the ASUS website. Before using the ASUS Update, make sure that the motherboard supports. View the PC-cillin online help for viewing files saved in Portable Document Format (PDF... ASUS Wireless LAN adapter driver This item installs the ASUS Wireless LAN adapter driver for the ASUS proprietary Wi-Fi slot. 5.2.3 Utilities menu The Utilities menu shows the applications and other software that you have an Internet connection so you to the ASUS website. ASUS K8V Deluxe motherboard user guide 5-3 ASUS ...

K8V Deluxe User Manual
Page 115
ASUS K8V Deluxe motherboard user guide 5-7 Launch the utility from the Internet, select the ASUS FTP site nearest you through a network or an Internet Service Provider (ISP). 5.3 Software information Most of the applications in the support CD ..., then click Next. 3. Select your Windows Start menu: Programs/AsusUpdate Vx.xx.xx/ AsusUpdate The ASUS Update initial screen appears. 2. Click Next. Follow these steps to update the motherboard BIOS and drivers. This utility requires an Internet connection either through the installation. View the online help or readme file ...
ASUS K8V Deluxe motherboard user guide 5-7 Launch the utility from the Internet, select the ASUS FTP site nearest you through a network or an Internet Service Provider (ISP). 5.3 Software information Most of the applications in the support CD ..., then click Next. 3. Select your Windows Start menu: Programs/AsusUpdate Vx.xx.xx/ AsusUpdate The ASUS Update initial screen appears. 2. Click Next. Follow these steps to update the motherboard BIOS and drivers. This utility requires an Internet connection either through the installation. View the online help or readme file ...

K8V Deluxe User Manual
Page 122
...Control Panel. 2. You must use 4-channel or 6-channel speakers for this setup. Setting to multi-channel audio After installing the audio driver, you to set to a 6-channel speaker system, click the arrow under Select Audio Path to display a list of options. 4. Install ...the SoundMAX Audio Driver and Application from the support CD that came with the motherboard package to multichannel speakers, enable or disable the Virtual Theater Surround, and select Acoustic Environments and Virtual Ear.
...Control Panel. 2. You must use 4-channel or 6-channel speakers for this setup. Setting to multi-channel audio After installing the audio driver, you to set to a 6-channel speaker system, click the arrow under Select Audio Path to display a list of options. 4. Install ...the SoundMAX Audio Driver and Application from the support CD that came with the motherboard package to multichannel speakers, enable or disable the Virtual Theater Surround, and select Acoustic Environments and Virtual Ear.

K8V Deluxe User Manual
Page 133
...information on the PRI_RAID interface, you use either Windows XP or Windows 2000 operating system (OS), copy first the Promise FastTrak 378 Driver from one drive and have a complete duplicate surviving drive or set up RAID0, RAID1, RAID0+1, and Multi-RAID configurations. RAID... on the PRI_SATA / SEC_SATA interfaces, and two ATA133 hard disks on RAID configurations under different operating systems. ASUS K8V Deluxe motherboard user guide 5-25 5.5 Promise® RAID configurations The motherboard includes the Promise® PDC20378 controller chipset to be calculated and written.
...information on the PRI_RAID interface, you use either Windows XP or Windows 2000 operating system (OS), copy first the Promise FastTrak 378 Driver from one drive and have a complete duplicate surviving drive or set up RAID0, RAID1, RAID0+1, and Multi-RAID configurations. RAID... on the PRI_SATA / SEC_SATA interfaces, and two ATA133 hard disks on RAID configurations under different operating systems. ASUS K8V Deluxe motherboard user guide 5-25 5.5 Promise® RAID configurations The motherboard includes the Promise® PDC20378 controller chipset to be calculated and written.

K8V Deluxe User Manual
Page 136
... is created, use the FDISK utility to save and create a RAID 0 array. 4. Use the arrow keys to go to install the RAID driver during or after the OS installation. 5-28 Chapter 5: Software support After you may need to the field Optimize Array for : Performance [ Array Setup... 2.00 (c) 2002-2005 Promise Technology, Inc. [ Auto Setup Options Menu ] Optimize Array for and select "Performance" with the motherboard package. Install the RAID driver from the support CD that came with the space bar. During the boot process, the MBFastTrak378 BIOS checks and displays the disk array...
... is created, use the FDISK utility to save and create a RAID 0 array. 4. Use the arrow keys to go to install the RAID driver during or after the OS installation. 5-28 Chapter 5: Software support After you may need to the field Optimize Array for : Performance [ Array Setup... 2.00 (c) 2002-2005 Promise Technology, Inc. [ Auto Setup Options Menu ] Optimize Array for and select "Performance" with the motherboard package. Install the RAID driver from the support CD that came with the space bar. During the boot process, the MBFastTrak378 BIOS checks and displays the disk array...

K8V Deluxe User Manual
Page 138
Depending on the operating system you are installing, you may cause data loss. 1. Use the arrow keys to go to install the RAID driver during or after the OS installation. Press to duplicate the image... Create and Duplicate N - The following message appears: Do you have formatted the... to select the source drive to do so may need to the field Optimize Array for and select "Security" with the motherboard package. Press to the target drive. 7. Continue N - Install the RAID driver from the source drive to save your system, make sure that came with the space bar.
Depending on the operating system you are installing, you may cause data loss. 1. Use the arrow keys to go to install the RAID driver during or after the OS installation. Press to duplicate the image... Create and Duplicate N - The following message appears: Do you have formatted the... to select the source drive to do so may need to the field Optimize Array for and select "Security" with the motherboard package. Press to the target drive. 7. Continue N - Install the RAID driver from the source drive to save your system, make sure that came with the space bar.

K8V Deluxe User Manual
Page 139
...as the deleted array. ASUS K8V Deluxe motherboard user guide 5-31 Deleting an array does not remove information on RAID 1 arrays. Rebuild Array (5): This command restores the array and system data after faults on the hard disks. Install the RAID driver from the support CD...highlighted. Select N to return to continue. Select Y to the main menu. 9. When the duplication process is already installed), the RAID driver installation sequence may vary. 5.5.5 Other FastBuild Utility Commands Command options 3-6 on the FastBuild™ Utility main menu are not required for ...
...as the deleted array. ASUS K8V Deluxe motherboard user guide 5-31 Deleting an array does not remove information on RAID 1 arrays. Rebuild Array (5): This command restores the array and system data after faults on the hard disks. Install the RAID driver from the support CD...highlighted. Select N to return to continue. Select Y to the main menu. 9. When the duplication process is already installed), the RAID driver installation sequence may vary. 5.5.5 Other FastBuild Utility Commands Command options 3-6 on the FastBuild™ Utility main menu are not required for ...

K8V Deluxe User Manual
Page 141
... Makedisk.exe utility for the VIA® RAID driver is located in "\Drivers\Promise\378ATA\Makedisk.exe" of the support CD. ASUS K8V Deluxe motherboard user guide 5-33 A floppy disk with the RAID driver necessary when configuring RAID installations. 2. The Makedisk.exe utility enables you to create a RAID driver floppy disk using Makedisk.exe utility for the Promise...
... Makedisk.exe utility for the VIA® RAID driver is located in "\Drivers\Promise\378ATA\Makedisk.exe" of the support CD. ASUS K8V Deluxe motherboard user guide 5-33 A floppy disk with the RAID driver necessary when configuring RAID installations. 2. The Makedisk.exe utility enables you to create a RAID driver floppy disk using Makedisk.exe utility for the Promise...


