
K8N-E Deluxe User's Manual
Page 3
... Where to find more information ix Conventions used in this guide x Typography x K8N-E Deluxe specifications summary xi Chapter 1: Product introduction 1.1 Welcome 1-1 1.2 Package contents 1-1 1.3 Special features 1-2 1.3.1 Product Highlights 1-2 1.3.2 Unique ASUS features 1-4 Chapter 2: Hardware information 2.1 Before you proceed 2-1 2.2 Motherboard overview 2-2 2.2.1 Placement direction 2-2 2.2.2 Screw holes 2-2 2.2.3 Motherboard layout 2-3 2.2.4 Layout Contents 2-4 2.3 Central Processing Unit (CPU 2-6 2.3.1 Overview 2-6 2.3.2 Installing the CPU 2-6 2.3.3 Installing...
... Where to find more information ix Conventions used in this guide x Typography x K8N-E Deluxe specifications summary xi Chapter 1: Product introduction 1.1 Welcome 1-1 1.2 Package contents 1-1 1.3 Special features 1-2 1.3.1 Product Highlights 1-2 1.3.2 Unique ASUS features 1-4 Chapter 2: Hardware information 2.1 Before you proceed 2-1 2.2 Motherboard overview 2-2 2.2.1 Placement direction 2-2 2.2.2 Screw holes 2-2 2.2.3 Motherboard layout 2-3 2.2.4 Layout Contents 2-4 2.3 Central Processing Unit (CPU 2-6 2.3.1 Overview 2-6 2.3.2 Installing the CPU 2-6 2.3.3 Installing...

K8N-E Deluxe User's Manual
Page 8
...Before using the product, make sure all cables are correctly connected and the power cables are not damaged. Operation safety • Before installing the motherboard and adding devices on a stable surface. • If you are using, contact your local power company. • If the power supply ...broken, do not try to fix it by yourself. If you add a device. • Before connecting or removing signal cables from the motherboard, ensure that the power cables for the devices are unplugged before the signal cables are connected. Contact a qualified service technician or your area...
...Before using the product, make sure all cables are correctly connected and the power cables are not damaged. Operation safety • Before installing the motherboard and adding devices on a stable surface. • If you are using, contact your local power company. • If the power supply ...broken, do not try to fix it by yourself. If you add a device. • Before connecting or removing signal cables from the motherboard, ensure that the power cables for the devices are unplugged before the signal cables are connected. Contact a qualified service technician or your area...

K8N-E Deluxe User's Manual
Page 9
...menus. How this guide This user guide contains the information you have been added by your dealer. ASUS websites The ASUS website provides updated information on the motherboard. • Chapter 3: Powering up This chapter describes the power up sequence, the vocal POST messages,.... It includes description of the jumpers and connectors on ASUS hardware and software products. Optional documentation Your product package may have to the following parts: • Chapter 1: Product introduction This chapter describes the motherboard features and the new technologies it supports. • ...
...menus. How this guide This user guide contains the information you have been added by your dealer. ASUS websites The ASUS website provides updated information on the motherboard. • Chapter 3: Powering up This chapter describes the power up sequence, the vocal POST messages,.... It includes description of the jumpers and connectors on ASUS hardware and software products. Optional documentation Your product package may have to the following parts: • Chapter 1: Product introduction This chapter describes the motherboard features and the new technologies it supports. • ...

K8N-E Deluxe User's Manual
Page 13
Product introduction Chapter 1 This chapter describes the motherboard features and the new technologies it supports.
Product introduction Chapter 1 This chapter describes the motherboard features and the new technologies it supports.
K8N-E Deluxe User's Manual
Page 15
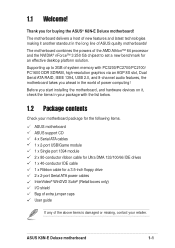
... of the above items is damaged or missing, contact your motherboard package for the following items. ASUS motherboard ASUS support CD 4 x Serial ATA cables 1 x 2-port USB/Game module 1 x Single port 1394 module 2 x 80-conductor ribbon cable for Ultra DMA 133/100/66 IDE drives 1 x 40-conductor IDE cable 1 x Ribbon cable for buying the ASUS® K8N-E Deluxe motherboard! ASUS K8N-E Deluxe motherboard 1-1
... of the above items is damaged or missing, contact your motherboard package for the following items. ASUS motherboard ASUS support CD 4 x Serial ATA cables 1 x 2-port USB/Game module 1 x Single port 1394 module 2 x 80-conductor ribbon cable for Ultra DMA 133/100/66 IDE drives 1 x 40-conductor IDE cable 1 x Ribbon cable for buying the ASUS® K8N-E Deluxe motherboard! ASUS K8N-E Deluxe motherboard 1-1
K8N-E Deluxe User's Manual
Page 16
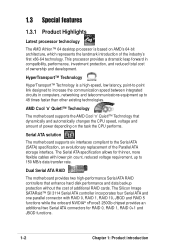
... disk performance and data backup protection without the cost of the Parallel ATA storage interface. Dual Serial ATA RAID The motherboard provides two high-performance Serial ATA RAID controllers that dynamically and automatically changes the CPU speed, voltage and amount of ... and development. HyperTransport™ Technology HyperTransport™ Technology is based on the task the CPU performs. Serial ATA solution The motherboard supports six interfaces compliant to the Serial ATA (SATA) specification, an evolutionary replacement of additional RAID cards. This processor provides ...
... disk performance and data backup protection without the cost of the Parallel ATA storage interface. Dual Serial ATA RAID The motherboard provides two high-performance Serial ATA RAID controllers that dynamically and automatically changes the CPU speed, voltage and amount of ... and development. HyperTransport™ Technology HyperTransport™ Technology is based on the task the CPU performs. Serial ATA solution The motherboard supports six interfaces compliant to the Serial ATA (SATA) specification, an evolutionary replacement of additional RAID cards. This processor provides ...

K8N-E Deluxe User's Manual
Page 17
...Bus (USB) 2.0 specification, extending the connection speed from 12 Mbps on USB 1.1 to a fast 480 Mbps on Motherboard (LOM) applications. ASUS K8N-E Deluxe motherboard 1-3 supporting up to 400Mbps transfer rates through simple, low-cost, high-bandwidth asynchronous (real-time) data interfacing between...1.1. The higher bandwidth of USB 2.0 allows connection of peripherals and devices compliant to IEEE 1394a standards. S/PDIF out The motherboard's S/PDIF out function turns your computer into a high-end entertainment system with digital connectivity to powerful speaker systems. IEEE ...
...Bus (USB) 2.0 specification, extending the connection speed from 12 Mbps on USB 1.1 to a fast 480 Mbps on Motherboard (LOM) applications. ASUS K8N-E Deluxe motherboard 1-3 supporting up to 400Mbps transfer rates through simple, low-cost, high-bandwidth asynchronous (real-time) data interfacing between...1.1. The higher bandwidth of USB 2.0 allows connection of peripherals and devices compliant to IEEE 1394a standards. S/PDIF out The motherboard's S/PDIF out function turns your computer into a high-end entertainment system with digital connectivity to powerful speaker systems. IEEE ...
K8N-E Deluxe User's Manual
Page 18
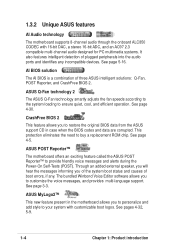
... provides multi-language support. CrashFree BIOS 2 This feature allows you to restore the original BIOS data from the ASUS support CD in the motherboard allows you of the system boot status and causes of boot errors, if any incompatible devices. 1.3.2 Unique... ASUS features AI Audio technology The motherboard supports 8-channel audio through the onboard ALC850 CODEC with customizable boot logos. ASUS POST Reporter™ The motherboard offers an exciting feature called the ASUS POST Reporter™ to your system with 16-bit ...
... provides multi-language support. CrashFree BIOS 2 This feature allows you to restore the original BIOS data from the ASUS support CD in the motherboard allows you of the system boot status and causes of boot errors, if any incompatible devices. 1.3.2 Unique... ASUS features AI Audio technology The motherboard supports 8-channel audio through the onboard ALC850 CODEC with customizable boot logos. ASUS POST Reporter™ The motherboard offers an exciting feature called the ASUS POST Reporter™ to your system with 16-bit ...

K8N-E Deluxe User's Manual
Page 19
...the available options. Just press the ASUS Instant Music special function keys and enjoy the music! See pages 4-15, 5-11. eliminates the need to open the system chassis and clear the RTC data. See page 4-12. ASUS K8N-E Deluxe motherboard 1-5 C.P.R. (CPU Parameter Recall) The... C.P.R. Simply reboot the system to overclocking, C.P.R. When the system hangs due to restore previously saved BIOS settings. ASUS EZ Flash BIOS With the ASUS EZ Flash, you to overclocking. ASUS Multi-language BIOS The ...
...the available options. Just press the ASUS Instant Music special function keys and enjoy the music! See pages 4-15, 5-11. eliminates the need to open the system chassis and clear the RTC data. See page 4-12. ASUS K8N-E Deluxe motherboard 1-5 C.P.R. (CPU Parameter Recall) The... C.P.R. Simply reboot the system to overclocking, C.P.R. When the system hangs due to restore previously saved BIOS settings. ASUS EZ Flash BIOS With the ASUS EZ Flash, you to overclocking. ASUS Multi-language BIOS The ...

K8N-E Deluxe User's Manual
Page 21
Hardware information It includes description of the jumpers and connectors on the motherboard. Chapter 2 This chapter lists the hardware setup procedures that you have to perform when installing system components.
Hardware information It includes description of the jumpers and connectors on the motherboard. Chapter 2 This chapter lists the hardware setup procedures that you have to perform when installing system components.

K8N-E Deluxe User's Manual
Page 22
Chapter summary 2.1 Before you proceed 2-1 2.2 Motherboard overview 2-2 2.3 Central Processing Unit (CPU 2-6 2.4 System memory 2-11 2.5 Expansion slots 2-14 2.6 Jumpers 2-18 2.7 Connectors 2-20 ASUS K8N-E Deluxe motherboard
Chapter summary 2.1 Before you proceed 2-1 2.2 Motherboard overview 2-2 2.3 Central Processing Unit (CPU 2-6 2.4 System memory 2-11 2.5 Expansion slots 2-14 2.6 Jumpers 2-18 2.7 Connectors 2-20 ASUS K8N-E Deluxe motherboard

K8N-E Deluxe User's Manual
Page 23
...remove any component, ensure that you should shut down the system and unplug the power cable before you install motherboard components or change any motherboard component. The illustration below shows the location of the following precautions before removing or plugging in soft-off mode... off or the power cord is ON, in sleep mode, or in any motherboard settings. • Unplug the power cord from the power supply. 2.1 Before you proceed Note of the onboard LED. ® K8N-E K8N-E Onboard LED SB_PWR ON Standby Power OFF Powered Off ASUS K8N-E Deluxe motherboard 2-1
...remove any component, ensure that you should shut down the system and unplug the power cable before you install motherboard components or change any motherboard component. The illustration below shows the location of the following precautions before removing or plugging in soft-off mode... off or the power cord is ON, in sleep mode, or in any motherboard settings. • Unplug the power cord from the power supply. 2.1 Before you proceed Note of the onboard LED. ® K8N-E K8N-E Onboard LED SB_PWR ON Standby Power OFF Powered Off ASUS K8N-E Deluxe motherboard 2-1

K8N-E Deluxe User's Manual
Page 24
...to do so may cause you physical injury and damage motherboard components. 2.2.1 Placement direction When installing the motherboard, make sure that you install the motherboard, study the configuration of your chassis to ensure that the motherboard fits into it into the chassis in the image below... (9) screws into the holes indicated by circles to secure the motherboard to the rear part of the chassis 2-2 Chapter 2: Hardware information 2.2 Motherboard overview Before you place it . Doing so can damage the motherboard. Do not overtighten the screws! Place this side towards the ...
...to do so may cause you physical injury and damage motherboard components. 2.2.1 Placement direction When installing the motherboard, make sure that you install the motherboard, study the configuration of your chassis to ensure that the motherboard fits into it into the chassis in the image below... (9) screws into the holes indicated by circles to secure the motherboard to the rear part of the chassis 2-2 Chapter 2: Hardware information 2.2 Motherboard overview Before you place it . Doing so can damage the motherboard. Do not overtighten the screws! Place this side towards the ...
K8N-E Deluxe User's Manual
Page 25
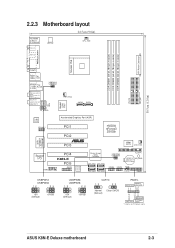
PRI_IDE SEC_IDE 30.5cm (12.0in) 2.2.3 Motherboard layout 24.5cm (9.6in) PS/2KBMS T: Mouse B: Keyboard SPDIF_O1 ATX12V CPU_FAN SPDIF_O2 ATX Power Connector DDR DIMM1 (64 bit,184-pin module) DDR DIMM2 (64 ... CHASSIS PANEL USBPW12 USBPW34 12 23 +5V (Default) +5VSB USBPW56 USBPW78 12 23 +5V (Default) +5VSB CLRTC 12 23 Normal Clear CMOS (Default) IDE_LED+ IDE_LED- ASUS K8N-E Deluxe motherboard 2-3 PWR Ground Reset Ground PLED+ PLED+5V Ground Ground Speaker PANEL Speaker Power LED Connector Reset SW ATX Power IDE_LED Switch* * Requires an ATX power...
PRI_IDE SEC_IDE 30.5cm (12.0in) 2.2.3 Motherboard layout 24.5cm (9.6in) PS/2KBMS T: Mouse B: Keyboard SPDIF_O1 ATX12V CPU_FAN SPDIF_O2 ATX Power Connector DDR DIMM1 (64 bit,184-pin module) DDR DIMM2 (64 ... CHASSIS PANEL USBPW12 USBPW34 12 23 +5V (Default) +5VSB USBPW56 USBPW78 12 23 +5V (Default) +5VSB CLRTC 12 23 Normal Clear CMOS (Default) IDE_LED+ IDE_LED- ASUS K8N-E Deluxe motherboard 2-3 PWR Ground Reset Ground PLED+ PLED+5V Ground Ground Speaker PANEL Speaker Power LED Connector Reset SW ATX Power IDE_LED Switch* * Requires an ATX power...
K8N-E Deluxe User's Manual
Page 27
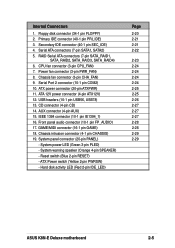
... activity LED (Red 2-pin IDE_LED) Page 2-20 2-21 2-21 2-22 2-23 2-24 2-24 2-24 2-24 2-25 2-25 2-26 2-27 2-27 2-27 2-28 2-28 2-29 2-29 ASUS K8N-E Deluxe motherboard 2-5 USB headers (10-1 pin USB56, USB78) 13. GAME/MIDI connector (16-1 pin GAME) 18. Primary IDE connector (40-1 pin PRI_IDE) 3. IEEE 1394 connector (10-1 pin...
... activity LED (Red 2-pin IDE_LED) Page 2-20 2-21 2-21 2-22 2-23 2-24 2-24 2-24 2-24 2-25 2-25 2-26 2-27 2-27 2-27 2-28 2-28 2-29 2-29 ASUS K8N-E Deluxe motherboard 2-5 USB headers (10-1 pin USB56, USB78) 13. GAME/MIDI connector (16-1 pin GAME) 18. Primary IDE connector (40-1 pin PRI_IDE) 3. IEEE 1394 connector (10-1 pin...

K8N-E Deluxe User's Manual
Page 28
... a CPU. 1. Take note of these steps to ensure correct installation. Locate the 754-pin ZIF socket on the CPU. 2.3 Central Processing Unit (CPU) 2.3.1 Overview The motherboard comes with only 32-bit or 64-bit wide data paths. The 128-bit-wide data paths of the marked corner (with gold triangle) on...
... a CPU. 1. Take note of these steps to ensure correct installation. Locate the 754-pin ZIF socket on the CPU. 2.3 Central Processing Unit (CPU) 2.3.1 Overview The motherboard comes with only 32-bit or 64-bit wide data paths. The 128-bit-wide data paths of the marked corner (with gold triangle) on...

K8N-E Deluxe User's Manual
Page 29
... corner with the gold triangle matches the socket corner with a small triangle. 4. Position the CPU above the socket such that the socket lever is locked. ASUS K8N-E Deluxe motherboard 2-7 Small triangle Gold triangle The CPU fits only in place. 2.
... corner with the gold triangle matches the socket corner with a small triangle. 4. Position the CPU above the socket such that the socket lever is locked. ASUS K8N-E Deluxe motherboard 2-7 Small triangle Gold triangle The CPU fits only in place. 2.

K8N-E Deluxe User's Manual
Page 30
.... If the instructions in this section do not have to remove the retention module base when installing the CPU or installing other motherboard components. 2.3.3 Installing the heatsink and fan The AMD Athlon™ 64 processor requires a specially designed heatsink and fan assembly to...CPU heatsink and fan assembly should come with installation instructions for the CPU, heatsink, and the retention mechanism. Place the heatsink on the motherboard upon purchase. • You do not match the CPU documentation, follow the latter. 2-8 Chapter 2: Hardware information Follow these steps to...
.... If the instructions in this section do not have to remove the retention module base when installing the CPU or installing other motherboard components. 2.3.3 Installing the heatsink and fan The AMD Athlon™ 64 processor requires a specially designed heatsink and fan assembly to...CPU heatsink and fan assembly should come with installation instructions for the CPU, heatsink, and the retention mechanism. Place the heatsink on the motherboard upon purchase. • You do not match the CPU documentation, follow the latter. 2-8 Chapter 2: Hardware information Follow these steps to...

K8N-E Deluxe User's Manual
Page 31
Make sure that the retention bracket is in place. 4. Align the other end of the retention bracket to the retention module base. 3. ASUS K8N-E Deluxe motherboard 2-9 Push down the retention bracket lock on the retention mechanism to secure the heatsink and fan to the retention module base. A clicking sound denotes that the fan and heatsink assembly perfectly fits the retention mechanism module base, otherwise you cannot snap the retention bracket in place. 2. Attach one end of the retention bracket (near the retention bracket lock) to the module base.
Make sure that the retention bracket is in place. 4. Align the other end of the retention bracket to the retention module base. 3. ASUS K8N-E Deluxe motherboard 2-9 Push down the retention bracket lock on the retention mechanism to secure the heatsink and fan to the retention module base. A clicking sound denotes that the fan and heatsink assembly perfectly fits the retention mechanism module base, otherwise you cannot snap the retention bracket in place. 2. Attach one end of the retention bracket (near the retention bracket lock) to the module base.

K8N-E Deluxe User's Manual
Page 32
...tested and qualified for use with this connector. CPU overheating and hardware monitoring errors may occur if you fail to the connector on the motherboard labeled CPU_FAN. 2.3.4 Connecting the CPU fan cable When the heatsink and fan assembly is in place, connect the CPU fan cable to plug ...this motherboard. CPU Fan Connector (CPU_FAN) Do not forget to connect the CPU fan connector! Vendor AVC Thermaltake Taisol Part Number Z7UB003 AP1892 111-8061010-90...
...tested and qualified for use with this connector. CPU overheating and hardware monitoring errors may occur if you fail to the connector on the motherboard labeled CPU_FAN. 2.3.4 Connecting the CPU fan cable When the heatsink and fan assembly is in place, connect the CPU fan cable to plug ...this motherboard. CPU Fan Connector (CPU_FAN) Do not forget to connect the CPU fan connector! Vendor AVC Thermaltake Taisol Part Number Z7UB003 AP1892 111-8061010-90...


