

K7M User Manual
Page 2
...1999 ASUSTeK COMPUTER INC. Product Name: K7M Manual Revision: 1.04 E463 Release Date: October 1999 2 ASUS K7M User's Manual Manual updates are released for each product design represented by the third digit in the manual revision number. ASUS ASSUMES NO RESPONSIBILITY OR LIABILITY FOR ...PARTICULAR PURPOSE. All Rights Reserved. For previous or updated manuals, BIOS, drivers, or product release information, contact ASUS at http://www.asus.com.tw or through any means, except documentation kept by ASUS; Products and corporate names appearing in this manual, including the products...
...1999 ASUSTeK COMPUTER INC. Product Name: K7M Manual Revision: 1.04 E463 Release Date: October 1999 2 ASUS K7M User's Manual Manual updates are released for each product design represented by the third digit in the manual revision number. ASUS ASSUMES NO RESPONSIBILITY OR LIABILITY FOR ...PARTICULAR PURPOSE. All Rights Reserved. For previous or updated manuals, BIOS, drivers, or product release information, contact ASUS at http://www.asus.com.tw or through any means, except documentation kept by ASUS; Products and corporate names appearing in this manual, including the products...

K7M User Manual
Page 5
... 71 5.1.1 Windows 98 First Time Installation 71 5.2 K7M Support CD 72 5.3 Audio Driver (only with onboard audio option 73 5.4 PC-cillin 98 74 5.5 Acrobat Reader Vx.x 75 5.6 IDE Driver 76 5.7 Miniport Driver 77 5.8 ASUS PC Probe 78 5.9 YAMAHA S-YXG50 79 5.10 YAMAHA... SOFTWARE REFERENCE 83 6.1 ASUS PC Probe 83 6.2 Using YAMAHA XGPlayer 89 6.3 Using YAMAHA XGstudio Mixer 91 7. CONTENTS 4. BIOS SETUP 46 4.1 Managing and Updating Your BIOS 46 4.1.1 Upon First Use of the Computer System 46 4.1.2 Updating BIOS Procedures 48 4.2. BIOS Setup Program 49 4.2.1 BIOS Menu Bar 50 4.2.2 ...
... 71 5.1.1 Windows 98 First Time Installation 71 5.2 K7M Support CD 72 5.3 Audio Driver (only with onboard audio option 73 5.4 PC-cillin 98 74 5.5 Acrobat Reader Vx.x 75 5.6 IDE Driver 76 5.7 Miniport Driver 77 5.8 ASUS PC Probe 78 5.9 YAMAHA S-YXG50 79 5.10 YAMAHA... SOFTWARE REFERENCE 83 6.1 ASUS PC Probe 83 6.2 Using YAMAHA XGPlayer 89 6.3 Using YAMAHA XGstudio Mixer 91 7. CONTENTS 4. BIOS SETUP 46 4.1 Managing and Updating Your BIOS 46 4.1.1 Upon First Use of the Computer System 46 4.1.2 Updating BIOS Procedures 48 4.2. BIOS Setup Program 49 4.2.1 BIOS Menu Bar 50 4.2.2 ...
K7M User Manual
Page 7
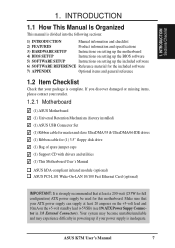
...ASUS K7M User's Manual 7 INTRODUCTION Sections/Checklist 1. Your system may become unstable/unreliable and may experience difficulty in 3.8 External Connectors). If you discover damaged or missing items, please contact your ATX power supply can supply at least a 200-watt (235W for full configuration) ATX power supply be used for this motherboard... HARDWARE SETUP Instructions on setting up the motherboard 4) BIOS SETUP Instructions on setting up the BIOS software 5) SOFTWARE SETUP Instructions on the +5-volt standby lead (+5VSB) (see 19) ATX Power Suppy Connector in powering up the...
...ASUS K7M User's Manual 7 INTRODUCTION Sections/Checklist 1. Your system may become unstable/unreliable and may experience difficulty in 3.8 External Connectors). If you discover damaged or missing items, please contact your ATX power supply can supply at least a 200-watt (235W for full configuration) ATX power supply be used for this motherboard... HARDWARE SETUP Instructions on setting up the motherboard 4) BIOS SETUP Instructions on setting up the BIOS software 5) SOFTWARE SETUP Instructions on the +5-volt standby lead (+5VSB) (see 19) ATX Power Suppy Connector in powering up the...
K7M User Manual
Page 8
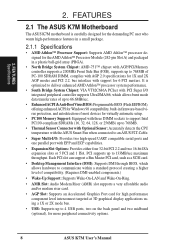
... 2. FEATURES 2.1 The ASUS K7M Motherboard The ASUS K7M motherboard is optimized to deliver enhanced AMD Athlon™ processor system performance. • South Bridge System Chipset: VIA VT82C686A PCIset with PCI Super I/O integrated peripheral controller supports UltraDMA/66, which allows hardware to an ASUS P2T-Cable. •...PC100-compliant SDRAMs (16, 32, 64, 128, or 256MB) up to 66.6MB/sec. • EnhancedACPI &Anti-BootVirus BIOS: Programmable BIOS (Flash EEPROM), offering enhanced ACPI for Windows 98 compatibility, built-in a plastic ball-grid array (PBGA). • North ...
... 2. FEATURES 2.1 The ASUS K7M Motherboard The ASUS K7M motherboard is optimized to deliver enhanced AMD Athlon™ processor system performance. • South Bridge System Chipset: VIA VT82C686A PCIset with PCI Super I/O integrated peripheral controller supports UltraDMA/66, which allows hardware to an ASUS P2T-Cable. •...PC100-compliant SDRAMs (16, 32, 64, 128, or 256MB) up to 66.6MB/sec. • EnhancedACPI &Anti-BootVirus BIOS: Programmable BIOS (Flash EEPROM), offering enhanced ACPI for Windows 98 compatibility, built-in a plastic ball-grid array (PBGA). • North ...

K7M User Manual
Page 9
... system voltages, temperatures, and fan status through the onboard hardware ASIC and the bundled ASUS PC Probe. • Additional USB Ports: For more control and protection over the motherboard. 2. Provides CPU/SDRAM frequency adjustments, and HD/SCSI/ZIP/CD/Floppy/Network boot... CDR/RW, LS-120, and Tape Backup drives. • Smart BIOS: 2Mb firmware gives a new easy-to meet PC 99 compliancy, major connectors in this motherboard are color-coded. 2.1.1.1 Optional Components The following onboard components are supported midboard. ASUS K7M User's Manual 9 FEATURES Specifications 2.
... system voltages, temperatures, and fan status through the onboard hardware ASIC and the bundled ASUS PC Probe. • Additional USB Ports: For more control and protection over the motherboard. 2. Provides CPU/SDRAM frequency adjustments, and HD/SCSI/ZIP/CD/Floppy/Network boot... CDR/RW, LS-120, and Tape Backup drives. • Smart BIOS: 2Mb firmware gives a new easy-to meet PC 99 compliancy, major connectors in this motherboard are color-coded. 2.1.1.1 Optional Components The following onboard components are supported midboard. ASUS K7M User's Manual 9 FEATURES Specifications 2.
K7M User Manual
Page 10
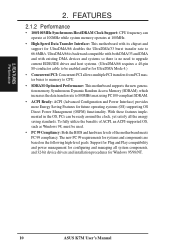
...Configuration and Power Interface) provides more Energy Saving Features for Windows 95/98/NT. 10 ASUS K7M User's Manual FEATURES 2.1.2 Performance • 100/100MHz Synchronous Host/DRAM Clock Support: CPU frequency ...can be used. • PC 99 Compliancy: Both the BIOS and hardware levels of ACPI, an ACPI-supported OS, such as Windows 98, must...PCI transfers from PCI master buses to memory to CPU. • SDRAM Optimized Performance: This motherboard supports the new generation memory, Synchronous Dynamic Random Access Memory (SDRAM), which increases the data ...
...Configuration and Power Interface) provides more Energy Saving Features for Windows 95/98/NT. 10 ASUS K7M User's Manual FEATURES 2.1.2 Performance • 100/100MHz Synchronous Host/DRAM Clock Support: CPU frequency ...can be used. • PC 99 Compliancy: Both the BIOS and hardware levels of ACPI, an ACPI-supported OS, such as Windows 98, must...PCI transfers from PCI master buses to memory to CPU. • SDRAM Optimized Performance: This motherboard supports the new generation memory, Synchronous Dynamic Random Access Memory (SDRAM), which increases the data ...
K7M User Manual
Page 14
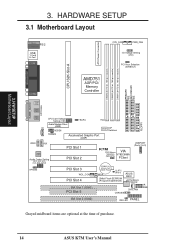
3. HARDWARE SETUP 3.1 Motherboard Layout PARALLEL PORT ATX Power Connector DIMM3 (64/72 bit, 168-pin module) DIMM2 (64/72 bit, 168-pin module) DIMM1 (64/72 bit, 168-pin module) PRIMARY IDE ... Slot 3 WOL_CON PCI Slot 4 ISA Slot 1 (ISA1) PCI Slot 5 CR2032 3V Lithium Cell CMOS Power WOR CLRTC (R181) 2Mbit Flash EEPROM (Programmable BIOS) ASUS ASIC Hardware Monitor CHA_FAN CHASSIS IR SMB ISA Slot 2 (ISA2) IDE LED PANEL Grayed midboard items are optional at the time of purchase. 14 ASUS K7M User's Manual H/W SETUP Motherboard Layout 3.
3. HARDWARE SETUP 3.1 Motherboard Layout PARALLEL PORT ATX Power Connector DIMM3 (64/72 bit, 168-pin module) DIMM2 (64/72 bit, 168-pin module) DIMM1 (64/72 bit, 168-pin module) PRIMARY IDE ... Slot 3 WOL_CON PCI Slot 4 ISA Slot 1 (ISA1) PCI Slot 5 CR2032 3V Lithium Cell CMOS Power WOR CLRTC (R181) 2Mbit Flash EEPROM (Programmable BIOS) ASUS ASIC Hardware Monitor CHA_FAN CHASSIS IR SMB ISA Slot 2 (ISA2) IDE LED PANEL Grayed midboard items are optional at the time of purchase. 14 ASUS K7M User's Manual H/W SETUP Motherboard Layout 3.
K7M User Manual
Page 20
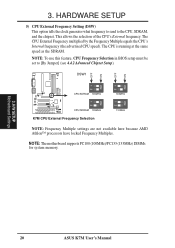
...) DIMMs for system memory. 3. 3. H/W SETUP Motherboard Settings 20 ASUS K7M User's Manual DSW1 OFF ON OFF ON 01 01 01 ON 12 ON 12 ON CPU/SDRAM 100MHz K7M ® CPU/SDRAM 105MHz K7M CPU External Frequency Selection 12 ON 12 103MHz 110MHz NOTE...: Frequency Multiple settings are not available here because AMD Athlon™ processors have locked Frequency Multiples. The CPU is running at the same speed as the SDRAM. NOTE: To use this feature, CPU Frequency Selection in BIOS...
...) DIMMs for system memory. 3. 3. H/W SETUP Motherboard Settings 20 ASUS K7M User's Manual DSW1 OFF ON OFF ON 01 01 01 ON 12 ON 12 ON CPU/SDRAM 100MHz K7M ® CPU/SDRAM 105MHz K7M CPU External Frequency Selection 12 ON 12 103MHz 110MHz NOTE...: Frequency Multiple settings are not available here because AMD Athlon™ processors have locked Frequency Multiples. The CPU is running at the same speed as the SDRAM. NOTE: To use this feature, CPU Frequency Selection in BIOS...
K7M User Manual
Page 22
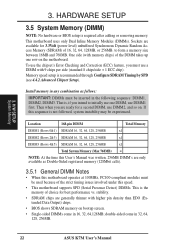
...Memory (DIMM) NOTE: No hardware or BIOS setup is , if you intend to form a memory size between 16MB and 768MB. Sockets are only available as follows: IMPORTANT: DIMMs must be experienced. Install memory in 32, 64, 128, 256MB. 22 ASUS K7M User's Manual If this User's Manual was... (Serial Presence Detect) DIMMs. This is the memory of choice for best performance vs. to initially use DIMM2, and so on the motherboard. This motherboard uses only Dual Inline Memory Modules (DIMMs). H/W SETUP System Memory 3. To use the chipset's Error Checking and Correction (ECC) feature...
...Memory (DIMM) NOTE: No hardware or BIOS setup is , if you intend to form a memory size between 16MB and 768MB. Sockets are only available as follows: IMPORTANT: DIMMs must be experienced. Install memory in 32, 64, 128, 256MB. 22 ASUS K7M User's Manual If this User's Manual was... (Serial Presence Detect) DIMMs. This is the memory of choice for best performance vs. to initially use DIMM2, and so on the motherboard. This motherboard uses only Dual Inline Memory Modules (DIMMs). H/W SETUP System Memory 3. To use the chipset's Error Checking and Correction (ECC) feature...

K7M User Manual
Page 31
...: Interrupt requests are shared as IRQ xx Used By ISA: Yes in PNP AND PCI SETUP) 7. Set up the BIOS if necessary (such as shown by the following table: INT-A PCI slot 1 shared PCI slot 2 - shared - ... your power supply when adding or removing expansion cards or other system components. Failure to both your motherboard and expansion cards. 3.7.1 Expansion Card Installation Procedure 1. Conflicts will arise between the two PCI groups ... card and make the system unstable or cards inoperable. Replace the computer system's cover. 6. shared - - ASUS K7M User's Manual 31
...: Interrupt requests are shared as IRQ xx Used By ISA: Yes in PNP AND PCI SETUP) 7. Set up the BIOS if necessary (such as shown by the following table: INT-A PCI slot 1 shared PCI slot 2 - shared - ... your power supply when adding or removing expansion cards or other system components. Failure to both your motherboard and expansion cards. 3.7.1 Expansion Card Installation Procedure 1. Conflicts will arise between the two PCI groups ... card and make the system unstable or cards inoperable. Replace the computer system's cover. 6. shared - - ASUS K7M User's Manual 31

K7M User Manual
Page 32
... in the PCI and PnP configuration section of the BIOS Setup utility. In a standard design, there are 16 IRQs available but most of the BIOS setup utility can contact your used by legacy and PnP ISA cards. If your motherboard has ISA audio onboard, an extra 3 IRQs will... gives you a Device Manager tab. To simplify this process, this motherboard are set an INT (interrupt) assignment. For PnP cards, IRQs are two types of your vendor for this motherboard complies with the BIOS, you want to one use an INTA #, be exclusively assigned to reserve). 32 ASUS K7M User's Manual
... in the PCI and PnP configuration section of the BIOS Setup utility. In a standard design, there are 16 IRQs available but most of the BIOS setup utility can contact your used by legacy and PnP ISA cards. If your motherboard has ISA audio onboard, an extra 3 IRQs will... gives you a Device Manager tab. To simplify this process, this motherboard are set an INT (interrupt) assignment. For PnP cards, IRQs are two types of your vendor for this motherboard complies with the BIOS, you want to one use an INTA #, be exclusively assigned to reserve). 32 ASUS K7M User's Manual
K7M User Manual
Page 37
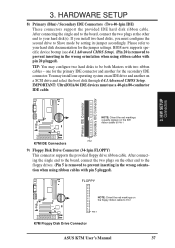
...orientation when using ribbon cables with two ribbon cables - IMPORTANT: UltraDMA/66 IDE devices must configure the second drive to PIN 1 K7M PIN 1 K7M IDE Connectors 9) Floppy Disk Drive Connector (34-1pin FLOPPY) This connector supports the provided floppy drive ribbon cable. If you install...the IDE ribbon cable to Slave mode by setting its jumper accordingly. BIOS now supports specific device bootup (see 4.4.1 Advanced CMOS Setup). (Pin 20 is removed to PIN 1 K7M PIN 1 K7M Floppy Disk Drive Connector ASUS K7M User's Manual 37 After connecting the single end to the board, ...
...orientation when using ribbon cables with two ribbon cables - IMPORTANT: UltraDMA/66 IDE devices must configure the second drive to PIN 1 K7M PIN 1 K7M IDE Connectors 9) Floppy Disk Drive Connector (34-1pin FLOPPY) This connector supports the provided floppy drive ribbon cable. If you install...the IDE ribbon cable to Slave mode by setting its jumper accordingly. BIOS now supports specific device bootup (see 4.4.1 Advanced CMOS Setup). (Pin 20 is removed to PIN 1 K7M PIN 1 K7M Floppy Disk Drive Connector ASUS K7M User's Manual 37 After connecting the single end to the board, ...

K7M User Manual
Page 44
... method of rebooting to prolong the life of the system's power supply. 24) ATX Power Switch Lead (2-pin PWRSW) The system power is activated when it detects a... the position of certain components when the system is in use the "Turbo Switch." H/W SETUP Connectors 44 ASUS K7M User's Manual The system power LED shows the status of the system's power. 25) System Management Interrupt Lead...a switch for rebooting your computer without having to this lead. SMI is controlled by settings in the BIOS but the keyboard will allow wake-up (the SMI lead cannot wake up can be controlled by a ...
... method of rebooting to prolong the life of the system's power supply. 24) ATX Power Switch Lead (2-pin PWRSW) The system power is activated when it detects a... the position of certain components when the system is in use the "Turbo Switch." H/W SETUP Connectors 44 ASUS K7M User's Manual The system power LED shows the status of the system's power. 25) System Management Interrupt Lead...a switch for rebooting your computer without having to this lead. SMI is controlled by settings in the BIOS but the keyboard will allow wake-up (the SMI lead cannot wake up can be controlled by a ...

K7M User Manual
Page 45
...your devices in the following order: a. For ATX power supplies, you turn off (in 4. While the tests are made, close the system case cover. 2. K7M User's Manual 45 After all switches are off your system user's manual. 4. BIOS SETUP. * Powering Off your computer: You ...must first exit or shut down with ATX power supplies. The power supply should turn on the screen...
...your devices in the following order: a. For ATX power supplies, you turn off (in 4. While the tests are made, close the system case cover. 2. K7M User's Manual 45 After all switches are off your system user's manual. 4. BIOS SETUP. * Powering Off your computer: You ...must first exit or shut down with ATX power supplies. The power supply should turn on the screen...

K7M User Manual
Page 46
... your hard drive. It is your screen during bootup. BIOS SETUP Updating BIOS 46 K7M User's Manual Type COPY D:\FLASH\FLASHXXX.EXE A:\ (assuming D is recommended that you need to the just created boot disk. NOTE: FLASH works only in DOS mode. Reboot your computer from your motherboard, check the release date displayed on the...
... your hard drive. It is your screen during bootup. BIOS SETUP Updating BIOS 46 K7M User's Manual Type COPY D:\FLASH\FLASHXXX.EXE A:\ (assuming D is recommended that you need to the just created boot disk. NOTE: FLASH works only in DOS mode. Reboot your computer from your motherboard, check the release date displayed on the...

K7M User Manual
Page 47
Type a filename and the path, for saving field. BIOS SETUP 5. BIOS SETUP Updating BIOS K7M User's Manual 47 4. Use the up or down keypad arrow to activate the File frame. 6. will be displayed. 4. When the saving is finished, "BIOS ROM data saving successful." Use the up or down keypad arrow to select File from the Main Menu and press to select the BIOS Filename for example, A:\XXXXXXXX.XXX and then press . 7.
Type a filename and the path, for saving field. BIOS SETUP 5. BIOS SETUP Updating BIOS K7M User's Manual 47 4. Use the up or down keypad arrow to activate the File frame. 6. will be displayed. 4. When the saving is finished, "BIOS ROM data saving successful." Use the up or down keypad arrow to select File from the Main Menu and press to select the BIOS Filename for example, A:\XXXXXXXX.XXX and then press . 7.
K7M User Manual
Page 48
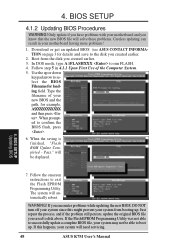
...to confirm the BIOS flash, press . 6. BIOS SETUP Updating BIOS 7. The system will need servicing. 48 ASUS K7M User's Manual When prompted to run FLASH. 4. 4. Download or get an updated BIOS (see ASUS CONTACT INFORMATION on page 3 for details) and save to the disk you know that the new BIOS file will ...you created earlier. 2. Type the filename of the Computer System. 5. Pass." Only update if you have problems with your motherboard having more problems! 1. will solve these problems. Careless updating can result in 4.1.1 Upon First Use of your system will ...
...to confirm the BIOS flash, press . 6. BIOS SETUP Updating BIOS 7. The system will need servicing. 48 ASUS K7M User's Manual When prompted to run FLASH. 4. 4. Download or get an updated BIOS (see ASUS CONTACT INFORMATION on page 3 for details) and save to the disk you know that the new BIOS file will ...you created earlier. 2. Type the filename of the Computer System. 5. Pass." Only update if you have problems with your motherboard having more problems! 1. will solve these problems. Careless updating can result in 4.1.1 Upon First Use of your system will ...

K7M User Manual
Page 49
... will then be updated using this program. Press to the power management settings. NOTE: Because the BIOS software is constantly being updated, the following BIOS screens and descriptions are installing a motherboard, reconfiguring your BIOS screens exactly. 4. BIOS SETUP Program Information ASUS K7M User's Manual 49 For example, you from calling up Setup. The Setup program has been...
... will then be updated using this program. Press to the power management settings. NOTE: Because the BIOS software is constantly being updated, the following BIOS screens and descriptions are installing a motherboard, reconfiguring your BIOS screens exactly. 4. BIOS SETUP Program Information ASUS K7M User's Manual 49 For example, you from calling up Setup. The Setup program has been...

K7M User Manual
Page 50
... fit in the legend bar located at the bottom of the screen has a menu bar with their corresponding alternates and functions. BIOS SETUP Menu Introduction 50 ASUS K7M User's Manual SECURITY Use this menu to make changes to the advanced features. To access the menu bar items, press the ...keyboard until the desired item is selected. 4.2.2 Navigation Keys Navigation keys are more menu items to scroll through the various Setup menus. 4. BIOS SETUP 4.2.1 BIOS Menu Bar The top of the Setup screen. ADVANCED Use this menu to exit the current menu or specify how to the basic system ...
... fit in the legend bar located at the bottom of the screen has a menu bar with their corresponding alternates and functions. BIOS SETUP Menu Introduction 50 ASUS K7M User's Manual SECURITY Use this menu to make changes to the advanced features. To access the menu bar items, press the ...keyboard until the desired item is selected. 4.2.2 Navigation Keys Navigation keys are more menu items to scroll through the various Setup menus. 4. BIOS SETUP 4.2.1 BIOS Menu Bar The top of the Setup screen. ADVANCED Use this menu to exit the current menu or specify how to the basic system ...

K7M User Manual
Page 51
...-up menus. NOTE: SETUP defaults are not grayed out. To call up a pop-up menu contains additional options for the currently selected field. BIOS SETUP Pop-up Menu Pop-up menu will then immediately appear. Use the legend keys to enter values and move the selection to the main... the Setup program, note that are noted in the item specific Setup Help window located to the right of each function heading. 4. BIOS SETUP Menu Introduction ASUS K7M User's Manual 51 Take some time to each menu. A pop-up menu, simply move from fields that explanations appear in square brackets...
...-up menus. NOTE: SETUP defaults are not grayed out. To call up a pop-up menu contains additional options for the currently selected field. BIOS SETUP Pop-up Menu Pop-up menu will then immediately appear. Use the legend keys to enter values and move the selection to the main... the Setup program, note that are noted in the item specific Setup Help window located to the right of each function heading. 4. BIOS SETUP Menu Introduction ASUS K7M User's Manual 51 Take some time to each menu. A pop-up menu, simply move from fields that explanations appear in square brackets...


