User Guide
Page 3
Contents Safety information...iv About this guide...iv Package contents...vi J1800I-C/BR specifications summary vi Chapter 1: Product introduction 1.1 Before you proceed 1-1 1.2 Motherboard overview 1-2 1.3 Central Processing Unit (CPU 1-4 1.4 System memory 1-4 1.5 Expansion slots 1-6 1.6 Jumpers...1-7 1.7 Connectors...1-9 1.8 Software support 1-16 Chapter 2: BIOS information 2.1 Managing and updating your BIOS 2-1 2.2 BIOS setup program 2-6 2.3 My Favorites 2-9 2.4 Main menu 2-10 2.5 Advanced menu 2-12...
Contents Safety information...iv About this guide...iv Package contents...vi J1800I-C/BR specifications summary vi Chapter 1: Product introduction 1.1 Before you proceed 1-1 1.2 Motherboard overview 1-2 1.3 Central Processing Unit (CPU 1-4 1.4 System memory 1-4 1.5 Expansion slots 1-6 1.6 Jumpers...1-7 1.7 Connectors...1-9 1.8 Software support 1-16 Chapter 2: BIOS information 2.1 Managing and updating your BIOS 2-1 2.2 BIOS setup program 2-6 2.3 My Favorites 2-9 2.4 Main menu 2-10 2.5 Advanced menu 2-12...
User Guide
Page 4
...the power supply is organized This guide contains the following parts: • Chapter 1: Product introduction This chapter describes the features of the BIOS parameters are also provided. Detailed descriptions of the motherboard and the new technology it , carefully read all the manuals that came with ... electrical outlet you detect any area where it may become wet. • Place the product on it supports. • Chapter 2: BIOS information This chapter tells how to the correct voltage in any damage, contact your retailer. Operation safety • Before installing the motherboard...
...the power supply is organized This guide contains the following parts: • Chapter 1: Product introduction This chapter describes the features of the BIOS parameters are also provided. Detailed descriptions of the motherboard and the new technology it , carefully read all the manuals that came with ... electrical outlet you detect any area where it may become wet. • Place the product on it supports. • Chapter 2: BIOS information This chapter tells how to the correct voltage in any damage, contact your retailer. Operation safety • Before installing the motherboard...

User Guide
Page 7
ASUS MyLogo 2 - J1800I-C/BR specifications summary ASUS Unique Features Back Panel I/O Ports Internal I/O Connectors BIOS features Manageability Support DVD Form factor ASUS EZ DIY - ASUS EZ-FLash 2 - ASUS Crash Free BIOS3 100% All High-quality Conductive Polymer Capacitors 1 x PS/2 mouse/keyboard combo port 1 x HDMI port 1 x D-Sub port 1 x COM port 1 x USB 3.0/2.0 ports 4 x USB 2.0/1.1 ports 1 x ...
ASUS MyLogo 2 - J1800I-C/BR specifications summary ASUS Unique Features Back Panel I/O Ports Internal I/O Connectors BIOS features Manageability Support DVD Form factor ASUS EZ DIY - ASUS EZ-FLash 2 - ASUS Crash Free BIOS3 100% All High-quality Conductive Polymer Capacitors 1 x PS/2 mouse/keyboard combo port 1 x HDMI port 1 x D-Sub port 1 x COM port 1 x USB 3.0/2.0 ports 4 x USB 2.0/1.1 ports 1 x ...

User Guide
Page 14
... system unit cover (if your motherboard is completely seated on the slot. 5. Align the card connector with the PCI Express specifications. Turn on BIOS setup. 2. shared - - - - - Keep the screw for the expansion card. 1.5.3 PCI Express 2.0 x1 slot This motherboard supports PCI...- - - - - - - - IRQ assignments for the card. 2. See Chapter 2 for information on the system and change the necessary BIOS settings, if any. Replace the system cover. 1.5.2 Configuring an expansion card After installing the expansion card, configure it and make the necessary hardware ...
... system unit cover (if your motherboard is completely seated on the slot. 5. Align the card connector with the PCI Express specifications. Turn on BIOS setup. 2. shared - - - - - Keep the screw for the expansion card. 1.5.3 PCI Express 2.0 x1 slot This motherboard supports PCI...- - - - - - - - IRQ assignments for the card. 2. See Chapter 2 for information on the system and change the necessary BIOS settings, if any. Replace the system cover. 1.5.2 Configuring an expansion card After installing the expansion card, configure it and make the necessary hardware ...
User Guide
Page 15
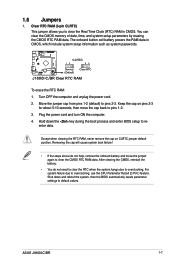
...on pins 2-3 for about 5-10 seconds, then move the jumper again to overclocking. Hold down and reboot the system, then the BIOS automatically resets parameter settings to pins 1-2. 3. ASUS J1800I-C/BR 1-7 1.6 Jumpers 1. For system failure due to clear the Real Time Clock (RTC) RAM in CMOS, which include system setup information... RAM data. Plug the power cord and turn ON the computer. 4. Shut down the key during the boot process and enter BIOS setup to pins 2-3. J1800I-C/BR CLRTC 12 23 Normal (Default) Clear RTC J1800I-C/BR Clear RTC RAM To erase the RTC RAM: 1.
...on pins 2-3 for about 5-10 seconds, then move the jumper again to overclocking. Hold down and reboot the system, then the BIOS automatically resets parameter settings to pins 1-2. 3. ASUS J1800I-C/BR 1-7 1.6 Jumpers 1. For system failure due to clear the Real Time Clock (RTC) RAM in CMOS, which include system setup information... RAM data. Plug the power cord and turn ON the computer. 4. Shut down the key during the boot process and enter BIOS setup to pins 2-3. J1800I-C/BR CLRTC 12 23 Normal (Default) Clear RTC J1800I-C/BR Clear RTC RAM To erase the RTC RAM: 1.

User Guide
Page 16
... that can wake up the computer from S1 sleep mode (CPU stopped, DRAM refreshed, system running in the BIOS. KBPWR 12 23 +5V (Default) +5VSB J1800I-C/BR J1800I-C/BR Keyboard power setting 3. USB device wake-up the computer from S1 sleep mode (CPU stopped, DRAM refreshed, ...pressing a key on the +5VSB lead, and a corresponding setting in low power mode) using the connected USB devices. J1800I-C/BR USBPWB 12 23 +5V +5VSB (Default) J1800I-C/BR USB device wake up 1-8 Chapter 1: Product introduction 2. Keyboard power (3-pin KBPWR) This jumper allows you can supply at...
... that can wake up the computer from S1 sleep mode (CPU stopped, DRAM refreshed, system running in the BIOS. KBPWR 12 23 +5V (Default) +5VSB J1800I-C/BR J1800I-C/BR Keyboard power setting 3. USB device wake-up the computer from S1 sleep mode (CPU stopped, DRAM refreshed, ...pressing a key on the +5VSB lead, and a corresponding setting in low power mode) using the connected USB devices. J1800I-C/BR USBPWB 12 23 +5V +5VSB (Default) J1800I-C/BR USB device wake up 1-8 Chapter 1: Product introduction 2. Keyboard power (3-pin KBPWR) This jumper allows you can supply at...
User Guide
Page 19
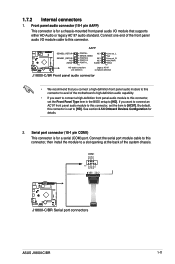
... that you connect a high-definition front panel audio module to this connector to [AC97]. AAFP J1800I-C/BR SENSE2_RETUR SENSE1_RETUR NC AGND PORT2 L NC SENSE_SEND PORT2 R NC PORT1 R NC PORT1 L AGND ...Line out_R MICPWR MIC2 PIN 1 HD-audio-compliant pin definition Legacy AC'97 compliant definition J1800I-C/BR Front panel audio connector • We recommend that supports either HD Audio or legacy .... COM1 PIN 1 RXD DTR DSR CTS DCD TXD GND RTS RI J1800I-C/BR J1800I-C/BR Serial port connectors ASUS J1800I-C/BR 1-11 Connect the serial port module cable to [HD]. Front panel ...
... that you connect a high-definition front panel audio module to this connector to [AC97]. AAFP J1800I-C/BR SENSE2_RETUR SENSE1_RETUR NC AGND PORT2 L NC SENSE_SEND PORT2 R NC PORT1 R NC PORT1 L AGND ...Line out_R MICPWR MIC2 PIN 1 HD-audio-compliant pin definition Legacy AC'97 compliant definition J1800I-C/BR Front panel audio connector • We recommend that supports either HD Audio or legacy .... COM1 PIN 1 RXD DTR DSR CTS DCD TXD GND RTS RI J1800I-C/BR J1800I-C/BR Serial port connectors ASUS J1800I-C/BR 1-11 Connect the serial port module cable to [HD]. Front panel ...

User Guide
Page 22
...securely store keys, digital certificates, passwords and data. SATA3G_2 GND RSATA_TXP2 RSATA_TXN2 GND RSATA_RXN2 RSATA_RXP2 GND SATA3G_1 GND RSATA_TXP1 RSATA_TXN1 GND RSATA_RXN1 RSATA_RXP1 GND J1800I-C/BR SATA 3.0Gb/s connectors • You must install Windows® XP Service Pack 3 or later version before using Serial ATA hard disk drives.... • To configure the default SATA type in BIOS, click Advanced Mode > Advanced tab > SATA Configuration > SATA Mode. • When using hot-plug and NCQ, set the SATA Mode item ...
...securely store keys, digital certificates, passwords and data. SATA3G_2 GND RSATA_TXP2 RSATA_TXN2 GND RSATA_RXN2 RSATA_RXP2 GND SATA3G_1 GND RSATA_TXP1 RSATA_TXN1 GND RSATA_RXN1 RSATA_RXP1 GND J1800I-C/BR SATA 3.0Gb/s connectors • You must install Windows® XP Service Pack 3 or later version before using Serial ATA hard disk drives.... • To configure the default SATA type in BIOS, click Advanced Mode > Advanced tab > SATA Configuration > SATA Mode. • When using hot-plug and NCQ, set the SATA Mode item ...
User Guide
Page 25
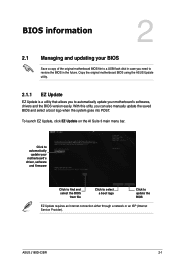
... or an ISP (Internet Service Provider). Copy the original motherboard BIOS using the ASUS Update utility. 2.1.1 EZ Update EZ Update is a utility that allows you need to automatically update your motherboard's softwares, drivers and the BIOS version easily. With this utlity, you can also manually update ...the saved BIOS and select a boot logo when the system goes into POST. Click to restore the BIOS in the future. To launch EZ Update, click EZ Update on the AI Suite 3 main menu bar. ASUS J1800I-C/BR 2-1
... or an ISP (Internet Service Provider). Copy the original motherboard BIOS using the ASUS Update utility. 2.1.1 EZ Update EZ Update is a utility that allows you need to automatically update your motherboard's softwares, drivers and the BIOS version easily. With this utlity, you can also manually update ...the saved BIOS and select a boot logo when the system goes into POST. Click to restore the BIOS in the future. To launch EZ Update, click EZ Update on the AI Suite 3 main menu bar. ASUS J1800I-C/BR 2-1

User Guide
Page 26
... to the USB port. 2. Reboot the system after updating the BIOS using EZ Flash 2: 1. Go to the Tool menu to select ASUS EZ Flash 2 Utility and press to the Folder Info field. 6. Enter the Advanced Mode of the BIOS setup program. Press to switch to enable it. 3. Select the...; DO NOT shut down or reset the system while updating the BIOS to the Drive field. 4. 2.1.2 ASUS EZ Flash 2 The ASUS EZ Flash 2 feature allows you start using this utility, download the latest BIOS file from the ASUS website at www.asus.com. Press to switch to prevent system boot failure! Press the...
... to the USB port. 2. Reboot the system after updating the BIOS using EZ Flash 2: 1. Go to the Tool menu to select ASUS EZ Flash 2 Utility and press to the Folder Info field. 6. Enter the Advanced Mode of the BIOS setup program. Press to switch to enable it. 3. Select the...; DO NOT shut down or reset the system while updating the BIOS to the Drive field. 4. 2.1.2 ASUS EZ Flash 2 The ASUS EZ Flash 2 feature allows you start using this utility, download the latest BIOS file from the ASUS website at www.asus.com. Press to switch to prevent system boot failure! Press the...
User Guide
Page 27
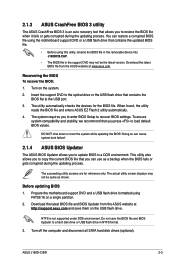
... a DOS environment. ASUS J1800I-C/BR 2-3 Download the latest BIOS file from the ASUS website at www.asus.com. DO NOT shut down or reset the system while updating the BIOS! Before updating BIOS 1. Download the latest BIOS file and BIOS Updater from the ASUS website at http://support.asus.com and save the BIOS file and BIOS Updater to load default BIOS values. NTFS is...
... a DOS environment. ASUS J1800I-C/BR 2-3 Download the latest BIOS file from the ASUS website at www.asus.com. DO NOT shut down or reset the system while updating the BIOS! Before updating BIOS 1. Download the latest BIOS file and BIOS Updater from the ASUS website at http://support.asus.com and save the BIOS file and BIOS Updater to load default BIOS values. NTFS is...

User Guide
Page 28
... . 2. Updating the BIOS file To update the BIOS file using BIOS Updater: 1. Booting the system to show the BIOS Boot Device Select Menu. 3. Boot your computer's USB port. 2. ASUSTek BIOS Updater for DOS V1.30 J1800I-C/BR 0302 01/16/2014 J1800ICB.CAP 8194 2014-01-16 15:25:48 2-4 Chapter 2: BIOS information When the ASUS Logo appears, press...
... . 2. Updating the BIOS file To update the BIOS file using BIOS Updater: 1. Booting the system to show the BIOS Boot Device Select Menu. 3. Boot your computer's USB port. 2. ASUSTek BIOS Updater for DOS V1.30 J1800I-C/BR 0302 01/16/2014 J1800ICB.CAP 8194 2014-01-16 15:25:48 2-4 Chapter 2: BIOS information When the ASUS Logo appears, press...

User Guide
Page 29
ASUS J1800I-C/BR 2-5 Select the Load Optimized Defaults item under the Exit menu. Select Yes and press . Refer to section 2.10 Exit menu for details. • Ensure to connect all SATA hard disk drives after updating BIOS. • Ensure to load the BIOS default settings to confirm BIOS update. 4. 3. BIOS Updater checks the selected BIOS file and prompts you...
ASUS J1800I-C/BR 2-5 Select the Load Optimized Defaults item under the Exit menu. Select Yes and press . Refer to section 2.10 Exit menu for details. • Ensure to connect all SATA hard disk drives after updating BIOS. • Ensure to load the BIOS default settings to confirm BIOS update. 4. 3. BIOS Updater checks the selected BIOS file and prompts you...

User Guide
Page 30
... priority. The EZ Mode provides you an overview of the basic system information, and allows you enter the BIOS setup program. Entering BIOS Setup after POST To enter BIOS Setup after changing any BIOS setting, try to clear the CMOS and reset the motherboard to the default value. If the system becomes ... the system chassis. • Press the power button to turn the system off then back on how to erase the RTC RAM. • The BIOS setup program does not support the bluetooth devices. Refer to section 1.6 Jumpers on . Select the Load Optimized Defaults item under two modes: EZ Mode ...
... priority. The EZ Mode provides you an overview of the basic system information, and allows you enter the BIOS setup program. Entering BIOS Setup after POST To enter BIOS Setup after changing any BIOS setting, try to clear the CMOS and reset the motherboard to the default value. If the system becomes ... the system chassis. • Press the power button to turn the system off then back on how to erase the RTC RAM. • The BIOS setup program does not support the bluetooth devices. Refer to section 1.6 Jumpers on . Select the Load Optimized Defaults item under two modes: EZ Mode ...
User Guide
Page 31
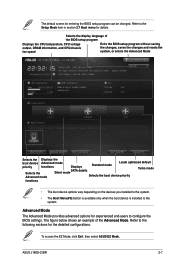
.... To access the EZ Mode, click Exit, then select ASUS EZ Mode. Selects the display language of the Advanced Mode. Refer to the following sections for experienced end-users to configure the BIOS settings. ASUS J1800I-C/BR 2-7 Refer to the system. The figure below shows an... example of the BIOS setup program Displays the CPU temperature, CPU voltage output, DRAM information, and CPU/...
.... To access the EZ Mode, click Exit, then select ASUS EZ Mode. Selects the display language of the Advanced Mode. Refer to the following sections for experienced end-users to configure the BIOS settings. ASUS J1800I-C/BR 2-7 Refer to the system. The figure below shows an... example of the BIOS setup program Displays the CPU temperature, CPU voltage output, DRAM information, and CPU/...

User Guide
Page 32
To display the submenu, select the item and press . 2-8 Chapter 2: BIOS information Submenu items A greater than sign (>) before each item on the menu bar have their respective menu items. Back button This button appears when entering a ...
To display the submenu, select the item and press . 2-8 Chapter 2: BIOS information Submenu items A greater than sign (>) before each item on the menu bar have their respective menu items. Back button This button appears when entering a ...

User Guide
Page 33
...to enter notes of the activities that item. You cannot select an item that is user-configurable, you can easily save and access your favorite BIOS items. ASUS J1800I-C/BR 2-9 Navigation keys At the bottom right corner of the menu screen are items that you last modified and saved in... BIOS Setup. 2.3 My Favorites MyFavorites is a brief description of options. Pop-up window Select a menu item and press to display a pop-up window with the ...
...to enter notes of the activities that item. You cannot select an item that is user-configurable, you can easily save and access your favorite BIOS items. ASUS J1800I-C/BR 2-9 Navigation keys At the bottom right corner of the menu screen are items that you last modified and saved in... BIOS Setup. 2.3 My Favorites MyFavorites is a brief description of options. Pop-up window Select a menu item and press to display a pop-up window with the ...

User Guide
Page 34
... the basic system information, and allows you to set the system time. 2.4.4 Security The Security menu items allow you enter the Advanced Mode of the BIOS Setup program. When using a mouse, hover the pointer to My Favorites: 1. Adding items to My Favorites To add frequently-used... BIOS items to the item. 2. You cannot add the following items to My Favorites: • Items with submenu options • User-configurable items such as language ...
... the basic system information, and allows you to set the system time. 2.4.4 Security The Security menu items allow you enter the Advanced Mode of the BIOS Setup program. When using a mouse, hover the pointer to My Favorites: 1. Adding items to My Favorites To add frequently-used... BIOS items to the item. 2. You cannot add the following items to My Favorites: • Items with submenu options • User-configurable items such as language ...
User Guide
Page 35
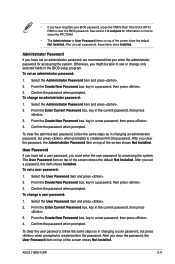
... item and press . 2. User Password If you have set a password, these items show the default Not Installed. To change an administrator password: 1. ASUS J1800I-C/BR 2-11 After you clear the password, the User Password item on top of the screen show Installed. From the Enter Current Password box, key in...on top of the screen shows the default Not Installed. Otherwise, you might be able to clear the BIOS password. Confirm the password when prompted. • If you have forgotten your BIOS password, erase the CMOS Real Time Clock (RTC) RAM to see or change only selected fields in...
... item and press . 2. User Password If you have set a password, these items show the default Not Installed. To change an administrator password: 1. ASUS J1800I-C/BR 2-11 After you clear the password, the User Password item on top of the screen show Installed. From the Enter Current Password box, key in...on top of the screen shows the default Not Installed. Otherwise, you might be able to clear the BIOS password. Confirm the password when prompted. • If you have forgotten your BIOS password, erase the CMOS Real Time Clock (RTC) RAM to see or change only selected fields in...

User Guide
Page 36
Adjacent Cache Line Prefetch [Enabled] [Disabled] Disables this function. 2-12 Chapter 2: BIOS information Intel Virtualization Technology [Enabled] [Enabled] Allows a hardware platform to run multiple operating systems separately and simultaneously, enabling one system to virtually function as several ...
Adjacent Cache Line Prefetch [Enabled] [Disabled] Disables this function. 2-12 Chapter 2: BIOS information Intel Virtualization Technology [Enabled] [Enabled] Allows a hardware platform to run multiple operating systems separately and simultaneously, enabling one system to virtually function as several ...


