

User Manual
Page 3
Contents Notices...v Safety information vi About this guide vii ITX-220 specifications summary viii Chapter 1: Product introduction 1.1 Before you proceed 1-1 1.2 Motherboard overview 1-2 1.2.1 Motherboard layout 1-2 1.2.2 Layout contents 1-2 1.3 Central Processing Unit (...operating system 1-14 1.8.2 Support DVD information 1-14 Chapter 2: BIOS information 2.1 Managing and updating your BIOS 2-1 2.1.1 ASUS Update utility 2-1 2.1.2 ASUS EZ Flash 2 utility 2-2 2.1.3 ASUS CrashFree BIOS 3 utility 2-3 2.2 BIOS setup program 2-4 2.3 Main menu 2-5 2.3.1 System Time 2-5 2.3.2 System Date 2-5...
Contents Notices...v Safety information vi About this guide vii ITX-220 specifications summary viii Chapter 1: Product introduction 1.1 Before you proceed 1-1 1.2 Motherboard overview 1-2 1.2.1 Motherboard layout 1-2 1.2.2 Layout contents 1-2 1.3 Central Processing Unit (...operating system 1-14 1.8.2 Support DVD information 1-14 Chapter 2: BIOS information 2.1 Managing and updating your BIOS 2-1 2.1.1 ASUS Update utility 2-1 2.1.2 ASUS EZ Flash 2 utility 2-2 2.1.3 ASUS CrashFree BIOS 3 utility 2-3 2.2 BIOS setup program 2-4 2.3 Main menu 2-5 2.3.1 System Time 2-5 2.3.2 System Date 2-5...

User Manual
Page 7
... of the BIOS parameters are not part of the motherboard and the new technology it supports. • Chapter 2: BIOS information This chapter tells how to complete a task. Conventions used throughout this manual. ASUS websites The ASUS website provides updated information on ASUS hardware and ... a task. NOTE: Tips and additional information to the ASUS contact information. 2. DANGER/WARNING: Information to prevent injury to yourself when trying to change system settings through the BIOS Setup menus. Optional documentation Your product package may have been...
... of the BIOS parameters are not part of the motherboard and the new technology it supports. • Chapter 2: BIOS information This chapter tells how to complete a task. Conventions used throughout this manual. ASUS websites The ASUS website provides updated information on ASUS hardware and ... a task. NOTE: Tips and additional information to the ASUS contact information. 2. DANGER/WARNING: Information to prevent injury to yourself when trying to change system settings through the BIOS Setup menus. Optional documentation Your product package may have been...

User Manual
Page 8
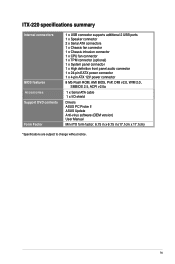
...system may only recognize less than 3GB. ITX-220 specifications summary CPU Chipset CPU Fan Front Side Bus Memory Graphics Expansion slot Storage Audio LAN USB ASUS special features Rear panel ports Integrated Intel® Celeron® 220 processor Supports Intel® EM64T technology Northbridge...; PCIe Gb LAN controller Supports up to 4GB system memory * Refer to 6 USB 2.0/1.1 ports (2 ports at mid-board, 4 ports at back panel) ASUS CrashFree BIOS 3 ASUS EZ Flash 2 ASUS MyLogo 2™ ASUS AI NET 2 1 x PS/2 keyboard port 1 x PS/2 mouse port 1 x VGA port 1 x COM port 1 x LAN (RJ-45) port...
...system may only recognize less than 3GB. ITX-220 specifications summary CPU Chipset CPU Fan Front Side Bus Memory Graphics Expansion slot Storage Audio LAN USB ASUS special features Rear panel ports Integrated Intel® Celeron® 220 processor Supports Intel® EM64T technology Northbridge...; PCIe Gb LAN controller Supports up to 4GB system memory * Refer to 6 USB 2.0/1.1 ports (2 ports at mid-board, 4 ports at back panel) ASUS CrashFree BIOS 3 ASUS EZ Flash 2 ASUS MyLogo 2™ ASUS AI NET 2 1 x PS/2 keyboard port 1 x PS/2 mouse port 1 x VGA port 1 x COM port 1 x LAN (RJ-45) port...
User Manual
Page 9
ix ITX-220 specifications summary Internal connectors BIOS features Accessories Support DVD contents Form Factor 1 x USB connector supports additional 2 USB ports 1 x Speaker connector 2 x Serial ATA connectors 1 x Chassis fan connector 1 x Chassis intrusion connector 1... EATX power connector 1 x 4-pin ATX 12V power connector 8 Mb Flash ROM, AMI BIOS, PnP, DMI v2.0, WfM 2.0, SMBIOS 2.5, ACPI v2.0a 1 x Serial ATA cable 1 x I/O shield Drivers ASUS PC Probe II ASUS Update Anti-virus software (OEM version) User Manual Mini ITX form factor: 6.75 in x 6.75 in (17.1cm x 17.1cm) *Specifications ...
ix ITX-220 specifications summary Internal connectors BIOS features Accessories Support DVD contents Form Factor 1 x USB connector supports additional 2 USB ports 1 x Speaker connector 2 x Serial ATA connectors 1 x Chassis fan connector 1 x Chassis intrusion connector 1... EATX power connector 1 x 4-pin ATX 12V power connector 8 Mb Flash ROM, AMI BIOS, PnP, DMI v2.0, WfM 2.0, SMBIOS 2.5, ACPI v2.0a 1 x Serial ATA cable 1 x I/O shield Drivers ASUS PC Probe II ASUS Update Anti-virus software (OEM version) User Manual Mini ITX form factor: 6.75 in x 6.75 in (17.1cm x 17.1cm) *Specifications ...

User Manual
Page 15
...expansion card To install an expansion card: 1. Unplug the power cord before adding or removing expansion cards. Remove the system unit cover (if your motherboard is completely seated on the slot. 5. Keep the screw for the expansion card. 1.5.3 PCI slot The PCI slot supports cards such as a... card After installing the expansion card, configure it and make the necessary hardware settings for information on the system and change the necessary BIOS settings, if any. The following sub‑sections describe the slot and the expansion cards that you removed earlier. 6. Remove the ...
...expansion card To install an expansion card: 1. Unplug the power cord before adding or removing expansion cards. Remove the system unit cover (if your motherboard is completely seated on the slot. 5. Keep the screw for the expansion card. 1.5.3 PCI slot The PCI slot supports cards such as a... card After installing the expansion card, configure it and make the necessary hardware settings for information on the system and change the necessary BIOS settings, if any. The following sub‑sections describe the slot and the expansion cards that you removed earlier. 6. Remove the ...
User Manual
Page 16
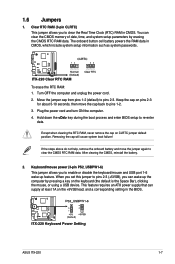
...cause system boot failure! Keyboard/mouse power (3-pin PS2_USBPW1-6) This jumper allows you set this jumper to pins 1-2. 3. ASUS ITX-220 1-7 Hold down the key during the boot process and enter BIOS setup to pins 2-3. When you to enable or disable the keyboard/mouse and USB port 1-6 wake-up the computer ... cap back to pins 2-3 (+5VSB), you to clear the CMOS RTC RAM data. The onboard button cell battery powers the RAM data in the BIOS. 1.6 Jumpers 1. Clear RTC RAM (3-pin CLRTC) This jumper allows you can wake up feature. This feature requires an ATX power supply that can...
...cause system boot failure! Keyboard/mouse power (3-pin PS2_USBPW1-6) This jumper allows you set this jumper to pins 1-2. 3. ASUS ITX-220 1-7 Hold down the key during the boot process and enter BIOS setup to pins 2-3. When you to enable or disable the keyboard/mouse and USB port 1-6 wake-up the computer ... cap back to pins 2-3 (+5VSB), you to clear the CMOS RTC RAM data. The onboard button cell battery powers the RAM data in the BIOS. 1.6 Jumpers 1. Clear RTC RAM (3-pin CLRTC) This jumper allows you can wake up feature. This feature requires an ATX power supply that can...

User Manual
Page 21
... system OFF. • Reset button (2-pin RESET) This 2-pin connector is for the system power LED. Pressing the power button turns the system on the BIOS settings. The system power LED lights up or flashes when data is read from or written to this connector. System panel connector (10-1 pin F_PANEL...
... system OFF. • Reset button (2-pin RESET) This 2-pin connector is for the system power LED. Pressing the power button turns the system on the BIOS settings. The system power LED lights up or flashes when data is read from or written to this connector. System panel connector (10-1 pin F_PANEL...

User Manual
Page 22
...an AC'97 front panel audio module to this connector, set to [HD Audio]. ASUS ITX-220 1-13 Front panel audio connector (10-1 pin AAFP) This connector is set the Front Panel Support Type item in the BIOS setup to [AC97]. 7. By default, this connector is for a chassis-mounted front...8. Serial ATA connectors (7-pin SATA1, SATA2) These connectors are for the Serial ATA signal cables for details. The data transfer rate of the motherboard's high-definition audio capability. • If you want to connect a high-definition front panel audio module to this connector, set the item...
...an AC'97 front panel audio module to this connector, set to [HD Audio]. ASUS ITX-220 1-13 Front panel audio connector (10-1 pin AAFP) This connector is set the Front Panel Support Type item in the BIOS setup to [AC97]. 7. By default, this connector is for a chassis-mounted front...8. Serial ATA connectors (7-pin SATA1, SATA2) These connectors are for the Serial ATA signal cables for details. The data transfer rate of the motherboard's high-definition audio capability. • If you want to connect a high-definition front panel audio module to this connector, set the item...

User Manual
Page 24
... Drivers menu appears. 2. Updating the BIOS To update the BIOS: 1. From the Windows® desktop, click Start > Programs > ASUS > ASUSUpdate > ASUSUpdate to manage, save, and update the motherboard BIOS in the future. Chapter 2 BIOS information 2.1 Managing and updating your BIOS Save a copy of the updating process: ASUS ITX-220 2-1 Click the Utilities tab, then click ASUS Update. 3. Quit all Windows®...
... Drivers menu appears. 2. Updating the BIOS To update the BIOS: 1. From the Windows® desktop, click Start > Programs > ASUS > ASUSUpdate > ASUSUpdate to manage, save, and update the motherboard BIOS in the future. Chapter 2 BIOS information 2.1 Managing and updating your BIOS Save a copy of the updating process: ASUS ITX-220 2-1 Click the Utilities tab, then click ASUS Update. 3. Quit all Windows®...
User Manual
Page 25
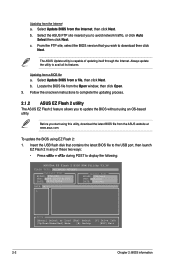
... the onscreen instructions to complete the updating process. 2.1.2 ASUS EZ Flash 2 utility The ASUS EZ Flash 2 feature allows you to display the following: ASUSTek EZ Flash 2 BIOS ROM Utility V3.36 FLASH TYPE: WOINBOND W25X80 Current ROM BOARD: ITX-220 VER: 0209 (H:00 B:05) DATE: 04/01/2009... Update ROM BOARD: Unknown VER: Unknown DATE: Unknown PATH: A:\ A: Note [Enter] Select or Load [Tab] Switch [Up/Down/Home/End] Move [B] Backup [V] Drive Info [ESC] Exit 2-2 Chapter 2: BIOS information Updating from the ...
... the onscreen instructions to complete the updating process. 2.1.2 ASUS EZ Flash 2 utility The ASUS EZ Flash 2 feature allows you to display the following: ASUSTek EZ Flash 2 BIOS ROM Utility V3.36 FLASH TYPE: WOINBOND W25X80 Current ROM BOARD: ITX-220 VER: 0209 (H:00 B:05) DATE: 04/01/2009... Update ROM BOARD: Unknown VER: Unknown DATE: Unknown PATH: A:\ A: Note [Enter] Select or Load [Tab] Switch [Up/Down/Home/End] Move [B] Backup [V] Drive Info [ESC] Exit 2-2 Chapter 2: BIOS information Updating from the ...

User Manual
Page 26
... corrupted during the updating process. Starting BIOS recovery... Start Erasing...\ ASUS ITX-220 2-3 Press to switch between drives until the correct BIOS file is an auto recovery tool that contains the updated BIOS file. • Prepare the motherboard support DVD or the USB flash disk containing the updated motherboard BIOS before using the motherboard support DVD or a USB flash disk...
... corrupted during the updating process. Starting BIOS recovery... Start Erasing...\ ASUS ITX-220 2-3 Press to switch between drives until the correct BIOS file is an auto recovery tool that contains the updated BIOS file. • Prepare the motherboard support DVD or the USB flash disk containing the updated motherboard BIOS before using the motherboard support DVD or a USB flash disk...

User Manual
Page 27
...; Visit the ASUS website at www.asus.com. 2.2 BIOS setup program Use the BIOS Setup program when you are for reference purposes only, and may not be smaller than 8GB. • DO NOT shut down the system properly from the operating system. • The default BIOS settings for this motherboard apply for this motherboard. 2-4 Chapter 2: BIOS information See...
...; Visit the ASUS website at www.asus.com. 2.2 BIOS setup program Use the BIOS Setup program when you are for reference purposes only, and may not be smaller than 8GB. • DO NOT shut down the system properly from the operating system. • The default BIOS settings for this motherboard apply for this motherboard. 2-4 Chapter 2: BIOS information See...
User Manual
Page 28
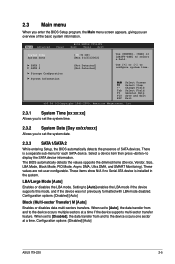
...xx:xx:xx] Allows you to set the system time. 2.3.2 System Date [Day xx/xx/xxxx] Allows you an overview of SATA devices. The BIOS automatically detects the values opposite the dimmed items (Device, Vendor, Size, LBA Mode, Block Mode, PIO Mode, Async DMA, Ultra DMA, and ...to the device occurs one sector at a time if the device supports multi-sector transfer feature. Configuration options: [Disabled] [Auto] ASUS ITX-220 2-5 2.3 Main menu When you enter the BIOS Setup program, the Main menu screen appears, giving you to set the system date. 2.3.3 SATA 1/SATA 2 While entering Setup, the...
...xx:xx:xx] Allows you to set the system time. 2.3.2 System Date [Day xx/xx/xxxx] Allows you an overview of SATA devices. The BIOS automatically detects the values opposite the dimmed items (Device, Vendor, Size, LBA Mode, Block Mode, PIO Mode, Async DMA, Ultra DMA, and ...to the device occurs one sector at a time if the device supports multi-sector transfer feature. Configuration options: [Disabled] [Auto] ASUS ITX-220 2-5 2.3 Main menu When you enter the BIOS Setup program, the Main menu screen appears, giving you to set the system date. 2.3.3 SATA 1/SATA 2 While entering Setup, the...

User Manual
Page 29
... Mode] 2.3.5 System Information This menu gives you installed. System Memory Displays the auto-detected system memory. 2-6 Chapter 2: BIOS information SATA Operate Mode [Enhanced Mode] Disables or allows selection of the SATA operation mode depending on the operating system (OS..., such as Windows® 2000/XP. Configuration options: [Auto] [0] [1] [2] [3] [4] DMA Mode [Auto] Selects the DMA mode. The BIOS automatically detects the items in this menu. Configuration options: [Auto] SMART Monitoring [Auto] Sets the Smart Monitoring, Analysis, and Reporting Technology. Configuration...
... Mode] 2.3.5 System Information This menu gives you installed. System Memory Displays the auto-detected system memory. 2-6 Chapter 2: BIOS information SATA Operate Mode [Enhanced Mode] Disables or allows selection of the SATA operation mode depending on the operating system (OS..., such as Windows® 2000/XP. Configuration options: [Auto] [0] [1] [2] [3] [4] DMA Mode [Auto] Selects the DMA mode. The BIOS automatically detects the items in this menu. Configuration options: [Auto] SMART Monitoring [Auto] Sets the Smart Monitoring, Analysis, and Reporting Technology. Configuration...

User Manual
Page 30
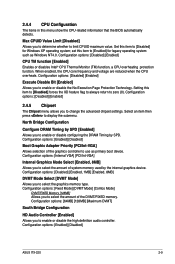
... Side Bus and CPU External Frequency settings. 2.4.2 TPM Configuration The items in this motherboard. The values range from 133 to adjust the CPU frequency. The TPM Configuration item.... Refer to the table below for the system. Configuration options: [Yes] [No] ASUS ITX-220 2-7 The value of CPU overclocking options to achieve desired CPU internal frequency. 2.4 Advanced menu...item then press to enable or disable TPM/TCG setting. Main Advanced Power BIOS SETUP UTILITY Boot Tools Exit JumperFree Configuration TPM Configuration USB Configuration CPU Configuration Chipset...
... Side Bus and CPU External Frequency settings. 2.4.2 TPM Configuration The items in this motherboard. The values range from 133 to adjust the CPU frequency. The TPM Configuration item.... Refer to the table below for the system. Configuration options: [Yes] [No] ASUS ITX-220 2-7 The value of CPU overclocking options to achieve desired CPU internal frequency. 2.4 Advanced menu...item then press to enable or disable TPM/TCG setting. Main Advanced Power BIOS SETUP UTILITY Boot Tools Exit JumperFree Configuration TPM Configuration USB Configuration CPU Configuration Chipset...

User Manual
Page 31
... to display the configuration options. USB Mass Storage Device Configuration USB Mass Storage Reset Delay [20 Sec] Allows you set the maximum time that the BIOS waits for Legacy USB storage devices, including USB flash drives and USB hard drives. Select an item then press to detect the presence of USB... is not user-configurable. 2.4.3 USB Configuration The items in HiSpeed (480Mbps) or Full Speed (12Mbps). Configuration options: [Auto] [Floppy] [Forced FDD] [Hard Disk] [CDROM] 2-8 Chapter 2: BIOS information
... to display the configuration options. USB Mass Storage Device Configuration USB Mass Storage Reset Delay [20 Sec] Allows you set the maximum time that the BIOS waits for Legacy USB storage devices, including USB flash drives and USB hard drives. Select an item then press to detect the presence of USB... is not user-configurable. 2.4.3 USB Configuration The items in HiSpeed (480Mbps) or Full Speed (12Mbps). Configuration options: [Auto] [Floppy] [Forced FDD] [Hard Disk] [CDROM] 2-8 Chapter 2: BIOS information
User Manual
Page 32
...DVMT Mode Select [DVMT Mode] Allows you to change the advanced chipset settings. Setting this menu show the CPU-related information that the BIOS automatically detects. Configuration options: [Disabled] [Enabled] CPU TM function [Enabled] Enables or disables Intel® CPU Thermal Monitor (TM)... Graphics Mode Select [Enabled, 8MB] Allows you to select the amount of the DVMT/FIXED memory. Configuration options: [Enabled] [Disabled] ASUS ITX-220 2-9 Configuration options: [Fixed Mode] [DVMT Mode] [Combo Mode] DVMT/FIXED Memory [128MB] Allows you to select the amount of ...
...DVMT Mode Select [DVMT Mode] Allows you to change the advanced chipset settings. Setting this menu show the CPU-related information that the BIOS automatically detects. Configuration options: [Disabled] [Enabled] CPU TM function [Enabled] Enables or disables Intel® CPU Thermal Monitor (TM)... Graphics Mode Select [Enabled, 8MB] Allows you to select the amount of the DVMT/FIXED memory. Configuration options: [Enabled] [Disabled] ASUS ITX-220 2-9 Configuration options: [Fixed Mode] [DVMT Mode] [Combo Mode] DVMT/FIXED Memory [128MB] Allows you to select the amount of ...

User Manual
Page 33
...] and if you to select the value in the system so that an ISA graphics device is set to [No], BIOS does not assign an IRQ to [No], BIOS configures all the devices in the onboard LAN controller. Take caution when changing the settings of PCI clocks for the PCI device...When set to enable or disable the boot ROM in the system. Configuration options: [Disabled] [Enabled] 2-10 Chapter 2: BIOS information If High Definition Audio Front Panel used, please set to [Yes], BIOS assigns an IRQ to PCI VGA card if the card requests for legacy ISA devices. Configuration options: [AC97] [HD...
...] and if you to select the value in the system so that an ISA graphics device is set to [No], BIOS does not assign an IRQ to [No], BIOS configures all the devices in the onboard LAN controller. Take caution when changing the settings of PCI clocks for the PCI device...When set to enable or disable the boot ROM in the system. Configuration options: [Disabled] [Enabled] 2-10 Chapter 2: BIOS information If High Definition Audio Front Panel used, please set to [Yes], BIOS assigns an IRQ to PCI VGA card if the card requests for legacy ISA devices. Configuration options: [AC97] [HD...

User Manual
Page 34
... to RAM) sleep state (default). When set to Enabled, the ACPI APIC table pointer is included in the S1 state. Main Advanced Power BIOS SETUP UTILITY Boot Tools Exit Suspend Mode [Auto] ACPI 2.0 Support [Disabled] ACPI APIC Support [Enabled] APM Configuration Hardware Monitor Select the ACPI... appears suspended and stays in the Application-Specific Integrated Circuit (ASIC). The system can be off . [Auto] - Configuration options: [Disabled] [Enabled] ASUS ITX-220 2-11 IRQ-xx assigned to [PCI Device] When set to [Reserved], the IRQ is reserved for legacy ISA devices.
... to RAM) sleep state (default). When set to Enabled, the ACPI APIC table pointer is included in the S1 state. Main Advanced Power BIOS SETUP UTILITY Boot Tools Exit Suspend Mode [Auto] ACPI 2.0 Support [Disabled] ACPI APIC Support [Enabled] APM Configuration Hardware Monitor Select the ACPI... appears suspended and stays in the Application-Specific Integrated Circuit (ASIC). The system can be off . [Auto] - Configuration options: [Disabled] [Enabled] ASUS ITX-220 2-11 IRQ-xx assigned to [PCI Device] When set to [Reserved], the IRQ is reserved for legacy ISA devices.

User Manual
Page 35
...power supply that turns the system power on. When this parameter allows you do not wish to display the detected temperatures. 2-12 Chapter 2: BIOS information Configuration options: [Disabled] [Enabled] Power On By PS/2 Keyboard [Disabled] Allows you to enable or disable RTC to generate a ...186;C/xxxºF] or [Ignored] MB Temperature [xxxºC/xxxºF] or [Ignored] The onboard hardware monitor automatically detects and displays the motherboard and CPU temperatures. Configuration options: [Power Off] [Power On] Power On By RTC Alarm [Disabled] Allows you to use the PS/2...
...power supply that turns the system power on. When this parameter allows you do not wish to display the detected temperatures. 2-12 Chapter 2: BIOS information Configuration options: [Disabled] [Enabled] Power On By PS/2 Keyboard [Disabled] Allows you to enable or disable RTC to generate a ...186;C/xxxºF] or [Ignored] MB Temperature [xxxºC/xxxºF] or [Ignored] The onboard hardware monitor automatically detects and displays the motherboard and CPU temperatures. Configuration options: [Power Off] [Power On] Power On By RTC Alarm [Disabled] Allows you to use the PS/2...


