

User Manual
Page 4
... 2-7 2.4.2 TPM Configuration 2-7 2.4.3 USB Configuration 2-8 2.4.4 CPU Configuration 2-9 2.4.5 Chipset 2-9 2.4.6 Onboard Devices Configuration 2-10 2.4.7 PCI PnP 2-10 2.5 Power menu 2-11 2.5.1 Suspend Mode 2-11 2.5.2 ACPI 2.0 Support 2-11 2.5.3 ACPI APIC Support 2-11 2.5.4 APM Configuration 2-12 2.5.5 Hardware Monitor 2-12 2.6 Boot menu 2-13 2.6.1 Boot Device Priority 2-13 2.6.2 Boot Settings Configuration 2-13 2.6.3 Security 2-14 2.7 Tools menu 2-16 2.7.1 AI NET 2 2-16 2.7.2 ASUS EZ Flash...
... 2-7 2.4.2 TPM Configuration 2-7 2.4.3 USB Configuration 2-8 2.4.4 CPU Configuration 2-9 2.4.5 Chipset 2-9 2.4.6 Onboard Devices Configuration 2-10 2.4.7 PCI PnP 2-10 2.5 Power menu 2-11 2.5.1 Suspend Mode 2-11 2.5.2 ACPI 2.0 Support 2-11 2.5.3 ACPI APIC Support 2-11 2.5.4 APM Configuration 2-12 2.5.5 Hardware Monitor 2-12 2.6 Boot menu 2-13 2.6.1 Boot Device Priority 2-13 2.6.2 Boot Settings Configuration 2-13 2.6.3 Security 2-14 2.7 Tools menu 2-16 2.7.1 AI NET 2 2-16 2.7.2 ASUS EZ Flash...
User Manual
Page 16
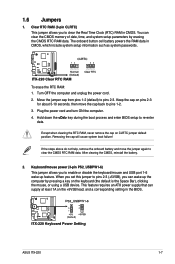
To erase the RTC RAM: 1. Hold down the key during the boot process and enter BIOS setup to pins 2-3. You can wake up feature. Turn OFF the computer and unplug the power cord. 2.... boot failure! When you set this jumper to enable or disable the keyboard/mouse and USB port 1-6 wake-up the computer by erasing the CMOS RTC RAM data. Move the jumper cap from pins 1-2 (default) to re-enter data. Plug the power cord and turn ON the computer. 4. ASUS ITX-220 ... that can supply at least 1A on the keyboard (the default is the Space Bar), clicking the mouse, or using a USB device.
To erase the RTC RAM: 1. Hold down the key during the boot process and enter BIOS setup to pins 2-3. You can wake up feature. Turn OFF the computer and unplug the power cord. 2.... boot failure! When you set this jumper to enable or disable the keyboard/mouse and USB port 1-6 wake-up the computer by erasing the CMOS RTC RAM data. Move the jumper cap from pins 1-2 (default) to re-enter data. Plug the power cord and turn ON the computer. 4. ASUS ITX-220 ... that can supply at least 1A on the keyboard (the default is the Space Bar), clicking the mouse, or using a USB device.

User Manual
Page 18
... keyboard. 1.7.2 Internal connectors 1. 6. This 15-pin port is for a VGA monitor or other serial devices. 10. COM port. ASUS ITX-220 1-9 Find the proper orientation and push down firmly until the connectors completely fit. • For a fully configured system, we recommend ... keyboard port (purple). USB 2.0 ports 1 and 2. ATX power connectors (24-pin EATXPWR, 4-pin ATX12V) These connectors are designed to install additional devices. USB 2.0 ports 3 and 4. The system may become unstable or may not boot up if the power is for connecting USB 2.0 devices. 8. The ...
... keyboard. 1.7.2 Internal connectors 1. 6. This 15-pin port is for a VGA monitor or other serial devices. 10. COM port. ASUS ITX-220 1-9 Find the proper orientation and push down firmly until the connectors completely fit. • For a fully configured system, we recommend ... keyboard port (purple). USB 2.0 ports 1 and 2. ATX power connectors (24-pin EATXPWR, 4-pin ATX12V) These connectors are designed to install additional devices. USB 2.0 ports 3 and 4. The system may become unstable or may not boot up if the power is for connecting USB 2.0 devices. 8. The ...

User Manual
Page 26
... BIOS to prevent system boot failure! 2.1.3 ASUS CrashFree BIOS 3 utility The ASUS CrashFree BIOS 3 is an auto recovery tool that contains the updated BIOS file. • Prepare the motherboard support DVD or the USB flash disk containing the updated motherboard BIOS before using this ... Flash 2 and press to the optical drive or USB port. 3. Turn on the system. 2. The utility displays the following message and automatically checks the support DVD or USB flash disk for USB Device... Starting BIOS recovery... USB Device found . 2. Completed. Start Erasing...\ ASUS ITX-220 2-3
... BIOS to prevent system boot failure! 2.1.3 ASUS CrashFree BIOS 3 utility The ASUS CrashFree BIOS 3 is an auto recovery tool that contains the updated BIOS file. • Prepare the motherboard support DVD or the USB flash disk containing the updated motherboard BIOS before using this ... Flash 2 and press to the optical drive or USB port. 3. Turn on the system. 2. The utility displays the following message and automatically checks the support DVD or USB flash disk for USB Device... Starting BIOS recovery... USB Device found . 2. Completed. Start Erasing...\ ASUS ITX-220 2-3

User Manual
Page 27
...Restart the system after the utility completes the updating process. • Only a USB flash disk with FAT 32/16 format and single partition can cause system boot failure! Doing so can support ASUS CrashFree BIOS 3. Download the latest BIOS file from a running operating system can cause... damage to your screen. • Visit the ASUS website at www.asus.com. 2.2 BIOS setup program Use the BIOS Setup program when you wish to enter Setup after changing any of the following procedures: • Restart using this motherboard. 2-4 Chapter 2: BIOS information See section 2.8 Exit...
...Restart the system after the utility completes the updating process. • Only a USB flash disk with FAT 32/16 format and single partition can cause system boot failure! Doing so can support ASUS CrashFree BIOS 3. Download the latest BIOS file from a running operating system can cause... damage to your screen. • Visit the ASUS website at www.asus.com. 2.2 BIOS setup program Use the BIOS Setup program when you wish to enter Setup after changing any of the following procedures: • Restart using this motherboard. 2-4 Chapter 2: BIOS information See section 2.8 Exit...

User Manual
Page 30
... changing the settings of this item is installed in this motherboard. The following item appears only when you set the AI Overclocking item to malfunction. Configuration options: [Yes] [No] ASUS ITX-220 2-7 Main Advanced Power BIOS SETUP UTILITY Boot Tools Exit JumperFree Configuration TPM Configuration USB Configuration CPU Configuration Chipset Onboard Devices Configuration PCIPnP Adjust System...
... changing the settings of this item is installed in this motherboard. The following item appears only when you set the AI Overclocking item to malfunction. Configuration options: [Yes] [No] ASUS ITX-220 2-7 Main Advanced Power BIOS SETUP UTILITY Boot Tools Exit JumperFree Configuration TPM Configuration USB Configuration CPU Configuration Chipset Onboard Devices Configuration PCIPnP Adjust System...


