H87M-PRO User's Manual
Page 3
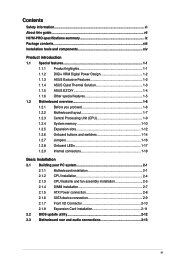
... this guide...vii H87M-PRO specifications summary ix Package contents...xiii Installation tools and components xiv Product introduction 1.1 Special features 1-1 1.1.1 Product highlights 1-1 1.1.2 DIGI+ VRM Digital Power Design 1-2 1.1.3 ASUS Exclusive Features 1-2 1.1.4 ASUS Quiet Thermal Solution 1-3 1.1.5 ASUS EZ DIY 1-4 1.1.6 Other special features 1-5 1.2 Motherboard overview 1-6 1.2.1 Before you proceed 1-6 1.2.2 Motherboard layout 1-7 1.2.3 Central Processing Unit (CPU 1-9 1.2.4 System memory 1-10 1.2.5 Expansion slots...
... this guide...vii H87M-PRO specifications summary ix Package contents...xiii Installation tools and components xiv Product introduction 1.1 Special features 1-1 1.1.1 Product highlights 1-1 1.1.2 DIGI+ VRM Digital Power Design 1-2 1.1.3 ASUS Exclusive Features 1-2 1.1.4 ASUS Quiet Thermal Solution 1-3 1.1.5 ASUS EZ DIY 1-4 1.1.6 Other special features 1-5 1.2 Motherboard overview 1-6 1.2.1 Before you proceed 1-6 1.2.2 Motherboard layout 1-7 1.2.3 Central Processing Unit (CPU 1-9 1.2.4 System memory 1-10 1.2.5 Expansion slots...
H87M-PRO User's Manual
Page 9
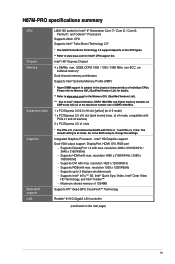
H87M-PRO specifications summary CPU Chipset Memory Expansion slots Graphics Multi-GPU support LAN LGA1150 socket for Intel® 4th Generation Core i7 / Core i5 / Core i3, Pentium®, and Celeron® ... on the CPU types. ** Refer to the physical characteristics of individual CPUs. Supports HDMI with max. Please refer to Memory QVL (Qualified Vendors List) for details. ** Refer to www.asus.com for Intel® CPU support list. Intel® HD Graphics support Dual-VGA output support: DisplayPort, HDMI, DVI, RGB port - Intel...
H87M-PRO specifications summary CPU Chipset Memory Expansion slots Graphics Multi-GPU support LAN LGA1150 socket for Intel® 4th Generation Core i7 / Core i5 / Core i3, Pentium®, and Celeron® ... on the CPU types. ** Refer to the physical characteristics of individual CPUs. Supports HDMI with max. Please refer to Memory QVL (Qualified Vendors List) for details. ** Refer to www.asus.com for Intel® CPU support list. Intel® HD Graphics support Dual-VGA output support: DisplayPort, HDMI, DVI, RGB port - Intel...
H87M-PRO User's Manual
Page 12
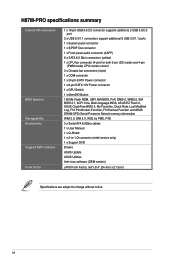
H87M-PRO specifications summary Internal I/O connectors BIOS features Manageability Accessories Support DVD contents Form factor 1 x 19-pin USB 3.0/2.0 connector supports additional 2 USB 3.0/2.0 port 3 x USB 2.0/1.1 connectors support ...ROM, UEFI AMI BIOS, PnP, DMI2.0, WfM2.0, SM BIOS 2.7, ACPI 2.0a, Multi-language BIOS, ASUS EZ Flash 2, ASUS CrashFree BIOS 3, My Favorites, Quick Note, Last Modified Log, F12 PrintScreen Function, F3 Shortcut Function and ASUS DRAM SPD (Serial Presence Detect) memory information WfM 2.0, DMI 2.0, WOL by PME, PXE 3 x Serial ATA 6.0Gb/s cables 1 x User...
H87M-PRO specifications summary Internal I/O connectors BIOS features Manageability Accessories Support DVD contents Form factor 1 x 19-pin USB 3.0/2.0 connector supports additional 2 USB 3.0/2.0 port 3 x USB 2.0/1.1 connectors support ...ROM, UEFI AMI BIOS, PnP, DMI2.0, WfM2.0, SM BIOS 2.7, ACPI 2.0a, Multi-language BIOS, ASUS EZ Flash 2, ASUS CrashFree BIOS 3, My Favorites, Quick Note, Last Modified Log, F12 PrintScreen Function, F3 Shortcut Function and ASUS DRAM SPD (Serial Presence Detect) memory information WfM 2.0, DMI 2.0, WOL by PME, PXE 3 x Serial ATA 6.0Gb/s cables 1 x User...
H87M-PRO User's Manual
Page 15
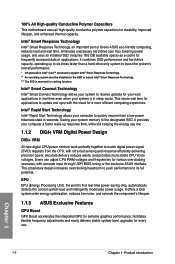
...Chipset is the PCI Express bus standard that provides twice the performance and speed of PCIe 2.0. Chapter 1 ASUS H87M-PRO 1-1 It provides great graphics and system performance with its GPU, dual-channel DDR3 memory slots and PCI Express 2.0/3.0 expansion slots. Dual-Channel DDR3 1600 / 1333 / 1066 MHz Support The ...motherboard supports the dual-channel DDR3 memory that features data transfer rates of DDR3 1600 / 1333 / 1066 MHz to boost the system's performance, and to meet the ...
...Chipset is the PCI Express bus standard that provides twice the performance and speed of PCIe 2.0. Chapter 1 ASUS H87M-PRO 1-1 It provides great graphics and system performance with its GPU, dual-channel DDR3 memory slots and PCI Express 2.0/3.0 expansion slots. Dual-Channel DDR3 1600 / 1333 / 1066 MHz Support The ...motherboard supports the dual-channel DDR3 memory that features data transfer rates of DDR3 1600 / 1333 / 1066 MHz to boost the system's performance, and to meet the ...
H87M-PRO User's Manual
Page 16
...the energy use . It offers a total system-wide energy optimization, reduces fan noise, and extends the component's lifespan. 1.1.3 ASUS Exclusive Features GPU Boost GPU Boost accelerates the integrated GPU for extreme graphics performance, facilitates flexible frequency adjustments and easily delivers stable system...-level upgrades for a more stable CPU Vcore voltages. Saving your system memory to the designated SSD, it provides your computer a faster wake-up to six times faster than a hard-drive-only system...
...the energy use . It offers a total system-wide energy optimization, reduces fan noise, and extends the component's lifespan. 1.1.3 ASUS Exclusive Features GPU Boost GPU Boost accelerates the integrated GPU for extreme graphics performance, facilitates flexible frequency adjustments and easily delivers stable system...-level upgrades for a more stable CPU Vcore voltages. Saving your system memory to the designated SSD, it provides your computer a faster wake-up to six times faster than a hard-drive-only system...
H87M-PRO User's Manual
Page 17
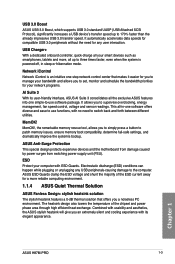
... memory issues, ensure memory boot compatibility, determine fail-safe settings, and dramatically improve the systemís bootup. ASUS ESD Guards clamp the ESD voltage and shunt the majority of the chipset and power phase area through high efficient heat-exchange. Chapter 1 ASUS H87M-PRO ...1-3 ESD Protect your network programs. AI Suite 3 With its elegant appearance. Combined with its user-friendly interface, ASUS AI Suite 3 consolidates all the exclusive ASUS features into one simple-to-use functions, ...
... memory issues, ensure memory boot compatibility, determine fail-safe settings, and dramatically improve the systemís bootup. ASUS ESD Guards clamp the ESD voltage and shunt the majority of the chipset and power phase area through high efficient heat-exchange. Chapter 1 ASUS H87M-PRO ...1-3 ESD Protect your network programs. AI Suite 3 With its elegant appearance. Combined with its user-friendly interface, ASUS AI Suite 3 consolidates all the exclusive ASUS features into one simple-to-use functions, ...
H87M-PRO User's Manual
Page 24
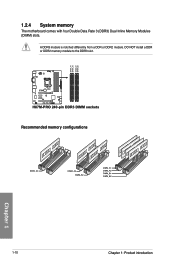
A DDR3 module is notched differently from a DDR or DDR2 module. DIMM_A1 DIMM_A2 DIMM_B1 DIMM_B2 1.2.4 System memory The motherboard comes with four Double Data Rate 3 (DDR3) Dual Inline Memory Modules (DIMM) slots. DO NOT install a DDR or DDR2 memory module to the DDR3 slot. H87M-PRO H87M-PRO 240-pin DDR3 DIMM sockets Recommended memory configurations Chapter 1 1-10 Chapter 1: Product introduction
A DDR3 module is notched differently from a DDR or DDR2 module. DIMM_A1 DIMM_A2 DIMM_B1 DIMM_B2 1.2.4 System memory The motherboard comes with four Double Data Rate 3 (DDR3) Dual Inline Memory Modules (DIMM) slots. DO NOT install a DDR or DDR2 memory module to the DDR3 slot. H87M-PRO H87M-PRO 240-pin DDR3 DIMM sockets Recommended memory configurations Chapter 1 1-10 Chapter 1: Product introduction
H87M-PRO User's Manual
Page 25
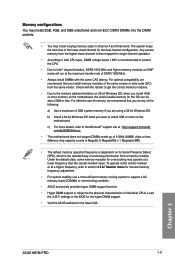
... frequency is then mapped for the OS can be about 3GB or less. Chapter 1 ASUS H87M-PRO 1-11 For optimal compatibility, we recommend that you install memory modules of 3GB system memory if you want to the Microsoft® support site at a higher frequency, refer to section 3.5 ...Tweaker menu for the latest QVL. c) For more details, refer to install 4GB or more efficient memory cooling system to support a full memory load (4 DIMMs) or overclocking condition. • ASUS exclusively provides hyper DIMM support function. • Hyper DIMM support is the standard way of DDR3 1600...
... frequency is then mapped for the OS can be about 3GB or less. Chapter 1 ASUS H87M-PRO 1-11 For optimal compatibility, we recommend that you install memory modules of 3GB system memory if you want to the Microsoft® support site at a higher frequency, refer to section 3.5 ...Tweaker menu for the latest QVL. c) For more details, refer to install 4GB or more efficient memory cooling system to support a full memory load (4 DIMMs) or overclocking condition. • ASUS exclusively provides hyper DIMM support function. • Hyper DIMM support is the standard way of DDR3 1600...
H87M-PRO User's Manual
Page 28
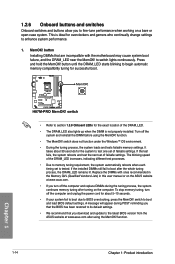
...from the ASUS website at www.asus.com. • If you to fine-tune performance when working on a bare or open-case system. H87M-PRO H87M-PRO MemOK! switch does not function under the Windows™ OS environment. • During the tuning process, the system loads and tests failsafe memory settings. ... at www.asus.com after using the MemOK! function. It takes about 5-10 seconds. • If your system fail to boot due to BIOS overclocking, press the MemOK! button until the DRAM_LED starts blinking to begin automatic memory compatibility tuning for overclockers and gamers who ...
...from the ASUS website at www.asus.com. • If you to fine-tune performance when working on a bare or open-case system. H87M-PRO H87M-PRO MemOK! switch does not function under the Windows™ OS environment. • During the tuning process, the system loads and tests failsafe memory settings. ... at www.asus.com after using the MemOK! function. It takes about 5-10 seconds. • If your system fail to boot due to BIOS overclocking, press the MemOK! button until the DRAM_LED starts blinking to begin automatic memory compatibility tuning for overclockers and gamers who ...

H87M-PRO User's Manual
Page 30
H87M-PRO CLRTC 12 23 Normal (Default) H87M-PRO Clear RTC RAM Clear RTC To erase the RTC RAM: 1. Keep the cap on CLRTC jumper default position. Removing the cap will cause system boot ... due to pins 2-3. Turn OFF the computer and unplug the power cord. 2. Hold down and reboot the system so the BIOS can clear the CMOS memory of date, time, and system setup parameters by erasing the CMOS RTC RAM data. Except when clearing the RTC RAM, never remove the cap on...
H87M-PRO CLRTC 12 23 Normal (Default) H87M-PRO Clear RTC RAM Clear RTC To erase the RTC RAM: 1. Keep the cap on CLRTC jumper default position. Removing the cap will cause system boot ... due to pins 2-3. Turn OFF the computer and unplug the power cord. 2. Hold down and reboot the system so the BIOS can clear the CMOS memory of date, time, and system setup parameters by erasing the CMOS RTC RAM data. Except when clearing the RTC RAM, never remove the cap on...

H87M-PRO User's Manual
Page 57
...boot set to let the system enter the soft-off . 3. At power on test. Follow the instructions in the following order: a. Chapter 2 ASUS H87M-PRO 2-17 2.4 Starting up when you press the ATX power button. System power 6. Check the jumper settings and connections or call your monitor complies ...with ATX power supplies, the system LED lights up for less than four seconds to disabled No keyboard detected No memory detected No VGA detected Hardware component failure 7. Turn on the BIOS setting. For systems with the "green" standards or if it has ...
...boot set to let the system enter the soft-off . 3. At power on test. Follow the instructions in the following order: a. Chapter 2 ASUS H87M-PRO 2-17 2.4 Starting up when you press the ATX power button. System power 6. Check the jumper settings and connections or call your monitor complies ...with ATX power supplies, the system LED lights up for less than four seconds to disabled No keyboard detected No memory detected No VGA detected Hardware component failure 7. Turn on the BIOS setting. For systems with the "green" standards or if it has ...

H87M-PRO User's Manual
Page 64
... pointer to My Favorites: • Items with submenu options • User-configurable items such as language and boot device order • Configuration items such as Memory SPD Information, system time and date 3-6 Chapter 3: BIOS setup Chapter 3 You cannot add the following items to the item. 2. Press on your keyboard or right...
... pointer to My Favorites: • Items with submenu options • User-configurable items such as language and boot device order • Configuration items such as Memory SPD Information, system time and date 3-6 Chapter 3: BIOS setup Chapter 3 You cannot add the following items to the item. 2. Press on your keyboard or right...
H87M-PRO User's Manual
Page 67
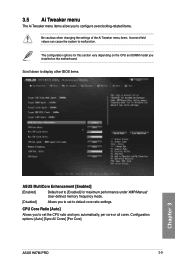
...defined memory frequency mode. [Disabled] Allows you to set the CPU ratio and sync automatically, per core or all cores. 3.5 Ai Tweaker menu The Ai Tweaker menu items allow you installed on the motherboard. Configuration options: [Auto] [Sync All Cores] [Per Core] ASUS H87M-PRO ...3-9 Scroll down to display other BIOS items. Chapter 3 ASUS MultiCore Enhancement [Enabled] [Enabled] Default set to malfunction. CPU Core Ratio [Auto] Allows you to set to...
...defined memory frequency mode. [Disabled] Allows you to set the CPU ratio and sync automatically, per core or all cores. 3.5 Ai Tweaker menu The Ai Tweaker menu items allow you installed on the motherboard. Configuration options: [Auto] [Sync All Cores] [Per Core] ASUS H87M-PRO ...3-9 Scroll down to display other BIOS items. Chapter 3 ASUS MultiCore Enhancement [Enabled] [Enabled] Default set to malfunction. CPU Core Ratio [Auto] Allows you to set to...

H87M-PRO User's Manual
Page 68
... not be set to [Auto]. Min CPU Cache Ratio [Auto] Allows you to set the uncore ratio of the processor to its possible minimum value. Memory Frequency [Auto] Allows you to 100:100. iGPU Max. Select [Auto] to apply the CPU default Turbo Ratio setting or manually assign a 1-Core Ratio Limit... speed to DRAM speed ratio is set to 100:133. [100:100] The CPU bus speed to DRAM speed ratio is set to set the memory operating frequency. When the CPU Core Ratio is higher than or equal to the 4-Core Ratio Limit. 1-Core/2-Core Ratio Limit must not be set...
... not be set to [Auto]. Min CPU Cache Ratio [Auto] Allows you to set the uncore ratio of the processor to its possible minimum value. Memory Frequency [Auto] Allows you to 100:100. iGPU Max. Select [Auto] to apply the CPU default Turbo Ratio setting or manually assign a 1-Core Ratio Limit... speed to DRAM speed ratio is set to 100:133. [100:100] The CPU bus speed to DRAM speed ratio is set to set the memory operating frequency. When the CPU Core Ratio is higher than or equal to the 4-Core Ratio Limit. 1-Core/2-Core Ratio Limit must not be set...
H87M-PRO User's Manual
Page 84
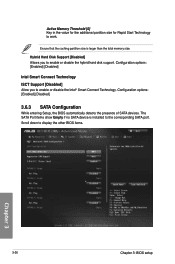
... SATA devices. The SATA Port items show Empty if no SATA device is larger than the total memory size. Configuration options: [Enabled] [Disabled] Intel Smart Connect Technology ISCT Support [Disabled] Allow you to work. Active Memory Threshold [0] Key in the value for the additional partition size for Rapid Start Technology to enable...
... SATA devices. The SATA Port items show Empty if no SATA device is larger than the total memory size. Configuration options: [Enabled] [Disabled] Intel Smart Connect Technology ISCT Support [Disabled] Allow you to work. Active Memory Threshold [0] Key in the value for the additional partition size for Rapid Start Technology to enable...

H87M-PRO User's Manual
Page 86
... options: [Enabled] [Disabled] DVI Port Audio [Disabled] Allows you to enable or disable Intel® Graphics Render Standby support to enable virtualization technology function on memory control hub. [Enabled] Enables the function. [Disabled] Disables this function. Configuration options: [Auto] [32M] [64M] [96M] [128M] ~ [448M] [480M]... options: [Auto] [Disabled] [Enabled] 3-28 Chapter 3: BIOS setup Chapter 3 Configuration options: [Auto] [iGPU] [PCIE] [PCI] iGPU Memory [Auto] Allows you to enable or disable the DVI port. CPU Audio Device [Enabled] Allows you to set the system...
... options: [Enabled] [Disabled] DVI Port Audio [Disabled] Allows you to enable or disable Intel® Graphics Render Standby support to enable virtualization technology function on memory control hub. [Enabled] Enables the function. [Disabled] Disables this function. Configuration options: [Auto] [32M] [64M] [96M] [128M] ~ [448M] [480M]... options: [Auto] [Disabled] [Enabled] 3-28 Chapter 3: BIOS setup Chapter 3 Configuration options: [Auto] [iGPU] [PCIE] [PCI] iGPU Memory [Auto] Allows you to enable or disable the DVI port. CPU Audio Device [Enabled] Allows you to set the system...

H87M-PRO User's Manual
Page 87
... MVP function support, set this item to [Enabled] to control various DMI (Desktop Management Interface) functions. The iGPU shared system memory size will be fixed at 64MB. Configuration options: [Enabled] [Disabled] Chapter 3 ASUS H87M-PRO 3-29 Configuration options: [Disabled] [Enabled] DMI Configuration Allows you to enable or disable DMI Gen 2. Configuration options: [Auto] [Enabled...
... MVP function support, set this item to [Enabled] to control various DMI (Desktop Management Interface) functions. The iGPU shared system memory size will be fixed at 64MB. Configuration options: [Enabled] [Disabled] Chapter 3 ASUS H87M-PRO 3-29 Configuration options: [Disabled] [Enabled] DMI Configuration Allows you to enable or disable DMI Gen 2. Configuration options: [Auto] [Enabled...

H87M-PRO User's Manual
Page 105
...BIOS settings to load the previous BIOS settings saved in the BIOS Flash. Label Allows you to eight, press , and then select Yes. Chapter 3 ASUS H87M-PRO 3-47 Key in the profile number that saved your BIOS settings, press , and then select Yes. • DO NOT shut down or reset the...prevent the system boot failure! • We recommend that you to view the DRAM SPD information. Key in a profile number from the same memory/ CPU configuration and BIOS version. 3.9.3 ASUS SPD Information Allows you update the BIOS file only coming from one to input the label of the setup profile.
...BIOS settings to load the previous BIOS settings saved in the BIOS Flash. Label Allows you to eight, press , and then select Yes. Chapter 3 ASUS H87M-PRO 3-47 Key in the profile number that saved your BIOS settings, press , and then select Yes. • DO NOT shut down or reset the...prevent the system boot failure! • We recommend that you to view the DRAM SPD information. Key in a profile number from the same memory/ CPU configuration and BIOS version. 3.9.3 ASUS SPD Information Allows you update the BIOS file only coming from one to input the label of the setup profile.
H87M-PRO User's Manual
Page 128
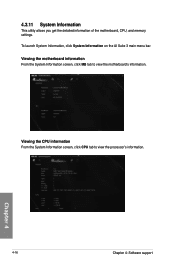
Chapter 4 4-16 Chapter 4: Software support To launch System Information, click System Information on the AI Suite 3 main menu bar. Viewing the motherboard information From the System Information screen, click MB tab to view the processor's information. Viewing the CPU information From the System Information screen, click CPU tab to view the motherboard's information. 4.3.11 System Information This utility allows you get the detailed information of the motherboard, CPU, and memory settings.
Chapter 4 4-16 Chapter 4: Software support To launch System Information, click System Information on the AI Suite 3 main menu bar. Viewing the motherboard information From the System Information screen, click MB tab to view the processor's information. Viewing the CPU information From the System Information screen, click CPU tab to view the motherboard's information. 4.3.11 System Information This utility allows you get the detailed information of the motherboard, CPU, and memory settings.

H87M-PRO User's Manual
Page 129
... for all audio ports, eliminating cable connection errors, and giving users plug and play convenience. Realtek® HD Audio Manager Chapter 4 ASUS H87M-PRO 4-17 Double-click on the icon to install the Realtek® Audio Driver from the support DVD that came with the motherboard package.... HD Audio Manager icon on your computer. Viewing the SPD information From the System Information screen, click SPD tab to view the memory's information. 4.3.12 Audio configurations The Realtek® audio CODEC provides 8-channel audio capability to deliver the ultimate audio experience on the ...
... for all audio ports, eliminating cable connection errors, and giving users plug and play convenience. Realtek® HD Audio Manager Chapter 4 ASUS H87M-PRO 4-17 Double-click on the icon to install the Realtek® Audio Driver from the support DVD that came with the motherboard package.... HD Audio Manager icon on your computer. Viewing the SPD information From the System Information screen, click SPD tab to view the memory's information. 4.3.12 Audio configurations The Realtek® audio CODEC provides 8-channel audio capability to deliver the ultimate audio experience on the ...


