User Guide
Page 1
H81M-V3 Motherboard
H81M-V3 Motherboard
User Guide
Page 3
Contents Safety information...4 About this guide...4 Package contents...6 H81M-V3 specifications summary 6 Chapter 1: Product introduction 1.1 Before you proceed 1-1 1.2 Motherboard overview 1-2 1.3 Central Processing Unit (CPU 1-4 1.4 System memory 1-7 1.5 Expansion slots 1-10 1.6 Headers...1-12 1.7 Connectors 1-13 1.8 Software support 1-23 Chapter 2: BIOS information 2.1 Managing and ... menu 2-11 2.6 Advanced menu 2-12 2.7 Monitor menu 2-12 2.8 Boot menu...2-13 2.9 Tools menu 2-14 2.10 Exit menu...2-14 Appendices Notices...15 ASUS contact information 17 3
Contents Safety information...4 About this guide...4 Package contents...6 H81M-V3 specifications summary 6 Chapter 1: Product introduction 1.1 Before you proceed 1-1 1.2 Motherboard overview 1-2 1.3 Central Processing Unit (CPU 1-4 1.4 System memory 1-7 1.5 Expansion slots 1-10 1.6 Headers...1-12 1.7 Connectors 1-13 1.8 Software support 1-23 Chapter 2: BIOS information 2.1 Managing and ... menu 2-11 2.6 Advanced menu 2-12 2.7 Monitor menu 2-12 2.8 Boot menu...2-13 2.9 Tools menu 2-14 2.10 Exit menu...2-14 Appendices Notices...15 ASUS contact information 17 3
User Guide
Page 4
...qualified service technician or your retailer. About this guide is broken, do not try to moisture. • Place the product on the motherboard. • Chapter 2: BIOS information This chapter discusses changing system settings through the BIOS Setup menus. If possible, disconnect all power cables... are connected. It includes descriptions of the motherboard and the new technology it by yourself. Detailed descriptions for the devices are unplugged before the signal cables are unplugged. •...
...qualified service technician or your retailer. About this guide is broken, do not try to moisture. • Place the product on the motherboard. • Chapter 2: BIOS information This chapter discusses changing system settings through the BIOS Setup menus. If possible, disconnect all power cables... are connected. It includes descriptions of the motherboard and the new technology it by yourself. Detailed descriptions for the devices are unplugged before the signal cables are unplugged. •...
User Guide
Page 6
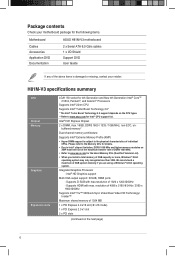
...x PCI Express 2.0 x1 slot 2 x PCI slots (continued on the CPU types. ** Refer to www.asus.com for Intel® CPU support list. H81M-V3 specifications summary CPU Chipset Memory Graphics Expansion slots LGA1150 socket for 4th Generation and New 4th Generation Intel® ...Technology 2.0 support depends on the next page) 6 Supports D-SUB with max. Package contents Check your motherboard package for the following items. Motherboard Cables Accessories Application DVD Documentation ASUS H81M-V3 motherboard 2 x Serial ATA 6.0 Gb/s cables 1 x I/O Shield Support DVD User Guide If any of ...
...x PCI Express 2.0 x1 slot 2 x PCI slots (continued on the CPU types. ** Refer to www.asus.com for Intel® CPU support list. H81M-V3 specifications summary CPU Chipset Memory Graphics Expansion slots LGA1150 socket for 4th Generation and New 4th Generation Intel® ...Technology 2.0 support depends on the next page) 6 Supports D-SUB with max. Package contents Check your motherboard package for the following items. Motherboard Cables Accessories Application DVD Documentation ASUS H81M-V3 motherboard 2 x Serial ATA 6.0 Gb/s cables 1 x I/O Shield Support DVD User Guide If any of ...
User Guide
Page 7
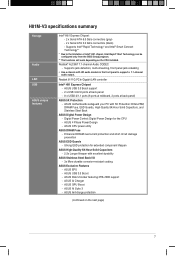
... lifespan ASUS High-Quality 5K-Hour Solid Capacitors - 2.5x Longer lifespan with excellent durability ASUS Stainless Steel Back I/O - 3x More durable corrosion-resistant coating ASUS Exclusive Features - ASUS GPU Boost - ASUS AI Suite 3 - ASUS motherboards safeguard your... Enhanced DRAM overcurrent protection and short circuit damage prevention ASUS ESD Guards - ASUS Disk Unlocker featuring 3TB+HDD support - ASUS Anti-Surge protection (continued on the CPU installed. H81M-V3 specifications summary Storage Audio LAN USB ASUS unique features Intel® H81 Express Chipset: -...
... lifespan ASUS High-Quality 5K-Hour Solid Capacitors - 2.5x Longer lifespan with excellent durability ASUS Stainless Steel Back I/O - 3x More durable corrosion-resistant coating ASUS Exclusive Features - ASUS GPU Boost - ASUS AI Suite 3 - ASUS motherboards safeguard your... Enhanced DRAM overcurrent protection and short circuit damage prevention ASUS ESD Guards - ASUS Disk Unlocker featuring 3TB+HDD support - ASUS Anti-Surge protection (continued on the CPU installed. H81M-V3 specifications summary Storage Audio LAN USB ASUS unique features Intel® H81 Express Chipset: -...
User Guide
Page 9
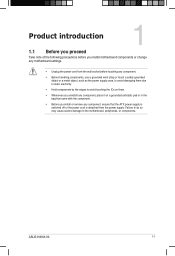
ASUS H81M-V3 1-1 Product introduction 1 1.1 Before you proceed Take note of the following precautions before you install motherboard components or change any motherboard settings. • Unplug the power cord from the wall socket before touching any component, ensure that came with the component. • Before you install or ... do so may cause severe damage to avoid touching the ICs on them due to static electricity. • Hold components by the edges to the motherboard, peripherals, or components.
ASUS H81M-V3 1-1 Product introduction 1 1.1 Before you proceed Take note of the following precautions before you install motherboard components or change any motherboard settings. • Unplug the power cord from the wall socket before touching any component, ensure that came with the component. • Before you install or ... do so may cause severe damage to avoid touching the ICs on them due to static electricity. • Hold components by the edges to the motherboard, peripherals, or components.
User Guide
Page 10
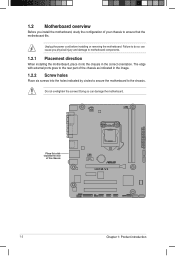
... edge with external ports goes to the rear part of the chassis as indicated in the correct orientation. Doing so can cause you install the motherboard, study the configuration of the chassis H81M-V3 1-2 Chapter 1: Product introduction Place this side towards the rear of your chassis to ensure that the...
... edge with external ports goes to the rear part of the chassis as indicated in the correct orientation. Doing so can cause you install the motherboard, study the configuration of the chassis H81M-V3 1-2 Chapter 1: Product introduction Place this side towards the rear of your chassis to ensure that the...
User Guide
Page 11
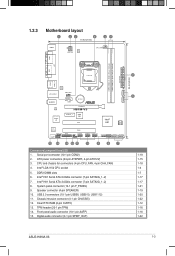
... CHASSIS) 12. Digital audio connector (4-1 pin SPDIF_OUT) 6 1-19 1-15 1-18 1-4 1-7 1-17 1-17 1-21 1-19 1-20 1-22 1-12 1-16 1-16 1-22 ASUS H81M-V3 1-3 Clear RTC RAM (2-pin CLRTC) 13. DDR3 DIMM slots 6. 1.2.3 Motherboard layout 1 23 4 19.8cm(7.8in) 35 KBMS ATX12V DIGI +VRM CPU_FAN COM DDR3 DIMM_A1 (64bit, 240-pin module) DDR3 DIMM_B1 (64bit...
... CHASSIS) 12. Digital audio connector (4-1 pin SPDIF_OUT) 6 1-19 1-15 1-18 1-4 1-7 1-17 1-17 1-21 1-19 1-20 1-22 1-12 1-16 1-16 1-22 ASUS H81M-V3 1-3 Clear RTC RAM (2-pin CLRTC) 13. DDR3 DIMM slots 6. 1.2.3 Motherboard layout 1 23 4 19.8cm(7.8in) 35 KBMS ATX12V DIGI +VRM CPU_FAN COM DDR3 DIMM_A1 (64bit, 240-pin module) DDR3 DIMM_B1 (64bit...
User Guide
Page 12
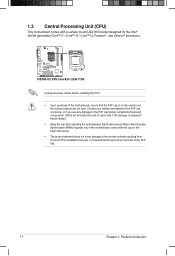
... 1: Product introduction H81M-V3 H81M-V3 CPU socket LGA1150 Unplug all power cables before installing the CPU. • Upon purchase of the motherboard, ensure that the PnP cap is shipment/ transit-related. • Keep the cap after installing the motherboard. ASUS will process Return Merchandise... Authorization (RMA) requests only if the motherboard comes with a surface mount LGA1150 socket designed for the Intel® 4th/5th generation Core...
... 1: Product introduction H81M-V3 H81M-V3 CPU socket LGA1150 Unplug all power cables before installing the CPU. • Upon purchase of the motherboard, ensure that the PnP cap is shipment/ transit-related. • Keep the cap after installing the motherboard. ASUS will process Return Merchandise... Authorization (RMA) requests only if the motherboard comes with a surface mount LGA1150 socket designed for the Intel® 4th/5th generation Core...
User Guide
Page 15
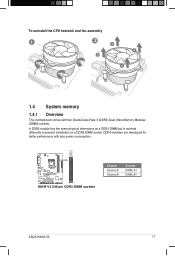
A DDR3 module has the same physical dimensions as a DDR2 DIMM but is notched differently to prevent installation on a DDR2 DIMM socket. DDR3 modules are developed for better performance with two Double Data Rate 3 (DDR3) Dual Inline Memory Modules (DIMM) sockets. To uninstall the CPU heatsink and fan assembly 1 2 A B B A 1.4 System memory 1.4.1 Overview This motherboard comes with less power consumption. DIMM_A1 DIMM_B1 H81M-V3 H81M-V3 240-pin DDR3 DIMM sockets Channel Channel A Channel B Sockets DIMM_A1 DIMM_B1 ASUS H81M-V3 1-7
A DDR3 module has the same physical dimensions as a DDR2 DIMM but is notched differently to prevent installation on a DDR2 DIMM socket. DDR3 modules are developed for better performance with two Double Data Rate 3 (DDR3) Dual Inline Memory Modules (DIMM) sockets. To uninstall the CPU heatsink and fan assembly 1 2 A B B A 1.4 System memory 1.4.1 Overview This motherboard comes with less power consumption. DIMM_A1 DIMM_B1 H81M-V3 H81M-V3 240-pin DDR3 DIMM sockets Channel Channel A Channel B Sockets DIMM_A1 DIMM_B1 ASUS H81M-V3 1-7
User Guide
Page 16
...overclocking condition. 1-8 Chapter 1: Product introduction For effective use of memory, we recommend that you install 4GB or more on the motherboard. • This motherboard does not support DIMMs made up of the lower-sized channel for manual memory frequency adjustment. • For system stability, use ... memory cooling system to install 4GB or more memory on its corresponding timing or the loaded XMP Profile is dependent on the motherboard, the actual usable memory for single-channel operation. • Always install DIMMs with memory frequency higher than the vendor-marked...
...overclocking condition. 1-8 Chapter 1: Product introduction For effective use of memory, we recommend that you install 4GB or more on the motherboard. • This motherboard does not support DIMMs made up of the lower-sized channel for manual memory frequency adjustment. • For system stability, use ... memory cooling system to install 4GB or more memory on its corresponding timing or the loaded XMP Profile is dependent on the motherboard, the actual usable memory for single-channel operation. • Always install DIMMs with memory frequency higher than the vendor-marked...
User Guide
Page 18
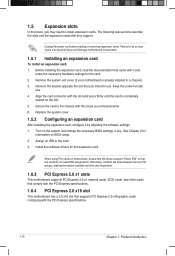
... and change the necessary BIOS settings, if any. Before installing the expansion card, read the documentation that you physical injury and damage motherboard components. 1.5.1 Installing an expansion card To install an expansion card: 1. Align the card connector with the screw you may cause you...to do not need to use . 4. 1.5 Expansion slots In the future, you removed earlier. 6. Remove the system unit cover (if your motherboard is completely seated on shared slots, ensure that the drivers support "Share IRQ" or that they support. Secure the card to the card. 3....
... and change the necessary BIOS settings, if any. Before installing the expansion card, read the documentation that you physical injury and damage motherboard components. 1.5.1 Installing an expansion card To install an expansion card: 1. Align the card connector with the screw you may cause you...to do not need to use . 4. 1.5 Expansion slots In the future, you removed earlier. 6. Remove the system unit cover (if your motherboard is completely seated on shared slots, ensure that the drivers support "Share IRQ" or that they support. Secure the card to the card. 3....
User Guide
Page 19
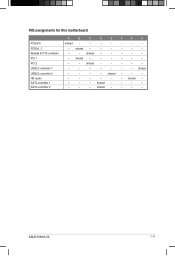
shared - - - - - - - shared - - - - shared - - - - shared - - - - - - - - IRQ assignments for this motherboard PCIEx16 PCIEx1_1 Realtek 8111G controller PCI 1 PCI 2 USB2.0 controller 1 USB2.0 controller 2 HD audio SATA controller 1 SATA controller 2 A B C D E F G H shared - - - - - - - - shared - - - - - - - - - - - - shared - - - - ASUS H81M-V3 1-11 shared - - - - - - shared - - - - - - - - - shared - - - - - - - -
shared - - - - - - - shared - - - - shared - - - - shared - - - - - - - - IRQ assignments for this motherboard PCIEx16 PCIEx1_1 Realtek 8111G controller PCI 1 PCI 2 USB2.0 controller 1 USB2.0 controller 2 HD audio SATA controller 1 SATA controller 2 A B C D E F G H shared - - - - - - - - shared - - - - - - - - - - - - shared - - - - ASUS H81M-V3 1-11 shared - - - - - - shared - - - - - - - - - shared - - - - - - - -

User Guide
Page 24
...NC AAFP PIN 1 MIC2 MICPWR Line out_R NC Line out_L PORT1 L PORT1 R PORT2 R SENSE_SEND PORT2 L H81M-V3 HD-audio-compliant Legacy AC'97 pin definition compliant definition H81M-V3 Front panel audio connector • We recommend that supports either HD Audio or legacy AC`97 audio standard. ...LAD1 LAD2 PWROWN GND H81M-V3 TPM Connector The TPM module is for details. 1-16 Chapter 1: Product introduction Connect one end of the front panel audio I /O module that you connect a high-definition front panel audio module to this connector to avail of the motherboard's high-definition audio ...
...NC AAFP PIN 1 MIC2 MICPWR Line out_R NC Line out_L PORT1 L PORT1 R PORT2 R SENSE_SEND PORT2 L H81M-V3 HD-audio-compliant Legacy AC'97 pin definition compliant definition H81M-V3 Front panel audio connector • We recommend that supports either HD Audio or legacy AC`97 audio standard. ...LAD1 LAD2 PWROWN GND H81M-V3 TPM Connector The TPM module is for details. 1-16 Chapter 1: Product introduction Connect one end of the front panel audio I /O module that you connect a high-definition front panel audio module to this connector to avail of the motherboard's high-definition audio ...

User Guide
Page 26
... CHA_FAN(DC mode) CHA_FAN (PWM mode) H81M-V3 H81M-V3 Fan connectors • Do not forget to connect the fan cables to Advanced Mode > Monitor > Chassis Fan Q-Fan Control item in BIOS. 1-18 Chapter 1: Product introduction Insufficient air flow inside the system may damage the motherboard components. To set the chassis fan to ...wire of each cable matches the ground pin of maximum 1A (12 W) fan power. • Both 3-pin and 4-pin chassis fans support the ASUS Fan Xpert feature. • The chassis fan connector supports DC and PWM modes. These are not jumpers! CPU FAN PWM CPU FAN IN CPU ...
... CHA_FAN(DC mode) CHA_FAN (PWM mode) H81M-V3 H81M-V3 Fan connectors • Do not forget to connect the fan cables to Advanced Mode > Monitor > Chassis Fan Q-Fan Control item in BIOS. 1-18 Chapter 1: Product introduction Insufficient air flow inside the system may damage the motherboard components. To set the chassis fan to ...wire of each cable matches the ground pin of maximum 1A (12 W) fan power. • Both 3-pin and 4-pin chassis fans support the ASUS Fan Xpert feature. • The chassis fan connector supports DC and PWM modes. These are not jumpers! CPU FAN PWM CPU FAN IN CPU ...
User Guide
Page 28
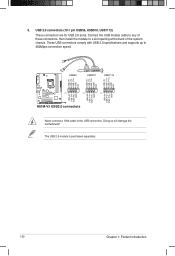
... USB_P5USB_P5+ GND NC USB+5V USB_P10USB_P10+ GND USB+5V USB_P12USB_P12+ GND H81M-V3 PIN 1 PIN 1 PIN 1 USB+5V USB_P6USB_P6+ GND H81M-V3 USB2.0 connectors Never connect a 1394 cable to a slot opening at the back of the system chassis. Doing so will damage the motherboard! The USB 2.0 module is purchased separately. 1-20 Chapter 1: Product introduction These...
... USB_P5USB_P5+ GND NC USB+5V USB_P10USB_P10+ GND USB+5V USB_P12USB_P12+ GND H81M-V3 PIN 1 PIN 1 PIN 1 USB+5V USB_P6USB_P6+ GND H81M-V3 USB2.0 connectors Never connect a 1394 cable to a slot opening at the back of the system chassis. Doing so will damage the motherboard! The USB 2.0 module is purchased separately. 1-20 Chapter 1: Product introduction These...
User Guide
Page 31
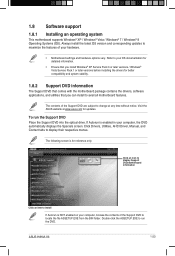
... Windows® 7 / Windows® 8 Operating Systems (OS). To run the DVD. Visit the ASUS website at any time without notice. Click an icon to display Support DVD/motherboard information Click an item to install If Autorun is for better compatibility and system stability. 1.8.2 Support DVD information... with the motherboard package contains the drivers, software applications, and utilities that you can install to locate the file ASSETUP.EXE from the BIN folder. Double-click the ASSETUP.EXE to your computer, the DVD automatically displays the Specials screen. ASUS H81M-V3 1-23 If...
... Windows® 7 / Windows® 8 Operating Systems (OS). To run the DVD. Visit the ASUS website at any time without notice. Click an icon to display Support DVD/motherboard information Click an item to install If Autorun is for better compatibility and system stability. 1.8.2 Support DVD information... with the motherboard package contains the drivers, software applications, and utilities that you can install to locate the file ASSETUP.EXE from the BIN folder. Double-click the ASSETUP.EXE to your computer, the DVD automatically displays the Specials screen. ASUS H81M-V3 1-23 If...
User Guide
Page 33
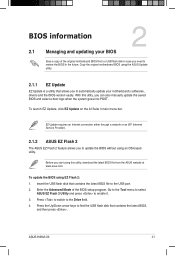
... contains the latest BIOS file to enable it. 3. Copy the original motherboard BIOS using the ASUS Update utility. 2.1.1 EZ Update EZ Update is a utility that contains the latest BIOS, and then press . ASUS H81M-V3 2-1 Before you need to restore the BIOS in case you start using...EZ Update requires an Internet connection either through a network or an ISP (Internet Service Provider). 2.1.2 ASUS EZ Flash 2 The ASUS EZ Flash 2 feature allows you to automatically update your motherboard's softwares, drivers and the BIOS version easily. Press the Up/Down arrow keys to the Drive ...
... contains the latest BIOS file to enable it. 3. Copy the original motherboard BIOS using the ASUS Update utility. 2.1.1 EZ Update EZ Update is a utility that contains the latest BIOS, and then press . ASUS H81M-V3 2-1 Before you need to restore the BIOS in case you start using...EZ Update requires an Internet connection either through a network or an ISP (Internet Service Provider). 2.1.2 ASUS EZ Flash 2 The ASUS EZ Flash 2 feature allows you to automatically update your motherboard's softwares, drivers and the BIOS version easily. Press the Up/Down arrow keys to the Drive ...
User Guide
Page 34
... on the system. 2. DO NOT shut down or reset the system while updating the BIOS to prevent system boot failure! 2.1.3 ASUS CrashFree BIOS 3 utility The ASUS CrashFree BIOS 3 is done. • This function supports USB flash disks with FAT 32/16 format and single partition only. ... Getting started When found, the utility reads the BIOS file and enters ASUS EZ Flash 2 utility automatically. 4. To ensure system compatibility and stability, we recommend that contains the updated BIOS file. • Before using the motherboard support DVD or a USB flash drive that you to enter BIOS Setup...
... on the system. 2. DO NOT shut down or reset the system while updating the BIOS to prevent system boot failure! 2.1.3 ASUS CrashFree BIOS 3 utility The ASUS CrashFree BIOS 3 is done. • This function supports USB flash disks with FAT 32/16 format and single partition only. ... Getting started When found, the utility reads the BIOS file and enters ASUS EZ Flash 2 utility automatically. 4. To ensure system compatibility and stability, we recommend that contains the updated BIOS file. • Before using the motherboard support DVD or a USB flash drive that you to enter BIOS Setup...
User Guide
Page 35
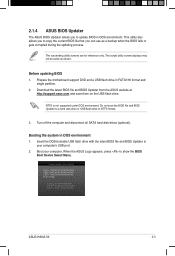
...actual utility screen displays may not be same as a backup when the BIOS fails or gets corrupted during the updating process. Prepare the motherboard support DVD and a USB flash drive in DOS environment 1. Insert the DOS-bootable USB flash drive with the latest BIOS file and BIOS... all SATA hard disk drives (optional). Download the latest BIOS file and BIOS Updater from the ASUS website at http://support.asus.com and save the BIOS file and BIOS Updater to update BIOS in NTFS format. 3. ASUS H81M-V3 2-3 Booting the system in FAT32/16 format and single partition. 2. When the...
...actual utility screen displays may not be same as a backup when the BIOS fails or gets corrupted during the updating process. Prepare the motherboard support DVD and a USB flash drive in DOS environment 1. Insert the DOS-bootable USB flash drive with the latest BIOS file and BIOS... all SATA hard disk drives (optional). Download the latest BIOS file and BIOS Updater from the ASUS website at http://support.asus.com and save the BIOS file and BIOS Updater to update BIOS in NTFS format. 3. ASUS H81M-V3 2-3 Booting the system in FAT32/16 format and single partition. 2. When the...


