H61M-A User's Manual
Page 19
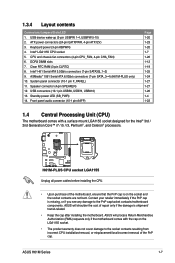
... Core™ i7 / i5 / i3, Pentium®, and Celeron® processors. ATX power connectors (24-pin EATXPWR, 4-pin ATX12V) 3. Clear RTC RAM (3-pin CLRTC) 8. System panel connector (10-1 pin F_PANEL) 11. USB connectors (10-1 pin USB56, USB78, USB910) 13. Contact your retailer immediately if...) The motherboard comes with the cap on the socket and the socket contacts are not bent. ASUS H61M Series 1-7 ASMedia® 1061 Serial ATA 6.0Gb/s connectors (7-pin SATA_3~4) (H61M-PLUS only) 10. ASUS will shoulder the cost of the PnP cap. USB device wake-up (3-pin USBPW 1-4, USBPW ...
... Core™ i7 / i5 / i3, Pentium®, and Celeron® processors. ATX power connectors (24-pin EATXPWR, 4-pin ATX12V) 3. Clear RTC RAM (3-pin CLRTC) 8. System panel connector (10-1 pin F_PANEL) 11. USB connectors (10-1 pin USB56, USB78, USB910) 13. Contact your retailer immediately if...) The motherboard comes with the cap on the socket and the socket contacts are not bent. ASUS H61M Series 1-7 ASMedia® 1061 Serial ATA 6.0Gb/s connectors (7-pin SATA_3~4) (H61M-PLUS only) 10. ASUS will shoulder the cost of the PnP cap. USB device wake-up (3-pin USBPW 1-4, USBPW ...
H61M-A User's Manual
Page 31
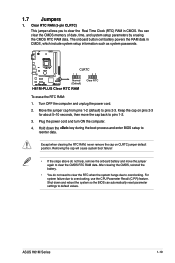
ASUS H61M Series 1-19 CLRTC H61M-PLUS 12 Normal (Default) 23 Clear RTC H61M-PLUS Clear RTC RAM To erase the RTC RAM: 1. Keep the cap on ...CLRTC jumper default position. After clearing the CMOS, reinstall the battery. • You do not help, remove the onboard battery and move the cap back to clear the Real Time Clock (RTC) RAM...Plug the power cord and turn ON the computer. 4. The onboard button cell battery powers the RAM data in CMOS. Move the jumper cap from pins 1-2 (default) to overclocking, use the ...
ASUS H61M Series 1-19 CLRTC H61M-PLUS 12 Normal (Default) 23 Clear RTC H61M-PLUS Clear RTC RAM To erase the RTC RAM: 1. Keep the cap on ...CLRTC jumper default position. After clearing the CMOS, reinstall the battery. • You do not help, remove the onboard battery and move the cap back to clear the Real Time Clock (RTC) RAM...Plug the power cord and turn ON the computer. 4. The onboard button cell battery powers the RAM data in CMOS. Move the jumper cap from pins 1-2 (default) to overclocking, use the ...

H61M-A User's Manual
Page 46
...BIOS Setup program. Entering BIOS Setup after POST To enter BIOS Setup after changing any BIOS setting, load the default settings to erase the RTC RAM. Do this option only if you do not press , POST continues with its parameters. Select the Load Optimized Defaults item under two modes: ... this motherboard. • Ensure that a USB mouse is connected to your data or system. Entering BIOS Setup at startup To enter BIOS Setup at www.asus.com to download the latest BIOS file for details. • If the system fails to boot after POST: • Press ++ simultaneously. • Press...
...BIOS Setup program. Entering BIOS Setup after POST To enter BIOS Setup after changing any BIOS setting, load the default settings to erase the RTC RAM. Do this option only if you do not press , POST continues with its parameters. Select the Load Optimized Defaults item under two modes: ... this motherboard. • Ensure that a USB mouse is connected to your data or system. Entering BIOS Setup at startup To enter BIOS Setup at www.asus.com to download the latest BIOS file for details. • If the system fails to boot after POST: • Press ++ simultaneously. • Press...

H61M-A User's Manual
Page 50
...] [Deutsch 2.3.2 System Date [Day xx/xx/xxxx] Allows you to set the system date. 2.3.3 System Time [xx:xx:xx] Allows you to erase the RTC RAM. • The Administrator or User Password items on top of the BIOS Setup program. After you set the system time. 2.3.4 Security The Security menu items... the system date, time, language, and security settings. 2.3.1 System Language [English] Allows you have forgotten your BIOS password, erase the CMOS Real Time Clock (RTC) RAM to choose the BIOS language version from the options.
...] [Deutsch 2.3.2 System Date [Day xx/xx/xxxx] Allows you to set the system date. 2.3.3 System Time [xx:xx:xx] Allows you to erase the RTC RAM. • The Administrator or User Password items on top of the BIOS Setup program. After you set the system time. 2.3.4 Security The Security menu items... the system date, time, language, and security settings. 2.3.1 System Language [English] Allows you have forgotten your BIOS password, erase the CMOS Real Time Clock (RTC) RAM to choose the BIOS language version from the options.


