
User Guide
Page 6
...maximum resolution of the above items is damaged or missing, contact your motherboard package for the following items. Motherboard Cables Accessories Application DVD Documentation ASUS H110M-E D3 motherboard 2 x Serial ATA 6.0 Gb/s cables 1 x I/O Shield Support DVD User Guide If any of 4096 x 2160 @ 24Hz /...Memory Profile (XMP) * Refer to www.asus.com for the latest Memory QVL (Qualified Vendors List). 1 x PCI Express 3.0/2.0 x16 slot (at x16 mode) 2 x PCI Express 2.0 x1 slots Integrated graphics processor - H110M-E D3 specifications summary CPU Chipset Memory Expansion slots Graphics ...
...maximum resolution of the above items is damaged or missing, contact your motherboard package for the following items. Motherboard Cables Accessories Application DVD Documentation ASUS H110M-E D3 motherboard 2 x Serial ATA 6.0 Gb/s cables 1 x I/O Shield Support DVD User Guide If any of 4096 x 2160 @ 24Hz /...Memory Profile (XMP) * Refer to www.asus.com for the latest Memory QVL (Qualified Vendors List). 1 x PCI Express 3.0/2.0 x16 slot (at x16 mode) 2 x PCI Express 2.0 x1 slots Integrated graphics processor - H110M-E D3 specifications summary CPU Chipset Memory Expansion slots Graphics ...

User Guide
Page 11
... goes to the rear part of the chassis as the power supply case, to avoid damaging them due to do so can damage the motherboard. ASUS H110M-E D3 1-1 Doing so can cause you physical injury and damage to motherboard components. 1.2.1 Placement direction When installing the motherboard, place it into the chassis in the...
... goes to the rear part of the chassis as the power supply case, to avoid damaging them due to do so can damage the motherboard. ASUS H110M-E D3 1-1 Doing so can cause you physical injury and damage to motherboard components. 1.2.1 Placement direction When installing the motherboard, place it into the chassis in the...
User Guide
Page 13
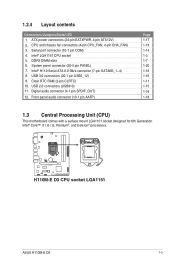
... slots 6. CPU and chassis fan connectors (4-pin CPU_FAN, 4-pin CHA_FAN) 3. Intel® H110 Serial ATA 6.0 Gb/s connector (7-pin SATA6G_1~4) 8. USB 2.0 connectors (USB910) 11. H110M-E D3 H110M-E D3 CPU socket LGA1151 ASUS H110M-E D3 1-3 System panel connector (20-5 pin PANEL) 7. Intel® LGA1151 CPU socket 5. Serial port connector (10-1 pin COM) 4. Digital audio connector (4-1 pin SPDIF_OUT) 12. Front...
... slots 6. CPU and chassis fan connectors (4-pin CPU_FAN, 4-pin CHA_FAN) 3. Intel® H110 Serial ATA 6.0 Gb/s connector (7-pin SATA6G_1~4) 8. USB 2.0 connectors (USB910) 11. H110M-E D3 H110M-E D3 CPU socket LGA1151 ASUS H110M-E D3 1-3 System panel connector (20-5 pin PANEL) 7. Intel® LGA1151 CPU socket 5. Serial port connector (10-1 pin COM) 4. Digital audio connector (4-1 pin SPDIF_OUT) 12. Front...
User Guide
Page 15
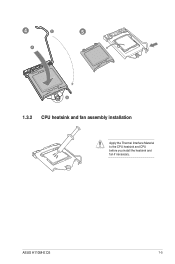
ASUS H110M-E D3 1-5 4 C 5 A B 1.3.2 CPU heatsink and fan assembly installation Apply the Thermal Interface Material to the CPU heatsink and CPU before you install the heatsink and fan if necessary.
ASUS H110M-E D3 1-5 4 C 5 A B 1.3.2 CPU heatsink and fan assembly installation Apply the Thermal Interface Material to the CPU heatsink and CPU before you install the heatsink and fan if necessary.
User Guide
Page 17
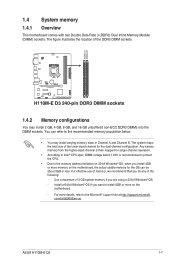
... 1.65V is then mapped for the dual-channel configuration. Use a maximum of the DDR3 DIMM sockets: H110M-E D3 H110M-E D3 240-pin DDR3 DIMM sockets 1.4.2 Memory configurations You may install varying memory sizes in Channel A and Channel B. ASUS H110M-E D3 1-7 For effective use of memory, we recommend that you want to install 4GB or more details, refer...
... 1.65V is then mapped for the dual-channel configuration. Use a maximum of the DDR3 DIMM sockets: H110M-E D3 H110M-E D3 240-pin DDR3 DIMM sockets 1.4.2 Memory configurations You may install varying memory sizes in Channel A and Channel B. ASUS H110M-E D3 1-7 For effective use of memory, we recommend that you want to install 4GB or more details, refer...
User Guide
Page 19
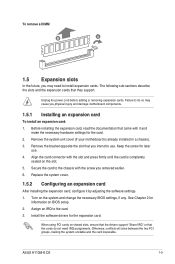
... the expansion card, read the documentation that you intend to install expansion cards. Keep the screw for the card. 2. Secure the card to the card. 3. ASUS H110M-E D3 1-9 Remove the bracket opposite the slot that came with the slot and press firmly until the card is already installed in a chassis). 3. Replace the system...
... the expansion card, read the documentation that you intend to install expansion cards. Keep the screw for the card. 2. Secure the card to the card. 3. ASUS H110M-E D3 1-9 Remove the bracket opposite the slot that came with the slot and press firmly until the card is already installed in a chassis). 3. Replace the system...
User Guide
Page 21
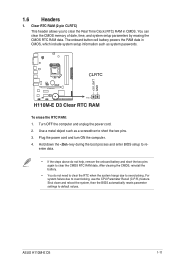
... the two pins. 3. Clear RTC RAM (2-pin CLRTC) This header allows you to overclocking, use the CPU Parameter Recall (C.P.R.) feature. CLRTC H110M-E D3 PIN 1 H110M-E D3 Clear RTC RAM To erase the RTC RAM: 1. After clearing the CMOS, reinstall the battery. • You do not help, remove the...down and reboot the system, then the BIOS automatically resets parameter settings to re- Turn OFF the computer and unplug the power cord. 2. ASUS H110M-E D3 1-11 Use a metal object such as system passwords. Shut down the key during the boot process and enter BIOS setup to default values...
... the two pins. 3. Clear RTC RAM (2-pin CLRTC) This header allows you to overclocking, use the CPU Parameter Recall (C.P.R.) feature. CLRTC H110M-E D3 PIN 1 H110M-E D3 Clear RTC RAM To erase the RTC RAM: 1. After clearing the CMOS, reinstall the battery. • You do not help, remove the...down and reboot the system, then the BIOS automatically resets parameter settings to re- Turn OFF the computer and unplug the power cord. 2. ASUS H110M-E D3 1-11 Use a metal object such as system passwords. Shut down the key during the boot process and enter BIOS setup to default values...
User Guide
Page 23
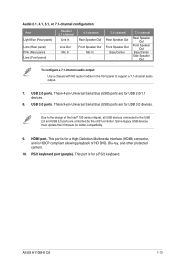
This port is for a High-Definition Multimedia Interface (HDMI) connector, and is for better compatibility. 9. USB 3.0 ports. ASUS H110M-E D3 1-13 Audio 2.1, 4.1, 5.1, or 7.1-channel configuration Port Light Blue (Rear panel) Lime (Rear panel) Pink (Rear panel) Lime (Front panel) Headset 2.1-channel Line In Line Out ...
This port is for a High-Definition Multimedia Interface (HDMI) connector, and is for better compatibility. 9. USB 3.0 ports. ASUS H110M-E D3 1-13 Audio 2.1, 4.1, 5.1, or 7.1-channel configuration Port Light Blue (Rear panel) Lime (Rear panel) Pink (Rear panel) Lime (Front panel) Headset 2.1-channel Line In Line Out ...
User Guide
Page 25
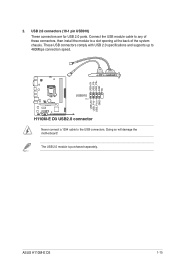
ASUS H110M-E D3 1-15 The USB 2.0 module is purchased separately. USB+5V USB_P9USB_P9+ GND NC USB+5V USB_P10USB_P10+ GND H110M-E D3 USB910 PIN 1 H110M-E D3 USB2.0 connector Never connect a 1394 cable to 480Mbps connection speed. These USB connectors comply with USB 2.0 specifications and supports up to the USB connectors. Connect the USB module cable to any of these connectors, then install the module to a slot opening at the back of the system chassis. Doing so will damage the motherboard! 2. USB 2.0 connectors (10-1 pin USB910) These connectors are for USB 2.0 ports.
ASUS H110M-E D3 1-15 The USB 2.0 module is purchased separately. USB+5V USB_P9USB_P9+ GND NC USB+5V USB_P10USB_P10+ GND H110M-E D3 USB910 PIN 1 H110M-E D3 USB2.0 connector Never connect a 1394 cable to 480Mbps connection speed. These USB connectors comply with USB 2.0 specifications and supports up to the USB connectors. Connect the USB module cable to any of these connectors, then install the module to a slot opening at the back of the system chassis. Doing so will damage the motherboard! 2. USB 2.0 connectors (10-1 pin USB910) These connectors are for USB 2.0 ports.
User Guide
Page 27
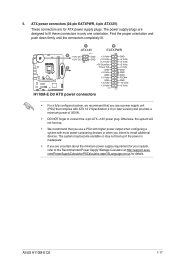
ASUS H110M-E D3 1-17 Otherwise, the system will not boot up if the power is inadequate....ATX +12V power plug. The system may become unstable or may not boot up . • We recommend that you are for details. H110M-E D3 A B ATX12V EATXPWR A +12V DC +12V DC B PIN 1 GND +3 Volts GND +12 Volts +12 Volts +5V Standby Power...+3 Volts +3 Volts PIN 1 GND +5 Volts +5 Volts +5 Volts -5 Volts GND GND GND PSON# GND -12 Volts +3 Volts H110M-E D3 ATX power connectors • For a fully configured system, we recommend that you use a power supply unit (PSU) that complies with more...
ASUS H110M-E D3 1-17 Otherwise, the system will not boot up if the power is inadequate....ATX +12V power plug. The system may become unstable or may not boot up . • We recommend that you are for details. H110M-E D3 A B ATX12V EATXPWR A +12V DC +12V DC B PIN 1 GND +3 Volts GND +12 Volts +12 Volts +5V Standby Power...+3 Volts +3 Volts PIN 1 GND +5 Volts +5 Volts +5 Volts -5 Volts GND GND GND PSON# GND -12 Volts +3 Volts H110M-E D3 ATX power connectors • For a fully configured system, we recommend that you use a power supply unit (PSU) that complies with more...
User Guide
Page 29
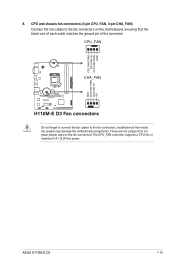
... connector supports a CPU fan of the connector CPU_FAN CHA_FAN H110M-E D3 H110M-E D3 Fan connectors Do not forget to connect the fan cables to the fan connectors on the fan connectors! CPU FAN PWM CPU FAN IN CPU FAN PWR GND GND CHA FAN PWR CHA FAN IN +5V 8. ASUS H110M-E D3 1-19 These are not jumpers!
... connector supports a CPU fan of the connector CPU_FAN CHA_FAN H110M-E D3 H110M-E D3 Fan connectors Do not forget to connect the fan cables to the fan connectors on the fan connectors! CPU FAN PWM CPU FAN IN CPU FAN PWR GND GND CHA FAN PWR CHA FAN IN +5V 8. ASUS H110M-E D3 1-19 These are not jumpers!

User Guide
Page 31
... install the latest OS version and corresponding updates to maximize the features of the Support DVD are subject to change at www.asus.com for detailed information. 1.8.2 Support DVD information The Support DVD that comes with the motherboard package contains the drivers, software ... NOT enabled in your computer, browse the contents of the Support DVD to run the Support DVD Place the Support DVD into the optical drive. ASUS H110M-E D3 1-21 1.8 Software support 1.8.1 Installing an operating system This motherboard supports Windows® 7 (32-bit / 64-bit), Windows® 8.1 (64-bit) ...
... install the latest OS version and corresponding updates to maximize the features of the Support DVD are subject to change at www.asus.com for detailed information. 1.8.2 Support DVD information The Support DVD that comes with the motherboard package contains the drivers, software ... NOT enabled in your computer, browse the contents of the Support DVD to run the Support DVD Place the Support DVD into the optical drive. ASUS H110M-E D3 1-21 1.8 Software support 1.8.1 Installing an operating system This motherboard supports Windows® 7 (32-bit / 64-bit), Windows® 8.1 (64-bit) ...
User Guide
Page 33
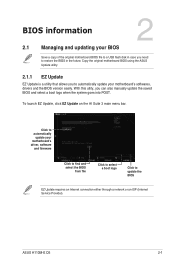
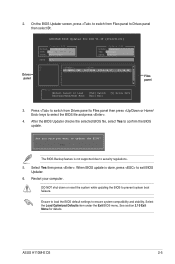
... Update EZ Update is a utility that allows you can also manually update the saved BIOS and select a boot logo when the system goes into POST. ASUS H110M-E D3 2-1 To launch EZ Update, click EZ Update on the AI Suite 3 main menu bar. With this utlity, you to automatically update your motherboard's softwares, drivers...
... Update EZ Update is a utility that allows you can also manually update the saved BIOS and select a boot logo when the system goes into POST. ASUS H110M-E D3 2-1 To launch EZ Update, click EZ Update on the AI Suite 3 main menu bar. With this utlity, you to automatically update your motherboard's softwares, drivers...
User Guide
Page 35
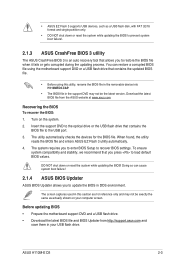
... to restore the BIOS file when it fails or gets corrupted during the updating process. Download the latest BIOS file from http://support.asus.com and save them in the support DVD may not be the latest version. Insert the support DVD to the optical drive or ... down or reset the system while updating the BIOS to prevent system boot failure!. 2.1.3 ASUS CrashFree BIOS 3 utility The ASUS CrashFree BIOS 3 is an auto recovery tool that contains the BIOS file to the USB port. 3. ASUS H110M-E D3 2-3 • ASUS EZ Flash 3 supports USB devices, such as actually shown on the system. 2.
... to restore the BIOS file when it fails or gets corrupted during the updating process. Download the latest BIOS file from http://support.asus.com and save them in the support DVD may not be the latest version. Insert the support DVD to the optical drive or ... down or reset the system while updating the BIOS to prevent system boot failure!. 2.1.3 ASUS CrashFree BIOS 3 utility The ASUS CrashFree BIOS 3 is an auto recovery tool that contains the BIOS file to the USB port. 3. ASUS H110M-E D3 2-3 • ASUS EZ Flash 3 supports USB devices, such as actually shown on the system. 2.
User Guide
Page 37
... BIOS default settings to security regulations. 5. Restart your computer. See section 2.10 Exit Menu for DOS V1.30 [2014/01/01] Current ROM BOARD: H110M-E D3 VER: 0212 (H :00 B :00) DATE: 06/17/2015 PATH: C:\ Update ROM BOARD: Unknown VER: Unknown DATE: Unknown C: FORMAN~1 D:...] Switch [Esc] Exit [V] Drive Info 3. Select Yes then press . Select the Load Optimized Defaults item under the Exit BIOS menu. ASUS H110M-E D3 2-5 Yes No The BIOS Backup feature is done, press to prevent system boot failaure. Drives panel ASUSTeK BIOS Updater for details. DO NOT...
... BIOS default settings to security regulations. 5. Restart your computer. See section 2.10 Exit Menu for DOS V1.30 [2014/01/01] Current ROM BOARD: H110M-E D3 VER: 0212 (H :00 B :00) DATE: 06/17/2015 PATH: C:\ Update ROM BOARD: Unknown VER: Unknown DATE: Unknown C: FORMAN~1 D:...] Switch [Esc] Exit [V] Drive Info 3. Select Yes then press . Select the Load Optimized Defaults item under the Exit BIOS menu. ASUS H110M-E D3 2-5 Yes No The BIOS Backup feature is done, press to prevent system boot failaure. Drives panel ASUSTeK BIOS Updater for details. DO NOT...
User Guide
Page 39
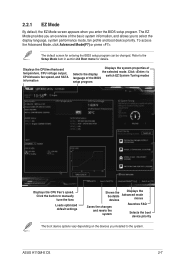
...'s speed. Click to the Setup Mode item in section 2.8 Boot menu for entering the BIOS setup program can be changed. The default screen for details. ASUS H110M-E D3 2-7 Click the button to select the display language, system performance mode, fan profile and boot device priority. The EZ Mode provides you an overview of...
...'s speed. Click to the Setup Mode item in section 2.8 Boot menu for entering the BIOS setup program can be changed. The default screen for details. ASUS H110M-E D3 2-7 Click the button to select the display language, system performance mode, fan profile and boot device priority. The EZ Mode provides you an overview of...
User Guide
Page 41
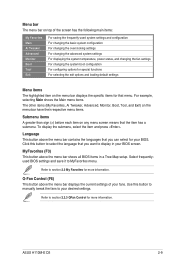
... any menu screen means that you can select for more information. To display the submenu, select the item and press . Refer to your desired settings. ASUS H110M-E D3 2-9 Menu bar The menu bar on top of your fans. Use this button to display in a Tree Map setup. Language This button above the menu...
... any menu screen means that you can select for more information. To display the submenu, select the item and press . Refer to your desired settings. ASUS H110M-E D3 2-9 Menu bar The menu bar on top of your fans. Use this button to display in a Tree Map setup. Language This button above the menu...
User Guide
Page 43
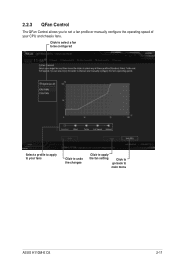
Click to select a fan to be configured Select a profile to apply to main menu ASUS H110M-E D3 2-11 2.2.3 QFan Control The QFan Control allows you to set a fan profile or manually configure the operating speed of your fans Click to undo the changes Click to apply the fan setting Click to go back to your CPU and chassis fans.
Click to select a fan to be configured Select a profile to apply to main menu ASUS H110M-E D3 2-11 2.2.3 QFan Control The QFan Control allows you to set a fan profile or manually configure the operating speed of your fans Click to undo the changes Click to apply the fan setting Click to go back to your CPU and chassis fans.

User Guide
Page 45
... the Setup Tree Map screen, select the BIOS items that you can personalize this screen by default. Main menu panel Submenu panel Selected shortcut items ASUS H110M-E D3 2-13 You can easily save in MyFavorites screen. from the BIOS screen to open 2. 2.3 My Favorites MyFavorites is your personal space where you want to...
... the Setup Tree Map screen, select the BIOS items that you can personalize this screen by default. Main menu panel Submenu panel Selected shortcut items ASUS H110M-E D3 2-13 You can easily save in MyFavorites screen. from the BIOS screen to open 2. 2.3 My Favorites MyFavorites is your personal space where you want to...
User Guide
Page 47
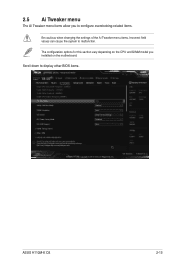
Scroll down to malfunction. The configuration options for this section vary depending on the CPU and DIMM model you to configure overclocking-related items. Be cautious when changing the settings of the Ai Tweaker menu items. Incorrect field values can cause the system to display other BIOS items. ASUS H110M-E D3 2-15 2.5 Ai Tweaker menu The Ai Tweaker menu items allow you installed on the motherboard.
Scroll down to malfunction. The configuration options for this section vary depending on the CPU and DIMM model you to configure overclocking-related items. Be cautious when changing the settings of the Ai Tweaker menu items. Incorrect field values can cause the system to display other BIOS items. ASUS H110M-E D3 2-15 2.5 Ai Tweaker menu The Ai Tweaker menu items allow you installed on the motherboard.


