
User Guide
Page 3
... information iv About this guide iv Package contents vi H110M-E D3 specifications summary vi Chapter 1: Product introduction 1.1 Before you proceed 1-1 1.2 Motherboard overview 1-1 1.3 Central Processing Unit (CPU 1-3 1.4 System memory 1-7 1.5 Expansion slots 1-9 1.6 Headers 1-11 1.7 Connectors 1-12 1.8 Software support 1-21 Chapter 2: BIOS information 2.1 Managing and updating your BIOS 2-1 2.2 BIOS setup program 2-6 2.3 My Favorites 2-13 2.4 Main menu 2-14 2.5 Ai...
... information iv About this guide iv Package contents vi H110M-E D3 specifications summary vi Chapter 1: Product introduction 1.1 Before you proceed 1-1 1.2 Motherboard overview 1-1 1.3 Central Processing Unit (CPU 1-3 1.4 System memory 1-7 1.5 Expansion slots 1-9 1.6 Headers 1-11 1.7 Connectors 1-12 1.8 Software support 1-21 Chapter 2: BIOS information 2.1 Managing and updating your BIOS 2-1 2.2 BIOS setup program 2-6 2.3 My Favorites 2-13 2.4 Main menu 2-14 2.5 Ai...
User Guide
Page 4
...to fix it may be exposed to moisture. • Place the product on the motherboard. • Chapter 2: BIOS information This chapter discusses changing system settings through the BIOS Setup menus. If possible, disconnect all power cables from the existing system before you detect any area where it by ... the system. • When adding or removing devices to or from the system, ensure that the power cables for the BIOS parameters are also provided. Operation safety • Before installing the motherboard and adding components, carefully read all the manuals that your retailer.
...to fix it may be exposed to moisture. • Place the product on the motherboard. • Chapter 2: BIOS information This chapter discusses changing system settings through the BIOS Setup menus. If possible, disconnect all power cables from the existing system before you detect any area where it by ... the system. • When adding or removing devices to or from the system, ensure that the power cables for the BIOS parameters are also provided. Operation safety • Before installing the motherboard and adding components, carefully read all the manuals that your retailer.
User Guide
Page 8
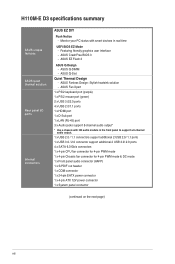
Monitor your PC status with HD audio module in real time UEFI BIOS EZ Mode - ASUS CrashFree BIOS 3 - ASUS Q-Slot Quiet Thermal Design - ASUS Fan Xpert 1 x PS/2 keyboard port (purple) 1 x PS/2 mouse port (green) 2 x USB 3.0/2.0 ports 4 x USB 2.0/1.1 ports 1 x HDMI port 1 x D-...power connector 1 x System panel connector (continued on the next page) viii Featuring friendly graphics user interface - ASUS Fanless Design: Stylish heatsink solution - ASUS Q-DIMM - H110M-E D3 specifications summary ASUS unique features ASUS quiet thermal solution Rear panel I/O ports Internal connectors...
Monitor your PC status with HD audio module in real time UEFI BIOS EZ Mode - ASUS CrashFree BIOS 3 - ASUS Q-Slot Quiet Thermal Design - ASUS Fan Xpert 1 x PS/2 keyboard port (purple) 1 x PS/2 mouse port (green) 2 x USB 3.0/2.0 ports 4 x USB 2.0/1.1 ports 1 x HDMI port 1 x D-...power connector 1 x System panel connector (continued on the next page) viii Featuring friendly graphics user interface - ASUS Fanless Design: Stylish heatsink solution - ASUS Q-DIMM - H110M-E D3 specifications summary ASUS unique features ASUS quiet thermal solution Rear panel I/O ports Internal connectors...

User Guide
Page 9
H110M-E D3 specifications summary BIOS features Manageability Support DVD OS support Form factor 128 Mb Flash ROM, UEFI AMI BIOS, PnP, DMI 2.0, WfM2.0, SM BIOS 3.0, ACPI 5.0, Multi-language BIOS, ASUS EZ Flash 3, ASUS CrashFree BIOS 3, My Favorites, Quick Note, Last Modified Log, F12 PrintScreen function, and ASUS DRAM SPD (Serial Presence Detect) memory information WfM 2.0, DMI 2.0, WOL by PME, PXE Drivers...
H110M-E D3 specifications summary BIOS features Manageability Support DVD OS support Form factor 128 Mb Flash ROM, UEFI AMI BIOS, PnP, DMI 2.0, WfM2.0, SM BIOS 3.0, ACPI 5.0, Multi-language BIOS, ASUS EZ Flash 3, ASUS CrashFree BIOS 3, My Favorites, Quick Note, Last Modified Log, F12 PrintScreen function, and ASUS DRAM SPD (Serial Presence Detect) memory information WfM 2.0, DMI 2.0, WOL by PME, PXE Drivers...
User Guide
Page 12
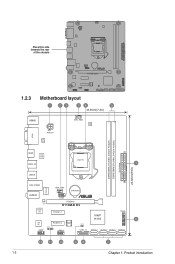
Place this side towards the rear of the chassis H110M-E D3 1.2.3 Motherboard layout 1 23 24 5 18.55cm(7.3in) VGA KBMS ATX12V RTD 2168 CPU_FAN DIGI +VRM DDR3 DIMM_A1 (64bit, 240-pin module) DDR3 DIMM_B1 (64bit, 240-pin module) EATXPWR 22.62cm(8.9in) 1-2 HDMI ASM 1442K LGA1151 USB3_34 1 USB78 LANGuard LAN_USB56 CHA_FAN BATTERY AUDIO Realtek 8111H COM PCIEX16 H110M-E D3 Super I/O PCIEX1_1 Intel® H110 PANEL 6 ALC 887 PCIEX1_2 128Mb BIOS CLRTC SPDIF_OUT AAFP USB910 USB3_12 SATA6G_1 SATA6G_2 SATA6G_3 SATA6G_4 12 11 10 98 7 Chapter 1: Product introduction
Place this side towards the rear of the chassis H110M-E D3 1.2.3 Motherboard layout 1 23 24 5 18.55cm(7.3in) VGA KBMS ATX12V RTD 2168 CPU_FAN DIGI +VRM DDR3 DIMM_A1 (64bit, 240-pin module) DDR3 DIMM_B1 (64bit, 240-pin module) EATXPWR 22.62cm(8.9in) 1-2 HDMI ASM 1442K LGA1151 USB3_34 1 USB78 LANGuard LAN_USB56 CHA_FAN BATTERY AUDIO Realtek 8111H COM PCIEX16 H110M-E D3 Super I/O PCIEX1_1 Intel® H110 PANEL 6 ALC 887 PCIEX1_2 128Mb BIOS CLRTC SPDIF_OUT AAFP USB910 USB3_12 SATA6G_1 SATA6G_2 SATA6G_3 SATA6G_4 12 11 10 98 7 Chapter 1: Product introduction
User Guide
Page 19
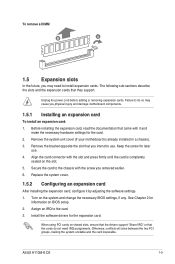
... card: 1. Remove the bracket opposite the slot that they support. Keep the screw for the card. 2. Turn on the slot. 5. ASUS H110M-E D3 1-9 When using PCI cards on BIOS setup. 2. Otherwise, conflicts will arise between the two PCI groups, making the system unstable and the card inoperable. Before installing the expansion ... See Chapter 2 for the expansion card. Remove the system unit cover (if your motherboard is completely seated on the system and change the necessary BIOS settings, if any. Unplug the power cord before adding or removing expansion cards.
... card: 1. Remove the bracket opposite the slot that they support. Keep the screw for the card. 2. Turn on the slot. 5. ASUS H110M-E D3 1-9 When using PCI cards on BIOS setup. 2. Otherwise, conflicts will arise between the two PCI groups, making the system unstable and the card inoperable. Before installing the expansion ... See Chapter 2 for the expansion card. Remove the system unit cover (if your motherboard is completely seated on the system and change the necessary BIOS settings, if any. Unplug the power cord before adding or removing expansion cards.
User Guide
Page 21
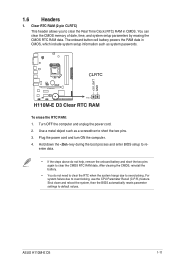
... a metal object such as system passwords. For system failure due to short the two pins. 3. Shut down the key during the boot process and enter BIOS setup to re- Clear RTC RAM (2-pin CLRTC) This header allows you to default values. You can clear the CMOS memory of date, time, and... to clear the RTC when the system hangs due to clear the CMOS RTC RAM data. Turn OFF the computer and unplug the power cord. 2. ASUS H110M-E D3 1-11 After clearing the CMOS, reinstall the battery. • You do not help, remove the onboard battery and short the two pins again to overclocking...
... a metal object such as system passwords. For system failure due to short the two pins. 3. Shut down the key during the boot process and enter BIOS setup to re- Clear RTC RAM (2-pin CLRTC) This header allows you to default values. You can clear the CMOS memory of date, time, and... to clear the RTC when the system hangs due to clear the CMOS RTC RAM data. Turn OFF the computer and unplug the power cord. 2. ASUS H110M-E D3 1-11 After clearing the CMOS, reinstall the battery. • You do not help, remove the onboard battery and short the two pins again to overclocking...
User Guide
Page 26
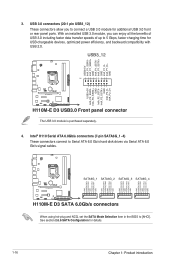
... 2.6.6 SATA Configuration for USB-chargeable devices, optimized power efficiency, and backward compatibility with USB 2.0. USB3_12 PIN 1 H110M-E D3 H110M-E D3 USB3.0 Front panel connector The USB 3.0 module is purchased separately. 4. USB3+5V IntA_P2_SSRXIntA_P2_SSRX+ GND IntA_P2_SSTXIntA_P2_SSTX+ GND... RSATA_TXN3 RSATA_TXP3 GND GND RSATA_RXP4 RSATA_RXN4 GND RSATA_TXN4 RSATA_TXP4 GND H110M-E D3 SATA6G_1 SATA6G_2 SATA6G_3 SATA6G_4 H110M-E D3 SATA 6.0Gb/s connectors When using hot-plug and NCQ, set the SATA Mode Selection item in the BIOS to Serial ATA 6.0 Gb/s hard disk drives via Serial...
... 2.6.6 SATA Configuration for USB-chargeable devices, optimized power efficiency, and backward compatibility with USB 2.0. USB3_12 PIN 1 H110M-E D3 H110M-E D3 USB3.0 Front panel connector The USB 3.0 module is purchased separately. 4. USB3+5V IntA_P2_SSRXIntA_P2_SSRX+ GND IntA_P2_SSTXIntA_P2_SSTX+ GND... RSATA_TXN3 RSATA_TXP3 GND GND RSATA_RXP4 RSATA_RXN4 GND RSATA_TXN4 RSATA_TXP4 GND H110M-E D3 SATA6G_1 SATA6G_2 SATA6G_3 SATA6G_4 H110M-E D3 SATA 6.0Gb/s connectors When using hot-plug and NCQ, set the SATA Mode Selection item in the BIOS to Serial ATA 6.0 Gb/s hard disk drives via Serial...
User Guide
Page 28
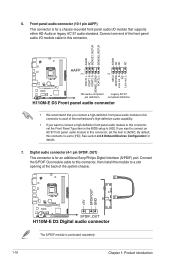
... /O module that you connect a high-definition front panel audio module to this connector to avail of the system chassis. +5V SPDIFOUT GND H110M-E D3 SPDIF_OUT H110M-E D3 Digital audio connector The S/PDIF module is for details. 7. If you want to connect an AC'97 front panel audio module to this ...connector, then install the module to [HD]. Connect the S/PDIF Out module cable to this connector, set the Front Panel Type item in the BIOS...
... /O module that you connect a high-definition front panel audio module to this connector to avail of the system chassis. +5V SPDIFOUT GND H110M-E D3 SPDIF_OUT H110M-E D3 Digital audio connector The S/PDIF module is for details. 7. If you want to connect an AC'97 front panel audio module to this ...connector, then install the module to [HD]. Connect the S/PDIF Out module cable to this connector, set the Front Panel Type item in the BIOS...
User Guide
Page 33
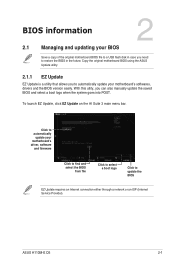
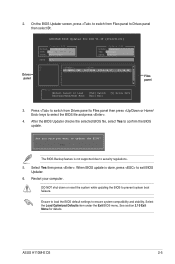
...into POST. Copy the original motherboard BIOS using the ASUS Update utility. 2.1.1 EZ Update EZ Update is a utility that allows you to automatically update your motherboard's driver, software and firmware Click to find and select the BIOS from file Click to select a ... BIOS in case you need to automatically update your motherboard's softwares, drivers and the BIOS version easily. To launch EZ Update, click EZ Update on the AI Suite 3 main menu bar. ASUS H110M-E D3 2-1 BIOS information 2 2.1 Managing and updating your BIOS Save a copy of the original motherboard BIOS file...
...into POST. Copy the original motherboard BIOS using the ASUS Update utility. 2.1.1 EZ Update EZ Update is a utility that allows you to automatically update your motherboard's driver, software and firmware Click to find and select the BIOS from file Click to select a ... BIOS in case you need to automatically update your motherboard's softwares, drivers and the BIOS version easily. To launch EZ Update, click EZ Update on the AI Suite 3 main menu bar. ASUS H110M-E D3 2-1 BIOS information 2 2.1 Managing and updating your BIOS Save a copy of the original motherboard BIOS file...
User Guide
Page 34
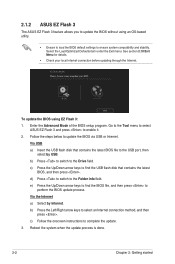
...8209;based utility. • Ensure to load the BIOS default settings to find the BIOS file, and then press to the Folder Info field. Go to the Tool menu to select ASUS EZ Flash 3 and press to update the BIOS via USB or Internet. Follow the steps below to... connection before updating through the Internet. Reboot the system when the update process is done. 2-2 Chapter 2: Getting started 2.1.2 ASUS EZ Flash 3 The ASUS EZ Flash 3 feature allows you to update the BIOS without using EZ Flash 3: 1. c) Press the Up/Down arrow keys to ensure system compatibility and stability.
...8209;based utility. • Ensure to load the BIOS default settings to find the BIOS file, and then press to the Folder Info field. Go to the Tool menu to select ASUS EZ Flash 3 and press to update the BIOS via USB or Internet. Follow the steps below to... connection before updating through the Internet. Reboot the system when the update process is done. 2-2 Chapter 2: Getting started 2.1.2 ASUS EZ Flash 3 The ASUS EZ Flash 3 feature allows you to update the BIOS without using EZ Flash 3: 1. c) Press the Up/Down arrow keys to ensure system compatibility and stability.
User Guide
Page 35
...the USB port. 3. The screen captures used in this utility, rename the BIOS file in the removable device into H110MED3.CAP. • The BIOS file in DOS environment. ASUS H110M-E D3 2-3 Recovering the BIOS To recover the BIOS: 1. Insert the support DVD to the optical drive or the USB flash drive... that allows you to enter BIOS Setup to update the BIOS in the support DVD may not be...
...the USB port. 3. The screen captures used in this utility, rename the BIOS file in the removable device into H110MED3.CAP. • The BIOS file in DOS environment. ASUS H110M-E D3 2-3 Recovering the BIOS To recover the BIOS: 1. Insert the support DVD to the optical drive or the USB flash drive... that allows you to enter BIOS Setup to update the BIOS in the support DVD may not be...
User Guide
Page 36
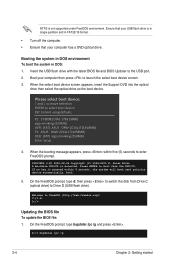
...26 Copyright (C) 1994-2005 H. Press ENTER to boot from Drive C (optical drive) to Drive D (USB flash drive). C:/> d: D:/> Updating the BIOS file To update the BIOS file: 1. D:/> bupdater /pc /g 2-4 Chapter 2: Getting started Boot your computer has a DVD optical drive. Peter Anvin A Bootable DVD/CD is...bupdater /pc /g and press . Insert the USB flash drive with the latest BIOS file and BIOS Updater to boot using defaults P2: ST3808110AS (76319MB) aigo miniking (250MB) UEFI: (FAT) ASUS DRW-2014L1T(4458MB) P1: ASUS DRW-2014L1T(4458MB) UEFI: (FAT) aigo miniking (250MB) Enter Setup 4. ...
...26 Copyright (C) 1994-2005 H. Press ENTER to boot from Drive C (optical drive) to Drive D (USB flash drive). C:/> d: D:/> Updating the BIOS file To update the BIOS file: 1. D:/> bupdater /pc /g 2-4 Chapter 2: Getting started Boot your computer has a DVD optical drive. Peter Anvin A Bootable DVD/CD is...bupdater /pc /g and press . Insert the USB flash drive with the latest BIOS file and BIOS Updater to boot using defaults P2: ST3808110AS (76319MB) aigo miniking (250MB) UEFI: (FAT) ASUS DRW-2014L1T(4458MB) P1: ASUS DRW-2014L1T(4458MB) UEFI: (FAT) aigo miniking (250MB) Enter Setup 4. ...
User Guide
Page 37
.... 6. Restart your computer. DO NOT shut down or reset the system while updating the BIOS to confirm the BIOS update. See section 2.10 Exit Menu for DOS V1.30 [2014/01/01] Current ROM BOARD: H110M-E D3 VER: 0212 (H :00 B :00) DATE: 06/17/2015 PATH: C:\ Update ...select D:. Ensure to load the BIOS default settings to update the BIOS? Select the Load Optimized Defaults item under the Exit BIOS menu. 2. Press to switch from Files panel to select the BIOS file and press . 4. Are you sure you want to ensure system compatibility and stability. ASUS H110M-E D3 2-5
.... 6. Restart your computer. DO NOT shut down or reset the system while updating the BIOS to confirm the BIOS update. See section 2.10 Exit Menu for DOS V1.30 [2014/01/01] Current ROM BOARD: H110M-E D3 VER: 0212 (H :00 B :00) DATE: 06/17/2015 PATH: C:\ Update ...select D:. Ensure to load the BIOS default settings to update the BIOS? Select the Load Optimized Defaults item under the Exit BIOS menu. 2. Press to switch from Files panel to select the BIOS file and press . 4. Are you sure you want to ensure system compatibility and stability. ASUS H110M-E D3 2-5
User Guide
Page 38
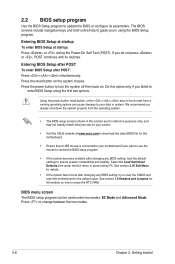
...and brief online help to guide you failed to enter BIOS Setup using the BIOS Setup program. Press the reset button on your data or system. BIOS menu screen The BIOS setup program can cause damage to your screen. • Visit the ASUS website at startup: Press or during the Power-On ..., try to clear the CMOS and reset the motherboard to the default value. Entering BIOS Setup at startup To enter BIOS Setup at www.asus.com to download the latest BIOS file for this section are for details. • If the system fails to boot after POST: Press ++ simultaneously. Press to ...
...and brief online help to guide you failed to enter BIOS Setup using the BIOS Setup program. Press the reset button on your data or system. BIOS menu screen The BIOS setup program can cause damage to your screen. • Visit the ASUS website at startup: Press or during the Power-On ..., try to clear the CMOS and reset the motherboard to the default value. Entering BIOS Setup at startup To enter BIOS Setup at www.asus.com to download the latest BIOS file for this section are for details. • If the system fails to boot after POST: Press ++ simultaneously. Press to ...
User Guide
Page 39
... to Selects the display switch EZ System Tuning modes language of the basic system information, and allows you an overview of the BIOS setup program Displays the CPU Fan's speed. ASUS H110M-E D3 2-7 Refer to manually tune the fans Loads optimized default settings Shows the Displays the bootable Advanced mode devices menus Saves the...
... to Selects the display switch EZ System Tuning modes language of the basic system information, and allows you an overview of the BIOS setup program Displays the CPU Fan's speed. ASUS H110M-E D3 2-7 Refer to manually tune the fans Loads optimized default settings Shows the Displays the bootable Advanced mode devices menus Saves the...
User Guide
Page 40
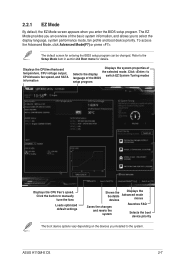
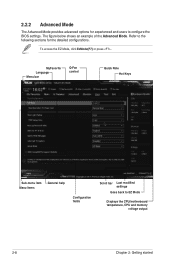
To access the EZ Mode, click EzMode(F7) or press . MyFavorite Language Menu bar Q-Fan control Quick Note Hot Keys Sub-menu item Menu items General help Configuration fields Scroll bar Last modified settings Goes back to configure the BIOS settings. Refer to the following sections for experienced end-users to EZ Mode Displays the CPU/motherboard temperature, CPU and memory voltage output 2-8 Chapter 2: Getting started 2.2.2 Advanced Mode The Advanced Mode provides advanced options for the detailed configurations. The figure below shows an example of the Advanced Mode.
To access the EZ Mode, click EzMode(F7) or press . MyFavorite Language Menu bar Q-Fan control Quick Note Hot Keys Sub-menu item Menu items General help Configuration fields Scroll bar Last modified settings Goes back to configure the BIOS settings. Refer to the following sections for experienced end-users to EZ Mode Displays the CPU/motherboard temperature, CPU and memory voltage output 2-8 Chapter 2: Getting started 2.2.2 Advanced Mode The Advanced Mode provides advanced options for the detailed configurations. The figure below shows an example of the Advanced Mode.
User Guide
Page 41
...the language that you can select for more information. ASUS H110M-E D3 2-9 Click this button to manually tweak the fans to section 2.3 My Favorites for your BIOS screen. Q-Fan Control (F6) This button above the menu bar shows all BIOS items in your BIOS. To display the submenu, select the item and... press . Refer to your fans. Menu bar The menu bar on top of your desired settings. Refer to MyFavorites menu. Select frequentlyused BIOS settings and save it to section ...
...the language that you can select for more information. ASUS H110M-E D3 2-9 Click this button to manually tweak the fans to section 2.3 My Favorites for your BIOS screen. Q-Fan Control (F6) This button above the menu bar shows all BIOS items in your BIOS. To display the submenu, select the item and... press . Refer to your fans. Menu bar The menu bar on top of your desired settings. Refer to MyFavorites menu. Select frequentlyused BIOS settings and save it to section ...
User Guide
Page 42
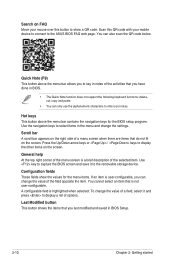
... button shows the items that is user-configurable, you to key in the menu and change the value of options. Scan this button to the ASUS BIOS FAQ web page. General help At the top right corner of the activities that do not fit on the screen. Quick Note (F9) This button... an item is not user-configurable. A configurable field is a brief description of a menu screen when there are items that you last modified and saved in BIOS. • The Quick Note function does not support the following keyboard functions: delete, cut, copy and paste. • You can also scan the QR ...
... button shows the items that is user-configurable, you to key in the menu and change the value of options. Scan this button to the ASUS BIOS FAQ web page. General help At the top right corner of the activities that do not fit on the screen. Quick Note (F9) This button... an item is not user-configurable. A configurable field is a brief description of a menu screen when there are items that you last modified and saved in BIOS. • The Quick Note function does not support the following keyboard functions: delete, cut, copy and paste. • You can also scan the QR ...

User Guide
Page 45
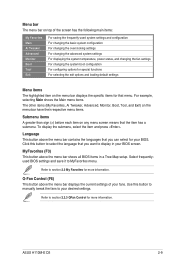
...: 1. Main menu panel Submenu panel Selected shortcut items ASUS H110M-E D3 2-13 On the Setup Tree Map screen, select the BIOS items that you can personalize this screen by default. You can easily save in MyFavorites screen. Press on your keyboard or click Setup Tree Map... screen. 2.3 My Favorites MyFavorites is your personal space where you want to save and access your favorite BIOS items. My Favorites comes with several performance, power saving, and fast boot related items by adding or removing items. Adding items to open 2.
...: 1. Main menu panel Submenu panel Selected shortcut items ASUS H110M-E D3 2-13 On the Setup Tree Map screen, select the BIOS items that you can personalize this screen by default. You can easily save in MyFavorites screen. Press on your keyboard or click Setup Tree Map... screen. 2.3 My Favorites MyFavorites is your personal space where you want to save and access your favorite BIOS items. My Favorites comes with several performance, power saving, and fast boot related items by adding or removing items. Adding items to open 2.


