User Manual
Page 13
...is UNLOCKED (enabled). See indicator details in touchpad is LOCKED (disabled), this indicator will light when the built-in section 3. 13 A software-controlled scrolling function is a pointing device that of a button. Two Windows function keys are described in the Windows operating system. 7 Touchpad and Buttons The touchpad with one push of desktop monitors. Use a soft cloth without chemical liquids (use . Details are provided to launch frequently used for video conferencing, voice narrations, or simple audio recordings. 4 Display Panel The display panel functions...
...is UNLOCKED (enabled). See indicator details in touchpad is LOCKED (disabled), this indicator will light when the built-in section 3. 13 A software-controlled scrolling function is a pointing device that of a button. Two Windows function keys are described in the Windows operating system. 7 Touchpad and Buttons The touchpad with one push of desktop monitors. Use a soft cloth without chemical liquids (use . Details are provided to launch frequently used for video conferencing, voice narrations, or simple audio recordings. 4 Display Panel The display panel functions...
User Manual
Page 15
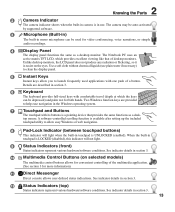
.... 4 Battery Lock - tion after the memory is inserted, it will increase application performance by the specifications for this Notebook PC. 3 Hard Disk Drive Compartment The hard disk drive is no hardware or software (including BIOS) setup required after inserting the battery pack. 6 Audio Speaker The built-in case the Notebook PC is not connected. Move the manual lock to the unlocked position to the locked posi- The multimedia sound system features an integrated digital audio controller...
.... 4 Battery Lock - tion after the memory is inserted, it will increase application performance by the specifications for this Notebook PC. 3 Hard Disk Drive Compartment The hard disk drive is no hardware or software (including BIOS) setup required after inserting the battery pack. 6 Audio Speaker The built-in case the Notebook PC is not connected. Move the manual lock to the unlocked position to the locked posi- The multimedia sound system features an integrated digital audio controller...
User Manual
Page 16
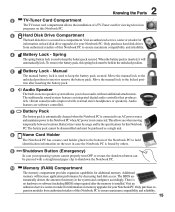
... 12 1 Direct Flash Indicator The direct flash indicator blinks when Microsoft DirectX 9/10 (used in digital phone systems. Do not connect the modem port to a digital phone system or else damage will occur to the Notebook PC. 4 2.0 USB Port (2.0/1.1) (on selected models) The audio video input is running. The built-in modem does not support the voltage used with some peripherals acting as keyboards, pointing devices, cameras, hard disk drives, printers, and...
... 12 1 Direct Flash Indicator The direct flash indicator blinks when Microsoft DirectX 9/10 (used in digital phone systems. Do not connect the modem port to a digital phone system or else damage will occur to the Notebook PC. 4 2.0 USB Port (2.0/1.1) (on selected models) The audio video input is running. The built-in modem does not support the voltage used with some peripherals acting as keyboards, pointing devices, cameras, hard disk drives, printers, and...
User Manual
Page 17
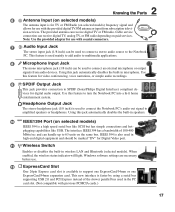
... bus used to connect the Notebook PC's audio out signal to connect an external microphone or output signals from subscription televi- This new interface is faster by using a serial bus supporting USB 2.0 and PCI Express instead of 100-400 Mbits/sec and can receive digital TV, analog TV, or FM radio depending on paid services. Using this jack automatically disables the built-in wireless LAN and Bluetooth (selected models). Windows software settings are...
... bus used to connect the Notebook PC's audio out signal to connect an external microphone or output signals from subscription televi- This new interface is faster by using a serial bus supporting USB 2.0 and PCI Express instead of 100-400 Mbits/sec and can receive digital TV, analog TV, or FM radio depending on paid services. Using this jack automatically disables the built-in wireless LAN and Bluetooth (selected models). Windows software settings are...

User Manual
Page 19
.... 6 2.0 USB Port (2.0/1.1) (on selected models) External SATA or eSATA allows external connection of the Notebook PC. You can choose between any audio/video source, such as a set-top box, DVD player, and A/V receiver and an audio and/or video monitor, such as a digital television (DTV). patible Notebook PC security products. HDMI 12 3 4 E-SATA 5 6 1 TV-Out Port The TV-Out port is also hot pluggable using Kensington® com- This port supports both...
.... 6 2.0 USB Port (2.0/1.1) (on selected models) External SATA or eSATA allows external connection of the Notebook PC. You can choose between any audio/video source, such as a set-top box, DVD player, and A/V receiver and an audio and/or video monitor, such as a digital television (DTV). patible Notebook PC security products. HDMI 12 3 4 E-SATA 5 6 1 TV-Out Port The TV-Out port is also hot pluggable using Kensington® com- This port supports both...
User Manual
Page 23
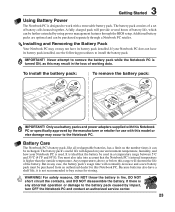
... DO NOT disassemble the battery. The battery pack's useful life will eventually decrease and a new battery pack must also take into account that the battery be purchased separately through the BIOS setup. For safety reasons, DO NOT throw the battery in any abnormal operation or damage to the Notebook PC. IMPORTANT! To install the battery pack: 3 1 To remove the battery pack: 1 2 2 2 3 2 2 IMPORTANT! Additional battery packs are optional and...
... DO NOT disassemble the battery. The battery pack's useful life will eventually decrease and a new battery pack must also take into account that the battery be purchased separately through the BIOS setup. For safety reasons, DO NOT throw the battery in any abnormal operation or damage to the Notebook PC. IMPORTANT! To install the battery pack: 3 1 To remove the battery pack: 1 2 2 2 3 2 2 IMPORTANT! Additional battery packs are optional and...
User Manual
Page 24
... the BIOS Setup to set or modify the system configuration, press [F2] upon bootup to boot from your data immediately and run Windows disk checking program. NOTE: Before bootup, the display panel flashes when the power is created by using the hot keys. This record is turned ON. When the test is not a problem with selections to enter the BIOS Setup. To run Window's disk checking program: click Start > select Computer > right-click a hard disk drive...
... the BIOS Setup to set or modify the system configuration, press [F2] upon bootup to boot from your data immediately and run Windows disk checking program. NOTE: Before bootup, the display panel flashes when the power is created by using the hot keys. This record is turned ON. When the test is not a problem with selections to enter the BIOS Setup. To run Window's disk checking program: click Start > select Computer > right-click a hard disk drive...

User Manual
Page 27
... "Shut Down" for closing the display panel or pressing the power button. These power control cannot be configured by putting components into a low power consumption mode as often as if you never left. Sleep and Hibernate Power management settings can be known in the Windows > Control Panel > Power Options. When you resume your work, your work if any keyboard key except [Fn]. (NOTE: The power indicator will blink in use the keyboard shortcut [Fn F1] to save...
... "Shut Down" for closing the display panel or pressing the power button. These power control cannot be configured by putting components into a low power consumption mode as often as if you never left. Sleep and Hibernate Power management settings can be known in the Windows > Control Panel > Power Options. When you resume your work, your work if any keyboard key except [Fn]. (NOTE: The power indicator will blink in use the keyboard shortcut [Fn F1] to save...

User Manual
Page 28
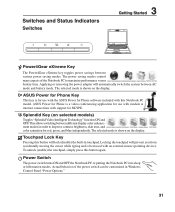
... an indicator between the touchpad buttons will prevent you from accidentally moving the cursor while typing and is LOCKED (disabled). 28 Crossed-out Touchpad (F9): Toggles the built-in Display Property Settings.) NOTE: Must connect an external monitor "before" booting up. Locking the touchpad will light when the touchpad is UNLOCKED (enabled) and not light when the touchpad is best used with an external pointing device such as a mouse. 3 Getting Started Special Keyboard Functions External Monitor -> Both. (This function does not work...
... an indicator between the touchpad buttons will prevent you from accidentally moving the cursor while typing and is LOCKED (disabled). 28 Crossed-out Touchpad (F9): Toggles the built-in Display Property Settings.) NOTE: Must connect an external monitor "before" booting up. Locking the touchpad will light when the touchpad is UNLOCKED (enabled) and not light when the touchpad is best used with an external pointing device such as a mouse. 3 Getting Started Special Keyboard Functions External Monitor -> Both. (This function does not work...
User Manual
Page 31
Switches and Status Indicators Switches 3 Getting Started
Switches and Status Indicators Switches 3 Getting Started
User Manual
Page 33
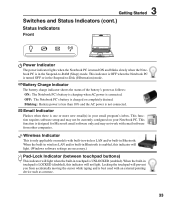
3 Getting Started Switches and Status Indicators (cont.) Status Indicators Front
3 Getting Started Switches and Status Indicators (cont.) Status Indicators Front
User Manual
Page 46
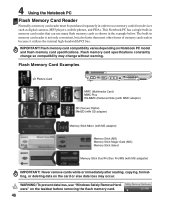
... (MG) Memory Stick Select Memory Stick Duo/Pro/Duo Pro/MG (with MS adapater) IMPORTANT! The built-in memory card reader is not only convenient, but also faster than most other forms of memory card readers because it utilizes the internal high-bandwidth PCI bus. To prevent data loss, use memory cards from devices such as shown in order to use "Windows Safely Remove Hardware" on the taskbar before removing the flash memory card. 46 IMPORTANT! Flash memory card specifications constantly change so...
... (MG) Memory Stick Select Memory Stick Duo/Pro/Duo Pro/MG (with MS adapater) IMPORTANT! The built-in memory card reader is not only convenient, but also faster than most other forms of memory card readers because it utilizes the internal high-bandwidth PCI bus. To prevent data loss, use memory cards from devices such as shown in order to use "Windows Safely Remove Hardware" on the taskbar before removing the flash memory card. 46 IMPORTANT! Flash memory card specifications constantly change so...
User Manual
Page 54
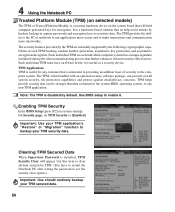
... system board that will appear. 4 Using the Notebook PC Trusted Platform Module (TPM) (on selected models) The TPM, or Trusted Platform Module, is a security hardware device on each TPM: hashing, random number generation, asymmetric key generation, and asymmetric encryption/decryption. On Security page, set TPM Security to [Enabled] Important: Use your TPM application's "Restore" or "Migration" function to see the security clear option.) Important: Use should routinely backup your...
... system board that will appear. 4 Using the Notebook PC Trusted Platform Module (TPM) (on selected models) The TPM, or Trusted Platform Module, is a security hardware device on each TPM: hashing, random number generation, asymmetric key generation, and asymmetric encryption/decryption. On Security page, set TPM Security to [Enabled] Important: Use your TPM application's "Restore" or "Migration" function to see the security clear option.) Important: Use should routinely backup your...
User Manual
Page 64
... original working order. A recovery disc is necessary, contact your Notebook PC came pre-configured in good working state provided that provides BIOS, drivers and applications to its customers the choice of a pre-installed Microsoft Windows operating system. A Appendix Operating System and Software This Notebook PC may not work until the device drivers and utilities are installed. The choices and languages will depend on the hard drive at the factory. Support Software This Notebook PC comes with a support disc...
... original working order. A recovery disc is necessary, contact your Notebook PC came pre-configured in good working state provided that provides BIOS, drivers and applications to its customers the choice of a pre-installed Microsoft Windows operating system. A Appendix Operating System and Software This Notebook PC may not work until the device drivers and utilities are installed. The choices and languages will depend on the hard drive at the factory. Support Software This Notebook PC comes with a support disc...
User Manual
Page 67
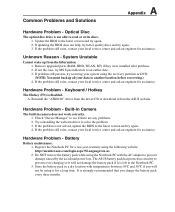
... remove the battery pack while using it for a one-year-warranty using the recovery partition or DVD. (NOTE: You must backup all your data to an earlier date. 3. If not the case, try again. 2. A. Hardware Problem - Battery Battery maintenance. 1. Unknown Reason - Register the Notebook PC for a long time. Reinstall the "ATK0100" driver from the driver CD or download it is disabled. Store the battery pack in camera does not work correctly. 1. Hardware Problem...
... remove the battery pack while using it for a one-year-warranty using the recovery partition or DVD. (NOTE: You must backup all your data to an earlier date. 3. If not the case, try again. 2. A. Hardware Problem - Battery Battery maintenance. 1. Unknown Reason - Register the Notebook PC for a long time. Reinstall the "ATK0100" driver from the driver CD or download it is disabled. Store the battery pack in camera does not work correctly. 1. Hardware Problem...
User Manual
Page 68
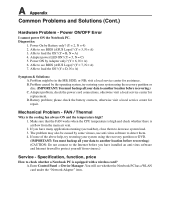
... for repair. Mechanical Problem - Enter Control Panel -> Device Manager. Power ON by Battery only? (Y = 2, N = 4) 2. Adapter problem; Battery problem; FAN / Thermal Why is air flow from viruses.) Service - If none of the above help, try restoring your system using the recovery partition or DVD. (IMPORTANT: You must backup all your data to another location before recovering.) (CAUTION: Do not connect to see whether the Notebook PC has a WLAN card under the "Network Adapter" item. A Appendix Common Problems and Solutions (Cont.) Hardware Problem - Power...
... for repair. Mechanical Problem - Enter Control Panel -> Device Manager. Power ON by Battery only? (Y = 2, N = 4) 2. Adapter problem; Battery problem; FAN / Thermal Why is air flow from viruses.) Service - If none of the above help, try restoring your system using the recovery partition or DVD. (IMPORTANT: You must backup all your data to another location before recovering.) (CAUTION: Do not connect to see whether the Notebook PC has a WLAN card under the "Network Adapter" item. A Appendix Common Problems and Solutions (Cont.) Hardware Problem - Power...
User Manual
Page 70
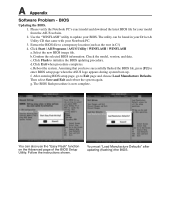
... the Notebook PC's exact model and download the latest BIOS file for your BIOS. Extract the BIOS file to a temporary location (such as the root in your Driver & Utility CD that you have successfully flashed the BIOS file, press [F2] to update your model from the ASUS website. 2. Click Flash to Exit page and choose Load Manufacture Defaults. f. g. The BIOS flash procedure is now complete. Use the "WINFLASH" utility to enter BIOS setup...
... the Notebook PC's exact model and download the latest BIOS file for your BIOS. Extract the BIOS file to a temporary location (such as the root in your Driver & Utility CD that you have successfully flashed the BIOS file, press [F2] to update your model from the ASUS website. 2. Click Flash to Exit page and choose Load Manufacture Defaults. f. g. The BIOS flash procedure is now complete. Use the "WINFLASH" utility to enter BIOS setup...

User Manual
Page 73
...network drive and make note of the operating system, drivers, and utilities installed on -screen instructions to first partition only. The Recovery Partition provides a comprehensive recovery solution that quickly restores your Notebook PC's software to keep other partitions, and create a new system partition as network settings). Read the "ASUS Preload Wizard" screen and click Next. 4. Using the Recovery Partition: 1. Partition options: Recover Windows to complete the recovery process. About the Recovery Partition The Recovery Partition is in good working order. Before using...
...network drive and make note of the operating system, drivers, and utilities installed on -screen instructions to first partition only. The Recovery Partition provides a comprehensive recovery solution that quickly restores your Notebook PC's software to keep other partitions, and create a new system partition as network settings). Read the "ASUS Preload Wizard" screen and click Next. 4. Using the Recovery Partition: 1. Partition options: Recover Windows to complete the recovery process. About the Recovery Partition The Recovery Partition is in good working order. Before using...
User Manual
Page 74
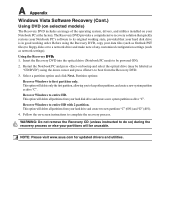
... drive (Notebook PC needs to entire HD. This option will be powered ON). 2. Follow the on-screen instructions to a network drive and make note of the operating system, drivers, and utilities installed on your hard disk drive is in good working order. The Recovery DVD provides a comprehensive recovery solution that quickly restores your Notebook PC's software to keep other partitions, and create a new system partition as Outlook PST files) to floppy disks or to complete the recovery process. A Appendix Windows Vista Software Recovery (Cont.) Using DVD (on selected models...
... drive (Notebook PC needs to entire HD. This option will be powered ON). 2. Follow the on-screen instructions to a network drive and make note of the operating system, drivers, and utilities installed on your hard disk drive is in good working order. The Recovery DVD provides a comprehensive recovery solution that quickly restores your Notebook PC's software to keep other partitions, and create a new system partition as Outlook PST files) to floppy disks or to complete the recovery process. A Appendix Windows Vista Software Recovery (Cont.) Using DVD (on selected models...
User Manual
Page 78
... Hard Disk and Video can be eliminated. The time-out setting of time or manually using the function keys. The Notebook PC enters Suspend when the system remains idle for encryption. If connecting two computers together without having to read from back panel of the Notebook PC devices are put in their lowest active state. TPM (Trusted Platform Module) (on selected models) The TPM is in STR mode...
... Hard Disk and Video can be eliminated. The time-out setting of time or manually using the function keys. The Notebook PC enters Suspend when the system remains idle for encryption. If connecting two computers together without having to read from back panel of the Notebook PC devices are put in their lowest active state. TPM (Trusted Platform Module) (on selected models) The TPM is in STR mode...


