
User Manual
Page 1
Notebook PC Hardware User's Manual OFF ON ASUS WIDE SCREEN NOTEBOOK E3232 / Jun 2007
Notebook PC Hardware User's Manual OFF ON ASUS WIDE SCREEN NOTEBOOK E3232 / Jun 2007
User Manual
Page 9
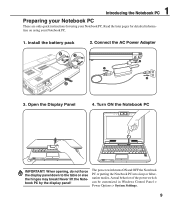
.... 1 Introducing the Notebook PC Preparing your Notebook PC These are only quick instructions for detailed informa- Turn ON the Notebook PC 1.3 MEGA PIXELS ASUS WIDE SCREEN NOTEBOOK ASUS WIDE SCREEN NOTEBOOK OFF ON OFF ON IMPORTANT! Connect the AC Power Adapter 2 3. Actual behavior of the power switch can be customized in Windows Control Panel...
.... 1 Introducing the Notebook PC Preparing your Notebook PC These are only quick instructions for detailed informa- Turn ON the Notebook PC 1.3 MEGA PIXELS ASUS WIDE SCREEN NOTEBOOK ASUS WIDE SCREEN NOTEBOOK OFF ON OFF ON IMPORTANT! Connect the AC Power Adapter 2 3. Actual behavior of the power switch can be customized in Windows Control Panel...
User Manual
Page 26
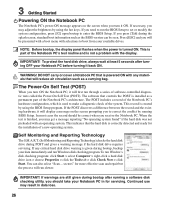
...check of a new operating system. 3 Getting Started Powering ON the Notebook PC The Notebook PC's power-ON message appears on the screen prompting you to correct the conflict by using the BIOS Setup program. If necessary, you receive the Notebook PC. To protect the...of the system. Self Monitoring and Reporting Technology The S.M.A.R.T. (Self Monitoring and Reporting Technology) checks the hard disk drive during the splash screen, standard boot information such as a permanent part of the Notebook PC's hardware configuration, which is installed as the BIOS version can also...
...check of a new operating system. 3 Getting Started Powering ON the Notebook PC The Notebook PC's power-ON message appears on the screen prompting you to correct the conflict by using the BIOS Setup program. If necessary, you receive the Notebook PC. To protect the...of the system. Self Monitoring and Reporting Technology The S.M.A.R.T. (Self Monitoring and Reporting Technology) checks the hard disk drive during the splash screen, standard boot information such as a permanent part of the Notebook PC's hardware configuration, which is installed as the BIOS version can also...
User Manual
Page 27
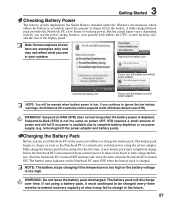
Note: Screen captures shown here are examples only and may not reflect what you use your Notebook PC on how you see in the battery. NOTE: You ...
Note: Screen captures shown here are examples only and may not reflect what you use your Notebook PC on how you see in the battery. NOTE: You ...
User Manual
Page 30
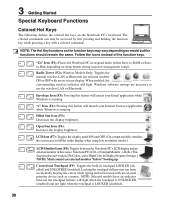
...Icons (F8): Toggles between the touchpad buttons will launch your Email application while Windows is best used with a colored command. The ASUS WIDE SCREEN NOTEBOOK colored commands can only be accessed by first pressing and holding the function key while pressing a key with an external pointing device... (F3): Pressing this button will light when the touchpad is UNLOCKED (enabled) and not light when the touchpad is running . stretches the screen area to -RAM or Saveto-Disk depending on the Notebook PC's keyboard. Radio Tower (F2): Wireless Models Only: Toggles the internal wireless ...
...Icons (F8): Toggles between the touchpad buttons will launch your Email application while Windows is best used with a colored command. The ASUS WIDE SCREEN NOTEBOOK colored commands can only be accessed by first pressing and holding the function key while pressing a key with an external pointing device... (F3): Pressing this button will light when the touchpad is UNLOCKED (enabled) and not light when the touchpad is running . stretches the screen area to -RAM or Saveto-Disk depending on the Notebook PC's keyboard. Radio Tower (F2): Wireless Models Only: Toggles the internal wireless ...
User Manual
Page 31
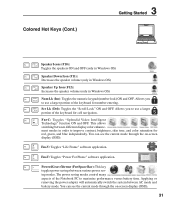
... of the keyboard for number entering. Fn+V: Toggles "Life Frame" software application. You can see the current mode through the on -screen display (OSD). 31 The power saving modes control many aspects of the keyboard for cell navigation. Fn+T: Toggles "Power For Phone" software... Fn+C: Toggles "Splendid Video Intelligent Technology" function ON and OFF. Colored Hot Keys (Cont.) 3 Getting Started 1.3 MEGA PIXELS OFF ON ASUS WIDE SCREEN NOTEBOOK Speaker Icons (F10): Toggles the speakers ON and OFF (only in Windows OS) Speaker Down Icon (F11): Decreases the speaker volume...
... of the keyboard for number entering. Fn+V: Toggles "Life Frame" software application. You can see the current mode through the on -screen display (OSD). 31 The power saving modes control many aspects of the keyboard for cell navigation. Fn+T: Toggles "Power For Phone" software... Fn+C: Toggles "Splendid Video Intelligent Technology" function ON and OFF. Colored Hot Keys (Cont.) 3 Getting Started 1.3 MEGA PIXELS OFF ON ASUS WIDE SCREEN NOTEBOOK Speaker Icons (F10): Toggles the speakers ON and OFF (only in Windows OS) Speaker Down Icon (F11): Decreases the speaker volume...

User Manual
Page 33
...various power saving modes. Actual behavior of the Notebook PC to use the wireless LAN or Bluetooth. The selected mode is shown on -screen display. Wireless Switch Wireless Models Only: Toggles the internal wireless LAN or Bluetooth (on selected models) ON or OFF with an on the... display. Switches and Status Indicators Switches 3 Getting Started 1.3 MEGA PIXELS ASUS WIDE SCREEN NOTEBOOK OFF ON Power4Gear eXtreme Key The Power4Gear eXtreme key toggles power savings between AC mode and battery mode. Power Switch The power switch...
...various power saving modes. Actual behavior of the Notebook PC to use the wireless LAN or Bluetooth. The selected mode is shown on -screen display. Wireless Switch Wireless Models Only: Toggles the internal wireless LAN or Bluetooth (on selected models) ON or OFF with an on the... display. Switches and Status Indicators Switches 3 Getting Started 1.3 MEGA PIXELS ASUS WIDE SCREEN NOTEBOOK OFF ON Power4Gear eXtreme Key The Power4Gear eXtreme key toggles power savings between AC mode and battery mode. Power Switch The power switch...
User Manual
Page 34
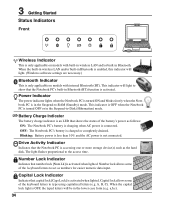
... the access time. This indicator will light. (Windows software settings are necessary.) Bluetooth Indicator This is activated. A, B, C). 3 Getting Started Status Indicators 1.3 MEGA PIXELS Front ASUS WIDE SCREEN NOTEBOOK OFF ON Wireless Indicator This is only applicable on models with built-in wireless LAN and/or built-in Bluetooth. When the built-in...
... the access time. This indicator will light. (Windows software settings are necessary.) Bluetooth Indicator This is activated. A, B, C). 3 Getting Started Status Indicators 1.3 MEGA PIXELS Front ASUS WIDE SCREEN NOTEBOOK OFF ON Wireless Indicator This is only applicable on models with built-in wireless LAN and/or built-in Bluetooth. When the built-in...

User Manual
Page 38
...and contains no moving parts; The following illustrations demonstrate proper use of your finger is all two/three-button and scrolling knob PS/2 mice. ASUS WIDE SCREEN NOTEBOOK 38 OFF ON The touchpad is available after setting up or down. 1.3 MEGA PIXELS Scrolling on the fingerprint scanner After software setup,... web navigation. Do not use the fingerprint scanner as a scroll wheel like that is still required for working with all that on the screen with the tip of your fingers. Moving The Cursor Place your finger in the center of your finger up or down on the right ...
...and contains no moving parts; The following illustrations demonstrate proper use of your finger is all two/three-button and scrolling knob PS/2 mice. ASUS WIDE SCREEN NOTEBOOK 38 OFF ON The touchpad is available after setting up or down. 1.3 MEGA PIXELS Scrolling on the fingerprint scanner After software setup,... web navigation. Do not use the fingerprint scanner as a scroll wheel like that is still required for working with all that on the screen with the tip of your fingers. Moving The Cursor Place your finger in the center of your finger up or down on the right ...

User Manual
Page 39
... item you wish. Lightly strike the touchpad twice, sliding finger on touchpad. Dragging means to pick up an item and place it anywhere on the screen you select, and while keeping the left button depressed, moving the cursor to the desired location, then release the button. DraggingClicking DraggingTapping Hold left button...
... item you wish. Lightly strike the touchpad twice, sliding finger on touchpad. Dragging means to pick up an item and place it anywhere on the screen you select, and while keeping the left button depressed, moving the cursor to the desired location, then release the button. DraggingClicking DraggingTapping Hold left button...
User Manual
Page 53
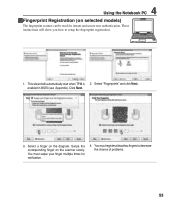
... instant and secure user authentication. 4 Using the Notebook PC Fingerprint Registration (on selected models) 1.3 MEGA PIXELS The fingerprint scanner can be used for verification. 4. ASUS WIDE SCREEN NOTEBOOK OFF ON 1. Click Next. 3. Swipe the corresponding finger on the diagram. enabled in BIOS (see Appendix). This wizard will show you how to decrease...
... instant and secure user authentication. 4 Using the Notebook PC Fingerprint Registration (on selected models) 1.3 MEGA PIXELS The fingerprint scanner can be used for verification. 4. ASUS WIDE SCREEN NOTEBOOK OFF ON 1. Click Next. 3. Swipe the corresponding finger on the diagram. enabled in BIOS (see Appendix). This wizard will show you how to decrease...

User Manual
Page 58
... Bluetooth mouse. • Install two "AA" batteries. • Turn ON the power switch on the bottom of the mouse. Or Launch Bluetooth Devices from this screen. 4. Switch ON the Wireless function if necessary for your model (see switches in Windows operating system. 1. Press [FN F2] repeatedly until Wireless LAN ON or...
... Bluetooth mouse. • Install two "AA" batteries. • Turn ON the power switch on the bottom of the mouse. Or Launch Bluetooth Devices from this screen. 4. Switch ON the Wireless function if necessary for your model (see switches in Windows operating system. 1. Press [FN F2] repeatedly until Wireless LAN ON or...
User Manual
Page 61
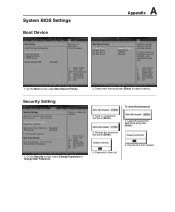
Password is then cleared. System BIOS Settings Boot Device A Appendix 1. On the Security screen, select Change Supervisor or Change User Password. Select each item and press [Enter] to select a device. To clear the password: 2. Leave the password field blank and press [Enter]. 4. Type in a password and press [Enter]. 3. Security Setting 1. Re-type the password and press [Enter]. 1. Password is then set. 2. On the Boot screen, select Boot Device Priority. 2.
Password is then cleared. System BIOS Settings Boot Device A Appendix 1. On the Security screen, select Change Supervisor or Change User Password. Select each item and press [Enter] to select a device. To clear the password: 2. Leave the password field blank and press [Enter]. 4. Type in a password and press [Enter]. 3. Security Setting 1. Re-type the password and press [Enter]. 1. Password is then set. 2. On the Boot screen, select Boot Device Priority. 2.
User Manual
Page 65
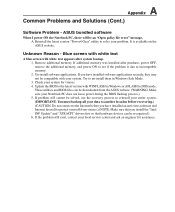
... Appendix Common Problems and Solutions (Cont.) Software Problem - It is due to un-install them in DOS mode. Unknown Reason - Blue screen with white text A blue screen with white text appears after purchase, power OFF, remove the additional memory, and power ON to see if the problem is available on... the ASUS website. Update the BIOS to solve your problem. A. If problem still cannot be solved, use the recovery process to ...
... Appendix Common Problems and Solutions (Cont.) Software Problem - It is due to un-install them in DOS mode. Unknown Reason - Blue screen with white text A blue screen with white text appears after purchase, power OFF, remove the additional memory, and power ON to see if the problem is available on... the ASUS website. Update the BIOS to solve your problem. A. If problem still cannot be solved, use the recovery process to ...
User Manual
Page 69
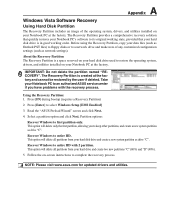
...'s software to entire HD with the recovery process. Press [F9] during bootup (requires a Recovery Partition) 2. Read the "ASUS Preload Wizard" screen and click Next. 4. A Appendix Windows Vista Software Recovery Using Hard Disk Partition The Recovery Partition includes an image of any ... Windows to select Windows Setup [EMS Enabled] 3. Follow the on-screen instructions to entire HD. Using the Recovery Partition: 1. Recover Windows to complete the recovery process. NOTE: Please visit www.asus.com for updated drivers and utilities. About the Recovery Partition The Recovery...
...'s software to entire HD with the recovery process. Press [F9] during bootup (requires a Recovery Partition) 2. Read the "ASUS Preload Wizard" screen and click Next. 4. A Appendix Windows Vista Software Recovery Using Hard Disk Partition The Recovery Partition includes an image of any ... Windows to select Windows Setup [EMS Enabled] 3. Follow the on-screen instructions to entire HD. Using the Recovery Partition: 1. Recover Windows to complete the recovery process. NOTE: Please visit www.asus.com for updated drivers and utilities. About the Recovery Partition The Recovery...
User Manual
Page 70
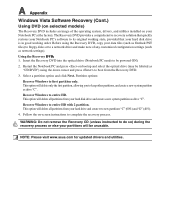
... (Notebook PC needs to complete the recovery process. This option will delete all partitions from the Recovery DVD. 3. Follow the on-screen instructions to be powered ON). 2. NOTE: Please visit www.asus.com for updated drivers and utilities. Using the Recovery D�V��D��: 1. Recover Windows to boot from your...
... (Notebook PC needs to complete the recovery process. This option will delete all partitions from the Recovery DVD. 3. Follow the on-screen instructions to be powered ON). 2. NOTE: Please visit www.asus.com for updated drivers and utilities. Using the Recovery D�V��D��: 1. Recover Windows to boot from your...


