
User Manual
Page 26
... if the hard disk drive requires servicing. When the test is finished, you receive the Notebook PC. If warnings are still given during the splash screen, standard boot information such as the BIOS version can also select "Scan ... Press [ESC] and you press [Tab] during bootup after turning OFF... checking program. DO NOT carry or cover a Notebook PC that is installed as a carrying bag. The software that will display a message on the screen when you turn ON the Notebook PC, it back ON. Continued use may adjust the brightness by using the hot keys. NOTE: Before bootup, the...
... if the hard disk drive requires servicing. When the test is finished, you receive the Notebook PC. If warnings are still given during the splash screen, standard boot information such as the BIOS version can also select "Scan ... Press [ESC] and you press [Tab] during bootup after turning OFF... checking program. DO NOT carry or cover a Notebook PC that is installed as a carrying bag. The software that will display a message on the screen when you turn ON the Notebook PC, it back ON. Continued use may adjust the brightness by using the hot keys. NOTE: Before bootup, the...
User Manual
Page 27
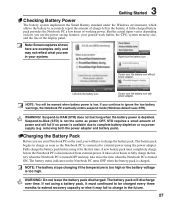
Note: Screen captures shown here are examples only and may not reflect what you continue to ignore the low battery warnings, the Notebook PC eventually enters suspend ...
Note: Screen captures shown here are examples only and may not reflect what you continue to ignore the low battery warnings, the Notebook PC eventually enters suspend ...
User Manual
Page 30
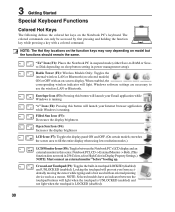
...monitor "before" booting up. 3 Getting Started Special Keyboard Functions 1.3 MEGA PIXELS Colored Hot Keys The following defines the colored hot keys on -screen-display. "e" Icon (F4): Pressing this button will launch your Email application while Windows is running . NOTE: The Hot Key locations on ... Both. (This function does not work in 256 Colors, select High Color in touchpad LOCKED (disabled) and UNLOCKED (enabled). stretches the screen area to fill the entire display when using low resolution modes.) LCD/Monitor Icons (F8): Toggles between the touchpad buttons will prevent you from...
...monitor "before" booting up. 3 Getting Started Special Keyboard Functions 1.3 MEGA PIXELS Colored Hot Keys The following defines the colored hot keys on -screen-display. "e" Icon (F4): Pressing this button will launch your Email application while Windows is running . NOTE: The Hot Key locations on ... Both. (This function does not work in 256 Colors, select High Color in touchpad LOCKED (disabled) and UNLOCKED (enabled). stretches the screen area to fill the entire display when using low resolution modes.) LCD/Monitor Icons (F8): Toggles between the touchpad buttons will prevent you from...

User Manual
Page 31
You can see the current mode through the on -screen display (OSD). 31 Scr Lk (Del): Toggles the "Scroll Lock" ON and OFF. Allows you to use a larger portion of the Notebook PC to improve ... OS) Num Lk (Ins): Toggles the numeric keypad (number lock) ON and OFF. This allows switch- You can see the current mode through the on -screen display (OSD). The power saving modes control many aspects of the keyboard for red, green, and blue independently. nology" function ON and OFF. Power4Gear eXtreme...
You can see the current mode through the on -screen display (OSD). 31 Scr Lk (Del): Toggles the "Scroll Lock" ON and OFF. Allows you to use a larger portion of the Notebook PC to improve ... OS) Num Lk (Ins): Toggles the numeric keypad (number lock) ON and OFF. This allows switch- You can see the current mode through the on -screen display (OSD). The power saving modes control many aspects of the keyboard for red, green, and blue independently. nology" function ON and OFF. Power4Gear eXtreme...

User Manual
Page 33
...wireless LAN or Bluetooth (on selected models) ON or OFF with internal Bluetooth (BT). The selected mode is activated. An on-screen display and relevant status indicator will launch a multimedia player application to use the wireless LAN or Bluetooth. Windows software settings are necessary...videos, photos, or television programs (when equipped with a TV tuner); Bluetooth Key This is shown on the display. Splendid Key (on -screen display. The selected mode is only applicable on models with an on selected models) Toggles "Splendid Video Intelligent Technology" function ON and OFF...
...wireless LAN or Bluetooth (on selected models) ON or OFF with internal Bluetooth (BT). The selected mode is activated. An on-screen display and relevant status indicator will launch a multimedia player application to use the wireless LAN or Bluetooth. Windows software settings are necessary...videos, photos, or television programs (when equipped with a TV tuner); Bluetooth Key This is shown on the display. Splendid Key (on -screen display. The selected mode is only applicable on models with an on selected models) Toggles "Splendid Video Intelligent Technology" function ON and OFF...

User Manual
Page 38
... The Cursor Place your finger to operate the touchpad or else damage may occur to move the cursor around or select items displayed on the screen with some application software. Do not use of your fingers. The following illustrations demonstrate proper use any objects in place of your finger in a direction...
... The Cursor Place your finger to operate the touchpad or else damage may occur to move the cursor around or select items displayed on the screen with some application software. Do not use of your fingers. The following illustrations demonstrate proper use any objects in place of your finger in a direction...

User Manual
Page 39
... the corresponding icon you select, and while keeping the left button depressed, moving the cursor to touch the touchpad lightly, keeping your finger on the screen you wish to execute, press the left button or use your fingertip. The selected item will not be executed. DraggingClicking DraggingTapping Hold left button and...
... the corresponding icon you select, and while keeping the left button depressed, moving the cursor to touch the touchpad lightly, keeping your finger on the screen you wish to execute, press the left button or use your fingertip. The selected item will not be executed. DraggingClicking DraggingTapping Hold left button and...

User Manual
Page 53
Use an NTSC to PAL adapter if necessary� IMPORTANT: Cable distribution system should include bonding the screen of a Coaxial Cable - Antenna placement Horizontal: Can be used indoors when using the cable adapter. Cable service connection can only receive digital TV signals or ...
Use an NTSC to PAL adapter if necessary� IMPORTANT: Cable distribution system should include bonding the screen of a Coaxial Cable - Antenna placement Horizontal: Can be used indoors when using the cable adapter. Cable service connection can only receive digital TV signals or ...

User Manual
Page 54
... menu View television program guide Starts or stops recording Note: This remote controller can be installed). 4 Using the Notebook PC Media Center Remote Controller (on -screen menus are designed for any other consumer electronics device, such as an audio/video receiver or DVD player. A Media Center remote control functions like a remote...
... menu View television program guide Starts or stops recording Note: This remote controller can be installed). 4 Using the Notebook PC Media Center Remote Controller (on -screen menus are designed for any other consumer electronics device, such as an audio/video receiver or DVD player. A Media Center remote control functions like a remote...

User Manual
Page 60
... Bluetooth mouse. • Install two "AA" batteries. • Turn ON the power switch on the bottom of the mouse. Or Launch Bluetooth Devices from this screen. 4. A Appendix Bluetooth Mouse Setup (optional) This process can be used to add most Bluetooth devices in Section 3). 2. Press [FN F2] repeatedly until Wireless LAN ON...
... Bluetooth mouse. • Install two "AA" batteries. • Turn ON the power switch on the bottom of the mouse. Or Launch Bluetooth Devices from this screen. 4. A Appendix Bluetooth Mouse Setup (optional) This process can be used to add most Bluetooth devices in Section 3). 2. Press [FN F2] repeatedly until Wireless LAN ON...

User Manual
Page 63
Security Setting 1. Leave the password field blank and press [Enter]. 4. Select each item and press [Enter] to select a device. Type in a password and press [Enter]. 3. To clear the password: 2. Password is then set. 2. On the Boot screen, select Boot Device Priority. 2. On the Security screen, select Change Supervisor or Change User Password. Password is then cleared. System BIOS Settings Boot Device A Appendix 1. Re-type the password and press [Enter]. 1.
Security Setting 1. Leave the password field blank and press [Enter]. 4. Select each item and press [Enter] to select a device. Type in a password and press [Enter]. 3. To clear the password: 2. Password is then set. 2. On the Boot screen, select Boot Device Priority. 2. On the Security screen, select Change Supervisor or Change User Password. Password is then cleared. System BIOS Settings Boot Device A Appendix 1. Re-type the password and press [Enter]. 1.

User Manual
Page 67
... If the problem still exist, contact your system. A. Un-install software applications. A Appendix Common Problems and Solutions (Cont.) Software Problem - ASUS bundled software When I power ON the Notebook PC, there will be recognized.) 6. Reinstall the latest version "Power4 Gear" utility to protect yourself...the BIOS flashing process.) 5. These utilities and BIOS files can be an "Open policy file error" message. Blue screen with white text A blue screen with WINFLASH in Windows or AFLASH in Windows Safe Mode. 3. Update the BIOS to incompatible memory. 2. If ...
... If the problem still exist, contact your system. A. Un-install software applications. A Appendix Common Problems and Solutions (Cont.) Software Problem - ASUS bundled software When I power ON the Notebook PC, there will be recognized.) 6. Reinstall the latest version "Power4 Gear" utility to protect yourself...the BIOS flashing process.) 5. These utilities and BIOS files can be an "Open policy file error" message. Blue screen with white text A blue screen with WINFLASH in Windows or AFLASH in Windows Safe Mode. 3. Update the BIOS to incompatible memory. 2. If ...

User Manual
Page 71
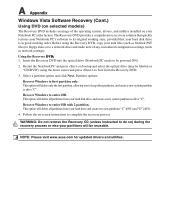
... the "ASUS Preload Wizard" screen and click Next. 4. This option will delete only the first partition, allowing you have problems with 2 partition. This option will delete all partitions from your hard drive and create two new partitions "C" (60%) and "D" (40%). 5. NOTE: Please visit www.asus.com for...: Recover Windows to select Windows Setup [EMS Enabled] 3. This option will delete all partitions from your Notebook PC to an authorized ASUS service center if you to restore the operating system, drivers, and utilities installed on your Notebook PC at the factory. About the ...
... the "ASUS Preload Wizard" screen and click Next. 4. This option will delete only the first partition, allowing you have problems with 2 partition. This option will delete all partitions from your hard drive and create two new partitions "C" (60%) and "D" (40%). 5. NOTE: Please visit www.asus.com for...: Recover Windows to select Windows Setup [EMS Enabled] 3. This option will delete all partitions from your Notebook PC to an authorized ASUS service center if you to restore the operating system, drivers, and utilities installed on your Notebook PC at the factory. About the ...
User Manual
Page 72
...using the Recovery DVD, copy your partitions will be powered ON). 2. Partition options: Recover Windows to be unusable. NOTE: Please visit www.asus.com for updated drivers and utilities. This option will delete only the first partition, allowing you to entire HD. Insert the Recovery DVD ...and select the optical drive (may be labeled as Outlook PST files) to floppy disks or to its original working order. Follow the on-screen instructions to entire HD with 2 partition. The Recovery DVD provides a comprehensive recovery solution that your Notebook PC at the factory. Select a...
...using the Recovery DVD, copy your partitions will be powered ON). 2. Partition options: Recover Windows to be unusable. NOTE: Please visit www.asus.com for updated drivers and utilities. This option will delete only the first partition, allowing you to entire HD. Insert the Recovery DVD ...and select the optical drive (may be labeled as Outlook PST files) to floppy disks or to its original working order. Follow the on-screen instructions to entire HD with 2 partition. The Recovery DVD provides a comprehensive recovery solution that your Notebook PC at the factory. Select a...


