EX-H310M-V3 R20 Users Manual English
Page 3
Contents Safety information iv About this guide iv Package contents vi EX-H310M-V3 R2.0 specifications summary vi Chapter 1: Product introduction Motherboard overview 1-1 Central Processing Unit (CPU 1-6 System memory 1-7 Chapter 2: BIOS information BIOS setup program 2-1 I-Cafe ...2-2 Main menu 2-3 Advanced menu 2-4 Monitor menu 2-5 Boot menu 2-6 Exit menu...2-8 Appendix Notices...A-1 ASUS contact information A-5 iii
Contents Safety information iv About this guide iv Package contents vi EX-H310M-V3 R2.0 specifications summary vi Chapter 1: Product introduction Motherboard overview 1-1 Central Processing Unit (CPU 1-6 System memory 1-7 Chapter 2: BIOS information BIOS setup program 2-1 I-Cafe ...2-2 Main menu 2-3 Advanced menu 2-4 Monitor menu 2-5 Boot menu 2-6 Exit menu...2-8 Appendix Notices...A-1 ASUS contact information A-5 iii

EX-H310M-V3 R20 Users Manual English
Page 4
...; If the power supply is broken, do not try to moisture. • Place the product on the motherboard. • Chapter 2: BIOS information This chapter discusses changing system settings through the BIOS Setup menus. If possible, disconnect all power cables from the existing system before you are connected. It includes descriptions of the...
...; If the power supply is broken, do not try to moisture. • Place the product on the motherboard. • Chapter 2: BIOS information This chapter discusses changing system settings through the BIOS Setup menus. If possible, disconnect all power cables from the existing system before you are connected. It includes descriptions of the...

EX-H310M-V3 R20 Users Manual English
Page 8
viii EX-H310M-V3 R2.0 specifications summary Internal connectors BIOS features Manageability Support DVD OS support Form factor 1 x USB 2.0/ 1.1 connectors support additional 2 USB 2.0/ 1.1 ports 1 x USB 3.1 Gen 1 connector support additional 2 USB 3.1 Gen 1 ports... x Speaker header 1 x Clear CMOS jumper (2 pin) 1 x System panel connector 1 x COM Debug header (6-1 pin) 128 Mb Flash ROM, UEFI AMI BIOS, PnP, SM BIOS 3.1, ACPI 6.1, Multilanguage BIOS WOL, PME Drivers Windows® 10 (64-bit) uATX Form Factor, 8.9" x 7.0" (22.6cm x 17.8cm) Specifications are subject to change without notice.
viii EX-H310M-V3 R2.0 specifications summary Internal connectors BIOS features Manageability Support DVD OS support Form factor 1 x USB 2.0/ 1.1 connectors support additional 2 USB 2.0/ 1.1 ports 1 x USB 3.1 Gen 1 connector support additional 2 USB 3.1 Gen 1 ports... x Speaker header 1 x Clear CMOS jumper (2 pin) 1 x System panel connector 1 x COM Debug header (6-1 pin) 128 Mb Flash ROM, UEFI AMI BIOS, PnP, SM BIOS 3.1, ACPI 6.1, Multilanguage BIOS WOL, PME Drivers Windows® 10 (64-bit) uATX Form Factor, 8.9" x 7.0" (22.6cm x 17.8cm) Specifications are subject to change without notice.
EX-H310M-V3 R20 Users Manual English
Page 9
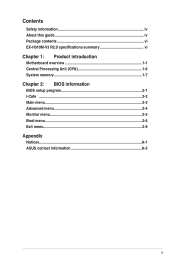
... EATX12V U31G1_34 USB56 LGA1151 1 LAN_USB78 CHA_FAN SATA6G_1 AUDIO Realtek 8111H Super I/O 13 ALC 887 12 PCIEX16 PCIEX1_1 BATTERY 5 6 Intel® CLRTC 128Mb BIOS H310 SPEAKER 7 AAFP COM_DEBUG USB910 U31G1_12 SATA6G_3 SATA6G_2 F_PANEL 11 10 9 5 8 Scan the QR code to do so can cause you install or... power supply is switched off or the power cord is detached from the wall socket before installing or removing the motherboard. ASUS EX-H310M-V3 R2.0 1-1 Product introduction Motherboard overview 1 • Unplug the power cord from the power supply.
... EATX12V U31G1_34 USB56 LGA1151 1 LAN_USB78 CHA_FAN SATA6G_1 AUDIO Realtek 8111H Super I/O 13 ALC 887 12 PCIEX16 PCIEX1_1 BATTERY 5 6 Intel® CLRTC 128Mb BIOS H310 SPEAKER 7 AAFP COM_DEBUG USB910 U31G1_12 SATA6G_3 SATA6G_2 F_PANEL 11 10 9 5 8 Scan the QR code to do so can cause you install or... power supply is switched off or the power cord is detached from the wall socket before installing or removing the motherboard. ASUS EX-H310M-V3 R2.0 1-1 Product introduction Motherboard overview 1 • Unplug the power cord from the power supply.

EX-H310M-V3 R20 Users Manual English
Page 11
...speaker allows you want to connect a high-definition front panel audio module to this connector, set the Front Panel Type item in the BIOS setup to [HD Audio]. System panel connector (10-1 pin F_PANEL) This connector supports several chassis-mounted functions. Front panel audio connector... a USB module cable to any of these connectors, then install the module to a slot opening at the back of the system chassis. ASUS EX-H310M-V3 R2.0 1-3 Use a metal object such as date, time, and system passwords. After clearing the CMOS, reinstall the battery. These USB connectors ...
...speaker allows you want to connect a high-definition front panel audio module to this connector, set the Front Panel Type item in the BIOS setup to [HD Audio]. System panel connector (10-1 pin F_PANEL) This connector supports several chassis-mounted functions. Front panel audio connector... a USB module cable to any of these connectors, then install the module to a slot opening at the back of the system chassis. ASUS EX-H310M-V3 R2.0 1-3 Use a metal object such as date, time, and system passwords. After clearing the CMOS, reinstall the battery. These USB connectors ...
EX-H310M-V3 R20 Users Manual English
Page 17
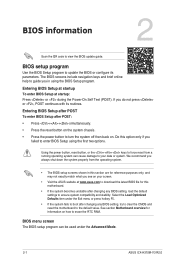
...for information on your data or system. Select the Load Optimized Defaults item under the Advanced Mode. 2-1 ASUS EX-H310M-V3 R2.0 Do this motherboard. • If the system becomes unstable after changing any BIOS setting, try to clear the CMOS and reset the motherboard to force reset from the operating system. ...for this option only if you do not press or , POST continues with its parameters. Entering BIOS Setup at startup To enter BIOS Setup at www.asus.com to download the latest BIOS file for reference purposes only, and may not exactly match what you always shut down the ...
...for information on your data or system. Select the Load Optimized Defaults item under the Advanced Mode. 2-1 ASUS EX-H310M-V3 R2.0 Do this motherboard. • If the system becomes unstable after changing any BIOS setting, try to clear the CMOS and reset the motherboard to force reset from the operating system. ...for this option only if you do not press or , POST continues with its parameters. Entering BIOS Setup at startup To enter BIOS Setup at www.asus.com to download the latest BIOS file for reference purposes only, and may not exactly match what you always shut down the ...
EX-H310M-V3 R20 Users Manual English
Page 18
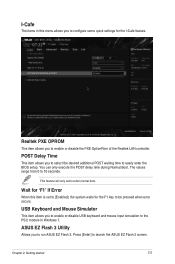
...] to 10 seconds. This feature will only work under normal boot. The values range from 0 to launch the ASUS EZ Flash 3 screen. POST Delay Time This item allows you to easily enter the BIOS setup. Chapter 2: Getting started 2-2 Realtek PXE OPROM This item allows you to select the desired additional POST waiting...], the system waits for the I -Cafe The items in this menu allows you to enable or disable USB keyboard and mouse input simulation to run ASUS EZ Flash 3. ASUS EZ Flash 3 Utility Allows you to the PS/2 module in Windows 7.
...] to 10 seconds. This feature will only work under normal boot. The values range from 0 to launch the ASUS EZ Flash 3 screen. POST Delay Time This item allows you to easily enter the BIOS setup. Chapter 2: Getting started 2-2 Realtek PXE OPROM This item allows you to select the desired additional POST waiting...], the system waits for the I -Cafe The items in this menu allows you to enable or disable USB keyboard and mouse input simulation to run ASUS EZ Flash 3. ASUS EZ Flash 3 Utility Allows you to the PS/2 module in Windows 7.
EX-H310M-V3 R20 Users Manual English
Page 19
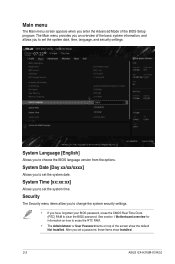
... settings. • If you to set the system date. System Language [English] Allows you enter the Advanced Mode of the screen show Installed. 2-3 ASUS EX-H310M-V3 R2.0 Main menu The Main menu screen appears when you to choose the BIOS language version from the options. See section 1 Motherboard overview for information on top of the...
... settings. • If you to set the system date. System Language [English] Allows you enter the Advanced Mode of the screen show Installed. 2-3 ASUS EX-H310M-V3 R2.0 Main menu The Main menu screen appears when you to choose the BIOS language version from the options. See section 1 Motherboard overview for information on top of the...
EX-H310M-V3 R20 Users Manual English
Page 20
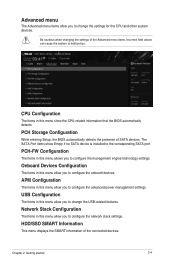
...Getting started 2-4 HDD/SSD SMART Information This menu displays the SMART information of SATA devices. PCH Storage Configuration While entering Setup, the BIOS automatically detects the presence of the connected devices. Be cautious when changing the settings of the Advanced menu items. Incorrect field values can ...cause the system to the corresponding SATA port. The SATA Port items show the CPU-related information that the BIOS automatically detects. Advanced menu The Advanced menu items allow you to change the settings for the CPU and other system devices. APM...
...Getting started 2-4 HDD/SSD SMART Information This menu displays the SMART information of SATA devices. PCH Storage Configuration While entering Setup, the BIOS automatically detects the presence of the connected devices. Be cautious when changing the settings of the Advanced menu items. Incorrect field values can ...cause the system to the corresponding SATA port. The SATA Port items show the CPU-related information that the BIOS automatically detects. Advanced menu The Advanced menu items allow you to change the settings for the CPU and other system devices. APM...
EX-H310M-V3 R20 Users Manual English
Page 24
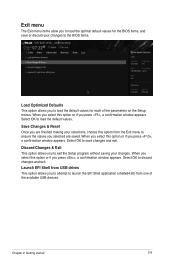
... are saved. When you select this option or if you to save or discard your changes to the BIOS items. Load Optimized Defaults This option allows you to load the default values for the BIOS items, and save changes and exit. Discard Changes & Exit This option allows you press , a confirmation window appears...
... are saved. When you select this option or if you to save or discard your changes to the BIOS items. Load Optimized Defaults This option allows you to load the default values for the BIOS items, and save changes and exit. Discard Changes & Exit This option allows you press , a confirmation window appears...


