Users Manual English
Page 3
Contents Safety information iv About this guide iv Package contents vi EX-B250M-V3 specifications summary vi Chapter 1: Product introduction Motherboard overview 1-1 Central Processing Unit (CPU 1-6 System memory 1-7 Chapter 2: BIOS information BIOS setup program 2-1 I-Cafe ...2-2 Main menu 2-3 Advanced menu 2-4 Monitor menu 2-5 Boot menu 2-6 Exit menu...2-7 Appendix Notices...A-1 ASUS contact information A-4 iii
Contents Safety information iv About this guide iv Package contents vi EX-B250M-V3 specifications summary vi Chapter 1: Product introduction Motherboard overview 1-1 Central Processing Unit (CPU 1-6 System memory 1-7 Chapter 2: BIOS information BIOS setup program 2-1 I-Cafe ...2-2 Main menu 2-3 Advanced menu 2-4 Monitor menu 2-5 Boot menu 2-6 Exit menu...2-7 Appendix Notices...A-1 ASUS contact information A-4 iii
Users Manual English
Page 6
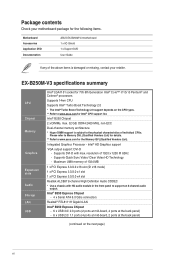
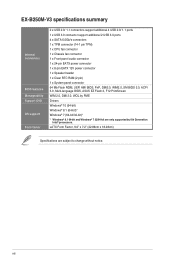
...(4 ports at mid-board, 2 ports at the back panel) (continued on the CPU types. ** Refer to www.asus.com for the following items. Motherboard Accessories Application DVD Documentation ASUS EX-B250M-V3 motherboard 1 x I/O Shield 1 x Support DVD User Guide If any of 1920 x 1200 @ 60Hz - Intel®...; HD Graphics support VGA output support: DVI-D - Maximum UMA memory of individual CPUs. EX-B250M-V3 specifications summary CPU Chipset ...
...(4 ports at mid-board, 2 ports at the back panel) (continued on the CPU types. ** Refer to www.asus.com for the following items. Motherboard Accessories Application DVD Documentation ASUS EX-B250M-V3 motherboard 1 x I/O Shield 1 x Support DVD User Guide If any of 1920 x 1200 @ 60Hz - Intel®...; HD Graphics support VGA output support: DVI-D - Maximum UMA memory of individual CPUs. EX-B250M-V3 specifications summary CPU Chipset ...
Users Manual English
Page 7
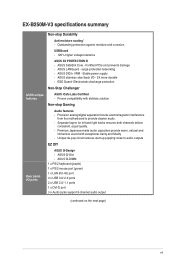
... noise to audio outputs EZ DIY ASUS Q-Design - ASUS Q-DIMM 1 x PS/2 keyboard (purple) 1 x PS/2 mouse port (green) 1 x LAN (RJ-45) port 4 x USB 3.0/ 2.0 ports 2 x USB 2.0/ 1.1 ports 1 x DVI-D port 3 x Audio jacks support 8-channel audio output (continued on the next page) vii ASUS SafeSlot Core - surge-protected networking - EX-B250M-V3 specifications summary ASUS unique features Rear panel I /O - 3X more...
... noise to audio outputs EZ DIY ASUS Q-Design - ASUS Q-DIMM 1 x PS/2 keyboard (purple) 1 x PS/2 mouse port (green) 1 x LAN (RJ-45) port 4 x USB 3.0/ 2.0 ports 2 x USB 2.0/ 1.1 ports 1 x DVI-D port 3 x Audio jacks support 8-channel audio output (continued on the next page) vii ASUS SafeSlot Core - surge-protected networking - EX-B250M-V3 specifications summary ASUS unique features Rear panel I /O - 3X more...
Users Manual English
Page 8
...64-bit)* Windows® 7 (64-bit/32-bit)* * Windows® 8.1 64-bit and Windows® 7 32/64-bit are subject to change without notice. viii EX-B250M-V3 specifications summary Internal connectors BIOS features Manageability Support DVD OS support Form factor 2 x USB 2.0/ 1.1 connectors support additional 4 USB 2.0/ 1.1 ports 1 x USB 3.0 connector support... RAM (2 pin) 1 x System panel connector 64 Mb Flash ROM, UEFI AMI BIOS, PnP, DMI3.0, WfM2.0, SM BIOS 3.0, ACPI 5.0, Multi-language BIOS, ASUS EZ Flash 3, F12 PrintScreen WfM 2.0, DMI 3.0, WOL by 6th Generation Intel® processors.
...64-bit)* Windows® 7 (64-bit/32-bit)* * Windows® 8.1 64-bit and Windows® 7 32/64-bit are subject to change without notice. viii EX-B250M-V3 specifications summary Internal connectors BIOS features Manageability Support DVD OS support Form factor 2 x USB 2.0/ 1.1 connectors support additional 4 USB 2.0/ 1.1 ports 1 x USB 3.0 connector support... RAM (2 pin) 1 x System panel connector 64 Mb Flash ROM, UEFI AMI BIOS, PnP, DMI3.0, WfM2.0, SM BIOS 3.0, ACPI 5.0, Multi-language BIOS, ASUS EZ Flash 3, F12 PrintScreen WfM 2.0, DMI 3.0, WOL by 6th Generation Intel® processors.
Users Manual English
Page 9
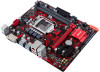
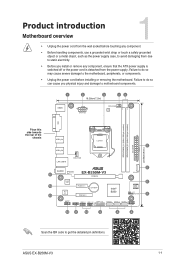
ASUS EX-B250M-V3 1-1 Failure to do so can cause you install or remove any component. • Before handling components, use a grounded wrist strap or touch a safely grounded object ..., 288-pin module) EATXPWR 22.86cm(9.0in) Place this side towards the rear of the chassis USB3_34 LGA1151 2 USB3_56 LAN_USB78 CHA_FAN AUDIO 15 Realtek 8111H EX-B250M-V3 PCIEX16 Super I/O 14 PCIEX1_1 BATTERY ALC 887 13 PCIEX4_1 Intel® B250 5 SATA6G_1 6 64Mb BIOS CLRTC SPEAKER 7 AAFP USB910 USB1112 USB3_12 SATA6G_4 SATA6G_3 SATA6G_2 TPM...
ASUS EX-B250M-V3 1-1 Failure to do so can cause you install or remove any component. • Before handling components, use a grounded wrist strap or touch a safely grounded object ..., 288-pin module) EATXPWR 22.86cm(9.0in) Place this side towards the rear of the chassis USB3_34 LGA1151 2 USB3_56 LAN_USB78 CHA_FAN AUDIO 15 Realtek 8111H EX-B250M-V3 PCIEX16 Super I/O 14 PCIEX1_1 BATTERY ALC 887 13 PCIEX4_1 Intel® B250 5 SATA6G_1 6 64Mb BIOS CLRTC SPEAKER 7 AAFP USB910 USB1112 USB3_12 SATA6G_4 SATA6G_3 SATA6G_2 TPM...
Users Manual English
Page 11
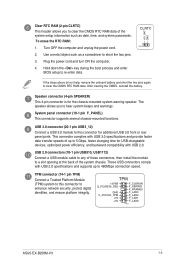
... connector for additional USB 3.0 front or rear panel ports. TPM +3VSB S_PCIRST#_TBD GND C_PCICLK_TPM +3V +3V F_CLKRUN F_SERIRQ F_FRAME# F_LAD3 F_LAD2 F_LAD1 F_LAD0 PIN 1 ASUS EX-B250M-V3 1-3 Turn OFF the computer and unplug the power cord. 2. Hold down the key during the boot process and enter BIOS setup to re-enter data...
... connector for additional USB 3.0 front or rear panel ports. TPM +3VSB S_PCIRST#_TBD GND C_PCICLK_TPM +3V +3V F_CLKRUN F_SERIRQ F_FRAME# F_LAD3 F_LAD2 F_LAD1 F_LAD0 PIN 1 ASUS EX-B250M-V3 1-3 Turn OFF the computer and unplug the power cord. 2. Hold down the key during the boot process and enter BIOS setup to re-enter data...
Users Manual English
Page 13
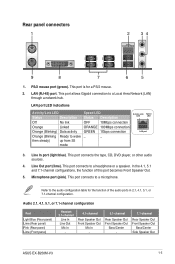
... Speaker Out Mic In - 5.1-channel Rear Speaker Out Front Speaker Out Bass/Center - 7.1-channel Rear Speaker Out Front Speaker Out Bass/Center Side Speaker Out ASUS EX-B250M-V3 1-5 Refer to the audio configuration table for a PS/2 mouse. 2. Rear panel connectors 1 2 34 9 8 7 6 5 1. This port allows Gigabit connection to a microphone. This port connects to wake...
... Speaker Out Mic In - 5.1-channel Rear Speaker Out Front Speaker Out Bass/Center - 7.1-channel Rear Speaker Out Front Speaker Out Bass/Center Side Speaker Out ASUS EX-B250M-V3 1-5 Refer to the audio configuration table for a PS/2 mouse. 2. Rear panel connectors 1 2 34 9 8 7 6 5 1. This port allows Gigabit connection to a microphone. This port connects to wake...
Users Manual English
Page 15
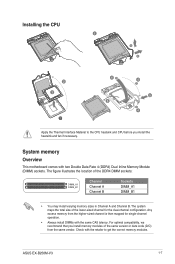
... modules of the DDR4 DIMM sockets: DIMM_A1 DIMM_B1 Channel Channel A Channel B Sockets DIMM_A1 DIMM_B1 • You may install varying memory sizes in Channel A and Channel B. ASUS EX-B250M-V3 1-7 Check with two Double Data Rate 4 (DDR4) Dual Inline Memory Module (DIMM) sockets. The figure illustrates the location of the same version or date code...
... modules of the DDR4 DIMM sockets: DIMM_A1 DIMM_B1 Channel Channel A Channel B Sockets DIMM_A1 DIMM_B1 • You may install varying memory sizes in Channel A and Channel B. ASUS EX-B250M-V3 1-7 Check with two Double Data Rate 4 (DDR4) Dual Inline Memory Module (DIMM) sockets. The figure illustrates the location of the same version or date code...
Users Manual English
Page 17
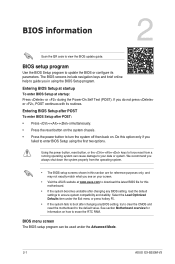
...can cause damage to turn the system off then back on your data or system. Select the Load Optimized Defaults item under the Advanced Mode. 2-1 ASUS EX-B250M-V3 We recommend you always shut down the system properly from a running operating system can be used under the Exit menu or press hotkey F5. •... how to guide you do not press or , POST continues with its parameters. Entering BIOS Setup at startup To enter BIOS Setup at www.asus.com to download the latest BIOS file for information on the system chassis. • Press the power button to your screen. • Visit the...
...can cause damage to turn the system off then back on your data or system. Select the Load Optimized Defaults item under the Advanced Mode. 2-1 ASUS EX-B250M-V3 We recommend you always shut down the system properly from a running operating system can be used under the Exit menu or press hotkey F5. •... how to guide you do not press or , POST continues with its parameters. Entering BIOS Setup at startup To enter BIOS Setup at www.asus.com to download the latest BIOS file for information on the system chassis. • Press the power button to your screen. • Visit the...
Users Manual English
Page 19
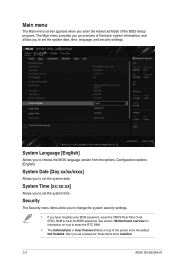
See section 1Motherboard overview for information on top of the screen show Installed. 2-3 ASUS EX-B250M-V3 Main menu The Main menu screen appears when you set a password, these items show the default Not Installed. System Language [English] Allows you to erase ...
See section 1Motherboard overview for information on top of the screen show Installed. 2-3 ASUS EX-B250M-V3 Main menu The Main menu screen appears when you set a password, these items show the default Not Installed. System Language [English] Allows you to erase ...
Users Manual English
Page 21
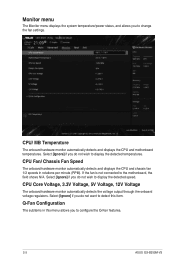
... to the motherboard, the field shows N/A. Monitor menu The Monitor menu displays the system temperature/power status, and allows you to configure the Q-Fan features. 2-5 ASUS EX-B250M-V3
... to the motherboard, the field shows N/A. Monitor menu The Monitor menu displays the system temperature/power status, and allows you to configure the Q-Fan features. 2-5 ASUS EX-B250M-V3

Users Manual English
Page 23
...you to configure the Windows® Secure Boot settings and manage its keys to protect the system from one of the available USB devices. 2-7 ASUS EX-B250M-V3 When you select this option or if you press , a confirmation window appears. Launch EFI Shell from USB drives This option allows you to...option from the Exit menu to launch the EFI Shell application (shellx64.efi) from unauthorized access and malwares during system startup, press when ASUS Logo appears. The number of device items that appears on the screen depends on the Setup menus. Select OK to load the default values...
...you to configure the Windows® Secure Boot settings and manage its keys to protect the system from one of the available USB devices. 2-7 ASUS EX-B250M-V3 When you select this option or if you press , a confirmation window appears. Launch EFI Shell from USB drives This option allows you to...option from the Exit menu to launch the EFI Shell application (shellx64.efi) from unauthorized access and malwares during system startup, press when ASUS Logo appears. The number of device items that appears on the screen depends on the Setup menus. Select OK to load the default values...
Users Manual English
Page 24
...fications. Cet appareil numérique de la Classe B respecte toutes les exigences du Règlement sur le matériel brouilleur du Canada. ASUS EX-B250M-V3 A-1 These limits are designed to radio communications. If this unit not expressly approved by one or more of the following two conditions: (1) this device may...
...fications. Cet appareil numérique de la Classe B respecte toutes les exigences du Règlement sur le matériel brouilleur du Canada. ASUS EX-B250M-V3 A-1 These limits are designed to radio communications. If this unit not expressly approved by one or more of the following two conditions: (1) this device may...
Users Manual English
Page 28
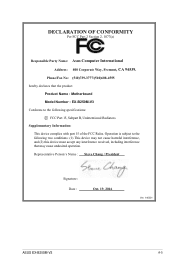
... Supplementary Information: This device complies with part 15 of the FCC Rules. Representative Person's Name : Steve Chang / President Signature : Date : Oct. 19, 2016 Ver. 140331 ASUS EX-B250M-V3 A-5 Operation is subject to the following two conditions: (1) This device may cause undesired operation. DECLARATION OF CONFORMITY Per FCC Part 2 Section 2. 1077(a) Responsible Party Name...
... Supplementary Information: This device complies with part 15 of the FCC Rules. Representative Person's Name : Steve Chang / President Signature : Date : Oct. 19, 2016 Ver. 140331 ASUS EX-B250M-V3 A-5 Operation is subject to the following two conditions: (1) This device may cause undesired operation. DECLARATION OF CONFORMITY Per FCC Part 2 Section 2. 1077(a) Responsible Party Name...


